


![[The AI Show Episode 144]: ChatGPT’s New Memory, Shopify CEO’s Leaked “AI First” Memo, Google Cloud Next Releases, o3 and o4-mini Coming Soon & Llama 4’s Rocky Launch](https://www.marketingaiinstitute.com/hubfs/ep%20144%20cover.png)


![Is this too much for a modular monolith system? [closed]](https://i.sstatic.net/pYL1nsfg.png)


_Andreas_Prott_Alamy.jpg?width=1280&auto=webp&quality=80&disable=upscale#)


![What features do you get with Gemini Advanced? [April 2025]](https://i0.wp.com/9to5google.com/wp-content/uploads/sites/4/2024/02/gemini-advanced-cover.jpg?resize=1200%2C628&quality=82&strip=all&ssl=1)


![Apple Shares Official Trailer for 'Long Way Home' Starring Ewan McGregor and Charley Boorman [Video]](https://www.iclarified.com/images/news/97069/97069/97069-640.jpg)
![Apple Watch Series 10 Back On Sale for $299! [Lowest Price Ever]](https://www.iclarified.com/images/news/96657/96657/96657-640.jpg)
![EU Postpones Apple App Store Fines Amid Tariff Negotiations [Report]](https://www.iclarified.com/images/news/97068/97068/97068-640.jpg)
![Apple Slips to Fifth in China's Smartphone Market with 9% Decline [Report]](https://www.iclarified.com/images/news/97065/97065/97065-640.jpg)


How to Create and Connect to a Linux VM Using a Public Key
How to Create and Connect to a Linux VM Using a Public Key Creating a Linux Virtual Machine (VM) and connecting to it via SSH using a public key is a secure and efficient method for managing cloud-based systems. This guide walks you through the entire process of creating a Linux VM in Azure and securely connecting to it using SSH keys. Table of Contents Create a Linux VM in Azure Generate SSH Private Key Connect to the Linux VM Using SSH Update the Server and Install a Web Server (Nginx) Troubleshooting Conclusion Create a Linux VM in Azure Before you can connect to a Linux VM using SSH, you need to create it. Follow the steps below to create the VM in Azure. Step 1: Log in to Azure Portal Open the Azure Portal and sign in with your Microsoft account. Step 2: Create a Virtual Machine In the Azure Portal, click on "Create a resource" in the left sidebar. Click Create to start the VM creation process. Fill Out the Basics Tab Subscription: Select your subscription Resource Group: Create a new one or use an existing one VM Name: e.g., LinuxVM Region: Choose the closest location Availability options- No Infrastructure redundancy as i am not replicating the vm Security - Standard Image: Any Ubuntu distribution that you want Size: e.g., Standard B1s (suitable for testing) or any size Authentication Type: Select SSH public key Username: e.g., azureuser SSH Public Key: Generate new key pair Inbound port rules- Allow selected ports and select SSH(22) and HTTP(80). Open port 80 to access the IP address on a browser as a simple web server will be installed. Configure the Disks Tab OS disk type: Choose Standard SSD or Premium SSD depending on your needs Leave other options at default unless you have specific disk encryption or backup requirements Configure the Networking Tab Virtual Network: Use default or create a new one Subnet: Leave as default Public IP: Enabled NIC network security group: Choose Basic Select inbound ports: SSH (port 22) – to connect to the VM HTTP (port 80) – to access a web server via browser Generate SSH private Key Click Review + Create Azure will validate the configuration Click Download private key and the deployment will start Connect to the Linux VM Using SSH click on connect we will connect to this VM using our public IP address and admin user name Go to your terminal(Windows PowerShell) and run the SSH command to connect to the Linux VM. ssh -i "/path/to/your_downloaded_key.pem" azureuser@your-vm-ip-address Explanation: ssh: The secure shell command used to connect to remote servers. -i "/path/to/your_downloaded_key.pem": Specifies the path to your private key file (downloaded from Azure). azureuser: This is the username you set when creating the VM. your-vm-ip-address: Replace this with the public IP address of your VM (you can find it in the Azure Portal). Update the Server and Install a Web Server (Nginx) Now that you're connected to your VM, it's time to update the system and install a basic web server. We’ll use Nginx, a lightweight and fast web server ideal for serving static websites. Step 1: Update Your Server Run the following commands to update the package list and install any available upgrades: sudo apt update sudo apt upgrade -y Step 2: Install Nginx Once the system is updated, install the Nginx web server: sudo apt install nginx -y Step3 :Access Your Web Server in a Browser Open your browser and visit: http:// You should see the default Nginx welcome page. Troubleshooting If you encounter issues: ✅ NSG Inbound Rules: Ensure port 22 and port 80 are open ✅ Correct IP: Use the public IP from Azure ✅ File Permissions: Confirm private key permission if necessary chmod 600 ~/.ssh/myLinuxKey ✅ SSH Key Format: Ensure the entire public key was pasted correctly Conclusion Congratulations! You’ve successfully: Created a Linux VM in Azure Configured it for SSH access using a public key Enabled web traffic via port 80 for web server deployment You're now ready to install your favorite web server and start developing or deploying apps securely.
How to Create and Connect to a Linux VM Using a Public Key
Creating a Linux Virtual Machine (VM) and connecting to it via SSH using a public key is a secure and efficient method for managing cloud-based systems. This guide walks you through the entire process of creating a Linux VM in Azure and securely connecting to it using SSH keys.
Table of Contents
- Create a Linux VM in Azure
- Generate SSH Private Key
- Connect to the Linux VM Using SSH
- Update the Server and Install a Web Server (Nginx)
- Troubleshooting
- Conclusion
Create a Linux VM in Azure
Before you can connect to a Linux VM using SSH, you need to create it. Follow the steps below to create the VM in Azure.
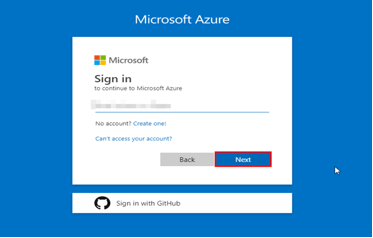
Step 1: Log in to Azure Portal
- Open the Azure Portal and sign in with your Microsoft account.
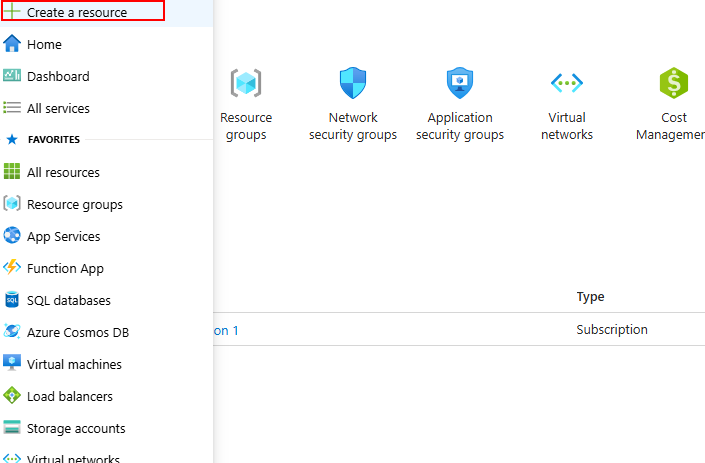
Step 2: Create a Virtual Machine
- In the Azure Portal, click on "Create a resource" in the left sidebar.
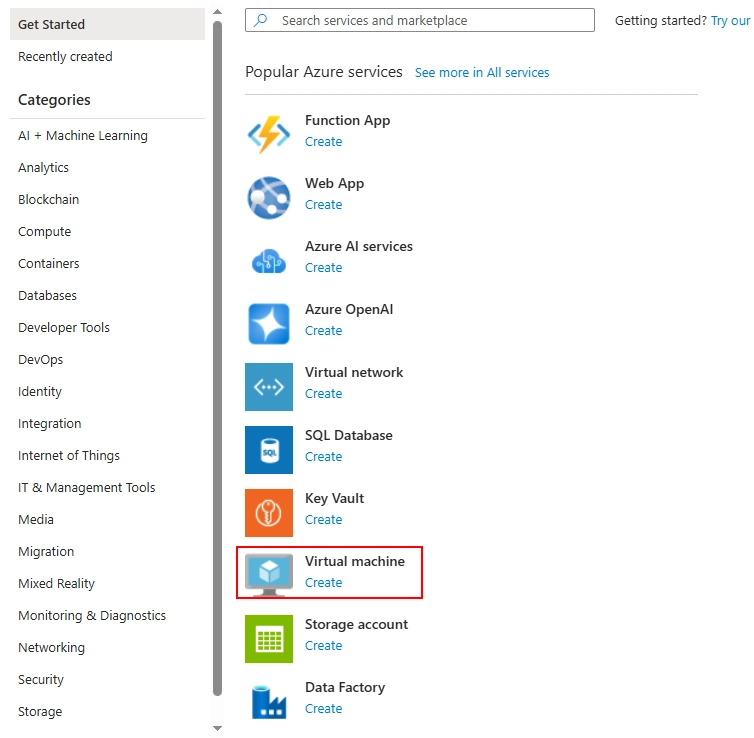
- Click Create to start the VM creation process.
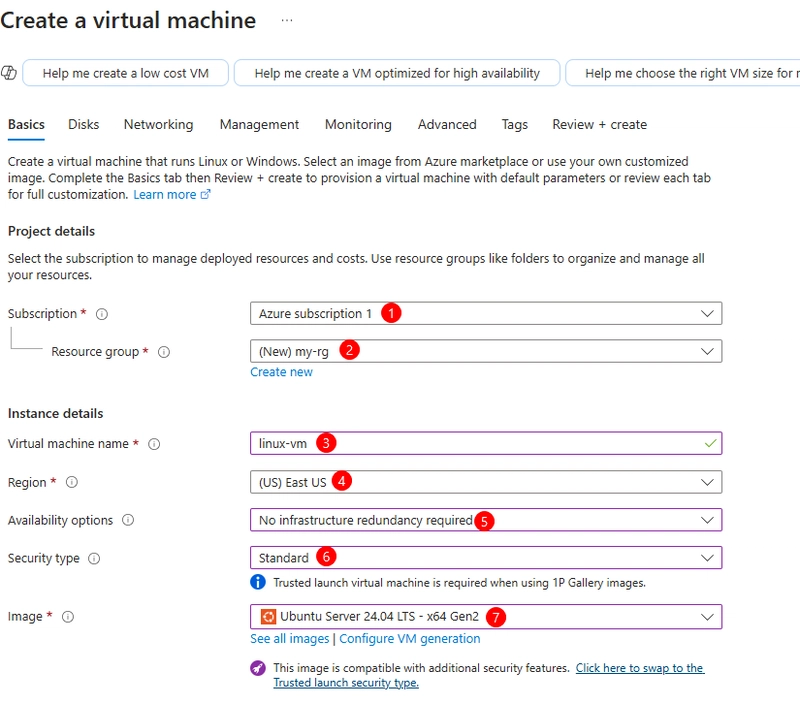
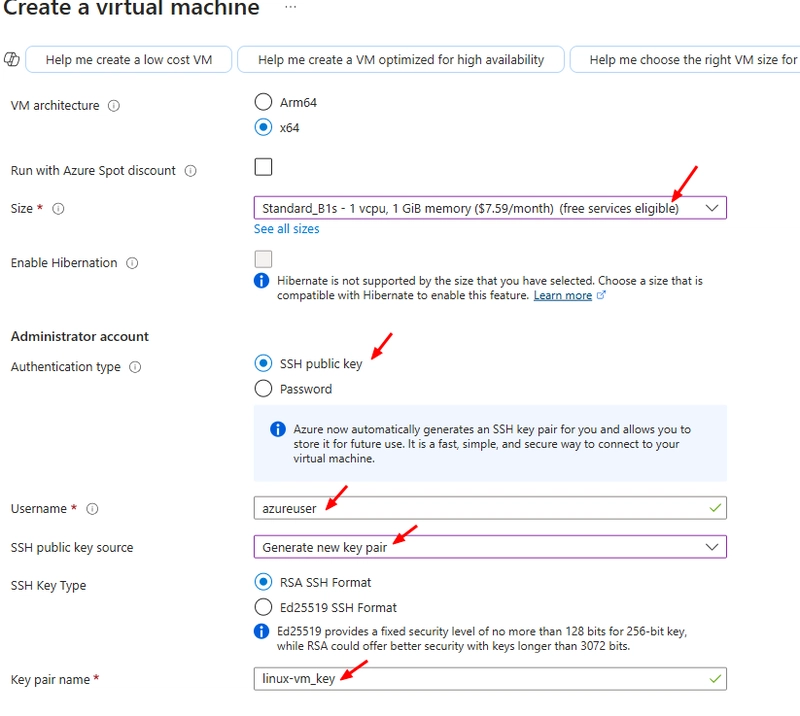
Fill Out the Basics Tab
Subscription: Select your subscription
Resource Group: Create a new one or use an existing one
VM Name: e.g., LinuxVM
Region: Choose the closest location
Availability options- No Infrastructure redundancy as i am not replicating the vm
Security - Standard
Image: Any Ubuntu distribution that you want
Size: e.g., Standard B1s (suitable for testing) or any size
Authentication Type: Select SSH public key
Username: e.g., azureuser
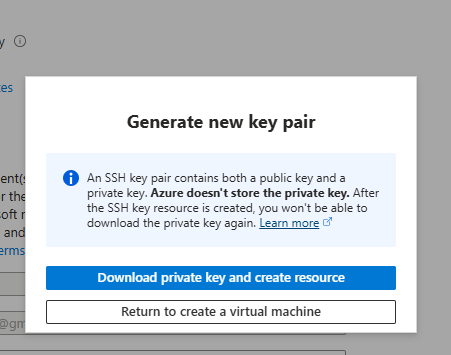
SSH Public Key: Generate new key pair
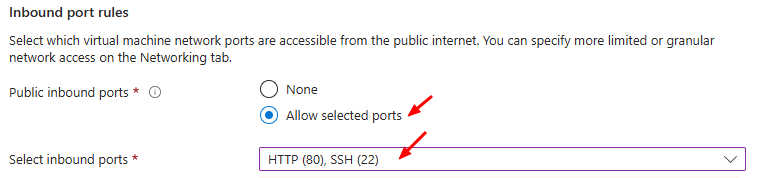
Inbound port rules- Allow selected ports and select SSH(22) and HTTP(80). Open port 80 to access the IP address on a browser as a simple web server will be installed.
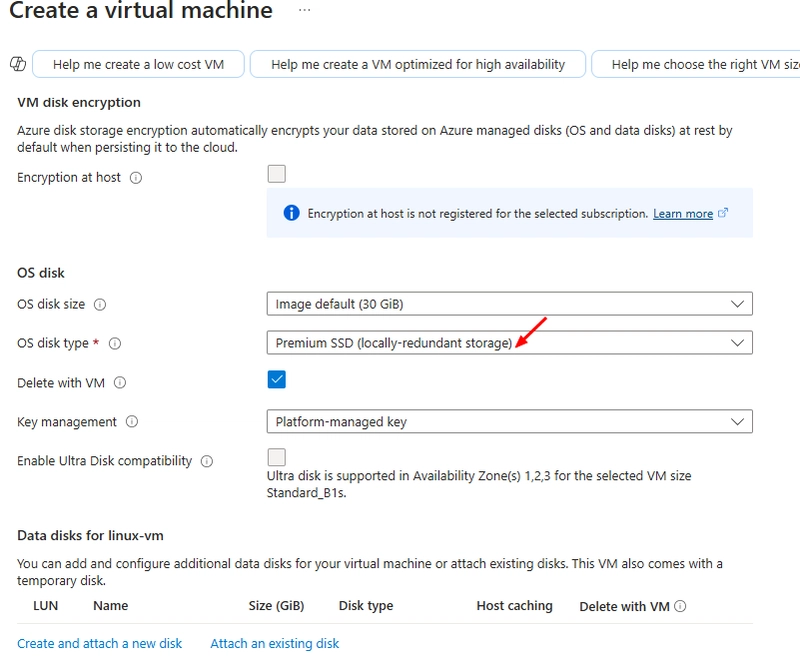
Configure the Disks Tab
OS disk type: Choose Standard SSD or Premium SSD depending on your needs
Leave other options at default unless you have specific disk encryption or backup requirements
Configure the Networking Tab
Virtual Network: Use default or create a new one
Subnet: Leave as default
Public IP: Enabled
NIC network security group: Choose Basic
Select inbound ports:
SSH (port 22) – to connect to the VM
HTTP (port 80) – to access a web server via browser

Generate SSH private Key
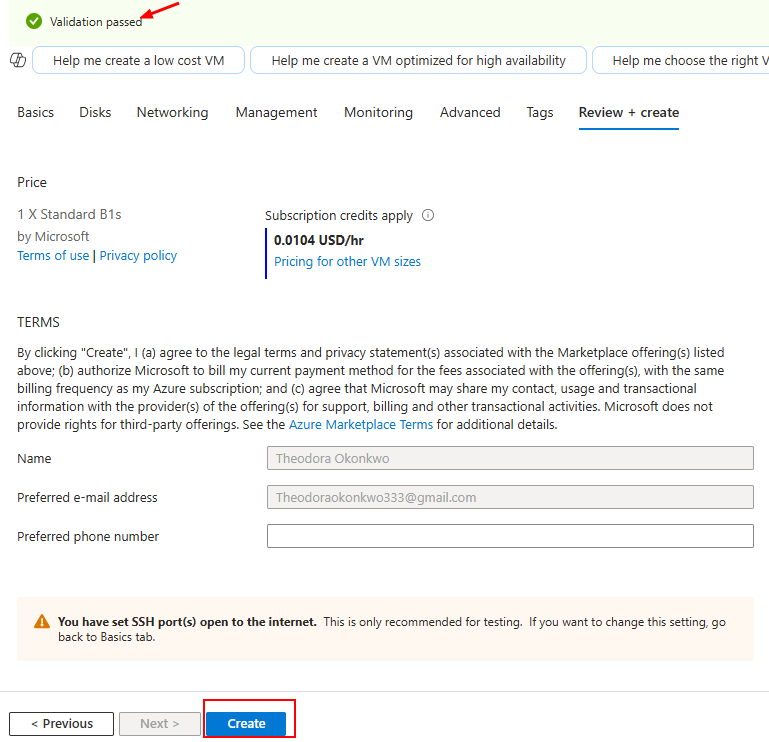
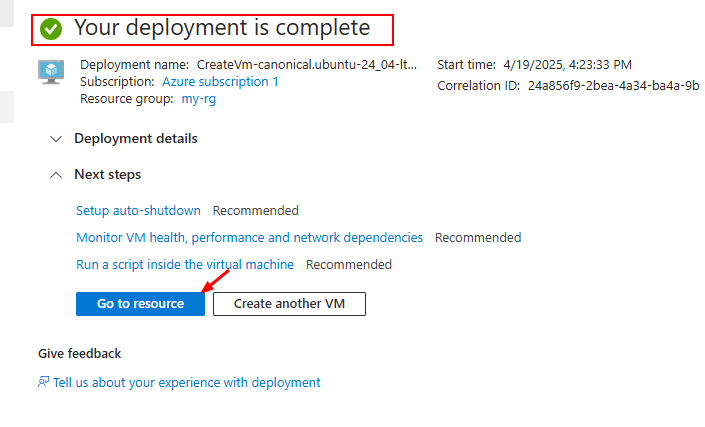
Click Review + Create
Azure will validate the configuration
Click Download private key and the deployment will start
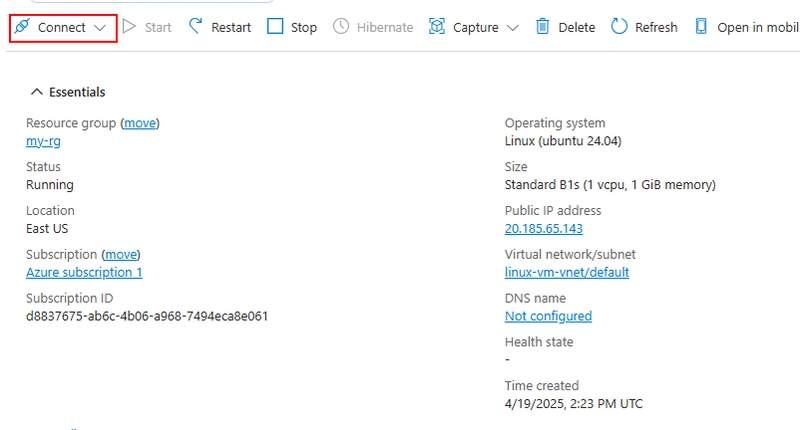
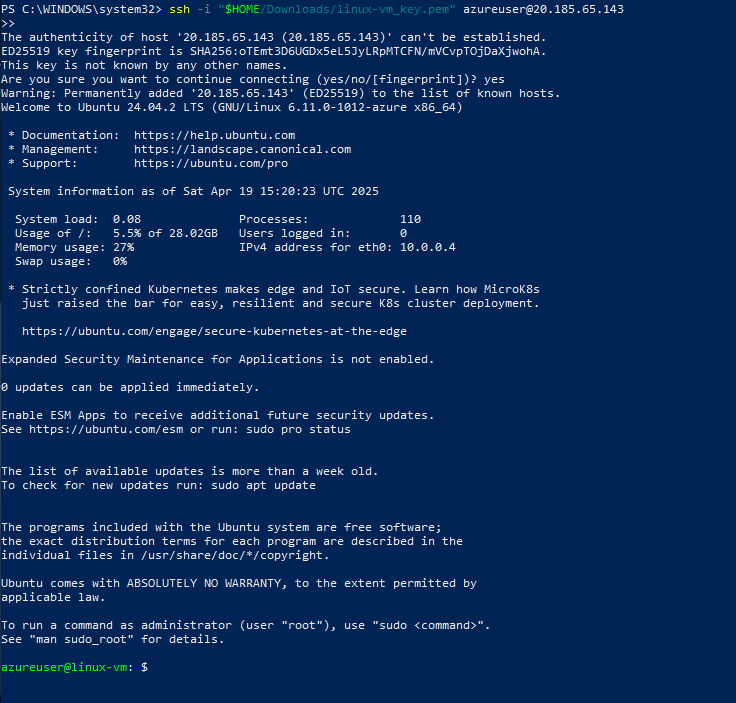
Connect to the Linux VM Using SSH
click on connect
we will connect to this VM using our public IP address and admin user name
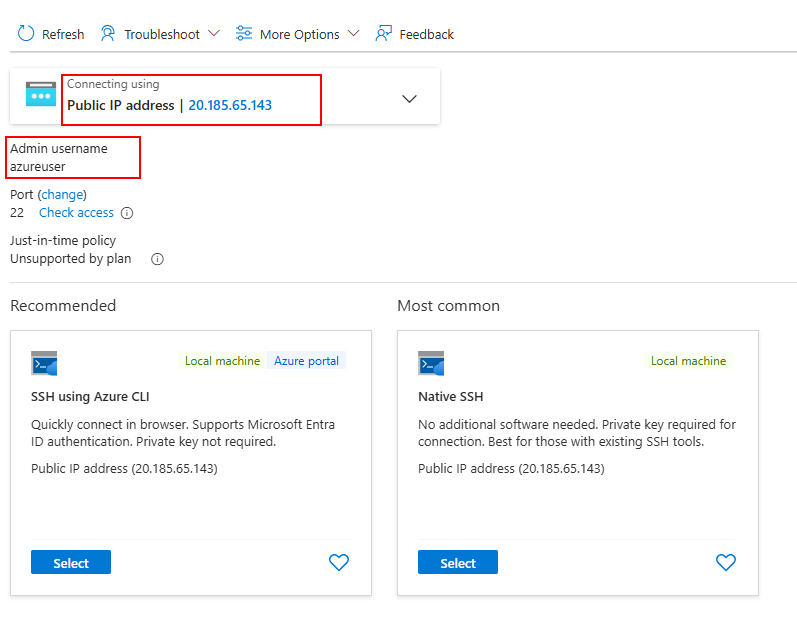
Go to your terminal(Windows PowerShell) and run the SSH command to connect to the Linux VM.
ssh -i "/path/to/your_downloaded_key.pem" azureuser@your-vm-ip-address
Explanation:
ssh: The secure shell command used to connect to remote servers.
-i "/path/to/your_downloaded_key.pem": Specifies the path to your private key file (downloaded from Azure).
azureuser: This is the username you set when creating the VM.
your-vm-ip-address: Replace this with the public IP address of your VM (you can find it in the Azure Portal).
Update the Server and Install a Web Server (Nginx)
Now that you're connected to your VM, it's time to update the system and install a basic web server. We’ll use Nginx, a lightweight and fast web server ideal for serving static websites.
Step 1: Update Your Server
Run the following commands to update the package list and install any available upgrades:
sudo apt update
sudo apt upgrade -y
Step 2: Install Nginx
Once the system is updated, install the Nginx web server:
sudo apt install nginx -y
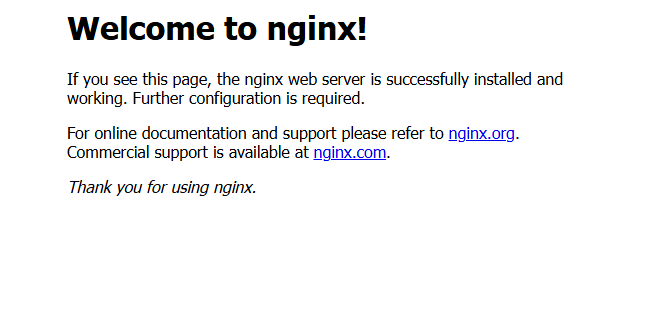
Step3 :Access Your Web Server in a Browser
Open your browser and visit:
http://
You should see the default Nginx welcome page.
Troubleshooting
If you encounter issues:
✅ NSG Inbound Rules: Ensure port 22 and port 80 are open
✅ Correct IP: Use the public IP from Azure
✅ File Permissions: Confirm private key permission if necessary
chmod 600 ~/.ssh/myLinuxKey
✅ SSH Key Format: Ensure the entire public key was pasted correctly
Conclusion
Congratulations! You’ve successfully:
Created a Linux VM in Azure
Configured it for SSH access using a public key
Enabled web traffic via port 80 for web server deployment
You're now ready to install your favorite web server and start developing or deploying apps securely.