


.jpg)


![[The AI Show Episode 144]: ChatGPT’s New Memory, Shopify CEO’s Leaked “AI First” Memo, Google Cloud Next Releases, o3 and o4-mini Coming Soon & Llama 4’s Rocky Launch](https://www.marketingaiinstitute.com/hubfs/ep%20144%20cover.png)


![BPMN-procesmodellering [closed]](https://i.sstatic.net/l7l8q49F.png)


-All-will-be-revealed-00-35-05.png?width=1920&height=1920&fit=bounds&quality=70&format=jpg&auto=webp#)
-All-will-be-revealed-00-17-36.png?width=1920&height=1920&fit=bounds&quality=70&format=jpg&auto=webp#)
-Jack-Black---Steve's-Lava-Chicken-(Official-Music-Video)-A-Minecraft-Movie-Soundtrack-WaterTower-00-00-32_lMoQ1fI.png?width=1920&height=1920&fit=bounds&quality=70&format=jpg&auto=webp#)


_Weyo_alamy.png?width=1280&auto=webp&quality=80&disable=upscale#)


![What iPhone 17 model are you most excited to see? [Poll]](https://9to5mac.com/wp-content/uploads/sites/6/2025/04/iphone-17-pro-sky-blue.jpg?quality=82&strip=all&w=290&h=145&crop=1)


![Hands-On With 'iPhone 17 Air' Dummy Reveals 'Scary Thin' Design [Video]](https://www.iclarified.com/images/news/97100/97100/97100-640.jpg)
![Mike Rockwell is Overhauling Siri's Leadership Team [Report]](https://www.iclarified.com/images/news/97096/97096/97096-640.jpg)
![Instagram Releases 'Edits' Video Creation App [Download]](https://www.iclarified.com/images/news/97097/97097/97097-640.jpg)
![Inside Netflix's Rebuild of the Amsterdam Apple Store for 'iHostage' [Video]](https://www.iclarified.com/images/news/97095/97095/97095-640.jpg)


Going Deeper with Keycloak: Understanding Authorization Services
In the first two parts of this Keycloak series, we covered the fundamentals, how to install Keycloak and get it up and running, and how to secure your RESTful API using Role-Based Access Control (RBAC). Now we're going to take it one step further. In this article, we'll explore Keycloak Authorization Services, what they are, how they differ from simple role checks, and how to use them to define fine-grained access control using policies, permissions, and resources. If RBAC is the "Who can do what", then Authorization Services answer the more complex "Who can do what, under which conditions." Let's get into it. Recap If you've been following along, you already know: How to install and set up Keycloak locally. How to configure clients and secure a RESTful API using Role-Based Access Control. Why not just stick with RBAC? RBAC is a great solution for many use cases due to its simplicity, ease of implementation and understanding. You assign roles to users (like admin, user, or viewer) and control what each role can access. However, RBAC starts to show its limitations when your access control needs become more dynamic or context-aware like : You need to restrict access based on ownership (users can only see/edit their own projects). You want to allow access only during certain times (like working hours). Access should depend on user attributes (like department or region). You need to apply different policies to the same role based on context. If you want to use RBAC to handle that, you'll need to create roles like: access-weekdays-only, admin-si-department, owner-or-manager-except-fridays. That leads to a spaghetti mess of roles, and congrats, you're accidentally reinventing what an Authorization Services was made for. What Is a Keycloak Authorization Services? The Keycloak Authorization Services is a feature in Keycloak that helps you control who can access what in your application, but in a smarter way than just using roles. It does this using four simple building blocks: Resources: What you're protecting (page, API, file, ...). Scopes: What actions someone can do (read, write, delete, ...). Policies: Rules that decide who's allowed (based on roles, groups, time of day, ...). Permissions: The final rule that puts everything together (combination of resources, scopes, and policies). So instead of writing all your access rules in your app code, you manage them in Keycloak, so it' clean, organized, and easy to update. Enough talk, Let's get to the fun part. Time to switch gears and bring those permissions to life in your app! Enabling Authorization on a Client In our demo, we'll use the same client from the previous article Secure Your RESTful API Using Keycloak Role-Based Access Control. To enable authorization go to your client settings in Keycloak and: Navigate to the Capability config section. Enable Authorization. Click on Save. Boooom!! Your client is now equipped to define advanced access controls. Defining Scopes Scopes in Keycloak Authorization represent what can be done to a resource. You can define scopes like: read write delete These are later used in permissions to grant access selectively. To create those scopes go to your client settings and : Navigate to the Authorization tab. Select Scopes sub-tab. Click on Create authorization scope. Set the scope name, (e.g. read). Click on Save. Repeat the same actions for all other scopes. Defining Resources Think of resources as the actual entities you're protecting. This could be: An API endpoint. A Web page. A Document. W'll create a new resource named user to protect all user-related endpoints like /users/*. To create a resource, go to your client settings and follow these steps: Navigate to the Authorization tab. Select Ressources sub-tab. Click on Create ressource. Set the resource name to something like user Add a URI pattern for user endpoints, such as /api/users/*. Select the previously created scopes (read,write and delete). Click on Save. In this demo, we'll use a simple role-based policy, which means access will be granted based on user roles we've already defined (like admin, manager, viewer, etc.). If you’re not familiar with how to create a client role, feel free to check out the previous article: Secure Your RESTful API Using Keycloak Role-Based Access Control, It walks you through the process step-by-step. To create a role-based policy: Go to your client settings and navigate to the Authorization tab. Click on the Policies sub-tab. Hit Create client policy and select Role as the policy type. Give your policy a meaningful name, for example: admin-role-policy: Includes the admin role (full access). manager-role-policy: Includes the manager role (read, create, and update access). viewer-role-policy: Includes the viewer role (read-only access). Under the Roles section, select the matching role for each policy. C
In the first two parts of this Keycloak series, we covered the fundamentals, how to install Keycloak and get it up and running, and how to secure your RESTful API using Role-Based Access Control (RBAC).
Now we're going to take it one step further.
In this article, we'll explore Keycloak Authorization Services, what they are, how they differ from simple role checks, and how to use them to define fine-grained access control using policies, permissions, and resources.
If RBAC is the "Who can do what", then Authorization Services answer the more complex "Who can do what, under which conditions." Let's get into it.
Recap
If you've been following along, you already know:
- How to install and set up Keycloak locally.
- How to configure clients and secure a RESTful API using Role-Based Access Control.
Why not just stick with RBAC?
RBAC is a great solution for many use cases due to its simplicity, ease of implementation and understanding. You assign roles to users (like admin, user, or viewer) and control what each role can access.
However, RBAC starts to show its limitations when your access control needs become more dynamic or context-aware like :
- You need to restrict access based on ownership (users can only see/edit their own projects).
- You want to allow access only during certain times (like working hours).
- Access should depend on user attributes (like department or region).
- You need to apply different policies to the same role based on context.
If you want to use RBAC to handle that, you'll need to create roles like: access-weekdays-only, admin-si-department, owner-or-manager-except-fridays. That leads to a spaghetti mess of roles, and congrats, you're accidentally reinventing what an Authorization Services was made for.
What Is a Keycloak Authorization Services?
The Keycloak Authorization Services is a feature in Keycloak that helps you control who can access what in your application, but in a smarter way than just using roles.
It does this using four simple building blocks:
- Resources: What you're protecting (page, API, file, ...).
- Scopes: What actions someone can do (read, write, delete, ...).
- Policies: Rules that decide who's allowed (based on roles, groups, time of day, ...).
- Permissions: The final rule that puts everything together (combination of resources, scopes, and policies).
So instead of writing all your access rules in your app code, you manage them in Keycloak, so it' clean, organized, and easy to update.
Enough talk, Let's get to the fun part. Time to switch gears and bring those permissions to life in your app!
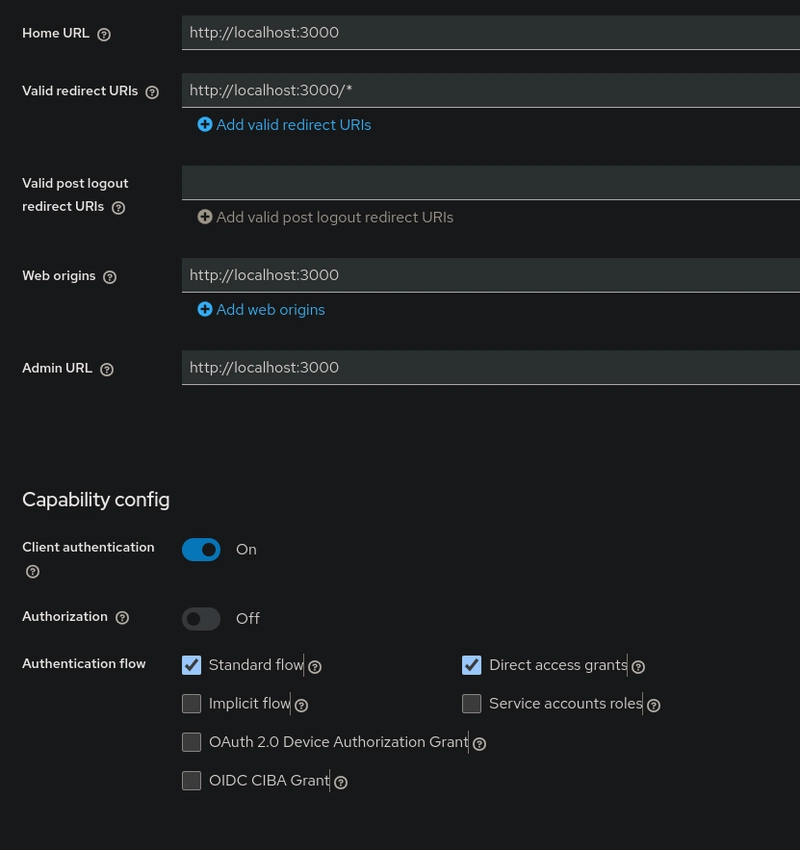
Enabling Authorization on a Client
In our demo, we'll use the same client from the previous article Secure Your RESTful API Using Keycloak Role-Based Access Control.
To enable authorization go to your client settings in Keycloak and:
- Navigate to the Capability config section.
- Enable Authorization.
- Click on Save.
Boooom!! Your client is now equipped to define advanced access controls.
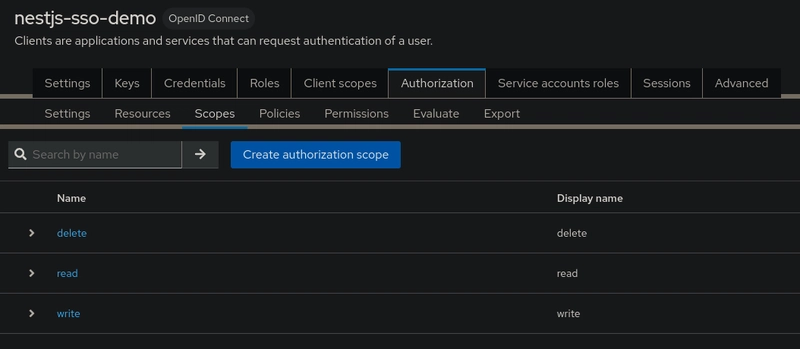
Defining Scopes
Scopes in Keycloak Authorization represent what can be done to a resource. You can define scopes like:
readwritedelete
These are later used in permissions to grant access selectively.
To create those scopes go to your client settings and :
- Navigate to the Authorization tab.
- Select Scopes sub-tab.
- Click on Create authorization scope.
- Set the scope name, (e.g.
read). - Click on Save.

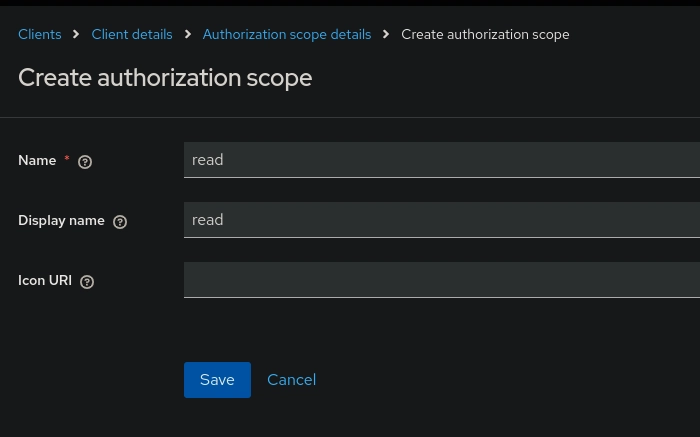
Repeat the same actions for all other scopes.
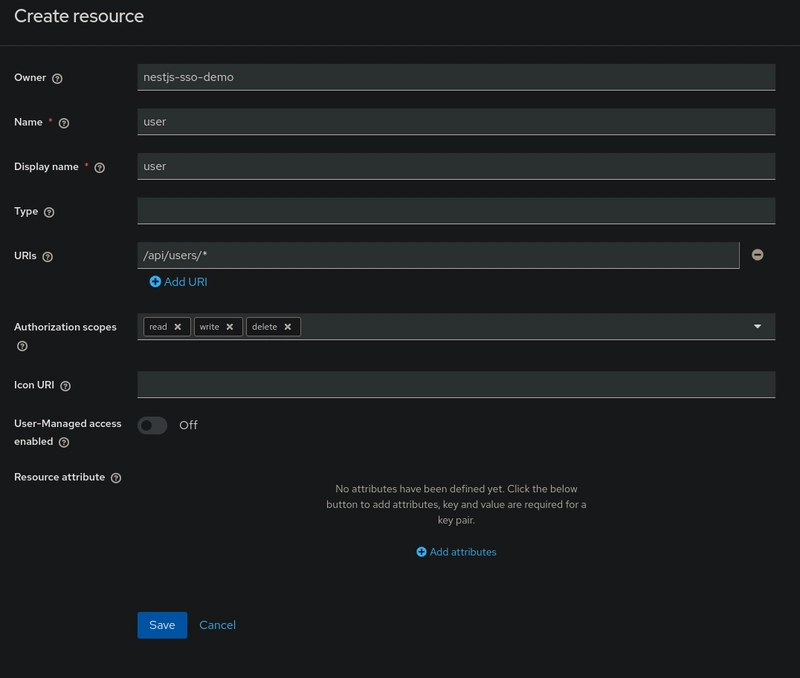
Defining Resources
Think of resources as the actual entities you're protecting. This could be:
- An API endpoint.
- A Web page.
- A Document.
W'll create a new resource named user to protect all user-related endpoints like /users/*.
To create a resource, go to your client settings and follow these steps:
- Navigate to the Authorization tab.
- Select Ressources sub-tab.
- Click on Create ressource.
- Set the resource name to something like
user - Add a URI pattern for user endpoints, such as
/api/users/*. - Select the previously created scopes (read,write and delete).
- Click on Save.
In this demo, we'll use a simple role-based policy, which means access will be granted based on user roles we've already defined (like admin, manager, viewer, etc.).
If you’re not familiar with how to create a client role, feel free to check out the previous article: Secure Your RESTful API Using Keycloak Role-Based Access Control, It walks you through the process step-by-step.
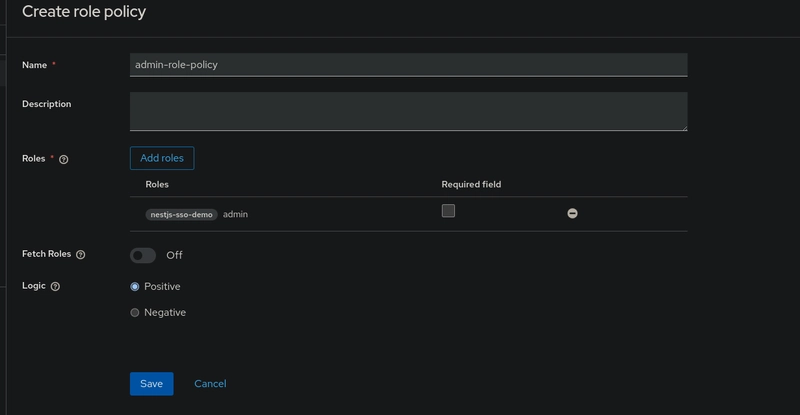
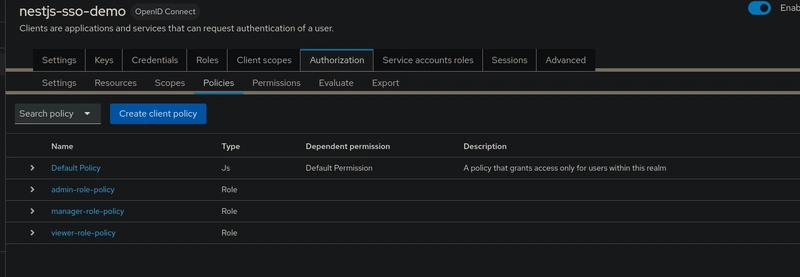
To create a role-based policy:
- Go to your client settings and navigate to the Authorization tab.
- Click on the Policies sub-tab.
- Hit Create client policy and select Role as the policy type.
- Give your policy a meaningful name, for example:
- admin-role-policy: Includes the admin role (full access).
- manager-role-policy: Includes the manager role (read, create, and update access).
- viewer-role-policy: Includes the viewer role (read-only access).
- Under the Roles section, select the matching role for each policy.
- Click Save.
Policies can be configured with positive or negative logic. Briefly, you can use this option to define whether the policy result should be kept as it is or be negated.
For example, suppose you want to create a policy where only users not granted with a specific role should be given access. In this case, you can create a role-based policy using that role and set its Logic field to Negative. If you keep Positive, which is the default behavior, the policy result will be kept as it is.
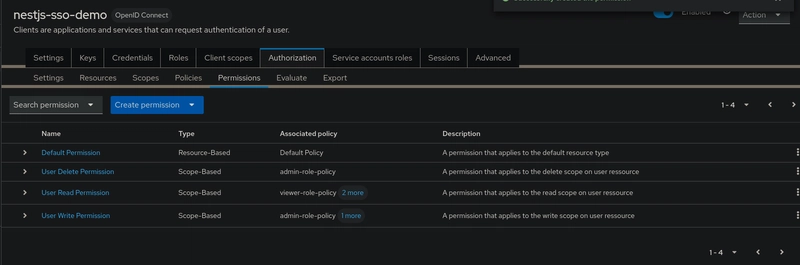
Defining Permissions
A permission associates the object being protected and the policies that must be evaluated to decide whether access should be granted.
For example:
Allow users with manager role to edit users.
In this demo, we'll create permissions associated with the defined scopes (read, write, and delete). Permissions are used to link resources, scopes, and policies together, they define who can do what on which resource.
To create a permission:
- Go to your client's Authorization tab.
- Select the Permissions sub-tab.
- Click on Create permission and choose Scope-Based as the type.
- Give your permission a meaningful name (e.g., User Read Permission).
- Under Resources, select the resource you created earlier (
user). - Under Scopes, choose the relevant scope (
read,write, ordelete). - Under Policies, select the policy that matches the role allowed to perform this action (e.g.,
viewer-role-policyfor read access). - Set the Decision strategy to Affirmative.
- Click Save.
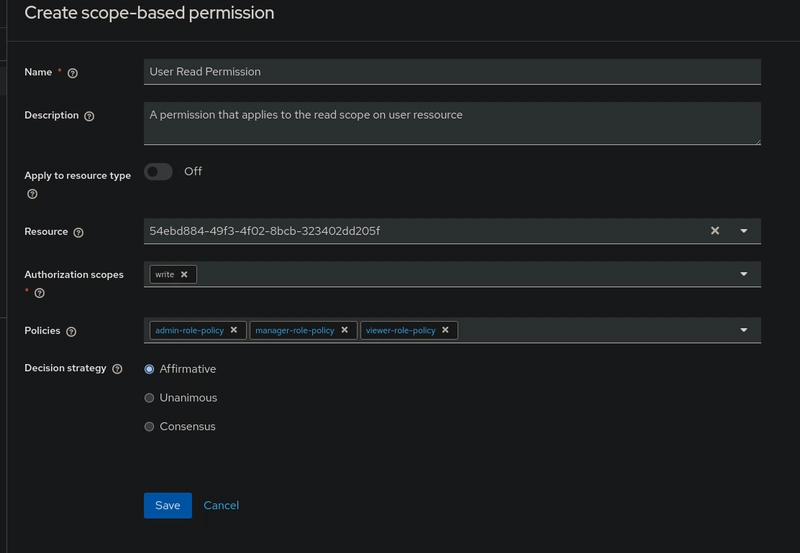
Repeat this process for each scope and link it with the appropriate policy:
- read => viewer-role-policy
- write => manager-role-policy or admin-role-policy
- delete => admin-role-policy
When associating policies with a permission, you can also define a decision strategy to specify how to evaluate the outcome of the associated policies to determine access.
- Unanimous : The default strategy if none is provided. In this case, all policies must evaluate to a positive decision for the final decision to be also positive.
- Affirmative : In this case, at least one policy must evaluate to a positive decision for the final decision to be also positive.
- Consensus : In this case, the number of positive decisions must be greater than the number of negative decisions. If the number of positive and negative decisions is equal, the final decision will be negative.
This setup ensures only the right roles can perform specific actions on the user resource.
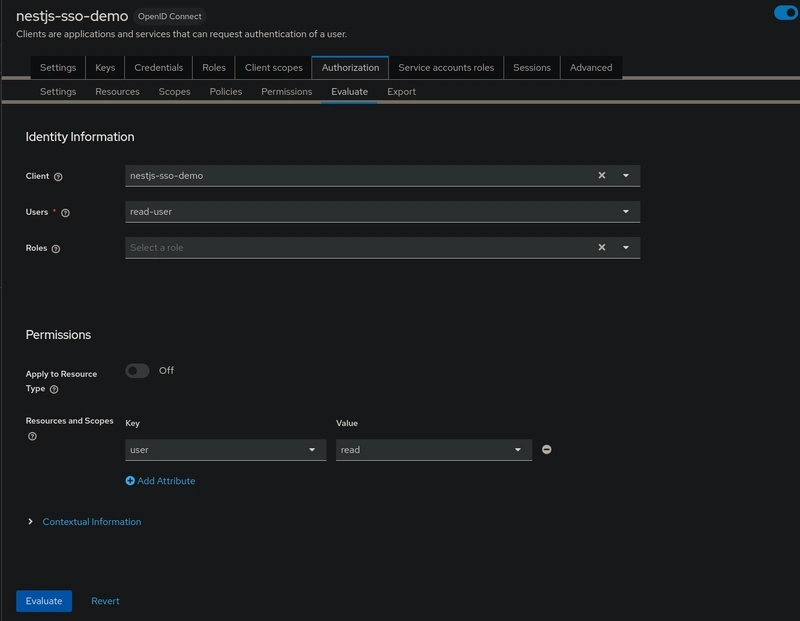
Evaluating and Testing Policies
When designing your policies, you can simulate authorization requests to test how your policies are being evaluated.
You can access the Policy Evaluation Tool by clicking the Evaluate tab when editing a resource server. There you can specify different inputs to simulate real authorization requests and test the effect of your policies.
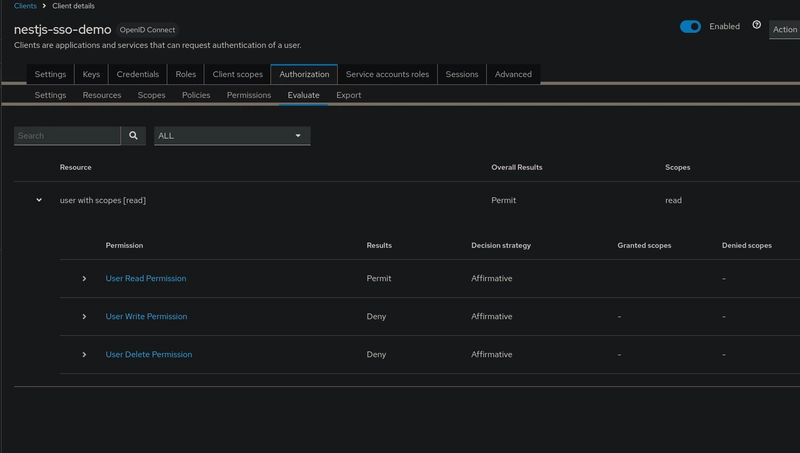
For example, we want to test and evaluate whether a viewer user has access to the read scope of the user resource.
The result :
Conclusion
And that's it! You've now seen how powerful Keycloak's Authorization Services can be, no more spaghetti roles or complex permission logic scattered across your codebase. Instead, you have a clean, centralized way to manage access, based on real-world rules.
In the next article, we'll take this setup and integrate it with a NestJS app, so you can see how everything works together in action.
Stay tuned, the real fun is just getting started!