Deploying FastAPI Application to AWS Fargate using Serverless Container Framework
In this post, I will demonstrate how to deploy a FastAPI application to AWS Fargate using the Serverless Container Framework (SCF). So, what's the Serverless Container Framework (SCF)? As stated in their documentation, the Serverless Container Framework provides a unified development and deployment experience for containers on serverless platforms. Think of it the same as their Serverless Framework, but built for containers. And what about FastAPI? FastAPI is a fast and modern web framework written in Python. It's often deployed in containers. You could also use Mangum, but we'll cover that another time. For now, we're using SCF to deploy our FastAPI application. Prerequisites I'll assume you already have an existing AWS account and a Serverless account, as these are necessary to successfully deploy our application. If you don't have them yet, use the following links to create them: Creating an AWS Account Creating a Serverless Account Done creating your account? That's great! Now, I have a confession to make: my setup is tailored for those using VS Code or Cursor as their IDE. If you prefer other IDEs like PyCharm or NeoVIM, your setup might differ. So, let's proceed shall we? We'll need to install Dev Containers within VS Code or Cursor. After installation, we can clone the repository from here. Let's start the journey... After cloning the repository, open the project in your IDE and press Ctrl + Shift + P (for Windows users) or Cmd + Shift + P (for Mac users). This will open the Command Palette. Then, search for "Dev Containers: Reopen in Container". This will set up the project within a containerized environment, complete with AWS CLI, Serverless Framework, and Docker installed. Project Structure Here's what the project looks like: scf-fastapi-example/ ├── .devcontainer/ │ └── devcontainer.json ├── app/ │ ├── Dockerfile │ ├── __init__.py │ ├── main.py │ ├── requirements.txt │ └── static/ └── serverless.containers.yml # Contains deployment config Inside app/main.py you'll find a simple FastAPI application. The app/Dockerfile holds the instructions for building our FastAPI app into a reusable image. By default, SCF looks for the Dockerfile in the root folder of the service you're deploying. Let's take a look inside the Dockerfile: FROM python:3.12-slim-bullseye WORKDIR /app ENV PYTHONDONTWRITEBYTECODE 1 ENV PYTHONUNBUFFERED 1 RUN pip install --upgrade pip COPY ./requirements.txt . RUN pip install --no-cache-dir --upgrade -r requirements.txt COPY . . CMD ["fastapi", "run", "main.py", "--port", "8080"] We're running FastAPI on port 8080 by default because the local emulation of the Application Load Balancer within SCF points to port 8080. The serverless.containers.yml file contains the development and deployment configuration for SCF. Here's what the serverless.containers.yml file looks like: name: fastapi-example deployment: type: awsApi@1.0 containers: app: src: ./app routing: pathPattern: /* pathHealthCheck: /health compute: type: awsFargateEcs awsFargateEcs: cpu: 256 memory: 512 The name attribute defines the namespace for your services when deployed to AWS. The deployment.type specifies awsApi, which deploys an AWS Application Load Balancer, networking components, and containers. The containers. will hold the configuration for each service deployed to AWS. For more detailed explanation of each attributes, refer to this documentation. Running the Application Locally To run the project, open the integrated terminal and run the following command: serverless login Choose login/register and you might encounter similar to this image below: Click the link and make sure that you are logged in to your Serverless account. Execute the following command to run the project locally: serverless dev After executing the above command, you will now see similar output like this one: You can access your application in http://localhost:3000/. Deploying the Application To deploy the project, run the following command in the terminal: serverless deploy Deployment of the application might take some time. After executing the command and SCF performing the deployment processes. The output on your terminal must look like this one: To remove all the deployed components, run the following command: serverless remove --force --all Conclusion Serverless Container Framework (SCF) offers a streamlined approach to deploying services to AWS, particularly for containerized applications like FastAPI or Django. It simplifies the process by abstracting away much of the underlying infrastructure management, making it easier for developers to get their applications running in the cloud. With SCF, you can focus on building your application and let the framework handle the deployment complexiti

In this post, I will demonstrate how to deploy a FastAPI application to AWS Fargate using the Serverless Container Framework (SCF).
So, what's the Serverless Container Framework (SCF)?
As stated in their documentation, the Serverless Container Framework provides a unified development and deployment experience for containers on serverless platforms. Think of it the same as their Serverless Framework, but built for containers.
And what about FastAPI?
FastAPI is a fast and modern web framework written in Python. It's often deployed in containers. You could also use Mangum, but we'll cover that another time. For now, we're using SCF to deploy our FastAPI application.
Prerequisites
I'll assume you already have an existing AWS account and a Serverless account, as these are necessary to successfully deploy our application. If you don't have them yet, use the following links to create them:
Done creating your account? That's great! Now, I have a confession to make: my setup is tailored for those using VS Code or Cursor as their IDE. If you prefer other IDEs like PyCharm or NeoVIM, your setup might differ.
So, let's proceed shall we? We'll need to install Dev Containers within VS Code or Cursor. After installation, we can clone the repository from here.
Let's start the journey...
After cloning the repository, open the project in your IDE and press Ctrl + Shift + P (for Windows users) or Cmd + Shift + P (for Mac users). This will open the Command Palette. Then, search for "Dev Containers: Reopen in Container". This will set up the project within a containerized environment, complete with AWS CLI, Serverless Framework, and Docker installed.
Project Structure
Here's what the project looks like:
scf-fastapi-example/
├── .devcontainer/
│   └── devcontainer.json
├── app/
│   ├── Dockerfile
│   ├── __init__.py
│   ├── main.py
│   ├── requirements.txt
│   └── static/
└── serverless.containers.yml        # Contains deployment config
Inside app/main.py you'll find a simple FastAPI application. The app/Dockerfile holds the instructions for building our FastAPI app into a reusable image. By default, SCF looks for the Dockerfile in the root folder of the service you're deploying.
Let's take a look inside the Dockerfile:
FROM python:3.12-slim-bullseye

WORKDIR /app

ENV PYTHONDONTWRITEBYTECODE 1
ENV PYTHONUNBUFFERED 1

RUN pip install --upgrade pip
COPY ./requirements.txt .
RUN pip install --no-cache-dir --upgrade -r requirements.txt

COPY . .

CMD ["fastapi", "run", "main.py", "--port", "8080"]
We're running FastAPI on port 8080 by default because the local emulation of the Application Load Balancer within SCF points to port 8080.
The serverless.containers.yml file contains the development and deployment configuration for SCF.
Here's what the serverless.containers.yml file looks like:
name: fastapi-example

deployment:
  type: awsApi@1.0

containers:
  app:
    src: ./app
    routing:
      pathPattern: /*
      pathHealthCheck: /health
    compute:
      type: awsFargateEcs
      awsFargateEcs:
        cpu: 256
        memory: 512
The name attribute defines the namespace for your services when deployed to AWS.
The deployment.type specifies awsApi, which deploys an AWS Application Load Balancer, networking components, and containers.
The containers. will hold the configuration for each service deployed to AWS. For more detailed explanation of each attributes, refer to this documentation.
Running the Application Locally
To run the project, open the integrated terminal and run the following command:
serverless login
Choose login/register and you might encounter similar to this image below:

Click the link and make sure that you are logged in to your Serverless account.
Execute the following command to run the project locally:
serverless dev
After executing the above command, you will now see similar output like this one:
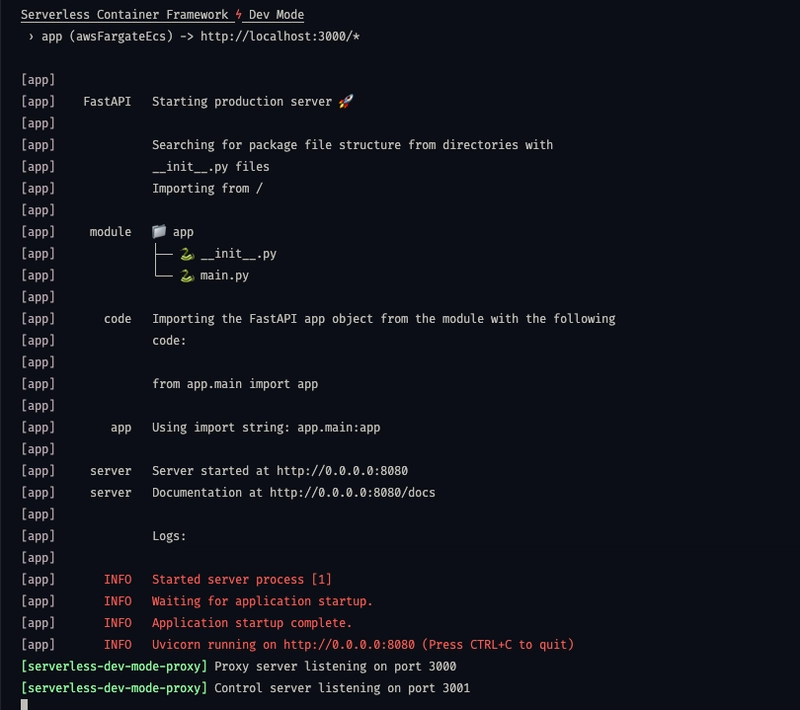
You can access your application in http://localhost:3000/.
Deploying the Application
To deploy the project, run the following command in the terminal:
serverless deploy
Deployment of the application might take some time. After executing the command and SCF performing the deployment processes. The output on your terminal must look like this one:
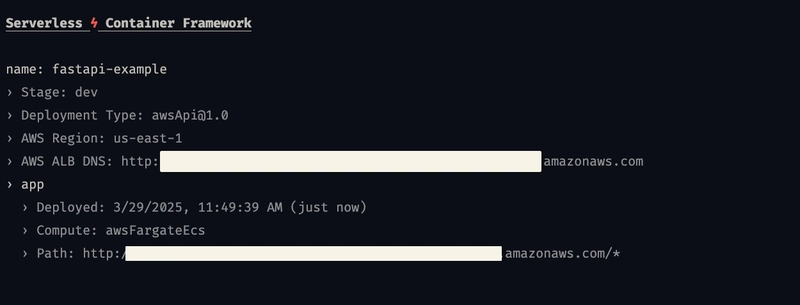
To remove all the deployed components, run the following command:
serverless remove --force --all
Conclusion
Serverless Container Framework (SCF) offers a streamlined approach to deploying services to AWS, particularly for containerized applications like FastAPI or Django. It simplifies the process by abstracting away much of the underlying infrastructure management, making it easier for developers to get their applications running in the cloud. With SCF, you can focus on building your application and let the framework handle the deployment complexities.


![[The AI Show Episode 142]: ChatGPT’s New Image Generator, Studio Ghibli Craze and Backlash, Gemini 2.5, OpenAI Academy, 4o Updates, Vibe Marketing & xAI Acquires X](https://www.marketingaiinstitute.com/hubfs/ep%20142%20cover.png)




![[FREE EBOOKS] The Kubernetes Bible, The Ultimate Linux Shell Scripting Guide & Four More Best Selling Titles](https://www.javacodegeeks.com/wp-content/uploads/2012/12/jcg-logo.jpg)


![From drop-out to software architect with Jason Lengstorf [Podcast #167]](https://cdn.hashnode.com/res/hashnode/image/upload/v1743796461357/f3d19cd7-e6f5-4d7c-8bfc-eb974bc8da68.png?#)


.png?#)


.jpg?#)


_Christophe_Coat_Alamy.jpg?#)










![Rapidus in Talks With Apple as It Accelerates Toward 2nm Chip Production [Report]](https://www.iclarified.com/images/news/96937/96937/96937-640.jpg)


