


![[The AI Show Episode 144]: ChatGPT’s New Memory, Shopify CEO’s Leaked “AI First” Memo, Google Cloud Next Releases, o3 and o4-mini Coming Soon & Llama 4’s Rocky Launch](https://www.marketingaiinstitute.com/hubfs/ep%20144%20cover.png)


![Is this too much for a modular monolith system? [closed]](https://i.sstatic.net/pYL1nsfg.png)


_Andreas_Prott_Alamy.jpg?width=1280&auto=webp&quality=80&disable=upscale#)


![What features do you get with Gemini Advanced? [April 2025]](https://i0.wp.com/9to5google.com/wp-content/uploads/sites/4/2024/02/gemini-advanced-cover.jpg?resize=1200%2C628&quality=82&strip=all&ssl=1)


![Apple Shares Official Trailer for 'Long Way Home' Starring Ewan McGregor and Charley Boorman [Video]](https://www.iclarified.com/images/news/97069/97069/97069-640.jpg)
![Apple Watch Series 10 Back On Sale for $299! [Lowest Price Ever]](https://www.iclarified.com/images/news/96657/96657/96657-640.jpg)
![EU Postpones Apple App Store Fines Amid Tariff Negotiations [Report]](https://www.iclarified.com/images/news/97068/97068/97068-640.jpg)
![Apple Slips to Fifth in China's Smartphone Market with 9% Decline [Report]](https://www.iclarified.com/images/news/97065/97065/97065-640.jpg)


Day 5/30 Days of Linux Mastery: User Account Management Like a Pro
Table of Contents Introduction What is a "User" in Linux? Types of Users Important User-Related Files Core User Management Commands You Should Know Real-World Scenario Conclusion Let's Connect Introduction Today, we are diving into one of the most essential parts of Linux: User Account Management. Whether you are setting up dev environments or locking down a production system, understanding how Linux handles users is non-negotiable. What is a "User" in Linux? In Linux, a user is any account that can log in, run processes, or own files. Every process on a Linux system runs as a user, and every file is owned by one. Users help you manage permissions, access, and security. Simply put, a user is an account that interacts with the system. Types of Users There are two types of users; System User: They are created automatically when we install Linux operating system. Example: root. Normal User: Created, edited and deleted by privilege user. They are created manually for people who will log in and use the system. Example: superuser with admin permission. Every user has a unique UID, which is used to identify the user; 0 - 999: Reserved for system users. 1000 - 60000: Reserved for the normal users. Important User-Related Files User account properties are stored in these two important files; User account properties: /etc/passwd This stores user info like name, UID, shell, and home dir. User account properties : /etc/shadow This stores encrypted passwords Core User Management Commands You Should Know User Management Commands Purpose useradd Add new user passwd Set up / Change password grep /etc/passwd Check user account properties grep /etc/shadow Check user password properties usermod Modify user (add to group etc.) whoami Show current user su - Switch user from root/admin pwd Show working directory userdel Delete the user but this retains the home directory userdel -r Deletes the user account and their data, including home directory useradd -m Add new user with home directory usermod -aG group Add user to group users See who is logged in usermod -l Modify user login name usermod -u Modify user ID usermod -c "comment" Adds comment on the user account usermod -d Changes home directory of a user usermod -d -m Moves the contents from old home dir to the new home dir usermod -s /sbin/nologin Modify user shell source usermod -L and usermod -U Locks and Unlocks User password usermod -e "_date you want_" Sets password expiry date usermod -e "" Sets no expiry date Real-World Scenario Imagine you are working as a Cloud SysAdmin and you are preparing a dev server. You are asked to: Add three new developers to the server Set up secure access with passwords Make sure they each have home directories to store their configs Verify that the users were added successfully Later, remove a test account after the onboarding test Let’s walk through it step by step. Create New Users (Amanda, Jeff, and Sharon) Set Password for the three new users Verify User Account Properties Note the following output meaning: Amanda stands for the username x = password store in the /etc/shadow UID = user ID GID = group ID : : = Field for additional info for the user /home/Amanda = The user's home directory path /bin/bash = The shell that will be used when user logs in. We are using bash (Bourne Again Shell) Verify user password properties Switch to One of the Users Change the username of Amanda to AmandaIgwe Add the comment "Cloud Engineer" to one of the users Remove a Temporary Test User And that's it! Conclusion Knowing how to manage users is foundational. If you are handling any environment, whether staging, dev, prod, your job is to keep access tight and controlled. User mismanagement leads to security risks, broken environments, and lots of late-night troubleshooting. If this is helpful to you, feel free to bookmark, comment, like and follow me for Day 6! Let's Connect! If you want to connect or share your journey, feel free to reach out on LinkedIn. I am always happy to learn and build with others in the tech space. #30DaysLinuxChallenge #Redhat#RHCSA #RHCE #CloudWhistler #Linux #Rhel #Ansible #Vim #CloudComputing #DevOps #LinuxAutomation #IaC #SysAdmin#CloudEngineer
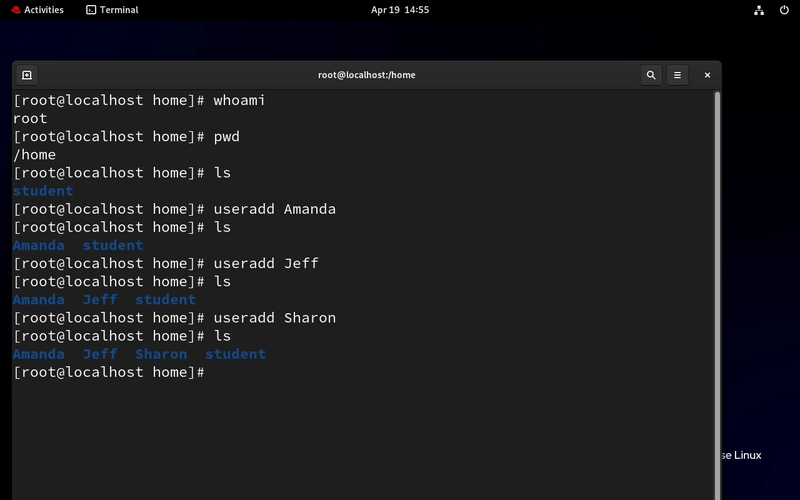
Table of Contents
- Introduction
- What is a "User" in Linux?
- Types of Users
- Important User-Related Files
- Core User Management Commands You Should Know
- Real-World Scenario
- Conclusion
- Let's Connect
Introduction
Today, we are diving into one of the most essential parts of Linux: User Account Management. Whether you are setting up dev environments or locking down a production system, understanding how Linux handles users is non-negotiable.
What is a "User" in Linux?
In Linux, a user is any account that can log in, run processes, or own files. Every process on a Linux system runs as a user, and every file is owned by one. Users help you manage permissions, access, and security. Simply put, a user is an account that interacts with the system.
Types of Users
There are two types of users;
System User: They are created automatically when we install Linux operating system. Example: root.
Normal User: Created, edited and deleted by privilege user.
They are created manually for people who will log in and use the system. Example: superuser with admin permission.
Every user has a unique UID, which is used to identify the user;
- 0 - 999: Reserved for system users.
- 1000 - 60000: Reserved for the normal users.
Important User-Related Files
User account properties are stored in these two important files;
User account properties:
/etc/passwdThis stores user info like name, UID, shell, and home dir.User account properties :
/etc/shadowThis stores encrypted passwords
Core User Management Commands You Should Know
| User Management Commands | Purpose |
|---|---|
useradd
|
Add new user |
passwd
|
Set up / Change password |
grep /etc/passwd
|
Check user account properties |
grep /etc/shadow
|
Check user password properties |
usermod
|
Modify user (add to group etc.) |
whoami
|
Show current user |
su -
|
Switch user from root/admin |
pwd
|
Show working directory |
userdel
|
Delete the user but this retains the home directory |
userdel -r
|
Deletes the user account and their data, including home directory |
useradd -m
|
Add new user with home directory |
usermod -aG group
|
Add user to group |
users
|
See who is logged in |
usermod -l
|
Modify user login name |
usermod -u
|
Modify user ID |
usermod -c "comment"
|
Adds comment on the user account |
usermod -d
|
Changes home directory of a user |
usermod -d -m
|
Moves the contents from old home dir to the new home dir |
usermod -s /sbin/nologin
|
Modify user shell source |
usermod -L and usermod -U
|
Locks and Unlocks User password |
usermod -e "_date you want_"
|
Sets password expiry date |
usermod -e ""
|
Sets no expiry date |
Real-World Scenario
Imagine you are working as a Cloud SysAdmin and you are preparing a dev server. You are asked to:
- Add three new developers to the server
- Set up secure access with passwords
- Make sure they each have home directories to store their configs
- Verify that the users were added successfully
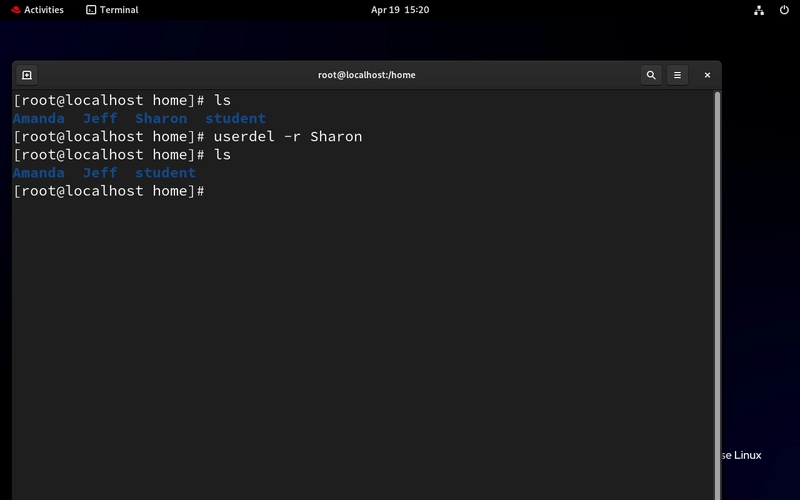
- Later, remove a test account after the onboarding test
Let’s walk through it step by step.
- Create New Users (Amanda, Jeff, and Sharon)
- Set Password for the three new users
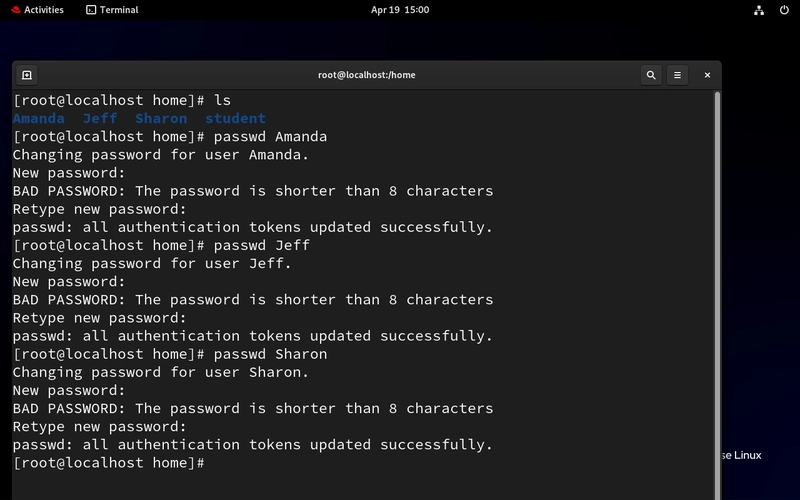
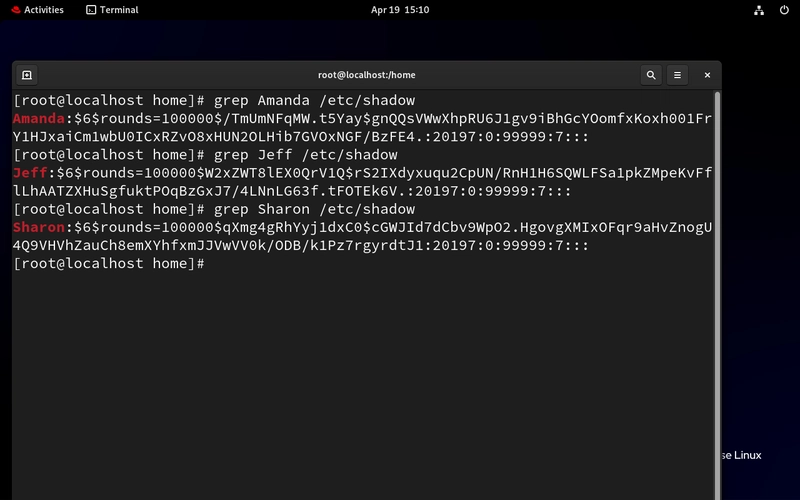
- Verify User Account Properties
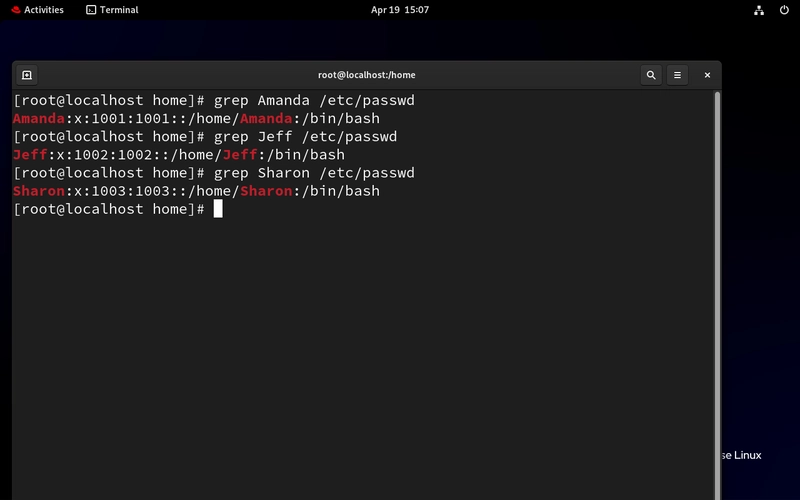
Note the following output meaning:
- Amanda stands for the username
- x = password store in the
/etc/shadow- UID = user ID
- GID = group ID
- : : = Field for additional info for the user
/home/Amanda= The user's home directory path/bin/bash= The shell that will be used when user logs in. We are using bash (Bourne Again Shell)
- Verify user password properties
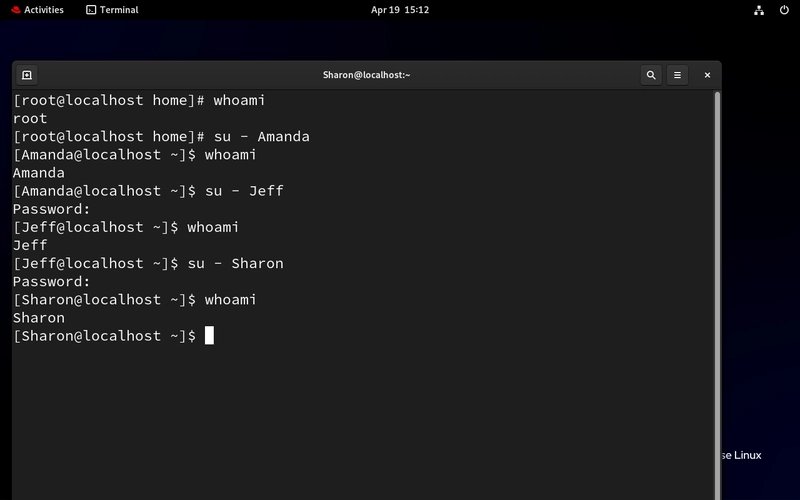
- Switch to One of the Users
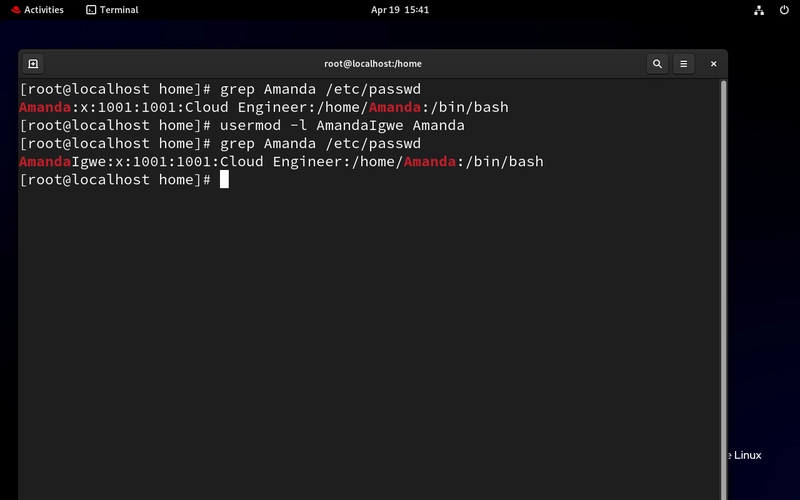
- Change the username of Amanda to AmandaIgwe
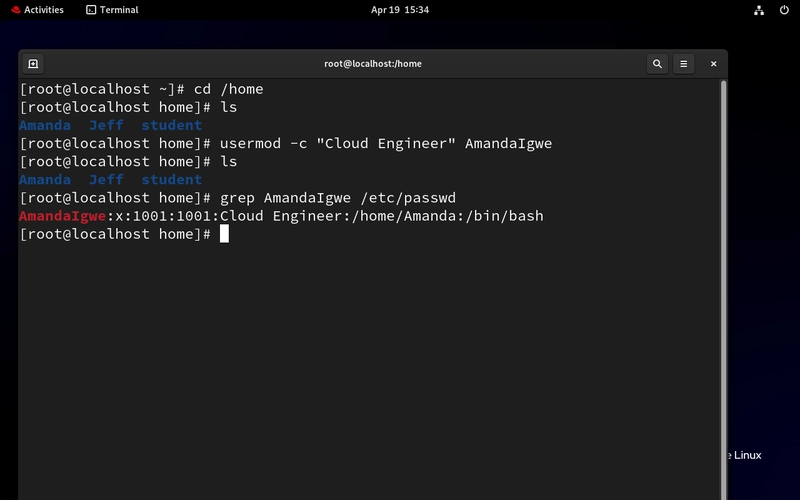
- Add the comment "Cloud Engineer" to one of the users
- Remove a Temporary Test User
And that's it!
Conclusion
Knowing how to manage users is foundational. If you are handling any environment, whether staging, dev, prod, your job is to keep access tight and controlled.
User mismanagement leads to security risks, broken environments, and lots of late-night troubleshooting.
If this is helpful to you, feel free to bookmark, comment, like and follow me for Day 6!
Let's Connect!
If you want to connect or share your journey, feel free to reach out on LinkedIn.
I am always happy to learn and build with others in the tech space.
#30DaysLinuxChallenge #Redhat#RHCSA #RHCE #CloudWhistler #Linux #Rhel #Ansible #Vim #CloudComputing #DevOps #LinuxAutomation #IaC #SysAdmin#CloudEngineer