Custom Linux Image for Raspberry Pi 5: A Guide with Buildroot
Earlier this year, I got my hands on a Raspberry Pi 5 with the goal of expanding my knowledge of embedded systems, device drivers, the Linux kernel, and related technologies. My objective is to explore several features of the Raspberry Pi 5, systematically enabling and configuring its functionalities until I achieve a fully functional image capable of managing all the board's main peripherals. Since I was already working on a project that uses Buildroot to generate a Linux system from scratch, I decided to integrate it into my learning process. What is Buildroot? According to its own documentation, Buildroot is a powerful tool that simplifies and automates the process of creating embedded Linux images, including the bootloader, Linux kernel, and root filesystem. It also generates a cross-compilation toolchain that can be used independently of Buildroot. Supporting a wide range of processors, Buildroot allows users to customize a Linux image from scratch according to the own needs. Fortunately, it includes several default configurations for various boards — including the Raspberry Pi 5 — making the setup process much more accessible. By the time I started working on this project, the default configuration for Raspberry Pi 5 was already available in Buildroot 2024.11.1, which is the version I chose to use. Before diving into building the Linux image, the host computer must meet several mandatory and optional requirements. To install all the necessary packages in a Debian/Ubuntu environment (sudo may be required), you can run the following command: apt-get update && apt-get upgrade -y && apt-get install -y which \ sed binutils build-essential diffutils gcc g++ bash patch gzip \ bzip2 perl tar cpio unzip rsync file bc findutils wget python3 \ libncurses5-dev libncursesw5-dev libncurses5 libncursesw5 git \ curl cvs mercurial openssh-client subversion Once all the packages are installed, we’re ready to start building our image. To download Buildroot 2024.11.1, run the following command: mkdir ~/buildroot && cd ~/buildroot wget https://buildroot.org/downloads/buildroot-2024.11.1.tar.gz tar zxf buildroot-2024.11.1.tar.gz --strip-components=1 The commands above will download and extract the specified Buildroot version. If you need a different version, you can find all available releases here. Buildroot follows a quarterly release cycle, with monthly bug-fix updates to ensure stability and improvements. Configuring the build After downloading Buildroot, the next step is to configure our build using the default Raspberry Pi 5 configuration. It's best practice to build the image outside the Buildroot source folder. To do this, run the following commands: cd ~/buildroot mkdir output && cd output make O=$PWD -C ../buildroot-2025.02 raspberrypi5_defconfig If you see an output similar to the image below, the configuration was successful. Before starting the build, we can make some customization, such as setting a root password for the system. To do this, run the following command: make menuconfig This will open a curses-based configurator, similar to the one used in the Linux kernel project. Using the arrow keys and Enter key to navigate through the menu, you can set the root password by going to the following option: -> System configuration │ │ -> Enable root login with password (BR2_TARGET_ENABLE_ROOT_LOGIN [=y]) After saving your changes and exiting the configuration menu, you can start the build process by simply running the following command: make This will trigger the compilation of the root filesystem and the Linux kernel for the Raspberry Pi 5. The process can take one to two hours, as it involves building everything from scratch, including host dependencies and the toolchain. After the compilation is complete without errors, the final binary file will be located in the images folder and will be named sdcard.img. This is the file that needs to be written to the SD card to boot the Raspberry Pi board. To write the image to the SD card (assuming it is enumerated as /dev/sda), run the following command: dd if=images/sdcard.img of=/dev/sda status=progress Once the SD card has finished flashing, the final step is to power up the board. You should be able to log in to the system using the password you set earlier. A serial connection can be used to access the system and log in. The serial session will also be helpful to troubleshoot any issue you face while booting the system. Conclusion

Earlier this year, I got my hands on a Raspberry Pi 5 with the goal of expanding my knowledge of embedded systems, device drivers, the Linux kernel, and related technologies. My objective is to explore several features of the Raspberry Pi 5, systematically enabling and configuring its functionalities until I achieve a fully functional image capable of managing all the board's main peripherals. Since I was already working on a project that uses Buildroot to generate a Linux system from scratch, I decided to integrate it into my learning process.
What is Buildroot?
According to its own documentation, Buildroot is a powerful tool that simplifies and automates the process of creating embedded Linux images, including the bootloader, Linux kernel, and root filesystem. It also generates a cross-compilation toolchain that can be used independently of Buildroot. Supporting a wide range of processors, Buildroot allows users to customize a Linux image from scratch according to the own needs. Fortunately, it includes several default configurations for various boards — including the Raspberry Pi 5 — making the setup process much more accessible.
By the time I started working on this project, the default configuration for Raspberry Pi 5 was already available in Buildroot 2024.11.1, which is the version I chose to use. Before diving into building the Linux image, the host computer must meet several mandatory and optional requirements. To install all the necessary packages in a Debian/Ubuntu environment (sudo may be required), you can run the following command:
apt-get update && apt-get upgrade -y && apt-get install -y which \
sed binutils build-essential diffutils gcc g++ bash patch gzip   \
bzip2 perl tar cpio unzip rsync file bc findutils wget python3   \
libncurses5-dev libncursesw5-dev libncurses5 libncursesw5 git    \
curl cvs mercurial openssh-client subversion
Once all the packages are installed, we’re ready to start building our image. To download Buildroot 2024.11.1, run the following command:
mkdir ~/buildroot && cd ~/buildroot
wget https://buildroot.org/downloads/buildroot-2024.11.1.tar.gz
tar zxf buildroot-2024.11.1.tar.gz --strip-components=1
The commands above will download and extract the specified Buildroot version. If you need a different version, you can find all available releases here. Buildroot follows a quarterly release cycle, with monthly bug-fix updates to ensure stability and improvements.
Configuring the build
After downloading Buildroot, the next step is to configure our build using the default Raspberry Pi 5 configuration. It's best practice to build the image outside the Buildroot source folder. To do this, run the following commands:
cd ~/buildroot
mkdir output && cd output
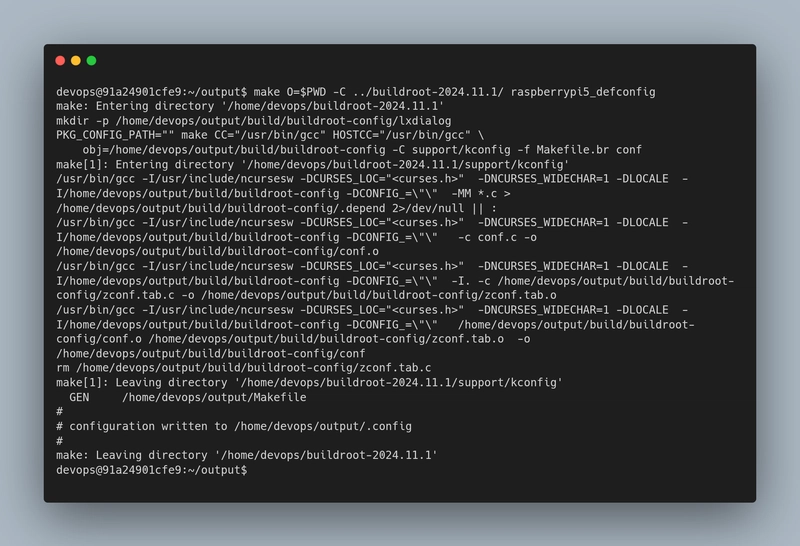
make O=$PWD -C ../buildroot-2025.02 raspberrypi5_defconfig
If you see an output similar to the image below, the configuration was successful.
Before starting the build, we can make some customization, such as setting a root password for the system. To do this, run the following command:
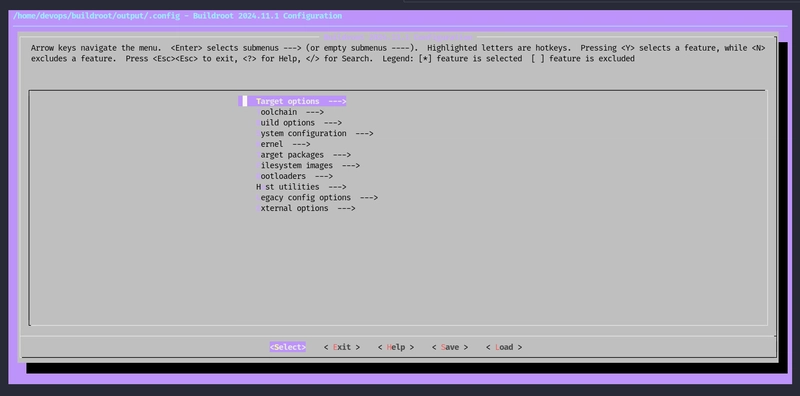
make menuconfig
This will open a curses-based configurator, similar to the one used in the Linux kernel project.
Using the arrow keys and Enter key to navigate through the menu, you can set the root password by going to the following option:
-> System configuration                                                                                                                                                                                                        │
│       -> Enable root login with password (BR2_TARGET_ENABLE_ROOT_LOGIN [=y])
After saving your changes and exiting the configuration menu, you can start the build process by simply running the following command:
make
This will trigger the compilation of the root filesystem and the Linux kernel for the Raspberry Pi 5. The process can take one to two hours, as it involves building everything from scratch, including host dependencies and the toolchain.
After the compilation is complete without errors, the final binary file will be located in the images folder and will be named sdcard.img. This is the file that needs to be written to the SD card to boot the Raspberry Pi board. To write the image to the SD card (assuming it is enumerated as /dev/sda), run the following command:
dd if=images/sdcard.img of=/dev/sda status=progress
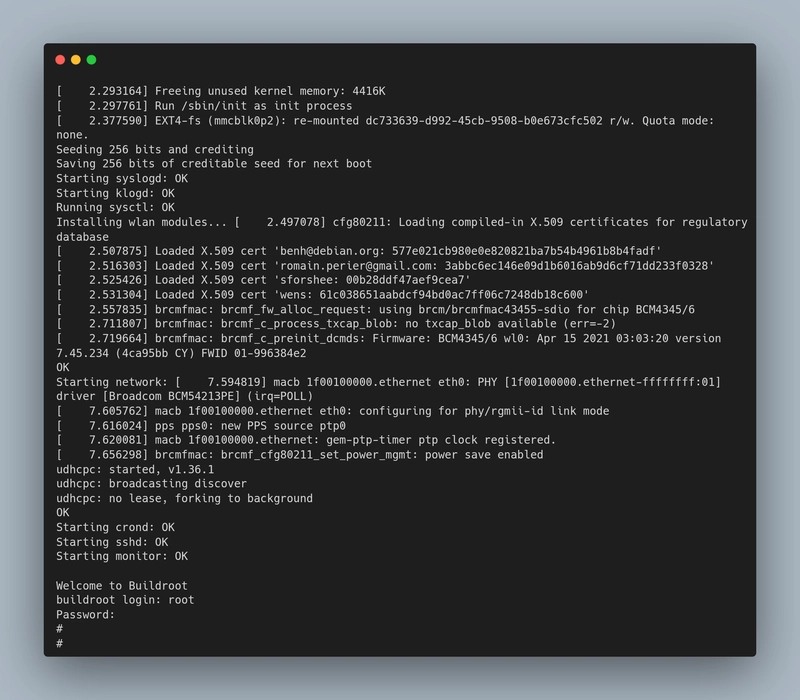
Once the SD card has finished flashing, the final step is to power up the board. You should be able to log in to the system using the password you set earlier. A serial connection can be used to access the system and log in. The serial session will also be helpful to troubleshoot any issue you face while booting the system.
Conclusion


![[The AI Show Episode 142]: ChatGPT’s New Image Generator, Studio Ghibli Craze and Backlash, Gemini 2.5, OpenAI Academy, 4o Updates, Vibe Marketing & xAI Acquires X](https://www.marketingaiinstitute.com/hubfs/ep%20142%20cover.png)


![[DEALS] The Premium Learn to Code Certification Bundle (97% off) & Other Deals Up To 98% Off – Offers End Soon!](https://www.javacodegeeks.com/wp-content/uploads/2012/12/jcg-logo.jpg)


![From drop-out to software architect with Jason Lengstorf [Podcast #167]](https://cdn.hashnode.com/res/hashnode/image/upload/v1743796461357/f3d19cd7-e6f5-4d7c-8bfc-eb974bc8da68.png?#)


.png?#)


.jpg?#)


![iPhone 17 Pro Won't Feature Two-Toned Back [Gurman]](https://www.iclarified.com/images/news/96944/96944/96944-640.jpg)


_Christophe_Coat_Alamy.jpg?#)
 (1).webp?#)


![Tariffs Threaten Apple's $999 iPhone Price Point in the U.S. [Gurman]](https://www.iclarified.com/images/news/96943/96943/96943-640.jpg)


