Creating a Static Website on AWS
Introduction In today's digital world, having an online presence is essential for businesses of all sizes, including small cafes. A simple, well-designed website can help attract customers, showcase a menu, provide location details, and even offer online ordering options. However, setting up a website can seem daunting, especially for those without a technical background. Fortunately, Amazon Web Services (AWS) provides an easy and cost-effective way to host a static website using Amazon Simple Storage Service (Amazon S3). A static website consists of HTML, CSS, and JavaScript files that do not require a backend server, making it an excellent choice for small businesses like cafes that need a fast, reliable, and low-maintenance online presence. In this guide, we will walk through the process of hosting a static website on AWS using a real-world example: a cafe website. This tutorial is inspired by AWS training materials and will demonstrate how to create and configure an S3 bucket for website hosting, implement basic security measures, and optimize the site for performance. Additionally, we will explore best practices such as data protection, lifecycle management, and disaster recovery strategies to ensure the website remains resilient and cost-efficient. By the end of this tutorial, you will have a fully functional static website running on AWS, with a strong foundation for further customization and enhancements. Let's get started! Scenario: Building a Cafe Website To make this tutorial practical, let's consider a fictional cafe, CloudCafe. The cafe owner wants a website that displays the menu, location, opening hours, and contact details. Since the site only needs to display information without dynamic content, a static website is the perfect solution. Website Requirements A homepage showcasing the cafe’s name and a brief introduction. A menu page displaying food and drink options. A contact page with an address, phone number, and social media links. A simple, modern design with images of the cafe. Step 1: Setting Up an S3 Bucket for Hosting AWS S3 (Simple Storage Service) allows us to store and serve static website files. Follow these steps to set up an S3 bucket to host your website: Log in to AWS and navigate to the S3 service. Create a new S3 bucket, naming it uniquely (e.g., cloudcafe-website). Choose the Region closest to your target audience for better performance. Under Bucket settings, uncheck "Block all public access" to make the website accessible. After creating the bucket, enable Static website hosting in the bucket settings. Set the index document as index.html. Step 2: Uploading Website Files After setting up the S3 bucket, you need to upload your website files: Prepare the HTML, CSS, and image files for the website. In the S3 console, open the newly created bucket. Click Upload and add the website files. Ensure files are set to public read access so visitors can view them. Copy the S3 static website endpoint URL to test your site in a browser. Step 3: Protecting Data To safeguard website data from accidental deletion or modification, follow these steps: 1. Enable Bucket Versioning: Open your S3 bucket in the AWS console. Navigate to the Properties tab. Locate the Bucket Versioning section and enable it. This feature helps recover previous versions of files if they are modified or deleted. 2. Set Up a Read-Only Bucket Policy: Go to the Permissions tab of your bucket. Click Bucket Policy and enter a policy that allows public read access but prevents unauthorized modifications. You can use the AWS policy generator to create one. { "Version": "2012-10-17", "Statement": [ { "Sid": "PublicReadGetObject", "Effect": "Allow", "Principal": "*", "Action": [ "s3:GetObject" ], "Resource": [ "arn:aws:s3:::Bucket-Name/*" ] } ] } Replace Bucket-Name with your actual bucket name. Save the policy to apply the security settings. Step 4: Automating Data Lifecycle Management Managing storage efficiently can help reduce costs and improve performance. Follow these steps to automate lifecycle management: 1. Create a Lifecycle Rule: Open your S3 bucket and go to the Management tab. Click Create lifecycle rule and name it (e.g., archive old files). 2. Define the Rule’s Scope: Choose whether to apply the rule to all objects or specific ones (e.g., files in an archive/ folder). To limit the scope to a particular object (e.g., index.html), create a tag before configuring the rule. 3. Set Expiration Policies: Configure the rule to move older versions of files to Amazon S3 Glacier after a specified number of days. Set objects to be automatically deleted after a certain perio
Introduction
In today's digital world, having an online presence is essential for businesses of all sizes, including small cafes. A simple, well-designed website can help attract customers, showcase a menu, provide location details, and even offer online ordering options. However, setting up a website can seem daunting, especially for those without a technical background.
Fortunately, Amazon Web Services (AWS) provides an easy and cost-effective way to host a static website using Amazon Simple Storage Service (Amazon S3). A static website consists of HTML, CSS, and JavaScript files that do not require a backend server, making it an excellent choice for small businesses like cafes that need a fast, reliable, and low-maintenance online presence.
In this guide, we will walk through the process of hosting a static website on AWS using a real-world example: a cafe website. This tutorial is inspired by AWS training materials and will demonstrate how to create and configure an S3 bucket for website hosting, implement basic security measures, and optimize the site for performance. Additionally, we will explore best practices such as data protection, lifecycle management, and disaster recovery strategies to ensure the website remains resilient and cost-efficient.
By the end of this tutorial, you will have a fully functional static website running on AWS, with a strong foundation for further customization and enhancements.
Let's get started!
Scenario: Building a Cafe Website
To make this tutorial practical, let's consider a fictional cafe, CloudCafe. The cafe owner wants a website that displays the menu, location, opening hours, and contact details. Since the site only needs to display information without dynamic content, a static website is the perfect solution.
Website Requirements
- A homepage showcasing the cafe’s name and a brief introduction.
- A menu page displaying food and drink options.
- A contact page with an address, phone number, and social media links.
- A simple, modern design with images of the cafe.
Step 1: Setting Up an S3 Bucket for Hosting
AWS S3 (Simple Storage Service) allows us to store and serve static website files. Follow these steps to set up an S3 bucket to host your website:
Log in to AWS and navigate to the S3 service.
-
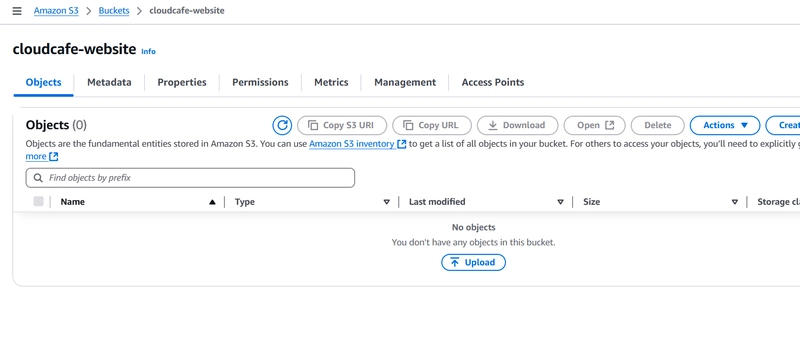
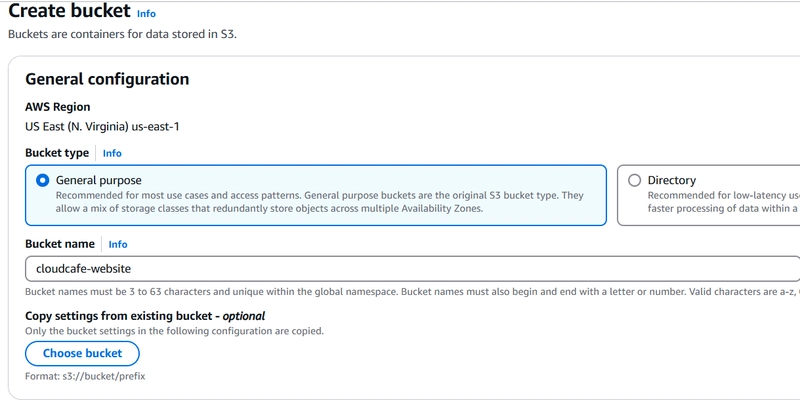
Create a new S3 bucket, naming it uniquely (e.g., cloudcafe-website).
Choose the Region closest to your target audience for better performance.
-
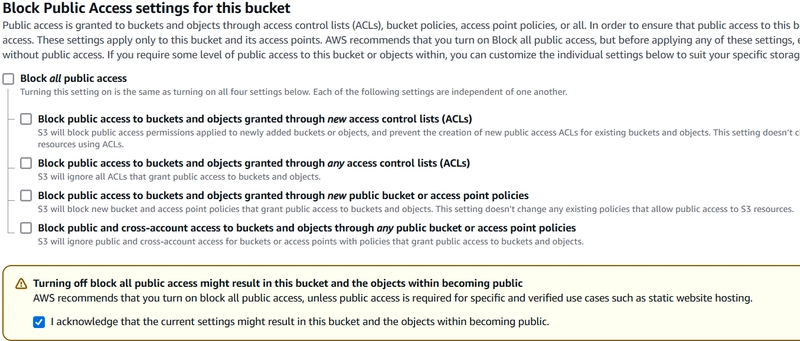
Under Bucket settings, uncheck "Block all public access" to make the website accessible.
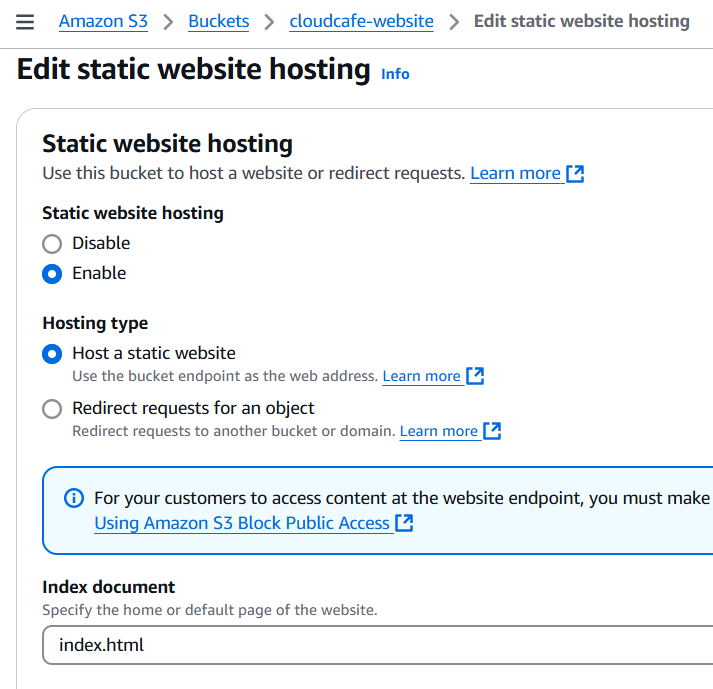
After creating the bucket, enable Static website hosting in the bucket settings.
Set the index document as index.html.
Step 2: Uploading Website Files
After setting up the S3 bucket, you need to upload your website files:
Prepare the HTML, CSS, and image files for the website.
In the S3 console, open the newly created bucket.
-
Click Upload and add the website files.
-
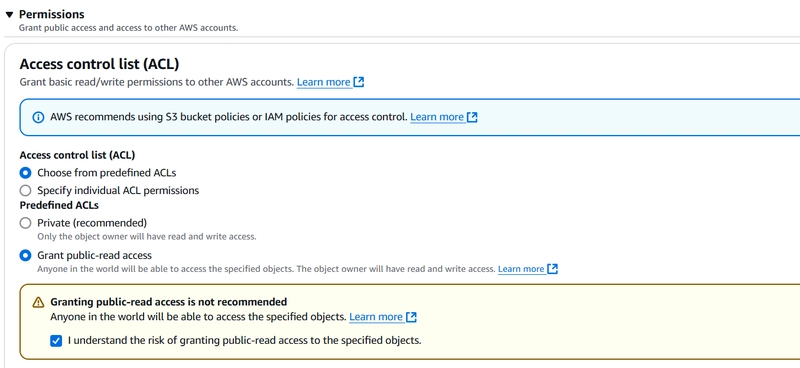
Ensure files are set to public read access so visitors can view them.
Copy the S3 static website endpoint URL to test your site in a browser.
Step 3: Protecting Data
To safeguard website data from accidental deletion or modification, follow these steps:
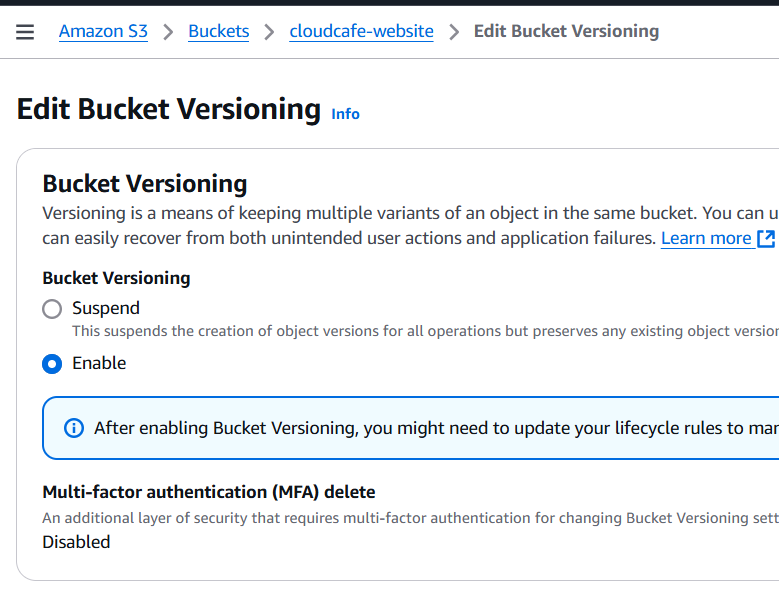
1. Enable Bucket Versioning:
- Open your S3 bucket in the AWS console.
- Navigate to the Properties tab.
This feature helps recover previous versions of files if they are modified or deleted.
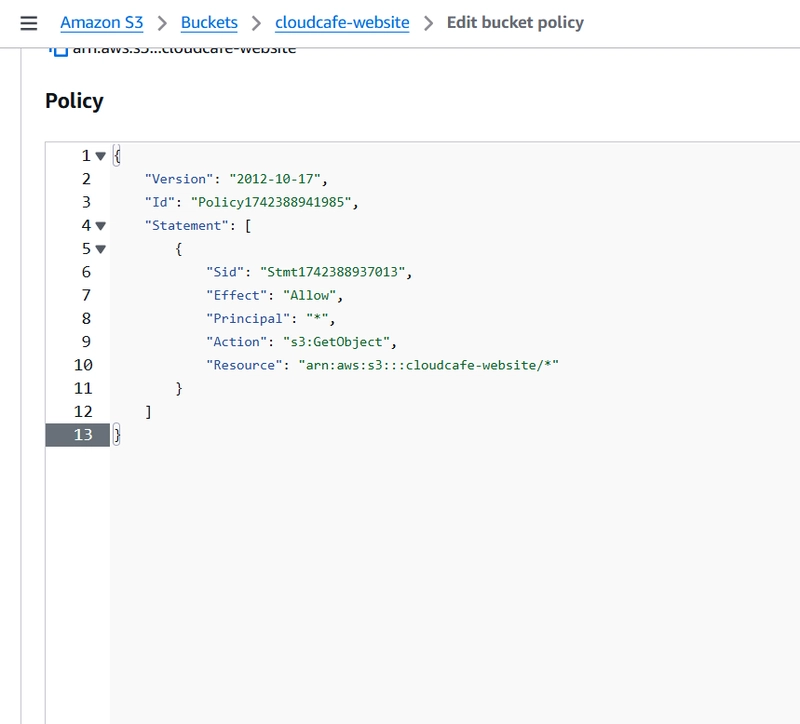
2. Set Up a Read-Only Bucket Policy:
Go to the Permissions tab of your bucket.
Click Bucket Policy and enter a policy that allows public read access but prevents unauthorized modifications. You can use the AWS policy generator to create one.
{
    "Version": "2012-10-17",
    "Statement": [
        {
            "Sid": "PublicReadGetObject",
            "Effect": "Allow",
            "Principal": "*",
            "Action": [
                "s3:GetObject"
            ],
            "Resource": [
                "arn:aws:s3:::Bucket-Name/*"
            ]
        }
    ]
}
- Replace Bucket-Name with your actual bucket name.
- Save the policy to apply the security settings.
Step 4: Automating Data Lifecycle Management
Managing storage efficiently can help reduce costs and improve performance. Follow these steps to automate lifecycle management:
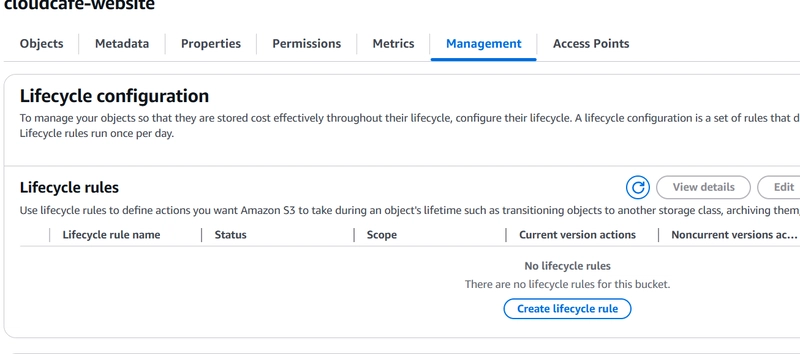
1. Create a Lifecycle Rule:
Open your S3 bucket and go to the Management tab.
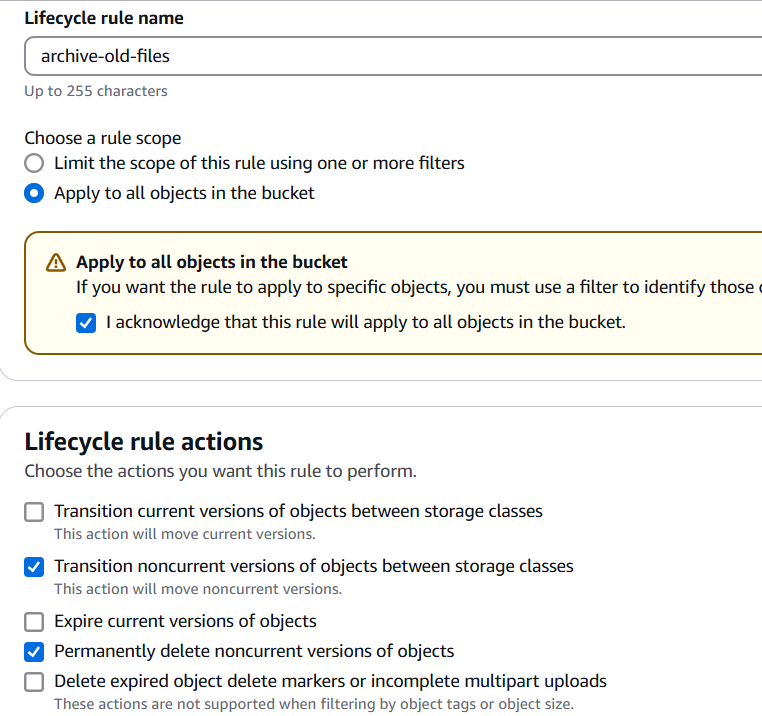
Click Create lifecycle rule and name it (e.g., archive old files).
2. Define the Rule’s Scope:
Choose whether to apply the rule to all objects or specific ones (e.g., files in an archive/ folder).
To limit the scope to a particular object (e.g., index.html), create a tag before configuring the rule.
3. Set Expiration Policies:
Configure the rule to move older versions of files to Amazon S3 Glacier after a specified number of days.
Set objects to be automatically deleted after a certain period if they are no longer needed.
Save and Apply the Rule.
Review the settings and confirm to activate the lifecycle rule.
Step 5: Disaster Recovery
To ensure your website remains available even in the event of failures, set up disaster recovery mechanisms:
1. Enable Cross-Region Replication (CRR):
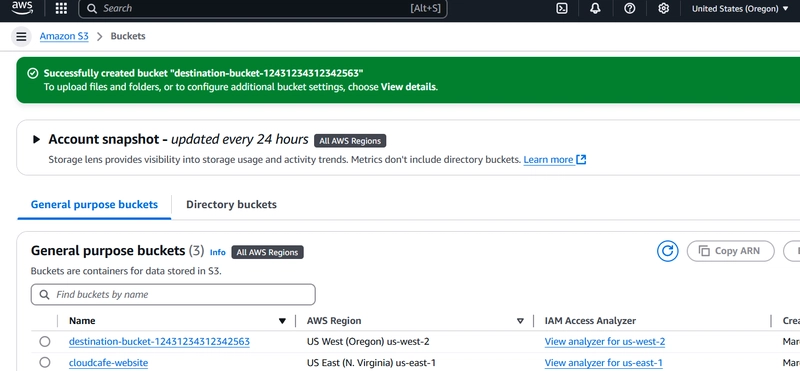
- Create a new S3 bucket in a different AWS region.
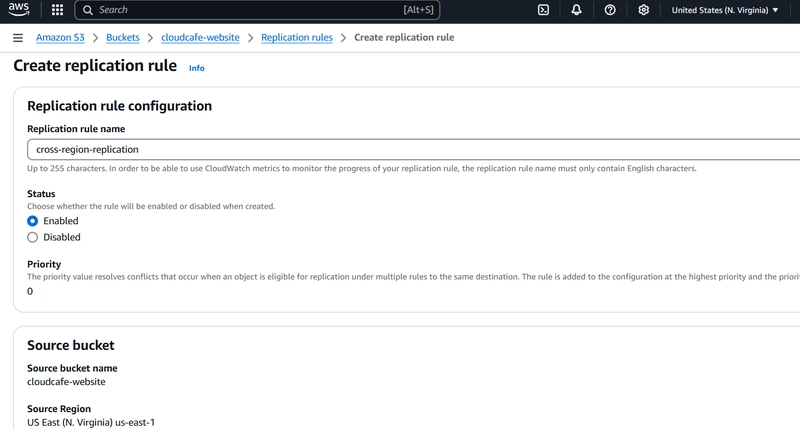
In the S3 console, navigate to the Replication section under Management.
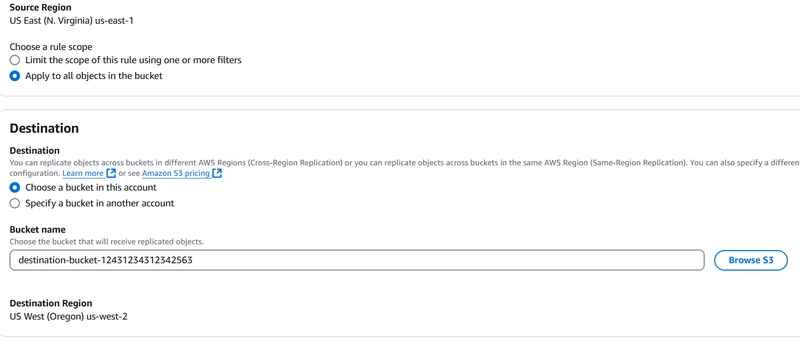
Click Create replication rule and select the destination bucket.
Enable Versioning on both the source and destination buckets.
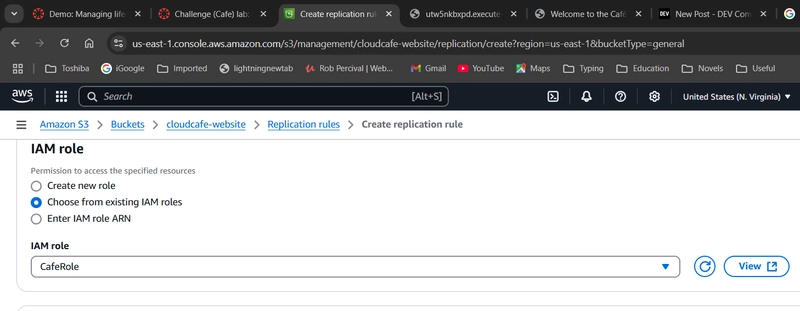
Choose IAM roles to allow AWS to manage the replication process.
- Save and activate the rule.
Conclusion
By following these steps, you can successfully create a static website for a cafe using AWS. This approach provides a scalable, secure, and cost-efficient solution for small businesses that need an online presence without the complexity of managing backend servers.
Next Steps:
Add a contact form using AWS Lambda and API Gateway.
Explore serverless functions for dynamic features like online orders.
Optimize images and assets for faster loading speeds.
Let me know if you have any questions or share your experience setting up an AWS static site!


![[The AI Show Episode 142]: ChatGPT’s New Image Generator, Studio Ghibli Craze and Backlash, Gemini 2.5, OpenAI Academy, 4o Updates, Vibe Marketing & xAI Acquires X](https://www.marketingaiinstitute.com/hubfs/ep%20142%20cover.png)




![[FREE EBOOKS] The Kubernetes Bible, The Ultimate Linux Shell Scripting Guide & Four More Best Selling Titles](https://www.javacodegeeks.com/wp-content/uploads/2012/12/jcg-logo.jpg)


![From drop-out to software architect with Jason Lengstorf [Podcast #167]](https://cdn.hashnode.com/res/hashnode/image/upload/v1743796461357/f3d19cd7-e6f5-4d7c-8bfc-eb974bc8da68.png?#)


.png?#)


.jpg?#)


 (1).webp?#)


_Christophe_Coat_Alamy.jpg?#)




![Rapidus in Talks With Apple as It Accelerates Toward 2nm Chip Production [Report]](https://www.iclarified.com/images/news/96937/96937/96937-640.jpg)


