Creating a Simple Website Blocking Extension
In this article, we will learn how to create a simple website blocking extension, similar to an ad blocker, using JavaScript and the Chrome Extensions API. The extension will block unwanted ads and trackers, improving your browsing experience. Project Structure Before we start coding, let's define the structure of our project: 1. Creating the manifest.json The manifest.json file is the heart of your extension. It contains information about the extension, such as its name, version, permissions, and the files it uses. Here is an example of what your manifest.json should look like: { "name": "Extensao_exemplo", "version": "1.0", "description": "Extensao_exemplo chrome extension", "permissions": ["webRequest", "webRequestBlocking", ""], "background": { "service_worker": "background.js" }, "icons": { "16": "icons/logo_16.png", "48": "icons/logo_48.png", "128": "icons/logo_128.png" }, "manifest_version": 3 } 2. Creating the background.js The background.js file contains the logic that will block unwanted sites. Here is an example of code you can use: const defaultFilters = [ "*://*.doubleclick.net/*", "*://partner.googleadservices.com/*", "*://*.googlesyndication.com/*", "*://*.google-analytics.com/*", "*://creative.ak.fbcdn.net/*", "*://*.adbrite.com/*", "*://*.exponential.com/*", "*://*.quantserve.com/*", "*://*.scorecardresearch.com/*", "*://*.zedo.com/*", "*://*.facebook.com/*", "*://*.instagram.com/*", ]; async function addBlacklist() { const response = await fetch("my_addres_URL"); const text = await response.text(); const blacklist = text.split('\n').filter(line => line && !line.startsWith('#')); const combinedFilters = [...defaultFilters, ...blacklist]; chrome.webRequest.onBeforeRequest.addListener( function(details) { return { cancel: true }; }, { urls: combinedFilters }, ["blocking"] ); } addBlacklist(); 3. Creating the Icons To give your extension a professional appearance, you will need icons. Create a folder called icons and add three images with the following dimensions: logo_16.png (16x16 pixels) logo_48.png (48x48 pixels) logo_128.png (128x128 pixels) You can use tools like Canva or GIMP to create your icons, or use my simple resizer that I made using Python: Redimensionador 4. Installing the Extension in Chrome Now that you have all the files ready, follow the steps below to install your extension in Chrome: Open Chrome and go to chrome://extensions/. Enable "Developer mode" in the upper right corner. Click on "Load unpacked" and select the Extensao_exemplo folder. Your extension should appear in the list, and you can test it! 5. Testing the Extension After installation, browse to sites that you know contain ads or trackers. The extension should block these sites as defined in the filter lists. Considerations for Other Browsers If you wish to use the extension in other browsers like Brave, Firefox, or Edge, it is important to note that: Brave: The extension should work normally, as it is based on Chromium. Firefox: You may need to adjust some permissions and APIs, as Firefox uses a different version of the extensions API. Edge: Like Brave, Edge is also based on Chromium, so installation should be similar to Chrome. Make sure to check the specific documentation for each browser to ensure compatibility.

In this article, we will learn how to create a simple website blocking extension, similar to an ad blocker, using JavaScript and the Chrome Extensions API. The extension will block unwanted ads and trackers, improving your browsing experience.
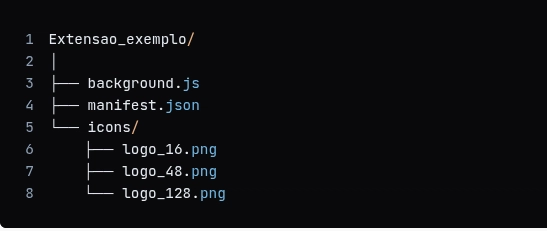
Project Structure
Before we start coding, let's define the structure of our project:
1. Creating the manifest.json
The manifest.json file is the heart of your extension. It contains information about the extension, such as its name, version, permissions, and the files it uses. Here is an example of what your manifest.json should look like:
{
"name": "Extensao_exemplo",
"version": "1.0",
"description": "Extensao_exemplo chrome extension",
"permissions": ["webRequest", "webRequestBlocking", "
"background": {
"service_worker": "background.js"
},
"icons": {
"16": "icons/logo_16.png",
"48": "icons/logo_48.png",
"128": "icons/logo_128.png"
},
"manifest_version": 3
}
2. Creating the background.js
The background.js file contains the logic that will block unwanted sites. Here is an example of code you can use:
const defaultFilters = [

    "*://*.doubleclick.net/*",

    "*://partner.googleadservices.com/*",

    "*://*.googlesyndication.com/*",

    "*://*.google-analytics.com/*",

    "*://creative.ak.fbcdn.net/*",

    "*://*.adbrite.com/*",

    "*://*.exponential.com/*",

    "*://*.quantserve.com/*",

    "*://*.scorecardresearch.com/*",

    "*://*.zedo.com/*",

    "*://*.facebook.com/*",

    "*://*.instagram.com/*",

];

async function addBlacklist() {

    const response = await fetch("my_addres_URL");

    const text = await response.text();

    const blacklist = text.split('\n').filter(line => line && !line.startsWith('#'));

    const combinedFilters = [...defaultFilters, ...blacklist];

    chrome.webRequest.onBeforeRequest.addListener(

        function(details) { return { cancel: true }; },

        { urls: combinedFilters },

        ["blocking"]

    );

}

addBlacklist();
3. Creating the Icons
To give your extension a professional appearance, you will need icons. Create a folder called icons and add three images with the following dimensions:
logo_16.png (16x16 pixels)
logo_48.png (48x48 pixels)
logo_128.png (128x128 pixels)
You can use tools like Canva or GIMP to create your icons, or use my simple resizer that I made using Python: Redimensionador
4. Installing the Extension in Chrome
Now that you have all the files ready, follow the steps below to install your extension in Chrome:
Open Chrome and go to chrome://extensions/.
Enable "Developer mode" in the upper right corner.
Click on "Load unpacked" and select the Extensao_exemplo folder.
Your extension should appear in the list, and you can test it!
5. Testing the Extension
After installation, browse to sites that you know contain ads or trackers. The extension should block these sites as defined in the filter lists.
Considerations for Other Browsers
If you wish to use the extension in other browsers like Brave, Firefox, or Edge, it is important to note that:
Brave: The extension should work normally, as it is based on Chromium.
Firefox: You may need to adjust some permissions and APIs, as Firefox uses a different version of the extensions API.
Edge: Like Brave, Edge is also based on Chromium, so installation should be similar to Chrome.
Make sure to check the specific documentation for each browser to ensure compatibility.


![[The AI Show Episode 142]: ChatGPT’s New Image Generator, Studio Ghibli Craze and Backlash, Gemini 2.5, OpenAI Academy, 4o Updates, Vibe Marketing & xAI Acquires X](https://www.marketingaiinstitute.com/hubfs/ep%20142%20cover.png)


![[FREE EBOOKS] The Kubernetes Bible, The Ultimate Linux Shell Scripting Guide & Four More Best Selling Titles](https://www.javacodegeeks.com/wp-content/uploads/2012/12/jcg-logo.jpg)


![From drop-out to software architect with Jason Lengstorf [Podcast #167]](https://cdn.hashnode.com/res/hashnode/image/upload/v1743796461357/f3d19cd7-e6f5-4d7c-8bfc-eb974bc8da68.png?#)


.png?#)


.jpg?#)


 (1).webp?#)


_Christophe_Coat_Alamy.jpg?#)


![Rapidus in Talks With Apple as It Accelerates Toward 2nm Chip Production [Report]](https://www.iclarified.com/images/news/96937/96937/96937-640.jpg)


