


![[The AI Show Episode 142]: ChatGPT’s New Image Generator, Studio Ghibli Craze and Backlash, Gemini 2.5, OpenAI Academy, 4o Updates, Vibe Marketing & xAI Acquires X](https://www.marketingaiinstitute.com/hubfs/ep%20142%20cover.png)


![From drop-out to software architect with Jason Lengstorf [Podcast #167]](https://cdn.hashnode.com/res/hashnode/image/upload/v1743796461357/f3d19cd7-e6f5-4d7c-8bfc-eb974bc8da68.png?#)


.png?#)


_Christophe_Coat_Alamy.jpg?#)
 (1).webp?#)


![Apple Considers Delaying Smart Home Hub Until 2026 [Gurman]](https://www.iclarified.com/images/news/96946/96946/96946-640.jpg)
![iPhone 17 Pro Won't Feature Two-Toned Back [Gurman]](https://www.iclarified.com/images/news/96944/96944/96944-640.jpg)
![Tariffs Threaten Apple's $999 iPhone Price Point in the U.S. [Gurman]](https://www.iclarified.com/images/news/96943/96943/96943-640.jpg)


Building a Multi-Step Form with Laravel, Livewire, and MongoDB
This article was wriiten by Moses Anumadu. In modern-day applications, there is often a need to collect user data through forms. When many details are required from users, the form can be very long and look messy. This often leads to a bad user experience and a high bounce rate from the application. A simple solution to this is creating multi-step forms. This tutorial will build a multi-step form using MongoDB, Laravel, and Laravel Livewire. For this tutorial, we are using MongoDB as our database because it stores data in nested form, document-based model, and has a flexible schema. MongoDB does not need many tables and relationships like a typical relational database would. Also, it does not require creating migrations. If you know nothing about MongoDB, you can read our Getting Started docs for more. Livewire, on the other hand, is a full-stack Laravel framework that enables developers to build dynamic interfaces easily without the need to write extensive JavaScript code. Livewire is easy to use and uses Laravel syntax. Check out the Laravel documentation to get started with Livewire. With that said, let's get started. Prerequisites To follow along with this tutorial, the following are required: Global installation of PHP and Composer MongoDB PHP Driver A free MongoDB Atlas cluster NPM Prior Laravel knowledge Prior Livewire knowledge Familiarity with MongoDB and NoSQL databases Environment setup Before proceeding, ensure that you have the MongoDB PHP Driver installed in the development environment so that MongoDB can work effectively. To verify, run the command below: php -i | grep mongo The expected output should look similar to the image below: If you have a different output, it means you probably do not have the MongoDB PHP Driver installed. To install it, visit the MongoDB extension for detailed instructions on how to install it. Also, ensure that you have PHP and Composer installed before proceeding. Project setup Let's get started building our multi-step form by creating a fresh Laravel project. We can do this using the command below: composer create-project laravel/laravel multi_step_form_tutorial After creating the Laravel project, we need to configure the application to work with MongoDB. Laravel does not come configured to work with MongoDB out of the box. We must install and configure the Laravel-MongoDB package to get it to work. So, let's get started by installing the Laravel-mongodb package using the command below: composer require mongodb/laravel-mongodb After successfully installing the Laravel-MongoDB package, we need to adjust some of the configuration in the config/database.php file to get it to work. You can do that by adding the code below: 'mongodb' => [ 'driver' => 'mongodb', 'dsn' => env('MONGODB_URI'), 'database' => 'YOUR_DATABASE_NAME', ], Let's take a moment to explain. The dsn value is obtained from the .env file. In your .env file, create a value for MONGODB_URI and set it to the value of your MongoDB Atlas connection string, like below: MONGODB_URI="" DB_CONNECTION=mongodb Set up Livewire Let's proceed to install and configure Livewire to work in our application. We first need to install Livewire using the command: composer require livewire/livewire After installing Livewire, we need to import it into the app. To keep things organized, let's create a layout file and make it a Blade component file. If Blade templates sound new to you, check out the Laravel documentation to get started. You can also get a deeper dive into Blade custom directives. With that said, let's generate our Blade template using the artisan command below: php artisan make:component layouts/App This will generate two files: app/View/Components/layouts/App.php and resources/views/components/layouts/app.blade.php. Open resources/views/components/layouts/app.blade.php and replace the content of the page with the code below: Multi-Step Form @vite(['resources/css/app.css', 'resources/js/app.js']) {{-- If using Vite --}} @livewireStyles {{ $slot ?? '' }} @livewireScripts From the code above, we added the HTML layout for the layout file. We also imported Livewire using @livewireStyles and @livewireScripts. This makes Livewire available on any page with this layout. Before we create the Livewire multi-form component, let's ensure that the database configuration works correctly. To do this, we need to create a route in routes/web.php to ping our MongoDB Atlas cluster and ensure things are set up correctly. Navigate to routes/web.php and add the following code snippet below the existing code on the page: use Illuminate\Http\Request; use Illuminate\Support\Facades\DB; Route::get('/ping', function (Request $request) { $connection = DB::connection('mongodb'); try { $connection->command(['ping' => 1]); $msg = 'MongoDB is accessible!'; } catch (Exception $e) { $msg = 'You are
This article was wriiten by Moses Anumadu.
In modern-day applications, there is often a need to collect user data through forms. When many details are required from users, the form can be very long and look messy. This often leads to a bad user experience and a high bounce rate from the application. A simple solution to this is creating multi-step forms.
This tutorial will build a multi-step form using MongoDB, Laravel, and Laravel Livewire.
For this tutorial, we are using MongoDB as our database because it stores data in nested form, document-based model, and has a flexible schema. MongoDB does not need many tables and relationships like a typical relational database would. Also, it does not require creating migrations. If you know nothing about MongoDB, you can read our Getting Started docs for more.
Livewire, on the other hand, is a full-stack Laravel framework that enables developers to build dynamic interfaces easily without the need to write extensive JavaScript code.
Livewire is easy to use and uses Laravel syntax. Check out the Laravel documentation to get started with Livewire.
With that said, let's get started.
Prerequisites
To follow along with this tutorial, the following are required:
- Global installation of PHP and Composer
- MongoDB PHP Driver
- A free MongoDB Atlas cluster
- NPM
- Prior Laravel knowledge
- Prior Livewire knowledge
- Familiarity with MongoDB and NoSQL databases
Environment setup
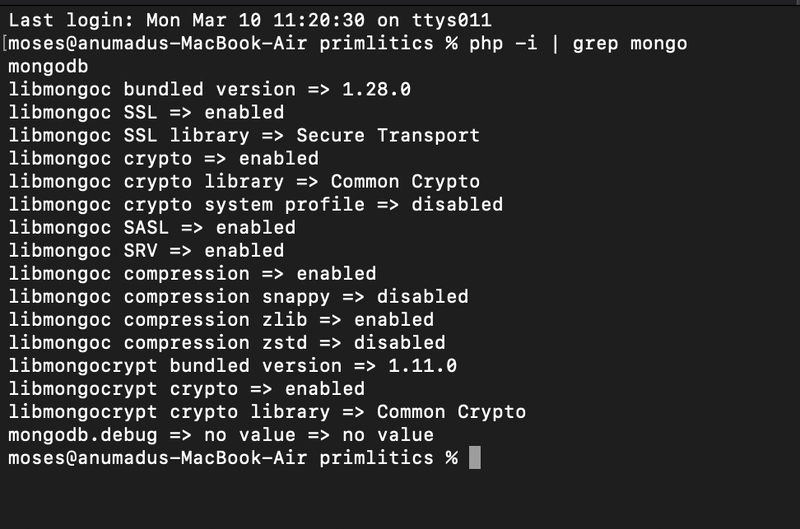
Before proceeding, ensure that you have the MongoDB PHP Driver installed in the development environment so that MongoDB can work effectively. To verify, run the command below:
php -i | grep mongo
The expected output should look similar to the image below:
If you have a different output, it means you probably do not have the MongoDB PHP Driver installed. To install it, visit the MongoDB extension for detailed instructions on how to install it.
Also, ensure that you have PHP and Composer installed before proceeding.
Project setup
Let's get started building our multi-step form by creating a fresh Laravel project. We can do this using the command below:
composer create-project laravel/laravel multi_step_form_tutorial
After creating the Laravel project, we need to configure the application to work with MongoDB. Laravel does not come configured to work with MongoDB out of the box. We must install and configure the Laravel-MongoDB package to get it to work. So, let's get started by installing the Laravel-mongodb package using the command below:
composer require mongodb/laravel-mongodb
After successfully installing the Laravel-MongoDB package, we need to adjust some of the configuration in the config/database.php file to get it to work. You can do that by adding the code below:
'mongodb' => [
'driver' => 'mongodb',
'dsn' => env('MONGODB_URI'),
'database' => 'YOUR_DATABASE_NAME',
],
Let's take a moment to explain. The dsn value is obtained from the .env file. In your .env file, create a value for MONGODB_URI and set it to the value of your MongoDB Atlas connection string, like below:
MONGODB_URI="<>"
DB_CONNECTION=mongodb
Set up Livewire
Let's proceed to install and configure Livewire to work in our application. We first need to install Livewire using the command:
composer require livewire/livewire
After installing Livewire, we need to import it into the app. To keep things organized, let's create a layout file and make it a Blade component file. If Blade templates sound new to you, check out the Laravel documentation to get started. You can also get a deeper dive into Blade custom directives. With that said, let's generate our Blade template using the artisan command below:
php artisan make:component layouts/App
This will generate two files: app/View/Components/layouts/App.php and resources/views/components/layouts/app.blade.php. Open resources/views/components/layouts/app.blade.php and replace the content of the page with the code below:
 lang="en">

 charset="UTF-8">
 name="viewport" content="width=device-width, initial-scale=1.0">
</span>Multi-Step Form<span class="nt">
@vite(['resources/css/app.css', 'resources/js/app.js']) {{-- If using Vite --}}
@livewireStyles

 class="bg-gray-100">
 class="container mx-auto mt-10">
{{ $slot ?? '' }}