


![[The AI Show Episode 144]: ChatGPT’s New Memory, Shopify CEO’s Leaked “AI First” Memo, Google Cloud Next Releases, o3 and o4-mini Coming Soon & Llama 4’s Rocky Launch](https://www.marketingaiinstitute.com/hubfs/ep%20144%20cover.png)


![Is this too much for a modular monolith system? [closed]](https://i.sstatic.net/pYL1nsfg.png)


_Andreas_Prott_Alamy.jpg?width=1280&auto=webp&quality=80&disable=upscale#)


![What features do you get with Gemini Advanced? [April 2025]](https://i0.wp.com/9to5google.com/wp-content/uploads/sites/4/2024/02/gemini-advanced-cover.jpg?resize=1200%2C628&quality=82&strip=all&ssl=1)


![Apple Shares Official Trailer for 'Long Way Home' Starring Ewan McGregor and Charley Boorman [Video]](https://www.iclarified.com/images/news/97069/97069/97069-640.jpg)
![Apple Watch Series 10 Back On Sale for $299! [Lowest Price Ever]](https://www.iclarified.com/images/news/96657/96657/96657-640.jpg)
![EU Postpones Apple App Store Fines Amid Tariff Negotiations [Report]](https://www.iclarified.com/images/news/97068/97068/97068-640.jpg)
![Apple Slips to Fifth in China's Smartphone Market with 9% Decline [Report]](https://www.iclarified.com/images/news/97065/97065/97065-640.jpg)


Backstage for the win!
Backstage is an open platform for building developer portals, created by Spotify and now an incubating project under the Cloud Native Computing Foundation (CNCF). It aims to streamline the developer experience by centralizing tools, services, documentation, and infrastructure into a single, cohesive interface. Whether you are managing hundreds of microservices or just want a clean, developer-friendly interface for your internal tooling, Backstage provides the building blocks to make it happen. This blog walks you through the practical process of standing up a working Backstage instance from scratch. We will cover: Creating and configuring a Backstage app Setting up a PostgreSQL database for Backstage to use Setting up authentication with GitHub By the end of this guide, you will have a local Backstage instance that you can share with your friends. Prerequisites Before we get started, make sure your development environment meets the following requirements: Access to a Unix-based operating system, such as Linux, MacOS, or Windows Subsystem for Linux A GNU-like build environment available at the command line. For example, on Debian/Ubuntu you will want to have the make and build-essential packages installed. On MacOS, you will want to run xcode-select --install to get the Xcode command line build tooling in place. curl or Wget Node.js Active LTS Release We recommend using nvm for this: Install nvm Install Node with nvm Yarn for dependency management You will need to use Yarn Classic to create a new project, but it can then be migrated to Yarn 3 Git for source control Great, now that we have some housekeeping done. Let us dive in! Creating a Backstage Application To create a new Backstage standalone application, we’ll use npx, a command-line tool that comes bundled with Node.js. It allows you to execute packages directly from the npm registry without needing to install them globally. Before running the command, let us break down what it actually does. When you run the Backstage app creation wizard, it will: Prompt you to enter a name for your application Create a new directory using that name in your current working directory Scaffold a complete Backstage project inside that directory with all the necessary configuration and code structure to get started Project Structure Overview Here is a simplified view of the folder structure that gets generated: my-backstage-app/ ├── app-config.yaml ├── catalog-info.yaml ├── package.json └── packages/ ├── app/ └── backend/ Here is what each part of the structure represents: app-config.yaml: The main configuration file for your app. This is where you'll manage everything from plugins to authentication settings. catalog-info.yaml: Describes catalog entities (like systems, APIs, and components). See Catalog Descriptor Format to learn more. package.json: Root-level package configuration. Avoid adding dependencies here—most should live in specific workspaces under packages/. packages/: A monorepo-style workspace directory (managed via Lerna) containing separate packages: app/: The frontend React app, your developer portal UI. backend/: The backend service that powers features like authentication, catalog ingestion, software templates, and TechDocs. Now that you know what’s being created, let us go ahead and generate your Backstage app: npx @backstage/create-app@latest Follow the prompts to name your app, and the CLI will take care of the rest. Run the Backstage application At this point your Backstage application should be installed and ready to be run. You can go to the application directory and start the application, for example: cd my-backstage-app # your app name yarn start When you navigate to http://localhost:3000 to see your Backstage application, you should see: Setting Up PostgreSQL with Backstage At this point, we want to ensure PostgreSQL is installed, initialized, and ready for use with our Backstage app on any operating system. Backstage offers SQLite, an in-memory database, for easy local setup with no external dependencies. SQLite is a great way to kick the tires, but it is recommended to set up PostgreSQL. Backstage uses the Knex database library under the covers, which supports many popular databases. First, let us stop Backstage before we continue by pressing Control-C. Configure Backstage (app-config.local.yaml) backend: database: client: pg connection: host: localhost port: 5432 user: postgres password: secret Linux Fedora / RHEL / CentOS / AlmaLinux / Rocky Linux sudo dnf install postgresql-server postgresql-contrib sudo postgresql-setup --initdb sudo systemctl enable --now postgresql Then set a password: sudo -u postgres psql ALTER USER postgres PASSWORD 'secret'; \q Ubuntu / Debian
Backstage is an open platform for building developer portals, created by Spotify and now an incubating project under the Cloud Native Computing Foundation (CNCF). It aims to streamline the developer experience by centralizing tools, services, documentation, and infrastructure into a single, cohesive interface. Whether you are managing hundreds of microservices or just want a clean, developer-friendly interface for your internal tooling, Backstage provides the building blocks to make it happen.
This blog walks you through the practical process of standing up a working Backstage instance from scratch. We will cover:
- Creating and configuring a Backstage app
- Setting up a PostgreSQL database for Backstage to use
- Setting up authentication with GitHub
By the end of this guide, you will have a local Backstage instance that you can share with your friends.
Prerequisites
Before we get started, make sure your development environment meets the following requirements:
- Access to a Unix-based operating system, such as Linux, MacOS, or Windows Subsystem for Linux
- A GNU-like build environment available at the command line. For example, on Debian/Ubuntu you will want to have the make and build-essential packages installed. On MacOS, you will want to run xcode-select --install to get the Xcode command line build tooling in place.
- curl or Wget
-
Node.js Active LTS Release
- We recommend using nvm for this:
- Install nvm
- Install Node with nvm
-
Yarn for dependency management
- You will need to use Yarn Classic to create a new project, but it can then be migrated to Yarn 3
- Git for source control
Great, now that we have some housekeeping done. Let us dive in!
Creating a Backstage Application
To create a new Backstage standalone application, we’ll use npx, a command-line tool that comes bundled with Node.js. It allows you to execute packages directly from the npm registry without needing to install them globally. Before running the command, let us break down what it actually does. When you run the Backstage app creation wizard, it will:
- Prompt you to enter a name for your application
- Create a new directory using that name in your current working directory
- Scaffold a complete Backstage project inside that directory with all the necessary configuration and code structure to get started
Project Structure Overview
Here is a simplified view of the folder structure that gets generated:
my-backstage-app/
├── app-config.yaml
├── catalog-info.yaml
├── package.json
└── packages/
    ├── app/
    └── backend/
Here is what each part of the structure represents:
-
app-config.yaml: The main configuration file for your app. This is where you'll manage everything from plugins to authentication settings. -
catalog-info.yaml: Describes catalog entities (like systems, APIs, and components). See Catalog Descriptor Format to learn more. -
package.json: Root-level package configuration. Avoid adding dependencies here—most should live in specific workspaces underpackages/. -
packages/: A monorepo-style workspace directory (managed via Lerna) containing separate packages:-
app/: The frontend React app, your developer portal UI. -
backend/: The backend service that powers features like authentication, catalog ingestion, software templates, and TechDocs.
-
Now that you know what’s being created, let us go ahead and generate your Backstage app:
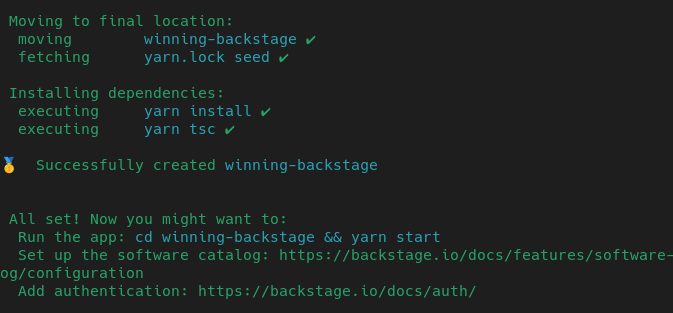
npx @backstage/create-app@latest
Follow the prompts to name your app, and the CLI will take care of the rest.
Run the Backstage application
At this point your Backstage application should be installed and ready to be run. You can go to the application directory and start the application, for example:
cd my-backstage-app # your app name
yarn start
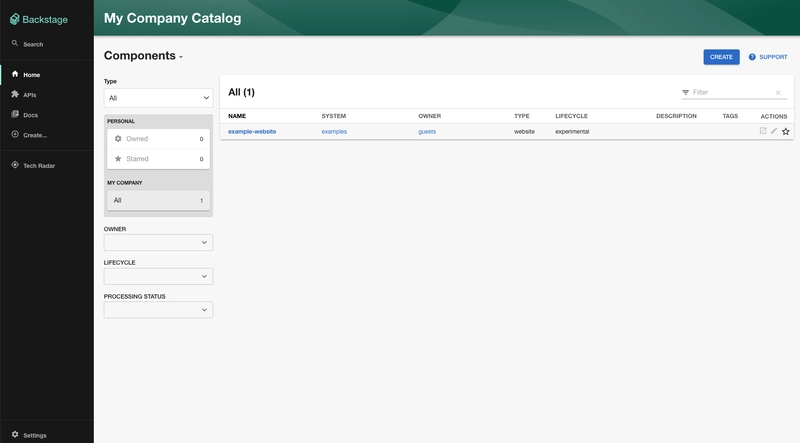
When you navigate to http://localhost:3000 to see your Backstage application, you should see:
Setting Up PostgreSQL with Backstage
At this point, we want to ensure PostgreSQL is installed, initialized, and ready for use with our Backstage app on any operating system. Backstage offers SQLite, an in-memory database, for easy local setup with no external dependencies. SQLite is a great way to kick the tires, but it is recommended to set up PostgreSQL. Backstage uses the Knex database library under the covers, which supports many popular databases.
First, let us stop Backstage before we continue by pressing Control-C.
Configure Backstage (app-config.local.yaml)
backend:
  database:
    client: pg
    connection:
      host: localhost
      port: 5432
      user: postgres
      password: secret
Linux
Fedora / RHEL / CentOS / AlmaLinux / Rocky Linux
sudo dnf install postgresql-server postgresql-contrib
sudo postgresql-setup --initdb
sudo systemctl enable --now postgresql
Then set a password:
sudo -u postgres psql
ALTER USER postgres PASSWORD 'secret';
\q
Ubuntu / Debian
sudo apt update
sudo apt install postgresql postgresql-contrib
Then:
sudo -u postgres psql
ALTER USER postgres PASSWORD 'secret';
\q
PostgreSQL runs automatically on install. Confirm with:
sudo systemctl status postgresql
macOS
Using Homebrew (recommended)
brew update
brew install postgresql
brew services start postgresql@16
Set password:
psql postgres
ALTER USER postgres PASSWORD 'secret';
\q
You’re ready to go.
Windows
Using the PostgreSQL Installer
Download the installer from: https://www.enterprisedb.com/downloads/postgres-postgresql-downloads
Run the installer and select:
PostgreSQL version (e.g. 16)
Default user:
postgresSet your password (e.g.
secret)
- Finish setup and start the database service
You can use pgAdmin or psql.exe to connect:
psql -U postgres -h localhost -d postgres
Done.
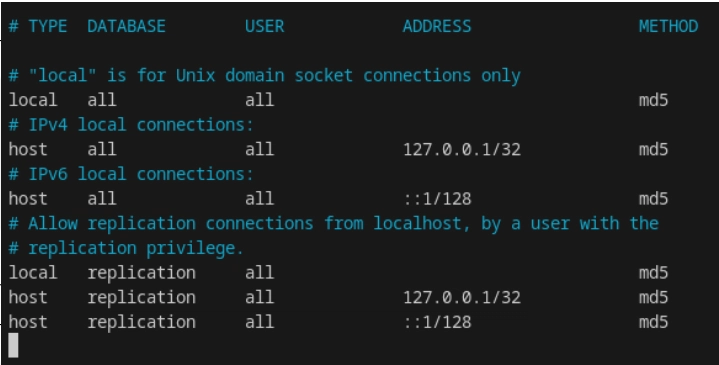
Make sure authentication is password-based (not ident/peer)
Edit pg_hba.conf:
| OS | Default location |
|---|---|
| Linux | /var/lib/pgsql/data/pg_hba.conf |
| Ubuntu | /etc/postgresql/ |
| macOS | /opt/homebrew/var/postgres/pg_hba.conf |
| Windows | %PROGRAMFILES%\PostgreSQL\ |
Update the file like this:
For example, on Linux:
sudo nano /var/lib/pgsql/data/pg_hba.conf
Replace all peer or ident entries with: md5
Then restart PostgreSQL:
# Linux (systemd)
sudo systemctl restart postgresql

# macOS (Homebrew)
brew services restart postgresql@16
Test it works
Try this from the terminal:
psql -U postgres -h 127.0.0.1 -d postgres
If it prompts for a password and connects, you’re ready
Start the app again:
yarn dev
The backend should connect and initialize all plugins.
Open in browser: http://localhost:3000
Verify DB connectivity inside Backstage
You should not see any startup errors like:
Failed to instantiate service 'core.database'
Backstage will use PostgreSQL to store catalog data, auth sessions, and more.
Setting up Authentication
Authentication is a core part of any internal developer portal, and Backstage offers a flexible, plugin-based system to integrate with your identity provider of choice. Whether your organization uses GitHub, GitLab, Google, Okta, or a custom solution, Backstage provides a consistent way to manage sign-in, issue tokens, and associate users with catalog entities.
In this guide, we'll focus on integrating with GitHub as our authentication provider, using Backstage's built-in GitHub auth provider. This allows developers to sign in using their GitHub credentials and enables features like ownership mapping and permission-aware visibility across the portal.
Go to https://github.com/settings/applications/new to create your OAuth App.
-
Homepage URLshould point to Backstage's frontend, in our tutorial it would behttp://localhost:3000 -
Authorization callback URLshould point to the auth backend,http://localhost:7007/api/auth/github/handler/frame
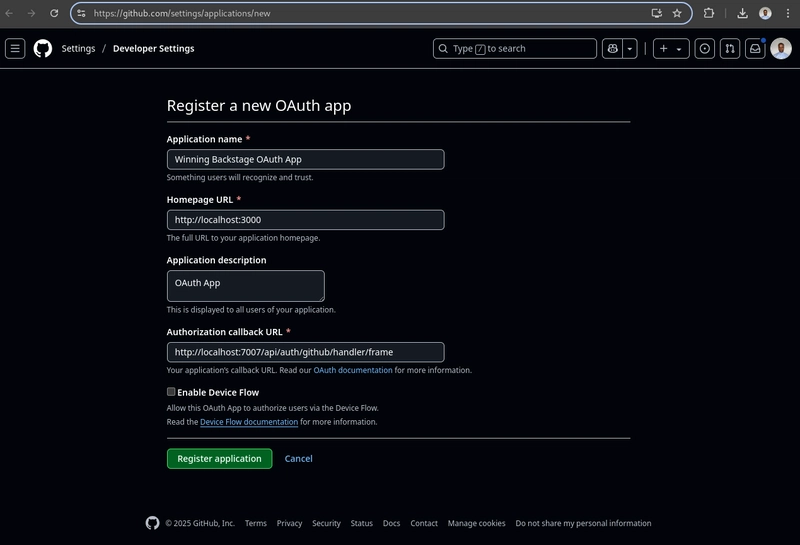
Generate a new Client Secret and take a note of the Client ID and the Client Secret.
With your OAuth app registered in GitHub, it’s time to wire up authentication in your Backstage instance. This involves two key steps:
- Adding your GitHub OAuth credentials to the
app-config.yaml - Updating the sign-in page logic in your
App.tsxto use the GitHub provider
1. Add GitHub OAuth Credentials to app-config.yaml
Open the app-config.yaml file at the root of your project (created automatically during app generation). This file is used to override the default configuration in a local development environment. Append the following:
auth:
# see
guest: {}
github:
development:
clientId: YOUR CLIENT ID
clientSecret: YOUR CLIENT SECRET
signIn:
resolvers:
# Matches the GitHub username with the Backstage user entity name.
# See for more resolvers.
- resolver: usernameMatchingUserEntityName
Replace YOUR_CLIENT_ID and YOUR_CLIENT_SECRET with the values from your GitHub OAuth App. Backstage will automatically reload configuration changes on save. If no errors appear in your terminal, you're good to go.
2. Customize the Sign-In Page in App.tsx
Next, we’ll tell Backstage to use GitHub as the sign-in method.
Open the packages/app/src/App.tsx file in your favorite editor.
Just below the final import line, add the following:
import { githubAuthApiRef } from '@backstage/core-plugin-api';
Now, locate the createApp function call and look for the components section. Add or modify the SignInPage definition like this:
components: {
SignInPage: props => (
This configures Backstage to present users with a sign-in screen offering both GitHub login. The default Backstage setup includes a guest Sign-In Resolver. This resolver assigns all users a shared identity (guest) and is designed for quick local setup or sandbox exploration. In a production environment, you’ll want to replace or disable it in favor of real user identity mapping. To learn more, check out the Backstage Auth documentation and the section on Sign-In Resolvers.
With the frontend configured to support both GitHub, we now need to ensure the backend knows how to handle those authentication flows. Backstage's createBackend() system makes this easy. You don't need to manually wire up auth routes, instead, you just declare the auth modules you want to use.
To add the auth provider to the backend, we will first need to install the package by running this command:
yarn --cwd packages/backend add @backstage/plugin-auth-backend-module-github-provider
Open packages/backend/src/index.ts and locate the section where backend plugins are registered. To enable GitHub and Guest authentication, add the following lines:
// auth plugin
backend.add(import('@backstage/plugin-auth-backend'));
// See
backend.add(import('@backstage/plugin-auth-backend-module-guest-provider'));
backend.add(import('@backstage/plugin-auth-backend-module-github-provider'));
Once those lines are in place, you may want to restart the backend using yarn start-backend, and then you can cancel if you wish and move forward.
We can add a User easily, the recommended approach for adding Users, and Groups, into your Catalog is to use one of the existing Org Entity Providers - like this one for GitHub - or if those don't work you may need to create one that fits your Organization's needs.
For the sake of this guide we'll simply step you though adding a User to the org.yaml file that is included when you create a new Backstage instance. Let's do that:
- First open the
/examples/org.yamlfile in your text editor of choice - At the bottom we'll add the following YAML:
---
apiVersion: backstage.io/v1alpha1
kind: User
metadata:
  name: YOUR GITHUB USERNAME
spec:
  memberOf: [guests]
- Now make sure to replace the text "YOUR GITHUB USERNAME" with your actual GitHub User name.
Just for Fun
Before we launch our newly wired-up Backstage app with GitHub authentication, let’s take a moment to make it feel like yours. Backstage is designed to be fully customizable, from layout and themes to branding, so let’s start with the basics: updating the app name, organization name, and logo.
Setting the Application and Organization Name
By default, the Backstage Catalog header reads “My Company Catalog.” Let’s swap that out for something more fitting for your team or project.
- Open the
app-config.yamlfile at the root of your project. - Locate the
appandorganizationblocks and edit them like this:
app:
  title: Winning Backstage

organization:
  name: Winning Backstage
-
app.title: Appears in the browser tab and in various places in the UI. -
organization.name: Appears in the Catalog header, as in "Rockit Rockets Catalog".
Note: app-config.local.yaml is already listed in your .gitignore, so it’s safe to include secrets and tokens there. But general branding like this should go in the main app-config.yaml.
Optional: Updating the Logo
Want to go a step further and give Backstage a visual identity?
- Open
packages/app/src/components/Root.tsx - You’ll find these imports near the top:
import { LogoFull, LogoIcon } from './components/Logo';
These are the logo components used in the header and sidebar.
- To update the branding:
- Replace the SVGs or React components used in
LogoFullandLogoIcon. - You can either modify the existing files or point to new components you've created.
- Replace the SVGs or React components used in
This allows you to drop in your own company logo, project branding, or any other personalized touch. To apply your changes, restart the development server:
yarn dev
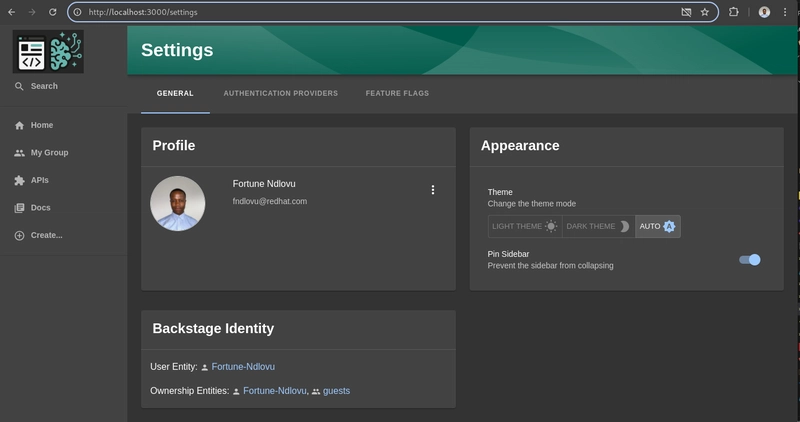
Navigate to your Backstage app in the browser and you should see the application name updated and your GitHub Authentication implemented:
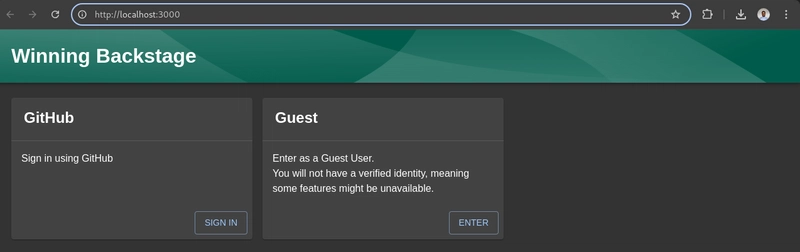
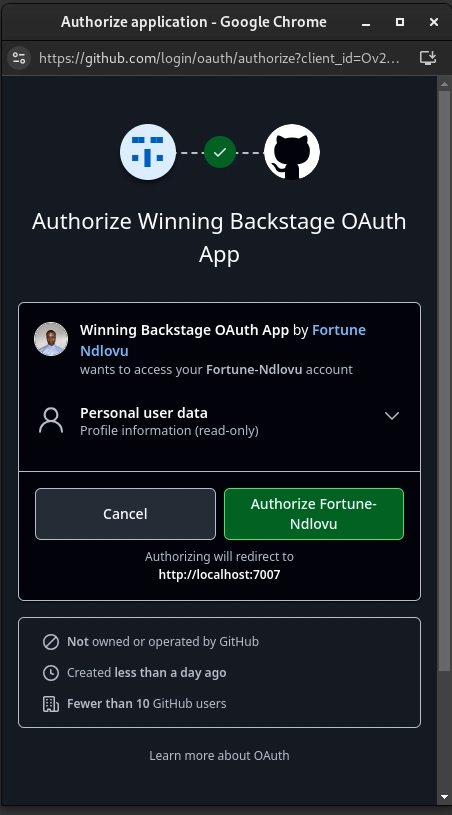
Next, sign in with GitHub and follow the authorization process:
Well done, you are now a Backstage expert. Continue experting!
To learn more about Backstage, visit https://backstage.io/