


![[Webinar] AI Is Already Inside Your SaaS Stack — Learn How to Prevent the Next Silent Breach](https://blogger.googleusercontent.com/img/b/R29vZ2xl/AVvXsEiOWn65wd33dg2uO99NrtKbpYLfcepwOLidQDMls0HXKlA91k6HURluRA4WXgJRAZldEe1VReMQZyyYt1PgnoAn5JPpILsWlXIzmrBSs_TBoyPwO7hZrWouBg2-O3mdeoeSGY-l9_bsZB7vbpKjTSvG93zNytjxgTaMPqo9iq9Z5pGa05CJOs9uXpwHFT4/s1600/ai-cyber.jpg?#)


![[The AI Show Episode 144]: ChatGPT’s New Memory, Shopify CEO’s Leaked “AI First” Memo, Google Cloud Next Releases, o3 and o4-mini Coming Soon & Llama 4’s Rocky Launch](https://www.marketingaiinstitute.com/hubfs/ep%20144%20cover.png)


![Rogue Company Elite tier list of best characters [April 2025]](https://media.pocketgamer.com/artwork/na-33136-1657102075/rogue-company-ios-android-tier-cover.jpg?#)


_Andreas_Prott_Alamy.jpg?width=1280&auto=webp&quality=80&disable=upscale#)


![What’s new in Android’s April 2025 Google System Updates [U: 4/18]](https://i0.wp.com/9to5google.com/wp-content/uploads/sites/4/2025/01/google-play-services-3.jpg?resize=1200%2C628&quality=82&strip=all&ssl=1)


![Apple Watch Series 10 Back On Sale for $299! [Lowest Price Ever]](https://www.iclarified.com/images/news/96657/96657/96657-640.jpg)
![EU Postpones Apple App Store Fines Amid Tariff Negotiations [Report]](https://www.iclarified.com/images/news/97068/97068/97068-640.jpg)
![Apple Slips to Fifth in China's Smartphone Market with 9% Decline [Report]](https://www.iclarified.com/images/news/97065/97065/97065-640.jpg)


Automate Your EC2 Setup Using AWS CLI and User Data
When I first dove into AWS services, spinning up an EC2 instance server felt like an accomplishment in itself. But the real thrill? Watching that server configure itself automatically with no manual tinkering required. That’s when working with EC2 instances truly starts to feel like magic. In this article, we’ll build a basic Apache web server on an EC2 instance using AWS CLI and a simple Bash script. We’ll even verify that the webpage is live! Index 1. What You Will Build 2. Tools You will Need 3. User Data Script 4. Launching the Instance with User Data 5. Quick Steps to Follow 6. A Few Pro Tips 7. Business Use Case 8. Summary 1. What You Will Build We’ll launch an EC2 instance that: Automatically installs an Apache webserver (httpd). Starts the Apache service. Creates a basic webpage (index.html). This leaves the server ready for you to visit the public IP address and see the site live! 2. Tools You'll Need AWS CLI installed and configured (sudo yum install aws-cli -y and aws configure) An existing AWS Key Pair (for SSH, if needed) A Security Group that allows port 22 (SSH) and port 80 (HTTP) inbound 3. The User Data Script Here's the basic script we'll use: #!/bin/bash yum update -y yum install -y httpd systemctl start httpd systemctl enable httpd echo "Welcome to the World of Cloud Engineers!" > /var/www/html/index.html This Bash script: Updates packages Installs the Apache web server Starts and enables the web server Creates a basic HTML homepage 4. Launching the EC2 Instance with User Data Here's the AWS CLI Command: aws ec2 run-instances \ --image-id ami-0abcdef1234567890 \ --count 1 \ --instance-type t2.micro \ --key-name MyKeyPair \ --security-group-ids sg-0123456789abcdef0 \ --subnet-id subnet-0123456789abcdef0 \ --associate-public-ip-address \ --user-data file://setup-apache.sh ✅ Notice the important part: --user-data file://setup-apache.sh setup-apache.sh is a local file containing the script above. The file:// prefix tells AWS CLI to read the file and send it as base65-encoded user data. You use the --associate-public-ip-address to request that AWS automatically assigns a public IP address to your new EC2 instance when you launch it into a subnet that does not automatically assign public IPs by default. Note: You don't "get" the --associate-public-ip-address option from AWS; it's a flag you add manually into your CLI command when needed. 5. Quick Steps to Follow 5.1 - Create your script file: Command: nano setup-apache.sh Paste the bash script above into the file and save it. 5.2 - Make sure the file is saved in the same directory where you run your AWS CLI command. 5.3 Run the aws ec2 run-instances command with --user-data. 5.4 Wait for the instance to launch and initialize. 5.5 Get the public IP: Command: aws ec2 describe-instances --query 'Reservations[*].Instances[*].PublicIpAddress' --output text 5.6 Open your browser and visit: http:// ✅ You should see: "Welcome to the World of Cloud Engineers!" 6. A Few Pro Tips Keep your user data scripts simple especially if you’re just starting out. User data script only runs once the very first time the instance boots. If testing fails, check the instance's /var/log/cloud-init-output.log to debug. Make sure your security group allows HTTP traffic (port 80) or you won't see the webpage! 7. Business Use Case Instead of logging into the server every time to set things up manually, you can preload a script that runs the moment the instance boots for the first time. This saves time, reduces mistakes, and it falls in line with automation in the cloud. 8. Summary Using the AWS CLI and User Data field lets you automate an EC2 instance server setup without even logging into the instance. It’s a key feature to use for cloud engineers, DevOps, and anyone looking to build real-world cloud deployments. The Next time you launch an instance, give it a little brainpower using the User Data field, and save yourself a ton of setup time! Connect with me on LinkedIn to comment or share your experiences with using the AWS CLI. #30DaysLinuxChallenge #RedHatEnterpriseLinux #CloudWhistler #CloudEngineer #Linux #DevOps #RedHat #OpenSource #CloudComputing #WomenInTech

When I first dove into AWS services, spinning up an EC2 instance server felt like an accomplishment in itself. But the real thrill? Watching that server configure itself automatically with no manual tinkering required. That’s when working with EC2 instances truly starts to feel like magic.
In this article, we’ll build a basic Apache web server on an EC2 instance using AWS CLI and a simple Bash script. We’ll even verify that the webpage is live!
Index
1. What You Will Build
2. Tools You will Need
3. User Data Script
4. Launching the Instance with User Data
5. Quick Steps to Follow
6. A Few Pro Tips
7. Business Use Case
8. Summary
1. What You Will Build
- We’ll launch an EC2 instance that:
- Automatically installs an Apache webserver (httpd).
- Starts the Apache service.
- Creates a basic webpage (index.html).
This leaves the server ready for you to visit the public IP address and see the site live!
2. Tools You'll Need
- AWS CLI installed and configured
(
sudo yum install aws-cli -yandaws configure) - An existing AWS Key Pair (for SSH, if needed)
- A Security Group that allows port 22 (SSH) and port 80 (HTTP) inbound
3. The User Data Script
Here's the basic script we'll use:
#!/bin/bash
yum update -y
yum install -y httpd
systemctl start httpd
systemctl enable httpd
echo "Welcome to the World of Cloud Engineers!
" > /var/www/html/index.html
This Bash script:
- Updates packages
- Installs the Apache web server
- Starts and enables the web server
- Creates a basic HTML homepage
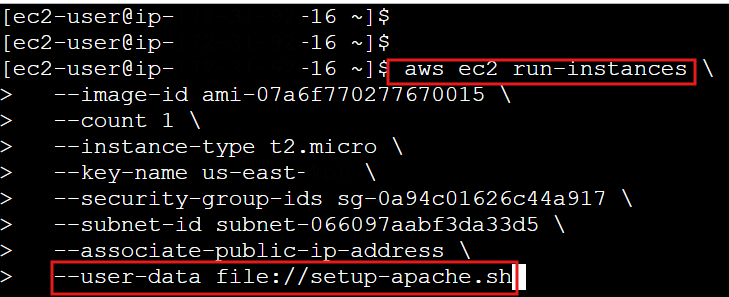
4. Launching the EC2 Instance with User Data
Here's the AWS CLI Command:
aws ec2 run-instances \
--image-id ami-0abcdef1234567890 \
--count 1 \
--instance-type t2.micro \
--key-name MyKeyPair \
--security-group-ids sg-0123456789abcdef0 \
--subnet-id subnet-0123456789abcdef0 \
--associate-public-ip-address \
--user-data file://setup-apache.sh
✅ Notice the important part:
--user-data file://setup-apache.sh
-
setup-apache.shis a local file containing the script above. - The
file://prefix tells AWS CLI to read the file and send it as base65-encoded user data. - You use the
--associate-public-ip-addressto request that AWS automatically assigns a public IP address to your new EC2 instance when you launch it into a subnet that does not automatically assign public IPs by default.
Note: You don't "get" the --associate-public-ip-address option from AWS; it's a flag you add manually into your CLI command when needed.
5. Quick Steps to Follow
5.1 - Create your script file:
Command:
nano setup-apache.sh
- Paste the bash script above into the file and save it.
5.2 - Make sure the file is saved in the same directory where you run your AWS CLI command.
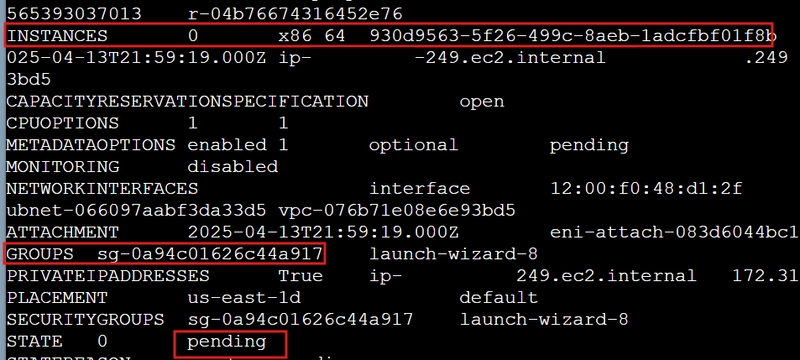
5.3 Run the aws ec2 run-instances command with --user-data.
5.4 Wait for the instance to launch and initialize.
5.5 Get the public IP:
Command:
aws ec2 describe-instances --query 'Reservations[*].Instances[*].PublicIpAddress' --output text

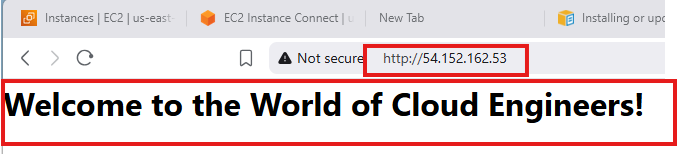
5.6 Open your browser and visit:
http://
✅ You should see: "Welcome to the World of Cloud Engineers!"
6. A Few Pro Tips
- Keep your user data scripts simple especially if you’re just starting out.
- User data script only runs once the very first time the instance boots.
- If testing fails, check the instance's /var/log/cloud-init-output.log to debug.
- Make sure your security group allows HTTP traffic (port 80) or you won't see the webpage!
7. Business Use Case
Instead of logging into the server every time to set things up manually, you can preload a script that runs the moment the instance boots for the first time. This saves time, reduces mistakes, and it falls in line with automation in the cloud.
8. Summary
Using the AWS CLI and User Data field lets you automate an EC2 instance server setup without even logging into the instance.
It’s a key feature to use for cloud engineers, DevOps, and anyone looking to build real-world cloud deployments.
The Next time you launch an instance, give it a little brainpower using the User Data field, and save yourself a ton of setup time!
Connect with me on LinkedIn to comment or share your experiences with using the AWS CLI.
#30DaysLinuxChallenge #RedHatEnterpriseLinux
#CloudWhistler #CloudEngineer #Linux
#DevOps #RedHat #OpenSource
#CloudComputing #WomenInTech