


![[The AI Show Episode 144]: ChatGPT’s New Memory, Shopify CEO’s Leaked “AI First” Memo, Google Cloud Next Releases, o3 and o4-mini Coming Soon & Llama 4’s Rocky Launch](https://www.marketingaiinstitute.com/hubfs/ep%20144%20cover.png)


![Is this too much for a modular monolith system? [closed]](https://i.sstatic.net/pYL1nsfg.png)


_Andreas_Prott_Alamy.jpg?width=1280&auto=webp&quality=80&disable=upscale#)


![What features do you get with Gemini Advanced? [April 2025]](https://i0.wp.com/9to5google.com/wp-content/uploads/sites/4/2024/02/gemini-advanced-cover.jpg?resize=1200%2C628&quality=82&strip=all&ssl=1)


![Apple Shares Official Trailer for 'Long Way Home' Starring Ewan McGregor and Charley Boorman [Video]](https://www.iclarified.com/images/news/97069/97069/97069-640.jpg)
![Apple Watch Series 10 Back On Sale for $299! [Lowest Price Ever]](https://www.iclarified.com/images/news/96657/96657/96657-640.jpg)
![EU Postpones Apple App Store Fines Amid Tariff Negotiations [Report]](https://www.iclarified.com/images/news/97068/97068/97068-640.jpg)
![Apple Slips to Fifth in China's Smartphone Market with 9% Decline [Report]](https://www.iclarified.com/images/news/97065/97065/97065-640.jpg)


Authentication without secrets to protect or public keys to distribute. Yay, nay or meh?
Kliento is a workload authentication protocol that brings the concept of Kubernetes- and GCP-style "service accounts" to the whole Internet in a vendor-neutral and decentralised way. I'm genuinely seeking feedback on this technology. After working at Auth0, I believe this could drastically simplify client and server authentication, but I need your insights—positive, negative or neutral—to decide whether to continue investing in it. Kliento is a small extension to VeraId, a protocol we originally built for humanitarian purposes. VeraId was independently audited and has an Internet-Draft: draft-narea-domainauth-00. The workload authentication problem Machine-to-machine authentication today typically relies on one of two approaches: API keys: Randomly generated strings that must be shared between client and server. These present ongoing management headaches and security risks if compromised. JWT-based authentication: Requires servers to maintain trusted public keys via JWKS endpoints or similar mechanisms, creating online dependencies and additional points of failure. Both approaches come with significant operational overhead—managing key rotation, handling revocation, ensuring secure distribution, and maintaining key registries. How Kliento solves the problem Kliento uses DNSSEC to embed the full chain of trust in the credentials, so servers won't have to query external systems during verification. Think of them as short-lived JWTs that can be verified entirely offline by the server. The key benefits: No shared secrets to protect: Credentials are issued based on existing workload identities (like GitHub Actions or GCP service accounts). No public keys to distribute or retrieve: The full verification chain is contained in the credential itself. Offline verification: Servers can verify credentials without network calls. Short-lived credentials: Tokens are valid for 60 minutes maximum, reducing the risk of compromise. Domain-based identities: Easy-to-understand, human-readable identifiers for workloads. Quick overview of VeraId Since Kliento is a small extension to the VeraId protocol, it's helpful to understand the basics. VeraId is a decentralised protocol that attributes digital content to domain names using a chain of trust that can be verified entirely offline. It establishes identity through domain names (e.g., example.com), verified via DNSSEC. Organisations create self-signed certificates, which then issue certificates to members (like alice@example.com or bots identified by the organisation's domain). A key innovation is packaging all verification information—DNSSEC proofs, certificate chains, and signatures—into self-contained bundles that require no external dependencies to verify. Kliento extends VeraId by defining a specific JSON structure for the signed content, transforming it into a client authentication token with audience and claims fields. Test drive Kliento on your computer This hands-on guide demonstrates how to set up a complete Kliento authentication system locally. You'll build both client and server components, configure your domain, obtain token bundles, and make authenticated requests between them. For educational purposes, I'll use low-level tools like curl rather than our existing high-level tooling to help you understand what's happening. This makes the walkthrough appear more complex than a typical Kliento integration would be in production. The bulk of this exercise involves configuring your domain name on VeraId Authority, which is technically optional, but it integrates natively with existing workload identities (e.g. GitHub, GCP) so it's the recommended approach to handle this use case. In a future where Kliento takes off, many clients won't even need to interact with VeraId Authority because the cloud provider could issue the token bundles directly. For example, GitHub workflows could get ids like your-repo@your-org.github.io. If you get stuck at any point, please leave comment below. Prerequisites A domain name you control. Docker Compose. Curl. jq. Please note that the commands in this tutorial have been tested on Linux and macOS. If you're using Windows, you'll need to adjust the commands accordingly (e.g. use curl.exe instead of curl). Lastly, we'll be creating new files, which you may want to do in a new temporary directory. 1. Enable DNSSEC on your domain Skip this step if you're using a domain name that is already DNSSEC-enabled. If your DNS hosting provider is the same as your registrar, the process may be as straightforward as ticking a box to enable DNSSEC. Otherwise, you'll have to copy the DNSSEC configuration from your DNS hosting provider to your registrar. You can use DNSSEC Analyzer to verify that your domain is correctly configured. Since it may take a few minutes for the DNS changes to propagate, you may want to continue with the rest of the guide and chec
Kliento is a workload authentication protocol that brings the concept of Kubernetes- and GCP-style "service accounts" to the whole Internet in a vendor-neutral and decentralised way.
I'm genuinely seeking feedback on this technology. After working at Auth0, I believe this could drastically simplify client and server authentication, but I need your insights—positive, negative or neutral—to decide whether to continue investing in it.
Kliento is a small extension to VeraId, a protocol we originally built for humanitarian purposes. VeraId was independently audited and has an Internet-Draft: draft-narea-domainauth-00.
The workload authentication problem
Machine-to-machine authentication today typically relies on one of two approaches:
- API keys: Randomly generated strings that must be shared between client and server. These present ongoing management headaches and security risks if compromised.
- JWT-based authentication: Requires servers to maintain trusted public keys via JWKS endpoints or similar mechanisms, creating online dependencies and additional points of failure.
Both approaches come with significant operational overhead—managing key rotation, handling revocation, ensuring secure distribution, and maintaining key registries.
How Kliento solves the problem
Kliento uses DNSSEC to embed the full chain of trust in the credentials, so servers won't have to query external systems during verification. Think of them as short-lived JWTs that can be verified entirely offline by the server.
The key benefits:
- No shared secrets to protect: Credentials are issued based on existing workload identities (like GitHub Actions or GCP service accounts).
- No public keys to distribute or retrieve: The full verification chain is contained in the credential itself.
- Offline verification: Servers can verify credentials without network calls.
- Short-lived credentials: Tokens are valid for 60 minutes maximum, reducing the risk of compromise.
- Domain-based identities: Easy-to-understand, human-readable identifiers for workloads.
Quick overview of VeraId
Since Kliento is a small extension to the VeraId protocol, it's helpful to understand the basics.
VeraId is a decentralised protocol that attributes digital content to domain names using a chain of trust that can be verified entirely offline. It establishes identity through domain names (e.g., example.com), verified via DNSSEC. Organisations create self-signed certificates, which then issue certificates to members (like alice@example.com or bots identified by the organisation's domain).
A key innovation is packaging all verification information—DNSSEC proofs, certificate chains, and signatures—into self-contained bundles that require no external dependencies to verify.
Kliento extends VeraId by defining a specific JSON structure for the signed content, transforming it into a client authentication token with audience and claims fields.
Test drive Kliento on your computer
This hands-on guide demonstrates how to set up a complete Kliento authentication system locally. You'll build both client and server components, configure your domain, obtain token bundles, and make authenticated requests between them.
For educational purposes, I'll use low-level tools like curl rather than our existing high-level tooling to help you understand what's happening. This makes the walkthrough appear more complex than a typical Kliento integration would be in production.
The bulk of this exercise involves configuring your domain name on VeraId Authority, which is technically optional, but it integrates natively with existing workload identities (e.g. GitHub, GCP) so it's the recommended approach to handle this use case.
In a future where Kliento takes off, many clients won't even need to interact with VeraId Authority because the cloud provider could issue the token bundles directly. For example, GitHub workflows could get ids like your-repo@your-org.github.io.
If you get stuck at any point, please leave comment below.
Prerequisites
- A domain name you control.
- Docker Compose.
- Curl.
-
jq.
Please note that the commands in this tutorial have been tested on Linux and macOS. If you're using Windows, you'll need to adjust the commands accordingly (e.g. use curl.exe instead of curl).
Lastly, we'll be creating new files, which you may want to do in a new temporary directory.
1. Enable DNSSEC on your domain
Skip this step if you're using a domain name that is already DNSSEC-enabled.
If your DNS hosting provider is the same as your registrar, the process may be as straightforward as ticking a box to enable DNSSEC. Otherwise, you'll have to copy the DNSSEC configuration from your DNS hosting provider to your registrar.
You can use DNSSEC Analyzer to verify that your domain is correctly configured. Since it may take a few minutes for the DNS changes to propagate, you may want to continue with the rest of the guide and check back later.
2. Implement the server
We'll implement a trivial Hono server that verifies Kliento token bundles and outputs the identifier of the client, as well as the claims in the token.
Save the following code in a file called server.js:
import { serve } from "@hono/node-server";
import { TokenBundle } from "@veraid/kliento";
import { Hono } from "hono";

const app = new Hono().get("/", async (context) => {
  const audience = context.req.url;

  const authHeader = context.req.header("Authorization");
  const tokenBundle = TokenBundle.deserialiseFromAuthHeader(authHeader);
  const result = await tokenBundle.verify(audience);
  return context.json(result);
});

serve({ fetch: app.fetch, port: 3000 });
The server above exposes a GET / endpoint that accepts an Authorization header with a Kliento token bundle, and requires the audience to be set to the URL of the request.
Next, create the package.json file with the following content:
{
  "name": "kliento-server",
  "version": "1.0.0",
  "type": "module",
  "dependencies": {
    "@hono/node-server": "^1.14.1",
    "@veraid/kliento-verifier": "^1.0.3"
  }
}
We're going to deploy it in a Docker container, so create the Dockerfile file with the following content:
FROM node:22.14.0-slim
WORKDIR /opt/kliento-server
COPY . ./
RUN npm install
CMD ["node", "server.js"]
EXPOSE 3000
We'll deploy this server in the next step when we also deploy VeraId Authority.
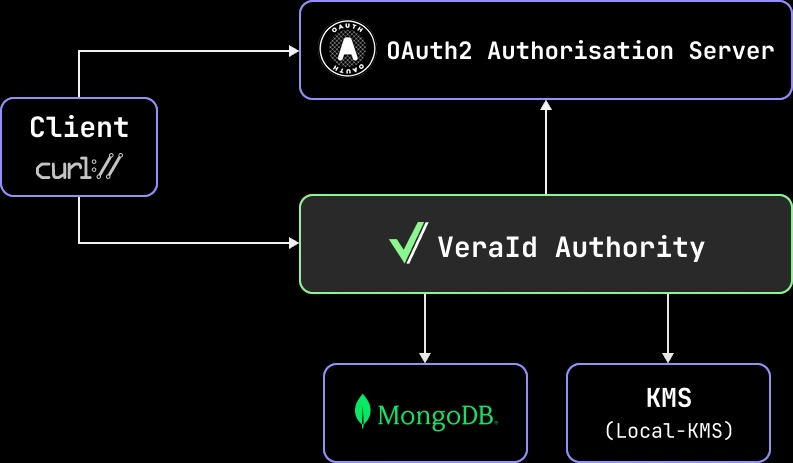
3. Deploy VeraId Authority
You're going to use Docker Compose to deploy a local instance of VeraId Authority, along with its backing services (e.g. MongoDB), and a mock OAuth2 server, to emulate a third-party identity provider like GCP (https://accounts.google.com).
In an eventual production deployment, you may actually prefer to use our upcoming VeraId Authority-as-a-Service offering or deploy a serverless infrastructure with an official Terraform module (e.g. relaycorp/veraid-authority/google for GCP).
Create a compose.yml file with the following content to deploy VeraId Authority and its backing services, using this opportunity to also deploy the server we implemented in the previous step:
services:
  kliento-server:
    build: .
    ports:
      - "127.0.0.1:8082:3000"

  veraid-authority:
    image: ghcr.io/relaycorp/veraid-authority:2.5.1
    command: api
    ports:
      - "127.0.0.1:8080:8080"
    environment:
      AUTHORITY_VERSION: "1.0.0dev1"
      AUTHORITY_SUPERADMIN: admin@veraid.example
      MONGODB_URI: mongodb://mongodb/?authSource=admin
      MONGODB_USER: root
      MONGODB_PASSWORD: password123
      MONGODB_DB: endpoint
      OAUTH2_JWKS_URL: http://mock-authz-server:8080/default/jwks
      OAUTH2_TOKEN_AUDIENCE: default
      OAUTH2_TOKEN_ISSUER_REGEX: "^http://[^/]+/default$$"
      KMS_ADAPTER: AWS
      AWS_ACCESS_KEY_ID: access_key_id
      AWS_SECRET_ACCESS_KEY: secret_access_key
      AWS_KMS_ENDPOINT: http://mock-aws-kms:8080
      AWS_KMS_REGION: eu-west-2
    depends_on:
      mongodb:
        condition: service_healthy
      mock-authz-server:
        condition: service_started
      mock-aws-kms:
        condition: service_healthy

  mock-authz-server:
    image: ghcr.io/navikt/mock-oauth2-server:2.1.10
    ports:
      - "127.0.0.1:8081:8080"
    environment:
      JSON_CONFIG: |
        {
          "tokenCallbacks": [
            {
              "issuerId": "default",
              "tokenExpiry": 3600,
              "requestMappings": [
                {
                  "requestParam": "client_id",
                  "match": "super-admin",
                  "claims": {"email": "admin@veraid.example"}
                },
                {
                  "requestParam": "client_id",
                  "match": "workload",
                  "claims": {
                    "email": "machine@cloud-provider.example",
                    "aud": "$${audience}"
                  }
                }
              ]
            }
          ]
        }

  mock-aws-kms:
    image: nsmithuk/local-kms:3.11.4
    healthcheck:
      test: ["CMD", "sh", "-c", "netstat -an | grep -q ':8080.*LISTEN' || nc -z localhost 8080"]
      interval: 5s
      retries: 3

  mongodb:
    image: mongo:8.0.6
    command: "--quiet"
    environment:
      MONGO_INITDB_ROOT_USERNAME: root
      MONGO_INITDB_ROOT_PASSWORD: password123
    volumes:
      - mongodb-data:/data/db
    healthcheck:
      test: echo 'db.runCommand("ping").ok' | mongosh localhost:27017/test --quiet
      interval: 10s
      timeout: 10s
      retries: 5
      start_period: 40s

volumes:
  mongodb-data:
Then start the services:
docker-compose up
At this point, you will have deployed the following services locally:
-
veraid-authority: The VeraId Authority server, accessible athttp://localhost:8080. -
mock-authz-server: A mock OAuth2 server, accessible athttp://localhost:8081. -
mock-aws-kms: A server that emulates AWS KMS. You can use any Key Management Service supported by@relaycorp/webcrypto-kms. -
mongodb: A MongoDB server. -
kliento-server: The trivial Hono server we implemented previously, accessible athttp://localhost:8082. Note that although we're deploying this server in the same Docker Compose project as the other services, it does not depend on any of them.
4. Log in as super-admin
We configured VeraId Authority to use admin@veraid.example as the super-admin, so we need to obtain a JWT from our mock OAuth2 server to assume that role on the VeraId Authority API:
export SUPER_ADMIN_TOKEN=$(curl --request POST \
  --header 'Content-Type: application/x-www-form-urlencoded' \
  --data-urlencode grant_type=client_credentials \
  --data-urlencode client_id=super-admin \
  --data-urlencode client_secret=s3cr3t \
  --silent \
  http://localhost:8081/default/token \
  | jq -r .access_token)
Double-check that you obtained a JWT by printing the token with echo $SUPER_ADMIN_TOKEN. You should see a base64-encoded string beginning with ey.
We'll act as super-admin when interacting with the VeraId Authority API for the rest of this guide, but in production you'd want to observe the principle of least privilege.
5. Configure your domain name
Now it's time to create an organisation for your domain name. In VeraId, domain names participating in the protocol are called "organisations".
To simplify the rest of the exercise, let's store your organisation name in an environment variable:
export ORG_NAME=example.com
Then run the following command to create the organisation:
curl --request POST \
  --header "Authorization: Bearer $SUPER_ADMIN_TOKEN" \
  --header 'Content-Type: application/json' \
  --data "{\"name\": \"$ORG_NAME\"}" \
  --silent \
  http://localhost:8080/orgs \
  | jq -r .txtRecordRdata
You should now create a TXT record under the _veraid subdomain of your domain name (_veraid.$ORG_NAME), setting its value to the output of the command above. The TXT record value will look like this:
1 XRSDmxhlZhYx+Y8dUy0LWd+Oinp6l6GZsk9gnZpd8S0= 3600
In this example, 1 denotes the key algorithm (RSA), XRSDmxhlZhYx+Y8dUy0LWd+Oinp6l6GZsk9gnZpd8S0= is the base64-encoded public key, and 3600 is the VeraId TTL override (in seconds). You may adjust the TTL depending on your needs.
6. Configure the VeraId member
VeraId signatures are attributed to members of the organisation, and there are two types of members: bots, which act on behalf of the organisation (e.g. example.com), and users, which act on their own behalf (e.g. alice@example.com). The only difference is that users have names and bots don't.
Run the following command to create a new user named alice, but feel free to replace alice with any name you like or remove the name altogether if you're creating a bot:
export MEMBER_SIGNATURE_SPECS_ENDPOINT=$(curl --request POST \
  --header "Authorization: Bearer $SUPER_ADMIN_TOKEN" \
  --header 'Content-Type: application/json' \
  --data '{"name": "alice", "role": "REGULAR"}' \
  --silent \
  "http://localhost:8080/orgs/$ORG_NAME/members" \
  | jq -r .signatureSpecs)
The command above will output the endpoint of the member's signature specs (e.g. /orgs/$ORG_NAME/members/{memberId}/signature-specs), which you'll use in the next step.
7. Configure the signature spec
Clients need to obtain a Kliento token bundle, which is a form of VeraId signature bundle where the payload is a JSON object with the attributes audience (a string identifying the server where the token bundle will be valid) and claims (an optional object of key/value pairs). It's up to the server to define which claims are supported and how they're used.
To get VeraId Authority to issue signature bundles for the desired payload, you'll have to create a signature spec for the member created in the previous step. Before creating the signature spec, let's define the payload and base64-encode it:
export KLIENTO_TOKEN='{"audience": "http://localhost:8082/"}'

export KLIENTO_TOKEN_BASE64=$(echo "$KLIENTO_TOKEN" | base64)
(On Windows, use an online encoder like base64decode.org instead.)
Once the base64-encoded Kliento token is stored in the KLIENTO_TOKEN_BASE64 environment variable, you can create the signature spec by making a POST request to the member's signature specs endpoint obtained in the previous step:
export SIGNATURE_SPEC=$(cat << EOF
{
  "auth": {
    "type": "oidc-discovery",
    "providerIssuerUrl": "http://mock-authz-server:8080/default",
    "jwtSubjectClaim": "email",
    "jwtSubjectValue": "machine@cloud-provider.example"
  },
  "serviceOid": "1.3.6.1.4.1.58708.3.0",
  "ttlSeconds": 600,
  "plaintext": "${KLIENTO_TOKEN_BASE64}"
}
EOF
)
export EXCHANGE_URL=$(curl --request POST \
  --header "Authorization: Bearer $SUPER_ADMIN_TOKEN" \
  --header 'Content-Type: application/json' \
  --data "$SIGNATURE_SPEC" \
  --silent \
  "http://localhost:8080${MEMBER_SIGNATURE_SPECS_ENDPOINT}" \
  | jq -r .exchangeUrl)
Where the signature spec is defined as follows:
-
authrequires the client to present a JWT from the mock OAuth2 server and the claimemailset tomachine@cloud-provider.example. -
serviceOidbinds the signature bundles to Kliento (OID1.3.6.1.4.1.58708.3.0), so they can't be used in a different context. -
ttlSecondscaps the validity of the signature bundles at 10 minutes (600 seconds). -
plaintextis the base64-encoded Kliento token ($KLIENTO_TOKEN_BASE64).
The output of the command above ($EXCHANGE_URL) is the URL that the client will use to exchange its JWTs for the signature bundles.
8. Test it!
We'll use curl as our client to demonstrate how to obtain token bundles and use them to make authenticated requests to the server.
First, obtain a JWT from the mock OAuth2 server:
export EXCHANGE_JWT=$(curl --request POST \
  --header "Host: mock-authz-server:8080" \
  --header 'Content-Type: application/x-www-form-urlencoded' \
  --data-urlencode grant_type=client_credentials \
  --data-urlencode client_id=workload \
  --data-urlencode client_secret=s3cr3t \
  --data-urlencode "audience=$EXCHANGE_URL" \
  --silent \
  "http://localhost:8081/default/token" \
  | jq -r .access_token)
Then exchange the JWT for a token bundle:
export TOKEN_BUNDLE="$(curl \
  --header 'Accept: application/vnd.veraid.signature-bundle+base64' \
  --header "Authorization: Bearer $EXCHANGE_JWT" \
  "$EXCHANGE_URL")"
And finally, make a request to the server using the token bundle:
curl --request GET \
  --header "Authorization: Kliento $TOKEN_BUNDLE" \
  "http://localhost:8082/"
The response should report the client's identifier: user@your-domain.com or simply your-domain.com if you created a bot.
Remember that you set the signature spec to expire in 10 minutes, so you can reuse the token bundle as many times as you like within that time frame.
Would this be useful for you?
I'd genuinely like to know if Kliento would solve authentication problems you're facing. Some specific questions I have:
- How much of a pain point is workload authentication for you?
- Would removing the need for API key management or JWKS endpoints be valuable?
- Do you see potential challenges with adoption?
- Could the reliance on DNSSEC be a blocker for you?
There's still a lot we could do to improve the Developer Experience and lower the barrier to adoption, like adding support for more languages on the server, but I hope what we have today is enough to kick off the conversation about where to take the technology if we continue to work on it.
Clean up
- Stop the Docker Compose process with
Ctrl+C/Cmd+C. - Remove the Docker resources:
docker-compose down --volumes --rmi all
- Delete the files we created:
rm compose.yml server.js package.json Dockerfile