


![[The AI Show Episode 144]: ChatGPT’s New Memory, Shopify CEO’s Leaked “AI First” Memo, Google Cloud Next Releases, o3 and o4-mini Coming Soon & Llama 4’s Rocky Launch](https://www.marketingaiinstitute.com/hubfs/ep%20144%20cover.png)


![BPMN-procesmodellering [closed]](https://i.sstatic.net/l7l8q49F.png)
![Roll Based Web App [closed]](https://cdn.sstatic.net/Sites/softwareengineering/Img/apple-touch-icon@2.png?v=1ef7363febba)


.jpg?#)


_Tanapong_Sungkaew_via_Alamy.jpg?width=1280&auto=webp&quality=80&disable=upscale#)

_Andreas_Prott_Alamy.jpg?width=1280&auto=webp&quality=80&disable=upscale#)


![Lenovo shows off its next 8.8-inch Legion Tab with vague AI promises [Gallery]](https://i0.wp.com/9to5google.com/wp-content/uploads/sites/4/2025/04/lenovo-legion-tab-y700-2025-1.jpg?resize=1200%2C628&quality=82&strip=all&ssl=1)


![OnePlus 13T has a 6,260 mAh battery as first camera samples arrive [Gallery]](https://i0.wp.com/9to5google.com/wp-content/uploads/sites/4/2025/04/oneplus-13t-teaser-2.jpg?resize=1200%2C628&quality=82&strip=all&ssl=1)


![Samsung Targets Late 2026 Launch for Advanced Texas Chip Fab Following Delays [Report]](https://www.iclarified.com/images/news/97073/97073/97073-640.jpg)

![Apple Shares Official Trailer for 'Long Way Home' Starring Ewan McGregor and Charley Boorman [Video]](https://www.iclarified.com/images/news/97069/97069/97069-640.jpg)
![Apple Watch Series 10 Back On Sale for $299! [Lowest Price Ever]](https://www.iclarified.com/images/news/96657/96657/96657-640.jpg)


![Mobile Legends: Bang Bang [MLBB] Free Redeem Codes April 2025](https://www.talkandroid.com/wp-content/uploads/2024/07/Screenshot_20240704-093036_Mobile-Legends-Bang-Bang.jpg)


An Easy Step-by-Step Guide to Creating and Connecting to a Linux Virtual Machine Using a Public Key
Creating a Linux Virtual Machine (VM) and connecting to it via SSH using a public key is a secure and efficient way to manage cloud-based infrastructure. In this guide, I’ll walk you through the step-by-step process of deploying a Linux VM on Microsoft Azure and establishing a secure SSH connection using public key authentication. Step 1. Log In to Azure On your web browser, head over to https://portal.azure.com and log in with your Microsoft account. If you dont have an account, create or sign up and provide the required information so your Microsoft account can be activated. A successful login bring you to this page below, Step 2. Create a New Virtual Machine To create a Virtual Machine, click on Create a resource as indicated in the image below Click on Virtual machine For the Basics configurations, fill in the tabs as follows: Subscription: Select your subscription Resource Group: Use an existing or create a resource group Virtual machine name: MyLinux-VM or use your desired username Region: Select a nearby or preferred location Availability options: No infrastructure redundancy required Security type: Standard Image: Ubuntu Server 24.04 LTS - x64 Gen2 VM architecture: x64 Size: Standard_B1s - 1 vcpu, 1 GiB memory (US$7.59/month) (free services eligible) Authentication type: SSH public key Username: Use your desired username SSH public key source: Generate new key pair SSH Key Type: RSA SSH Format Key pair name: linux-vm_key or use your desired username Public inbound ports: Allow selected ports Select inbound ports: HTTP (80) and SSH (22) Step 3. Configure Disks Click on Next : Disks >, this leads you to on the next page, you can use the default OS disk size, use the Image default (30 GiB) and for the OS disk type, use the default settings Premium SSD (locally-redundant storage) unless you have unique configuration requirements. Step 4. Networking Configuration On the bottom of the last page in Step 3, Click on Next : Networking >, this leads you to the Network interface page below: Use the default setting as provided by Azure in the above image. This is to ensure the Native SSH is enabled so you can easily connect to your Private key. Skip the Management tab and Click on Review + create. Step 5. Generate SSH private Key After a successful Linux VM deployment process, Azure will validate the configuration Click on Create Download private key and create resource, afterwards, the deployment will start. Click on Go to resource, then click on Connect then type: ssh -i "/$HOME/Downloads/linux-vm_key_0420.pem" azureuser@your_public_ip Update the Server and Install a Web Server (Nginx) Now that you're connected to your virtual machine, the next step is to update the system and install a web server. We'll be using Nginx, a high-performance and lightweight web server that's perfect for serving static websites and handling web traffic efficiently. Update the System Packages To ensure your server is up to date and secure, run the following commands to update the package list and install any available system upgrades: in the cmd prompt, type: sudo apt update then type sudo apt upgrade -y Proceed to Install Nginx Once the system is updated, you can proceed to install the Nginx web server by running the following command: sudo apt install nginx -y Finally, Access Your Web Server With Nginx successfully installed, you can now view your web server in action. Open your preferred web browser and enter your server's public IP address in the address bar. For example: http://172.191.120.151 Or simply type: 172.191.120.151 You should see the default Nginx welcome page, confirming that the web server is up and running. Congratulations! You’ve successfully created a Linux virtual machine in Microsoft Azure and configured secure SSH access using a public key. You're now all set to install your preferred web server and begin developing or deploying your applications with confidence in a secure cloud environment. Happy building!
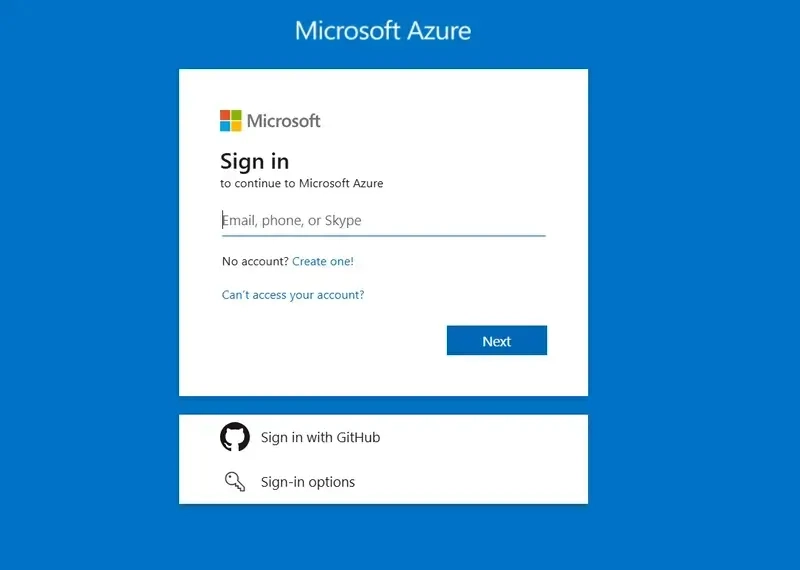
Creating a Linux Virtual Machine (VM) and connecting to it via SSH using a public key is a secure and efficient way to manage cloud-based infrastructure. In this guide, I’ll walk you through the step-by-step process of deploying a Linux VM on Microsoft Azure and establishing a secure SSH connection using public key authentication.
Step 1. Log In to Azure
On your web browser, head over to https://portal.azure.com and log in with your Microsoft account. If you dont have an account, create or sign up and provide the required information so your Microsoft account can be activated.
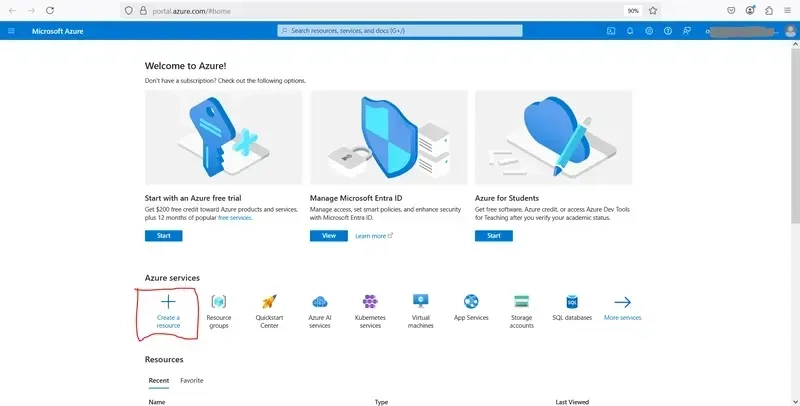
A successful login bring you to this page below,

Step 2. Create a New Virtual Machine
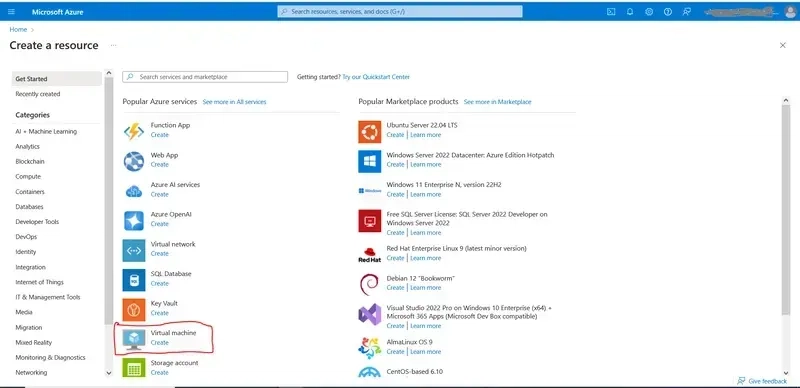
To create a Virtual Machine, click on Create a resource as indicated in the image below
Click on Virtual machine
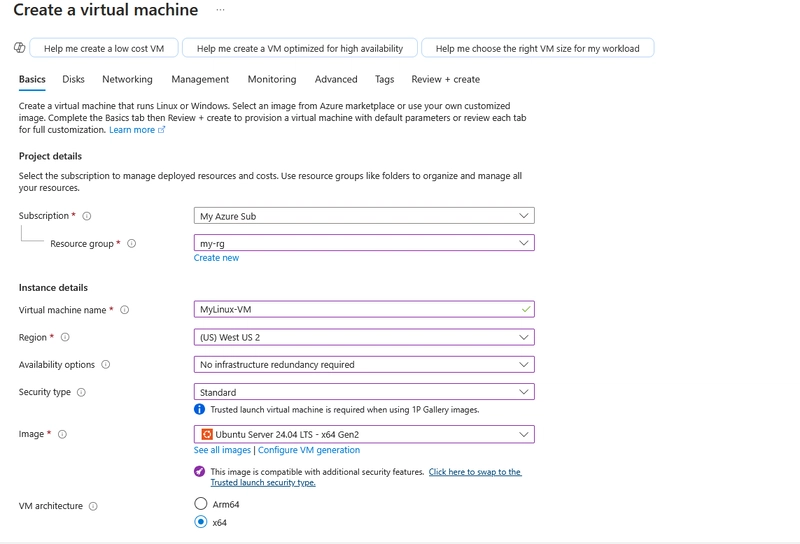
For the Basics configurations, fill in the tabs as follows:
- Subscription: Select your subscription
- Resource Group: Use an existing or create a resource group
- Virtual machine name: MyLinux-VM or use your desired username
- Region: Select a nearby or preferred location
- Availability options: No infrastructure redundancy required
- Security type: Standard
- Image: Ubuntu Server 24.04 LTS - x64 Gen2
- VM architecture: x64
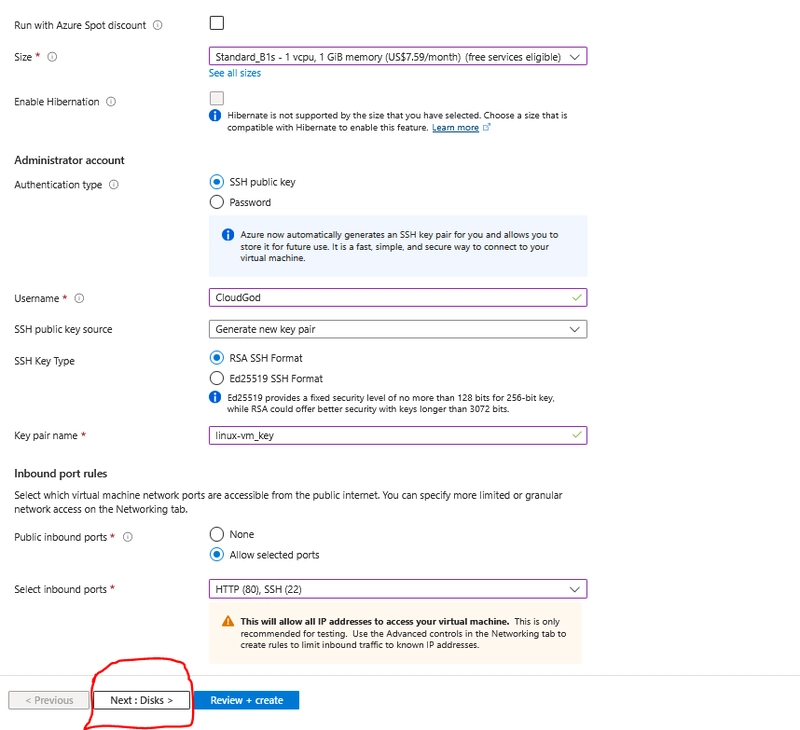
- Size: Standard_B1s - 1 vcpu, 1 GiB memory (US$7.59/month) (free services eligible)
- Authentication type: SSH public key
- Username: Use your desired username
- SSH public key source: Generate new key pair
- SSH Key Type: RSA SSH Format
- Key pair name: linux-vm_key or use your desired username
- Public inbound ports: Allow selected ports
- Select inbound ports: HTTP (80) and SSH (22)
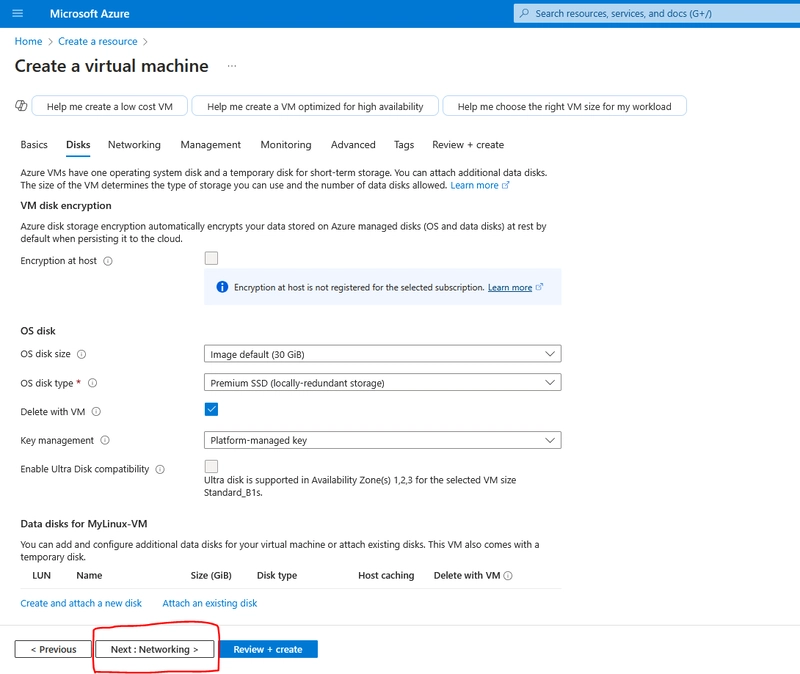
Step 3. Configure Disks
Click on Next : Disks >, this leads you to on the next page, you can use the default OS disk size, use the Image default (30 GiB) and for the OS disk type, use the default settings Premium SSD (locally-redundant storage) unless you have unique configuration requirements.
Step 4. Networking Configuration
On the bottom of the last page in Step 3, Click on Next : Networking >, this leads you to the Network interface page below:
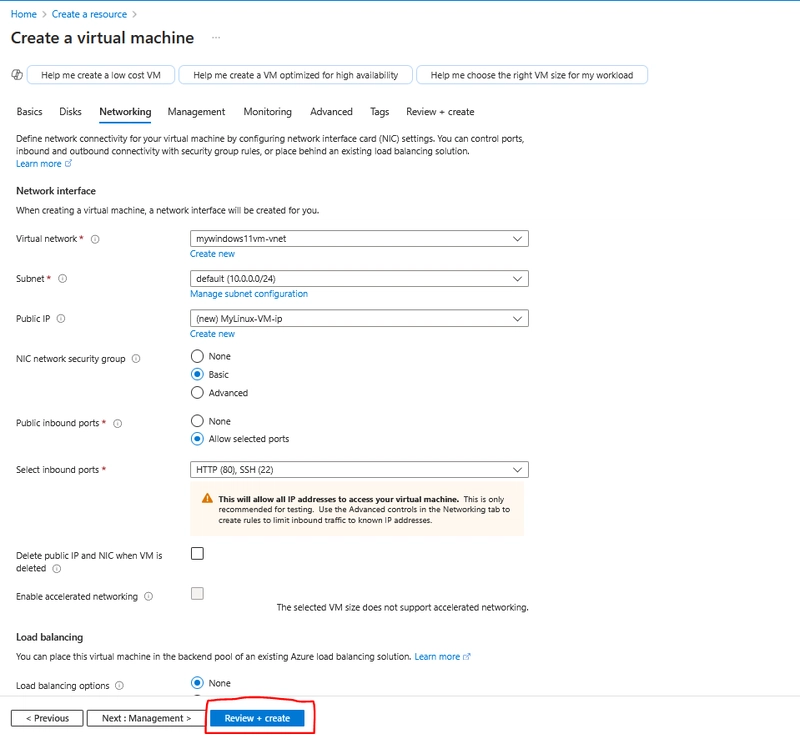
Use the default setting as provided by Azure in the above image. This is to ensure the Native SSH is enabled so you can easily connect to your Private key. Skip the Management tab and Click on Review + create.
Step 5. Generate SSH private Key
After a successful Linux VM deployment process, Azure will validate the configuration
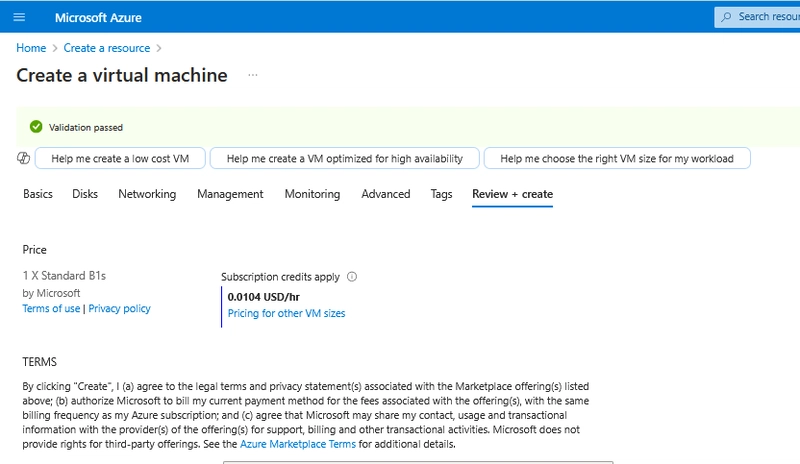
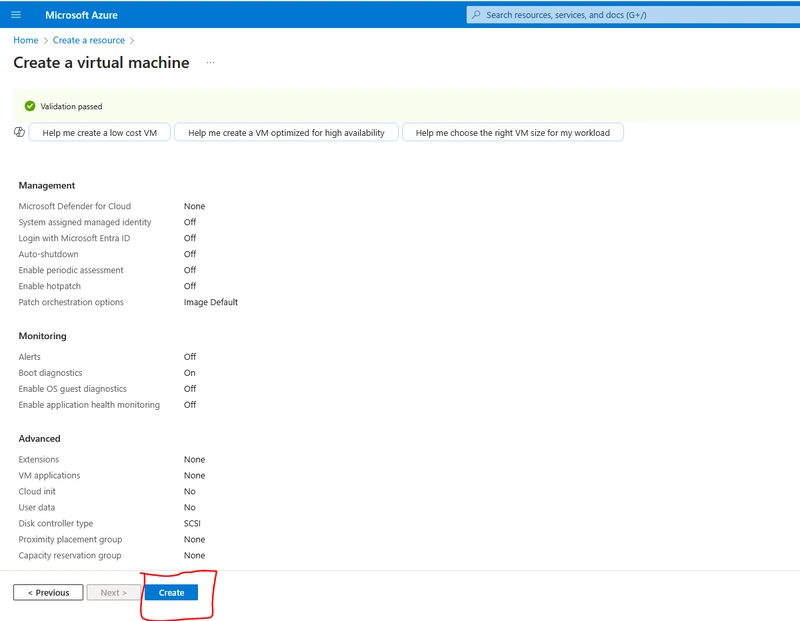
Click on Create
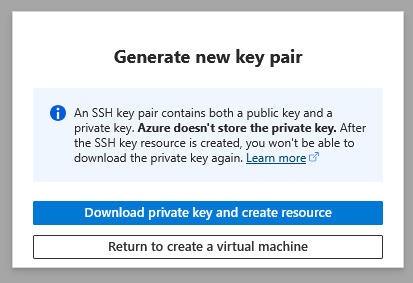
Download private key and create resource, afterwards, the deployment will start.
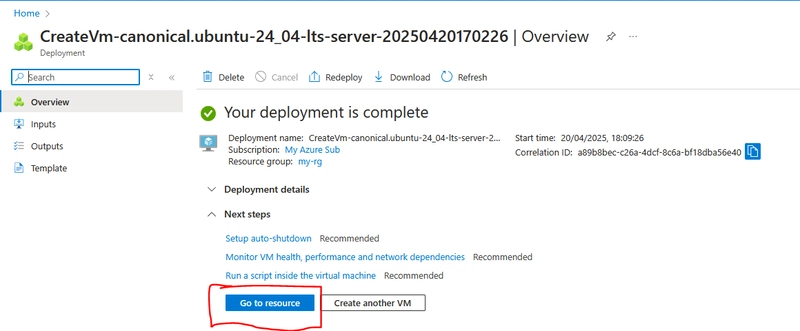
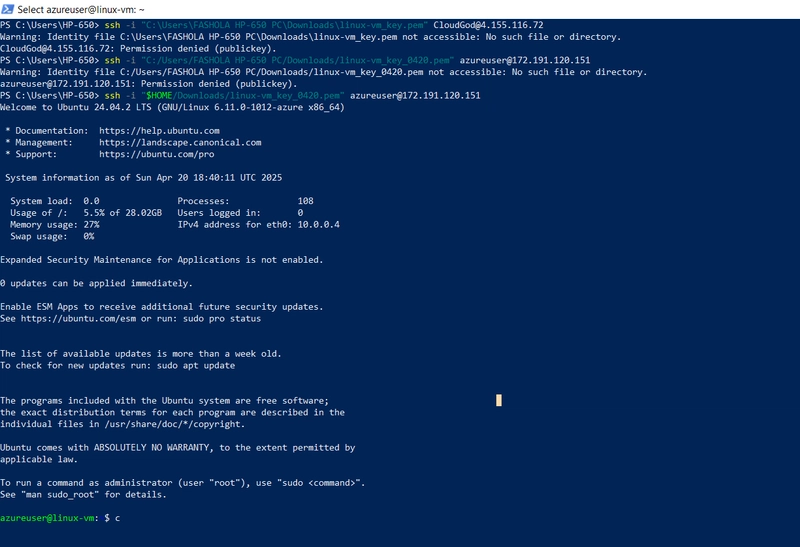
Click on Go to resource, then click on Connect

then type: ssh -i "/$HOME/Downloads/linux-vm_key_0420.pem" azureuser@your_public_ip
![]()
Update the Server and Install a Web Server (Nginx)
Now that you're connected to your virtual machine, the next step is to update the system and install a web server. We'll be using Nginx, a high-performance and lightweight web server that's perfect for serving static websites and handling web traffic efficiently.
Update the System Packages
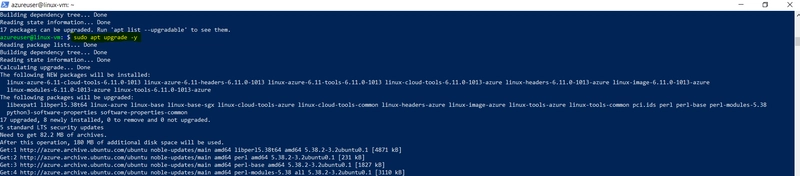
To ensure your server is up to date and secure, run the following commands to update the package list and install any available system upgrades:
in the cmd prompt, type: sudo apt update
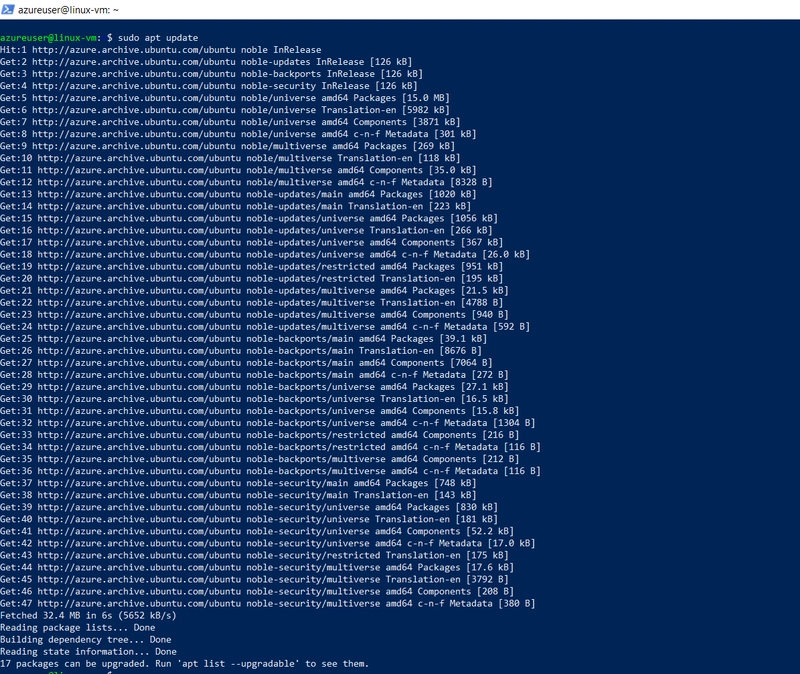
then type sudo apt upgrade -y
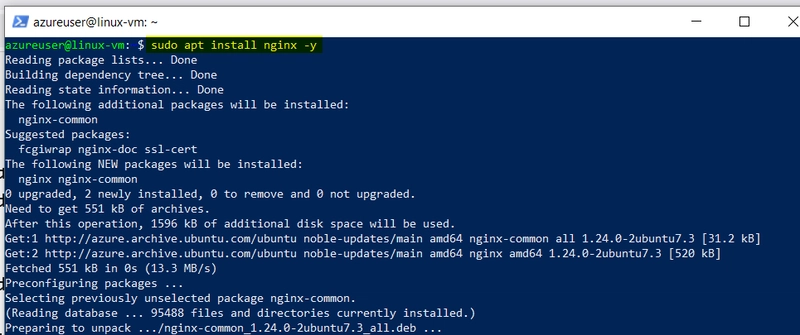
Proceed to Install Nginx
Once the system is updated, you can proceed to install the Nginx web server by running the following command: sudo apt install nginx -y
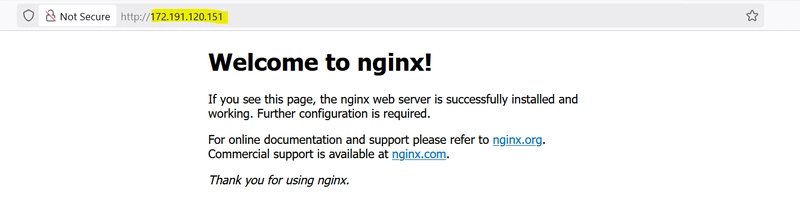
Finally, Access Your Web Server
With Nginx successfully installed, you can now view your web server in action.
Open your preferred web browser and enter your server's public IP address in the address bar.
For example: http://172.191.120.151
Or simply type: 172.191.120.151
You should see the default Nginx welcome page, confirming that the web server is up and running.
Congratulations!
You’ve successfully created a Linux virtual machine in Microsoft Azure and configured secure SSH access using a public key. You're now all set to install your preferred web server and begin developing or deploying your applications with confidence in a secure cloud environment. Happy building!