![[Webinar] AI Is Already Inside Your SaaS Stack — Learn How to Prevent the Next Silent Breach](https://blogger.googleusercontent.com/img/b/R29vZ2xl/AVvXsEiOWn65wd33dg2uO99NrtKbpYLfcepwOLidQDMls0HXKlA91k6HURluRA4WXgJRAZldEe1VReMQZyyYt1PgnoAn5JPpILsWlXIzmrBSs_TBoyPwO7hZrWouBg2-O3mdeoeSGY-l9_bsZB7vbpKjTSvG93zNytjxgTaMPqo9iq9Z5pGa05CJOs9uXpwHFT4/s1600/ai-cyber.jpg?#)


![[The AI Show Episode 144]: ChatGPT’s New Memory, Shopify CEO’s Leaked “AI First” Memo, Google Cloud Next Releases, o3 and o4-mini Coming Soon & Llama 4’s Rocky Launch](https://www.marketingaiinstitute.com/hubfs/ep%20144%20cover.png)


![Rogue Company Elite tier list of best characters [April 2025]](https://media.pocketgamer.com/artwork/na-33136-1657102075/rogue-company-ios-android-tier-cover.jpg?#)


_Andreas_Prott_Alamy.jpg?width=1280&auto=webp&quality=80&disable=upscale#)


![What’s new in Android’s April 2025 Google System Updates [U: 4/18]](https://i0.wp.com/9to5google.com/wp-content/uploads/sites/4/2025/01/google-play-services-3.jpg?resize=1200%2C628&quality=82&strip=all&ssl=1)


![Apple Watch Series 10 Back On Sale for $299! [Lowest Price Ever]](https://www.iclarified.com/images/news/96657/96657/96657-640.jpg)
![EU Postpones Apple App Store Fines Amid Tariff Negotiations [Report]](https://www.iclarified.com/images/news/97068/97068/97068-640.jpg)
![Apple Slips to Fifth in China's Smartphone Market with 9% Decline [Report]](https://www.iclarified.com/images/news/97065/97065/97065-640.jpg)


A Structured Workflow for "Vibe Coding" Full-Stack Apps
There's a lot of hype surrounding "vibe coding". You've probably seen the AI influencers making claims like how you can build SaaS apps in 15 minutes with just a few tools and prompts. But, as you might have guessed, these example workflows are pretty flimsy. Yes, you can copy a landing page, or build a decent CRUD app, but you're not gonna be able to build a complex SaaS or internal tool with them. But that doesn't mean there aren't workflows out there that can positively augment your development workflow. Anyone who's tinkered around with different AI-assisted techniques can tell you that there is some real magic in these tools. That's why I spent a couple weeks researching the best techniques and workflow tips and put them to the test by building a full-featured, full-stack app with them. Below, you'll find my honest review and the workflow that I found that really worked while using Cursor with Google's Gemini 2.5 Pro, and a solid UI template. By the way, I came up with this workflow by testing and building a full-stack personal finance app in my spare time, tweaking and improving the process the entire time. Then, after landing on a good template and workflow, I rebuilt the app again and recorded it entirely, from start to deployments, in a ~3 hour long youtube video (above). This article is a summary of the key approaches to implementing this workflow. Step 1: Laying the Foundation There are a lot of moving parts in modern full-stack web apps. Trying to get your LLM to glue it all together for you cohesively just doesn't work. That's why you should give your AI helper a helping hand by starting with a solid foundation and leveraging the tools we have at our disposal. In practical terms this means using stuff like: UI Component Libraries Boilerplate templates Full-stack frameworks with batteries-included Component libraries and templates are great ways to give the LLM a known foundation to build upon. It also takes the guess work out of styling and helps those styles be consistent as the app grows. Using a full-stack framework with batteries-included, such as Wasp for JavaScript (React, Node.js, Prisma) or Laravel for PHP, takes the complexity out of piecing the different parts of the stack together. Since these frameworks are opinionated, they've chosen a set of tools that work well together, and the have the added benefit of doing a lot of work under-the-hood. In the end, the AI can focus on just the business logic of the app. Take Wasp's main config file, for example (see below). All you or the LLM has to do is define your backend operations, and the framework takes care of managing the server setup and configuration for you. On top of that, this config file acts as a central "source of truth" the LLM can always reference to see how the app is defined as it builds new features. app vibeCodeWasp { wasp: { version: "^0.16.3" }, title: "Vibe Code Workflow", auth: { userEntity: User, methods: { email: {}, google: {}, github: {}, }, }, client: { rootComponent: import Main from "@src/main", setupFn: import QuerySetup from "@src/config/querySetup", }, } route LoginRoute { path: "/login", to: Login } page Login { component: import { Login } from "@src/features/auth/login" } route EnvelopesRoute { path: "/envelopes", to: EnvelopesPage } page EnvelopesPage { authRequired: true, component: import { EnvelopesPage } from "@src/features/envelopes/EnvelopesPage.tsx" } query getEnvelopes { fn: import { getEnvelopes } from "@src/features/envelopes/operations.ts", entities: [Envelope, BudgetProfile, UserBudgetProfile] // Need BudgetProfile to check ownership } action createEnvelope { fn: import { createEnvelope } from "@src/features/envelopes/operations.ts", entities: [Envelope, BudgetProfile, UserBudgetProfile] // Need BudgetProfile to link } //... Step 2: Getting the Most Out of Your AI Assistant Once you've got a solid foundation to work with, you need create a comprehensive set of rules for your editor and LLM to follow. To arrive at a solid set of rules you need to: Start building something Look out for times when the LLM (repeatedly) doesn't meet your expectations and define rules for them Constantly ask the LLM to help you improve your workflow Defining Rules Different IDE's and coding tools have different naming conventions for the rules you define, but they all function more or less the same way (I used Cursor for this project so I'll be referring to Cursor's conventions here). Cursor deprecated their .cursorrules config file in favor of a .cursor/rules/ directory with multiple files. In this set of rules, you can pack in general rules that align with your coding style, and project-specific rules (e.g. conventions, operations, auth). The key here is to provide structured context for the LLM so that it doesn't have to rely on broader knowledge. What does that mean e
There's a lot of hype surrounding "vibe coding". You've probably seen the AI influencers making claims like how you can build SaaS apps in 15 minutes with just a few tools and prompts.
But, as you might have guessed, these example workflows are pretty flimsy.
Yes, you can copy a landing page, or build a decent CRUD app, but you're not gonna be able to build a complex SaaS or internal tool with them.
But that doesn't mean there aren't workflows out there that can positively augment your development workflow. Anyone who's tinkered around with different AI-assisted techniques can tell you that there is some real magic in these tools.
That's why I spent a couple weeks researching the best techniques and workflow tips and put them to the test by building a full-featured, full-stack app with them.
Below, you'll find my honest review and the workflow that I found that really worked while using Cursor with Google's Gemini 2.5 Pro, and a solid UI template.
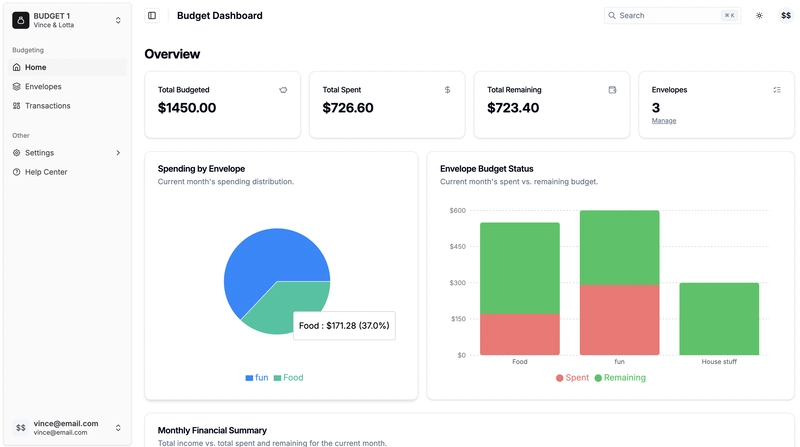
By the way, I came up with this workflow by testing and building a full-stack personal finance app in my spare time, tweaking and improving the process the entire time. Then, after landing on a good template and workflow, I rebuilt the app again and recorded it entirely, from start to deployments, in a ~3 hour long youtube video (above).
This article is a summary of the key approaches to implementing this workflow.
Step 1: Laying the Foundation
There are a lot of moving parts in modern full-stack web apps. Trying to get your LLM to glue it all together for you cohesively just doesn't work.
That's why you should give your AI helper a helping hand by starting with a solid foundation and leveraging the tools we have at our disposal.
In practical terms this means using stuff like:
- UI Component Libraries
- Boilerplate templates
- Full-stack frameworks with batteries-included
Component libraries and templates are great ways to give the LLM a known foundation to build upon. It also takes the guess work out of styling and helps those styles be consistent as the app grows.
Using a full-stack framework with batteries-included, such as Wasp for JavaScript (React, Node.js, Prisma) or Laravel for PHP, takes the complexity out of piecing the different parts of the stack together. Since these frameworks are opinionated, they've chosen a set of tools that work well together, and the have the added benefit of doing a lot of work under-the-hood. In the end, the AI can focus on just the business logic of the app.
Take Wasp's main config file, for example (see below). All you or the LLM has to do is define your backend operations, and the framework takes care of managing the server setup and configuration for you. On top of that, this config file acts as a central "source of truth" the LLM can always reference to see how the app is defined as it builds new features.
app vibeCodeWasp {
  wasp: { version: "^0.16.3" },
  title: "Vibe Code Workflow",
  auth: {
    userEntity: User,
    methods: {
      email: {},
      google: {},
      github: {},
    },
  },
  client: {
    rootComponent: import Main from "@src/main",
    setupFn: import QuerySetup from "@src/config/querySetup",
  },
}

route LoginRoute { path: "/login", to: Login }
page Login {
  component: import { Login } from "@src/features/auth/login"
}

route EnvelopesRoute { path: "/envelopes", to: EnvelopesPage }
page EnvelopesPage {
  authRequired: true,
  component: import { EnvelopesPage } from "@src/features/envelopes/EnvelopesPage.tsx"
}

query getEnvelopes {
  fn: import { getEnvelopes } from "@src/features/envelopes/operations.ts",
  entities: [Envelope, BudgetProfile, UserBudgetProfile] // Need BudgetProfile to check ownership
}

action createEnvelope {
  fn: import { createEnvelope } from "@src/features/envelopes/operations.ts",
  entities: [Envelope, BudgetProfile, UserBudgetProfile] // Need BudgetProfile to link
}

//...
Step 2: Getting the Most Out of Your AI Assistant
Once you've got a solid foundation to work with, you need create a comprehensive set of rules for your editor and LLM to follow.
To arrive at a solid set of rules you need to:
- Start building something
- Look out for times when the LLM (repeatedly) doesn't meet your expectations and define rules for them
- Constantly ask the LLM to help you improve your workflow
Defining Rules
Different IDE's and coding tools have different naming conventions for the rules you define, but they all function more or less the same way (I used Cursor for this project so I'll be referring to Cursor's conventions here).
Cursor deprecated their .cursorrules config file in favor of a .cursor/rules/ directory with multiple files. In this set of rules, you can pack in general rules that align with your coding style, and project-specific rules (e.g. conventions, operations, auth).
The key here is to provide structured context for the LLM so that it doesn't have to rely on broader knowledge.
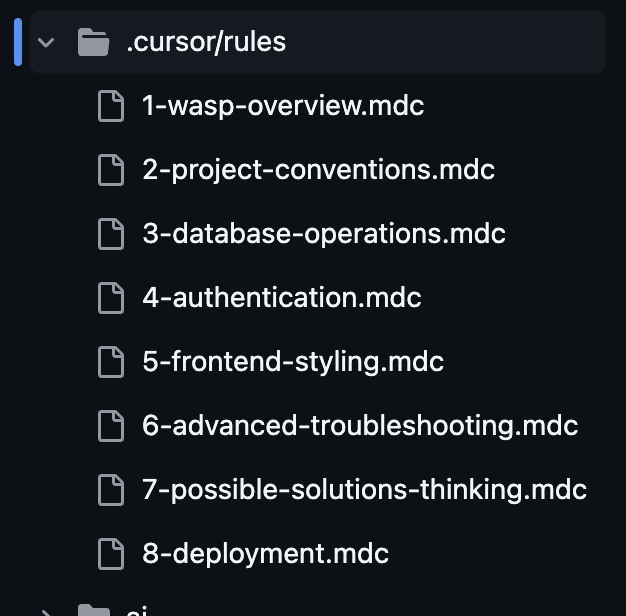
What does that mean exactly? It means telling the LLM about the current project and template you'll be building on, what conventions it should use, and how it should deal with common issues (e.g. the examples picture above, which are taken from the tutorial video's accompanying repo.
You can also add general strategies to rules files that you can manually reference in chat windows. For example, I often like telling the LLM to "think about 3 different strategies/approaches, pick the best one, and give your rationale for why you chose it." So I created a rule for it, 7-possible-solutions-thinking.mdc, and I pass it in whenever I want to use it, saving myself from typing the same thing over and over.
Using AI to Critique and Improve Your Workflow
Aside from this, I view the set of rules as a fluid object. As I worked on my apps, I started with a set of rules and iterated on them to get the kind of output I was looking for. This meant adding new rules to deal with common errors the LLM would introduce, or to overcome project-specific issues that didn't meet the general expectations of the LLM.
As I amended these rules, I would also take time to use the LLM as a source of feedback, asking it to critique my current workflow and find ways I could improve it.
This meant passing in my rules files into context, along with other documents like Plans and READMEs, and ask it to look for areas where we could improve them, using the past chat sessions as context as well.
A lot of time this just means asking the LLM something like:
Can you review for breadth and clarity and think of a few ways it could be improved, if necessary. Remember, these documents are to be used as context for AI-assisted coding workflows.
Step 3: Defining the "What" and the "How" (PRD & Plan)
An extremely important step in all this is the initial prompts you use to guide the generation of the Product Requirement Doc (PRD) and the step-by-step actionable plan you create from it.
The PRD is basically just a detailed guideline for how the app should look and behave, and some guidelines for how it should be implemented.
After generating the PRD, we ask the LLM to generate a step-by-step actionable plan that will implement the app in phases using a modified vertical slice method suitable for LLM-assisted development.
The vertical slice implementation is important because it instructs the LLM to develop the app in full-stack "slices" -- from DB to UI -- in increasingly complexity. That might look like developing a super simple version of a full-stack feature in an early phase, and then adding more complexity to that feature in the later phases.
This approach highlights a common recurring theme in this workflow: build a simple, solid foundation and increasing add on complexity in focused chunks
After the initial generation of each of these docs, I will often ask the LLM to review it's own work and look for possible ways to improve the documents based on the project structure and the fact that it will be used for assisted coding. Sometimes it finds seem interesting improvements, or at the very least it finds redundant information it can remove.
Here is an example prompt for generating the step-by-step plan (all example prompts used in the walkthrough video can be found in the accompanying repo):
From this PRD, create an actionable, step-by-step plan using a modified vertical slice implmentation approach that's suitable for LLM-assisted coding. Before you create the plan, think about a few different plan styles that would be suitable for this project and the implmentation style before selecting the best one. Give your reasoning for why you think we should use this plan style. Remember that we will constantly refer to this plan to guide our coding implementation so it should be well structured, concise, and actionable, while still providing enough information to guide the LLM.
Finding this tutorial interesting?
Wasp team is working hard to create content like this, not to mention building a modern, open-source React/NodeJS framework.
The easiest way to show your support is just to star Wasp repo!