


![[Webinar] AI Is Already Inside Your SaaS Stack — Learn How to Prevent the Next Silent Breach](https://blogger.googleusercontent.com/img/b/R29vZ2xl/AVvXsEiOWn65wd33dg2uO99NrtKbpYLfcepwOLidQDMls0HXKlA91k6HURluRA4WXgJRAZldEe1VReMQZyyYt1PgnoAn5JPpILsWlXIzmrBSs_TBoyPwO7hZrWouBg2-O3mdeoeSGY-l9_bsZB7vbpKjTSvG93zNytjxgTaMPqo9iq9Z5pGa05CJOs9uXpwHFT4/s1600/ai-cyber.jpg?#)


![[The AI Show Episode 144]: ChatGPT’s New Memory, Shopify CEO’s Leaked “AI First” Memo, Google Cloud Next Releases, o3 and o4-mini Coming Soon & Llama 4’s Rocky Launch](https://www.marketingaiinstitute.com/hubfs/ep%20144%20cover.png)


![Rogue Company Elite tier list of best characters [April 2025]](https://media.pocketgamer.com/artwork/na-33136-1657102075/rogue-company-ios-android-tier-cover.jpg?#)


_Andreas_Prott_Alamy.jpg?width=1280&auto=webp&quality=80&disable=upscale#)


![What’s new in Android’s April 2025 Google System Updates [U: 4/18]](https://i0.wp.com/9to5google.com/wp-content/uploads/sites/4/2025/01/google-play-services-3.jpg?resize=1200%2C628&quality=82&strip=all&ssl=1)


![Apple Watch Series 10 Back On Sale for $299! [Lowest Price Ever]](https://www.iclarified.com/images/news/96657/96657/96657-640.jpg)
![EU Postpones Apple App Store Fines Amid Tariff Negotiations [Report]](https://www.iclarified.com/images/news/97068/97068/97068-640.jpg)
![Apple Slips to Fifth in China's Smartphone Market with 9% Decline [Report]](https://www.iclarified.com/images/news/97065/97065/97065-640.jpg)


A Step-by-Step Guide to Streaming Live Weather Data Using Apache Kafka and Apache Cassandra
Introduction Delivering real-time weather data is increasingly important for applications across logistics, travel, emergency services, and consumer tools. In this tutorial, we will build a real-time weather data streaming pipeline using: OpenWeatherMap API to fetch weather data Apache Kafka (via Confluent Cloud) for streaming Apache Cassandra (installed on a Linux machine) for scalable storage We'll implement this pipeline using Python, demonstrate practical setups, and include screenshots to guide you through each step. By the end, you'll have a running system where weather data is continuously fetched, streamed to Kafka, and written to Cassandra for querying and visualization. Architecture Overview Prerequisites Python 3.8+ Linux Machine Kafka cluster on Confluent Cloud OpenWeatherMap API key Step 1: Set Up Kafka on Confluent Cloud Go to confluent.cloud Create an account (free tier available) Create a Kafka cluster Create a topic named weather-stream Generate an API Key and Secret Note the Bootstrap Server, API Key, and API Secret Step 2: Install Cassandra on a Linux Machine Open your terminal and run: sudo apt install openjdk-11-jdk -y # Add Apache Cassandra repo echo "deb https://downloads.apache.org/cassandra/debian 40x main" | sudo tee /etc/apt/sources.list.d/cassandra.list curl https://downloads.apache.org/cassandra/KEYS | sudo apt-key add - sudo apt update sudo apt install cassandra -y Start and verify Cassandra: sudo systemctl enable cassandra sudo systemctl start cassandra nodetool status Step 3: Connect Cassandra to DBeaver (GUI Tool) DBeaver is a great visual interface for managing Cassandra. Steps: Install DBeaver Open DBeaver and click New Connection Select Apache Cassandra from the list Fill in the following: Host: 127.0.0.1 Port: 9042 Username: leave blank (default auth) Password: leave blank Click Test Connection — you should see a successful message Save and connect — you can now browse your keyspaces, tables, and run CQL visually. Step 4: Create the Cassandra Table Once connected (or in cqlsh), run: CREATE KEYSPACE IF NOT EXISTS weather WITH replication = {'class': 'SimpleStrategy', 'replication_factor': 1}; USE weather; CREATE TABLE IF NOT EXISTS weather_data ( city TEXT, timestamp TIMESTAMP, temperature FLOAT, humidity INT, PRIMARY KEY (city, timestamp) ); This schema stores weather info per city, indexed by time. You can also run the above queries in DBeaver’s SQL editor. Step 5: Create Kafka Producer in Python Install Dependencies pip install requests confluent-kafka python-dotenv Create a .env file: BOOTSTRAP_SERVERS=pkc-xyz.us-central1.gcp.confluent.cloud:9092 SASL_USERNAME=API_KEY SASL_PASSWORD=API_SECRET OPENWEATHER_API_KEY=YOUR_OPENWEATHER_API_KEY Python Script: weather_producer.py import requests import json from confluent_kafka import Producer import time from dotenv import load_dotenv import os load_dotenv() conf = { 'bootstrap.servers': os.getenv("BOOTSTRAP_SERVERS"), 'security.protocol': 'SASL_SSL', 'sasl.mechanisms': 'PLAIN', 'sasl.username': os.getenv("SASL_USERNAME"), 'sasl.password': os.getenv("SASL_PASSWORD") } producer = Producer(conf) API_KEY = os.getenv("OPENWEATHER_API_KEY") TOPIC = 'weather-stream' CITIES = ["Nairobi", "Lagos", "Accra", "Cairo", "Cape Town", "Addis Ababa", "Dakar", "Kampala", "Algiers"] def get_weather(city): url = f'https://api.openweathermap.org/data/2.5/weather?q={city}&appid={API_KEY}&units=metric' response = requests.get(url) return response.json() def delivery_report(err, msg): if err is not None: print(f"Delivery failed: {err}") else: print(f"Delivered to {msg.topic()} [{msg.partition()}] @ offset {msg.offset()}") while True: for city in CITIES: weather = get_weather(city) weather['city'] = city # Attach city explicitly producer.produce(TOPIC, json.dumps(weather).encode('utf-8'), callback=delivery_report) producer.flush() time.sleep(2) # This will prevent API rate limit time.sleep(60) # Wait before the next full cycle This script loads credentials from .env, loops through several African cities, and sends weather data to your Kafka topic. Step 6: Create Kafka Consumer in Python (Store Data in Cassandra) Install additional libraries: pip install cassandra-driver Python Script: weather_consumer.py import json from cassandra.cluster import Cluster from confluent_kafka import Consumer import os from dotenv import load_dotenv load_dotenv() # Cassandra connection cluster = Cluster(['127.0.0.1']) session = cluster.connect() session.set_keyspace('weather') # Kafka configuration conf = { 'bootstrap.servers': os.getenv("BOOTSTRAP_SERVERS"), 'security.protocol': 'SASL_SSL', 'sasl.mechanisms': 'PLAIN', 'sasl.username': os.getenv("SASL
Introduction
Delivering real-time weather data is increasingly important for applications across logistics, travel, emergency services, and consumer tools. In this tutorial, we will build a real-time weather data streaming pipeline using:
- OpenWeatherMap API to fetch weather data
- Apache Kafka (via Confluent Cloud) for streaming
- Apache Cassandra (installed on a Linux machine) for scalable storage
We'll implement this pipeline using Python, demonstrate practical setups, and include screenshots to guide you through each step.
By the end, you'll have a running system where weather data is continuously fetched, streamed to Kafka, and written to Cassandra for querying and visualization.
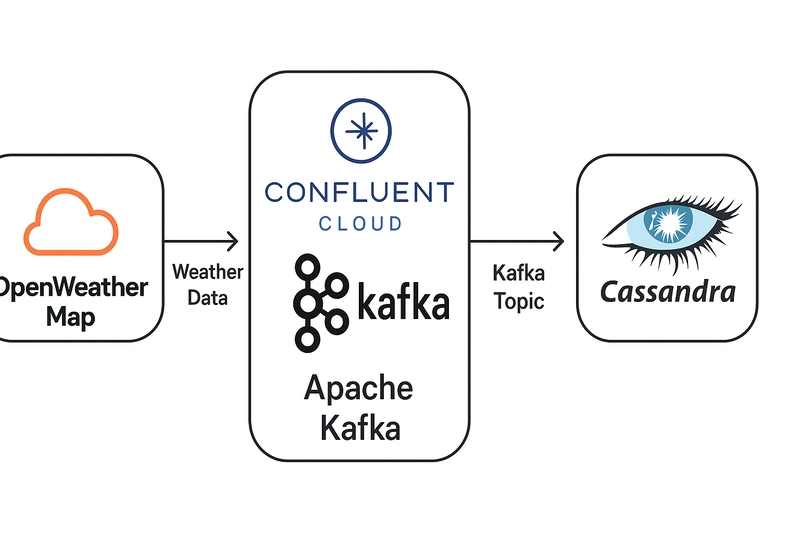
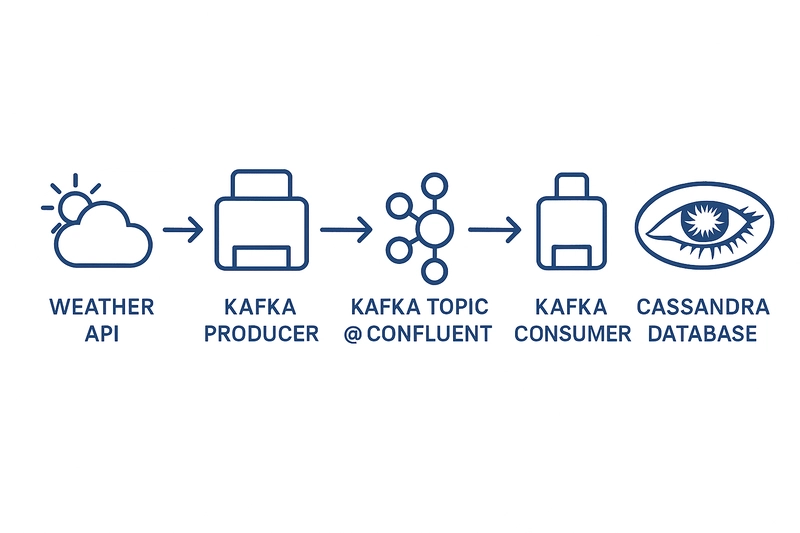
Architecture Overview
Prerequisites
- Python 3.8+
- Linux Machine
- Kafka cluster on Confluent Cloud
- OpenWeatherMap API key
Step 1: Set Up Kafka on Confluent Cloud
- Go to confluent.cloud
- Create an account (free tier available)
- Create a Kafka cluster
- Create a topic named weather-stream
- Generate an API Key and Secret
- Note the Bootstrap Server, API Key, and API Secret
Step 2: Install Cassandra on a Linux Machine
Open your terminal and run:
sudo apt install openjdk-11-jdk -y

# Add Apache Cassandra repo
echo "deb https://downloads.apache.org/cassandra/debian 40x main" | sudo tee /etc/apt/sources.list.d/cassandra.list
curl https://downloads.apache.org/cassandra/KEYS | sudo apt-key add -

sudo apt update
sudo apt install cassandra -y
Start and verify Cassandra:
sudo systemctl enable cassandra
sudo systemctl start cassandra
nodetool status
Step 3: Connect Cassandra to DBeaver (GUI Tool)
DBeaver is a great visual interface for managing Cassandra.
Steps:
- Install DBeaver
- Open DBeaver and click New Connection
- Select Apache Cassandra from the list
- Fill in the following:
- Host: 127.0.0.1
- Port: 9042
- Username: leave blank (default auth)
- Password: leave blank
- Click Test Connection — you should see a successful message Save and connect — you can now browse your keyspaces, tables, and run CQL visually.
Step 4: Create the Cassandra Table
Once connected (or in cqlsh), run:
CREATE KEYSPACE IF NOT EXISTS weather
WITH replication = {'class': 'SimpleStrategy', 'replication_factor': 1};

USE weather;

CREATE TABLE IF NOT EXISTS weather_data (
    city TEXT,
    timestamp TIMESTAMP,
    temperature FLOAT,
    humidity INT,
    PRIMARY KEY (city, timestamp)
);
This schema stores weather info per city, indexed by time.
You can also run the above queries in DBeaver’s SQL editor.
Step 5: Create Kafka Producer in Python
Install Dependencies
pip install requests confluent-kafka python-dotenv
Create a .env file:
BOOTSTRAP_SERVERS=pkc-xyz.us-central1.gcp.confluent.cloud:9092
SASL_USERNAME=API_KEY
SASL_PASSWORD=API_SECRET
OPENWEATHER_API_KEY=YOUR_OPENWEATHER_API_KEY
Python Script: weather_producer.py
import requests
import json
from confluent_kafka import Producer
import time
from dotenv import load_dotenv
import os

load_dotenv()

conf = {
    'bootstrap.servers': os.getenv("BOOTSTRAP_SERVERS"),
    'security.protocol': 'SASL_SSL',
    'sasl.mechanisms': 'PLAIN',
    'sasl.username': os.getenv("SASL_USERNAME"),
    'sasl.password': os.getenv("SASL_PASSWORD")
}

producer = Producer(conf)
API_KEY = os.getenv("OPENWEATHER_API_KEY")
TOPIC = 'weather-stream'
CITIES = ["Nairobi", "Lagos", "Accra", "Cairo", "Cape Town", "Addis Ababa", "Dakar", "Kampala", "Algiers"]

def get_weather(city):
    url = f'https://api.openweathermap.org/data/2.5/weather?q={city}&appid={API_KEY}&units=metric'
    response = requests.get(url)
    return response.json()

def delivery_report(err, msg):
    if err is not None:
        print(f"Delivery failed: {err}")
    else:
        print(f"Delivered to {msg.topic()} [{msg.partition()}] @ offset {msg.offset()}")

while True:
    for city in CITIES:
        weather = get_weather(city)
        weather['city'] = city  # Attach city explicitly
        producer.produce(TOPIC, json.dumps(weather).encode('utf-8'), callback=delivery_report)
        producer.flush()
        time.sleep(2)  # This will prevent API rate limit
    time.sleep(60)  # Wait before the next full cycle
This script loads credentials from .env, loops through several African cities, and sends weather data to your Kafka topic.
Step 6: Create Kafka Consumer in Python (Store Data in Cassandra)
Install additional libraries:
pip install cassandra-driver
Python Script: weather_consumer.py
import json
from cassandra.cluster import Cluster
from confluent_kafka import Consumer
import os
from dotenv import load_dotenv

load_dotenv()

# Cassandra connection
cluster = Cluster(['127.0.0.1'])
session = cluster.connect()
session.set_keyspace('weather')

# Kafka configuration
conf = {
    'bootstrap.servers': os.getenv("BOOTSTRAP_SERVERS"),
    'security.protocol': 'SASL_SSL',
    'sasl.mechanisms': 'PLAIN',
    'sasl.username': os.getenv("SASL_USERNAME"),
    'sasl.password': os.getenv("SASL_PASSWORD"),
    'group.id': 'weather-group',
    'auto.offset.reset': 'earliest'
}

consumer = Consumer(conf)
consumer.subscribe(['weather-stream'])

print("Listening for weather data...")

while True:
    msg = consumer.poll(1.0)
    if msg is None:
        continue
    if msg.error():
        print(f"Consumer error: {msg.error()}")
        continue

    data = json.loads(msg.value().decode('utf-8'))
    try:
        session.execute(
            """
            INSERT INTO weather_data (city, timestamp, temperature, humidity)
            VALUES (%s, toTimestamp(now()), %s, %s)
            """,
            (data['city'], data['main']['temp'], data['main']['humidity'])
        )
        print(f"Stored data for {data['city']}")
    except Exception as e:
        print(f"Failed to insert data: {e}")
This consumer listens to your Kafka topic, parses incoming messages, and stores them in the weather_data table.
Step 7: Querying Cassandra Data via DBeaver
Once the consumer is running and data is flowing, open DBeaver and run a CQL query to verify the data:
SELECT * FROM weather.weather_data;
You should now see rows of weather data streaming in from various African cities.
Conclusion & Next Steps
You’ve successfully built a real-time data pipeline using Python, Kafka, and Cassandra. Here’s a summary of what you’ve done:
- Set up Kafka via Confluent Cloud
- Pulled real-time weather data using OpenWeatherMap
- Streamed data to Kafka via a Python producer
- Consumed Kafka events and stored them in Cassandra
- Queried Cassandra data in DBeaver
Suggested Enhancements:
- Add Weather Alerts: Trigger notifications if temperatures exceed a threshold
- Streamlit Dashboard: Build a live dashboard showing city-by-city weather updates
- Data Retention Policy: Expire older data using Cassandra TTL
- Dockerize the Project: For easier deployment (optional since you skipped Docker)