![[The AI Show Episode 142]: ChatGPT’s New Image Generator, Studio Ghibli Craze and Backlash, Gemini 2.5, OpenAI Academy, 4o Updates, Vibe Marketing & xAI Acquires X](https://www.marketingaiinstitute.com/hubfs/ep%20142%20cover.png)


![From drop-out to software architect with Jason Lengstorf [Podcast #167]](https://cdn.hashnode.com/res/hashnode/image/upload/v1743796461357/f3d19cd7-e6f5-4d7c-8bfc-eb974bc8da68.png?#)


.png?#)


.webp?#)


_Christophe_Coat_Alamy.jpg?#)
 (1).webp?#)


![Apple Considers Delaying Smart Home Hub Until 2026 [Gurman]](https://www.iclarified.com/images/news/96946/96946/96946-640.jpg)
![iPhone 17 Pro Won't Feature Two-Toned Back [Gurman]](https://www.iclarified.com/images/news/96944/96944/96944-640.jpg)
![Tariffs Threaten Apple's $999 iPhone Price Point in the U.S. [Gurman]](https://www.iclarified.com/images/news/96943/96943/96943-640.jpg)


A Step-by-Step Guide to Migrating Files to Microsoft 365 Using the Migration Agent
Introduction Migrating your organization's files to Microsoft 365 is a transformative step that brings numerous benefits, such as enhanced collaboration, robust security, and seamless access to cutting-edge Office applications. By utilizing SharePoint, Teams, and OneDrive, your team can work more efficiently and productively in a cloud-based environment. To streamline this process, Microsoft provides the Migration Manager, accessible through the SharePoint Admin Center. This powerful tool allows you to set up multiple servers as "agents" to scale your migration efforts, ensuring a smooth and efficient transition. In this guide, we will walk you through the detailed process of downloading and using the Migration Agent to migrate your files to Microsoft 365, empowering your organization to fully leverage the cloud's capabilities. Step-by-Step Guide Step 1: Prepare for Migration Before initiating the migration process, ensure that you have the necessary permissions and access in place: Access to the SharePoint Admin Center: You must have SharePoint Administrator privileges or equivalent permissions to use the Migration Manager. Administrative Rights on the Computer: The Migration Agent needs to be installed on a computer or virtual machine (VM) where you have administrative rights. Read Access to File Shares: The Windows credentials used during agent setup must have read access to the file shares you intend to migrate. Proper preparation ensures a seamless setup and execution of the migration process. Step 2: Download and Install the Migration Agent Follow these steps to download and install the Migration Agent: - Sign in to the SharePoint Admin Center: Open your browser and log in to the SharePoint Admin Center using your SharePoint Admin credentials. - Navigate to the Migration Center: From the left-hand menu, select Migration to access the Migration Center. - Download the Agent Setup File: In the "For file shares" section, click Get started. Switch to the Agents tab and click Add. Click Download agent setup file to obtain the latest version of the Migration Agent. - Install the Agent: Locate the downloaded setup file on your computer or VM and run it. Follow the on-screen instructions to complete the installation. During the setup, you’ll be prompted to enter: Your SharePoint Admin credentials to authenticate with Microsoft 365. Windows credentials with read access to the file shares. Once installed, the agent runs as a service, connecting your on-premises source to your Microsoft 365 destination. Repeat this process on additional computers or VMs if you need multiple agents to handle larger migrations. Step 3: Set Up Migration Tasks With the agent installed, you can now configure migration tasks: Create a New Migration Task: In the Migration Center, click Add task. Choose between: Single source and destination: Ideal for migrating a few file shares. Bulk migration: Suitable for multiple file shares using a CSV file. - Specify the Source and Destination: Source: Input the file share path (e.g., \contoso\fileshare). Destination: Select the Microsoft 365 location—SharePoint site, OneDrive, or Teams—and provide the corresponding URL or account details. - Configure Task Settings: Assign a friendly name to your task for easy identification. Optionally, assign the task to a specific agent group if multiple agents are available. Adjust any additional settings, such as filters or permissions, as needed. - Schedule or Run the Task: Choose to run the task immediately or schedule it for a later time. Click Run to start the migration process. The Migration Manager can automatically distribute tasks across available agents, optimizing the migration workload. Step 4: Monitor Migration Progress Keep track of your migration tasks using the Migration Manager dashboard: - View Task Status: Return to the Migration Center to see the status of each task (e.g., Queued, In Progress, Completed). - Download Reports: After a task completes, download summary and detailed reports. These reports provide valuable insights, including migrated files, errors, or warnings encountered during the process. Monitoring ensures you can address any issues promptly and verify the migration’s progress. Step 5: Verify and Finalize Migration Once the migration is complete, take these final steps: Check Migrated Content: Visit the destination (SharePoint, OneDrive, or Teams) to confirm that all files have migrated successfully. Verify that permissions and metadata are intact as expected. Rerun Tasks if Necessary: If new or updated files need to be migrated, rerun the task to perform an incremental migration. This step ensures that your data is fully transitioned and accessible in Microsoft 365. Conclusion Migrating files to Microsoft 365 using the Migration
Introduction
Migrating your organization's files to Microsoft 365 is a transformative step that brings numerous benefits, such as enhanced collaboration, robust security, and seamless access to cutting-edge Office applications. By utilizing SharePoint, Teams, and OneDrive, your team can work more efficiently and productively in a cloud-based environment. To streamline this process, Microsoft provides the Migration Manager, accessible through the SharePoint Admin Center. This powerful tool allows you to set up multiple servers as "agents" to scale your migration efforts, ensuring a smooth and efficient transition. In this guide, we will walk you through the detailed process of downloading and using the Migration Agent to migrate your files to Microsoft 365, empowering your organization to fully leverage the cloud's capabilities.
Step-by-Step Guide
Step 1: Prepare for Migration
Before initiating the migration process, ensure that you have the necessary permissions and access in place:
- Access to the SharePoint Admin Center: You must have SharePoint Administrator privileges or equivalent permissions to use the Migration Manager.
- Administrative Rights on the Computer: The Migration Agent needs to be installed on a computer or virtual machine (VM) where you have administrative rights.
- Read Access to File Shares: The Windows credentials used during agent setup must have read access to the file shares you intend to migrate.
Proper preparation ensures a seamless setup and execution of the migration process.
Step 2: Download and Install the Migration Agent
Follow these steps to download and install the Migration Agent:
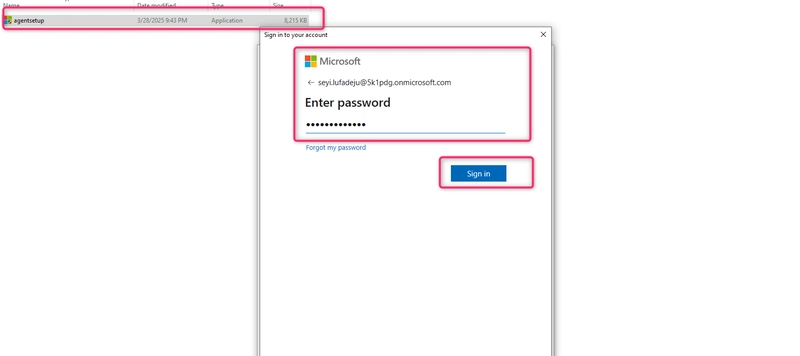
- Sign in to the SharePoint Admin Center:
- Open your browser and log in to the SharePoint Admin Center using your SharePoint Admin credentials.
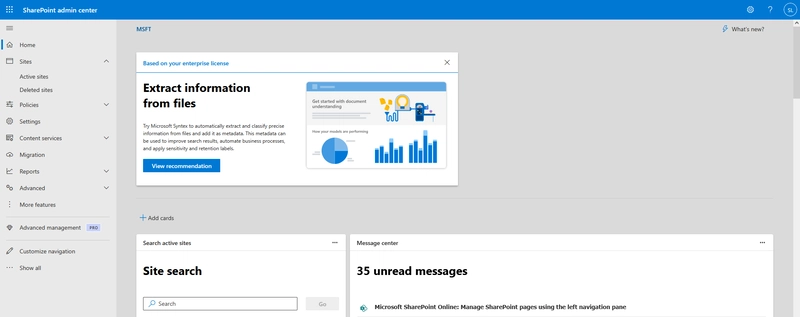
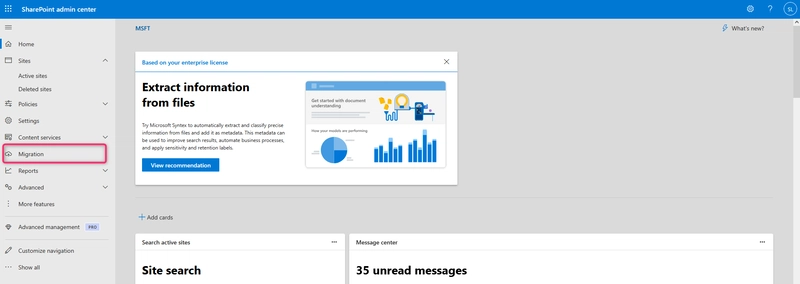
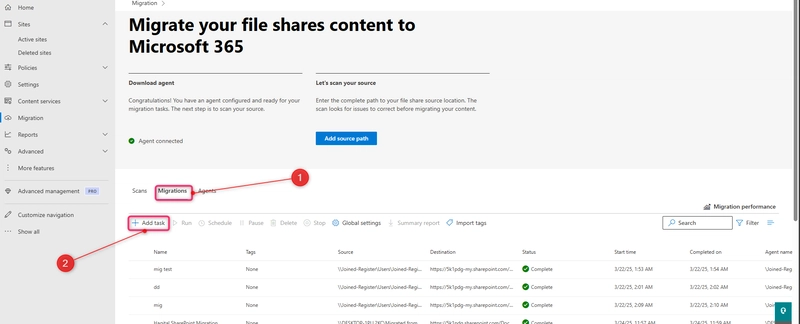
- Navigate to the Migration Center:
- From the left-hand menu, select Migration to access the Migration Center.
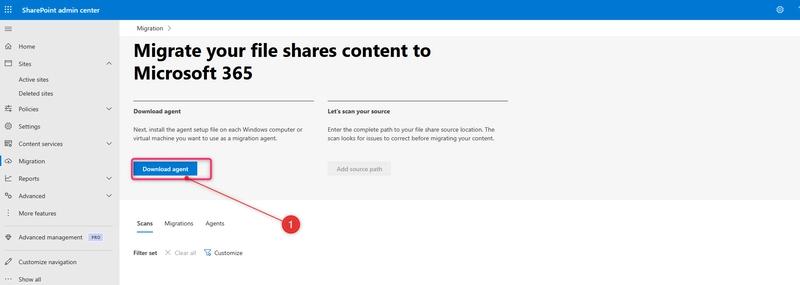
- Download the Agent Setup File:
- In the "For file shares" section, click Get started.
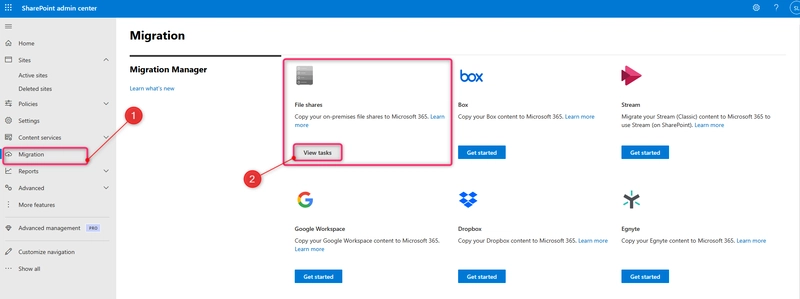
- Switch to the Agents tab and click Add.
- Click Download agent setup file to obtain the latest version of the Migration Agent.
- Install the Agent:
- Locate the downloaded setup file on your computer or VM and run it.
- Follow the on-screen instructions to complete the installation.
- During the setup, you’ll be prompted to enter:
- Your SharePoint Admin credentials to authenticate with Microsoft 365.
- Windows credentials with read access to the file shares.
- Once installed, the agent runs as a service, connecting your on-premises source to your Microsoft 365 destination.
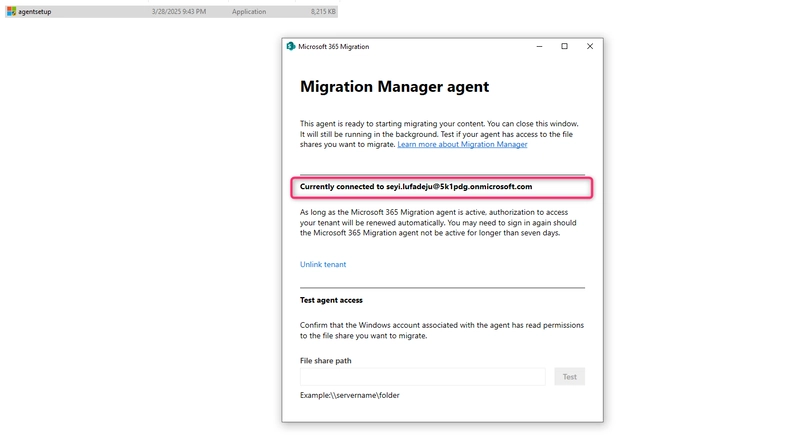
Repeat this process on additional computers or VMs if you need multiple agents to handle larger migrations.
Step 3: Set Up Migration Tasks
With the agent installed, you can now configure migration tasks:
Create a New Migration Task:
- In the Migration Center, click Add task.
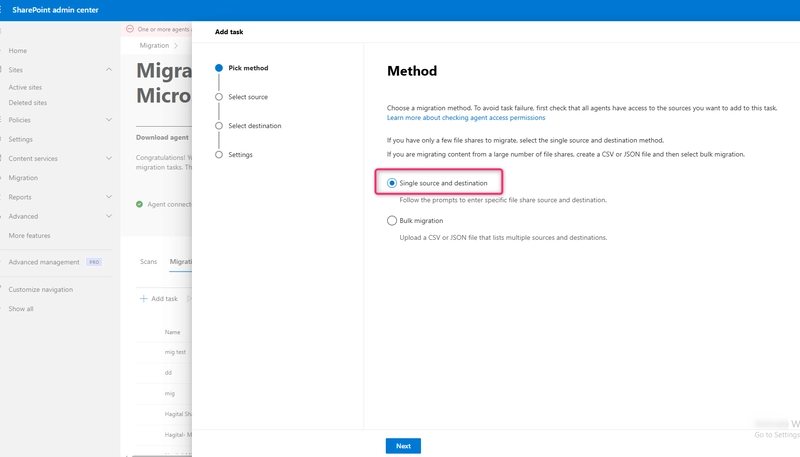
- Choose between:
- Single source and destination: Ideal for migrating a few file shares.
- Bulk migration: Suitable for multiple file shares using a CSV file.
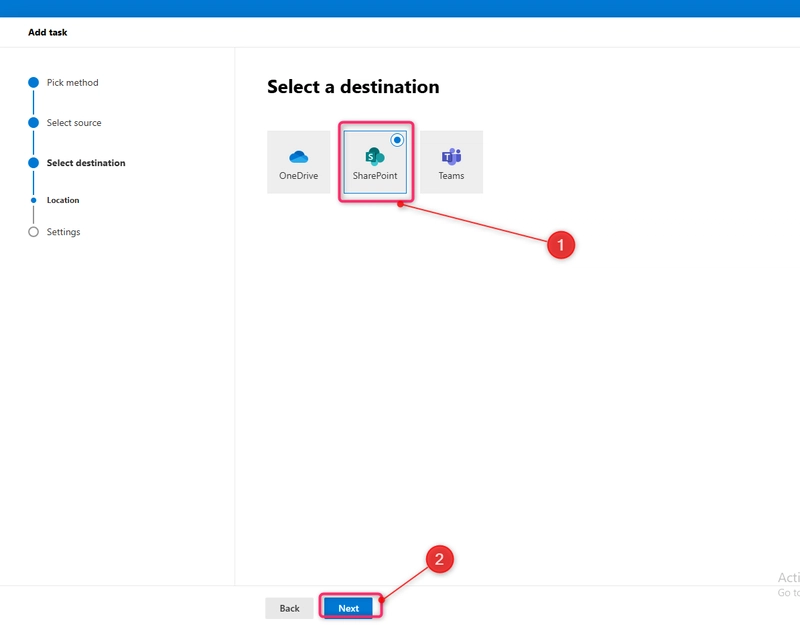
- Specify the Source and Destination:
- Source: Input the file share path (e.g., \contoso\fileshare).
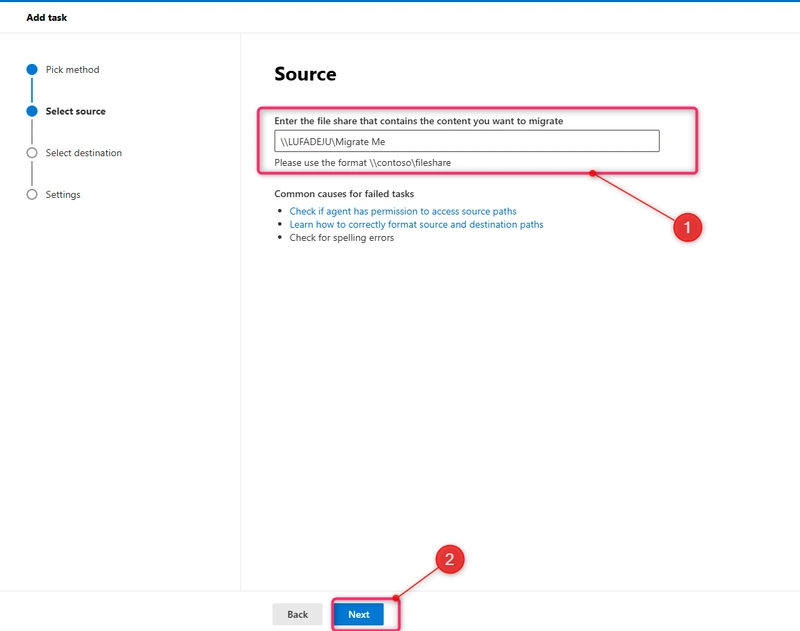
- Destination: Select the Microsoft 365 location—SharePoint site, OneDrive, or Teams—and provide the corresponding URL or account details.

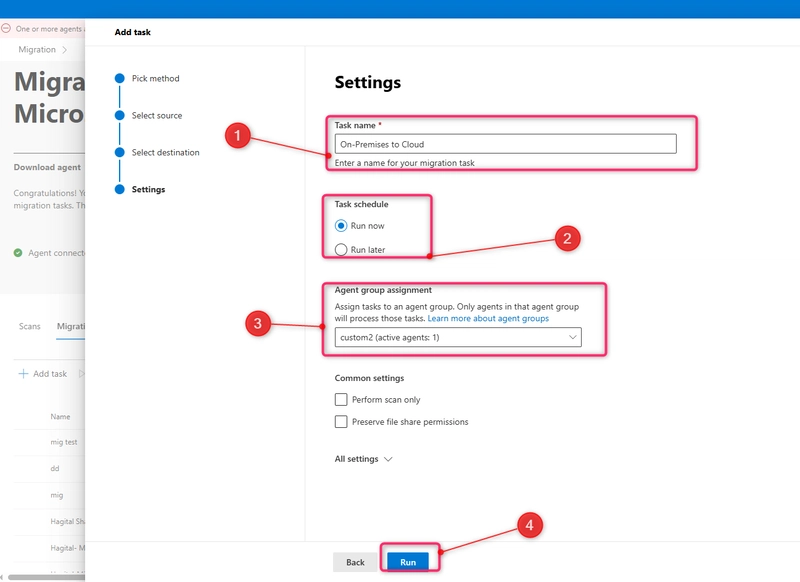
- Configure Task Settings:
- Assign a friendly name to your task for easy identification.
- Optionally, assign the task to a specific agent group if multiple agents are available.
- Adjust any additional settings, such as filters or permissions, as needed.
- Schedule or Run the Task:
- Choose to run the task immediately or schedule it for a later time.
- Click Run to start the migration process.
The Migration Manager can automatically distribute tasks across available agents, optimizing the migration workload.
Step 4: Monitor Migration Progress
Keep track of your migration tasks using the Migration Manager dashboard:
- View Task Status:
- Return to the Migration Center to see the status of each task (e.g., Queued, In Progress, Completed).
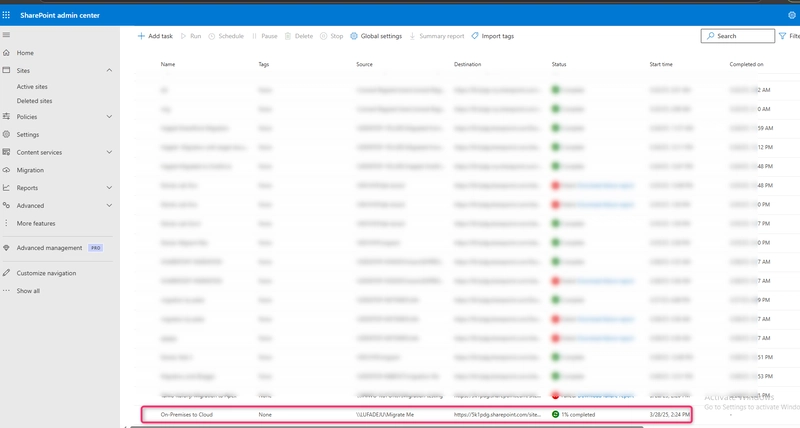
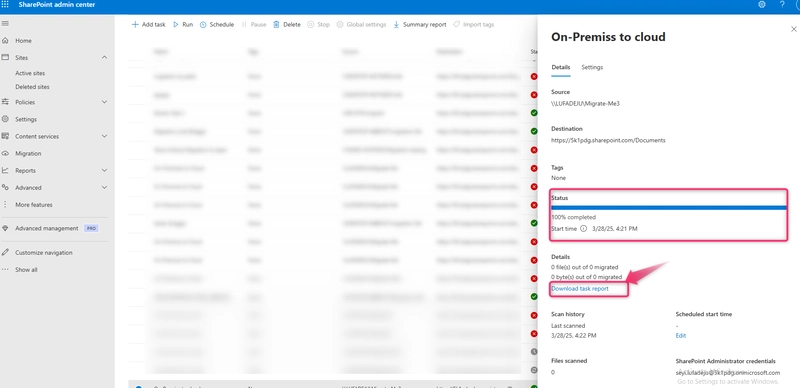
- Download Reports:
- After a task completes, download summary and detailed reports.
- These reports provide valuable insights, including migrated files, errors, or warnings encountered during the process. Monitoring ensures you can address any issues promptly and verify the migration’s progress.
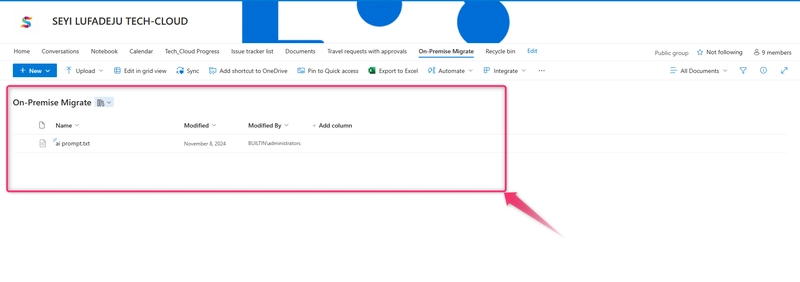
Step 5: Verify and Finalize Migration
Once the migration is complete, take these final steps:
Check Migrated Content:
- Visit the destination (SharePoint, OneDrive, or Teams) to confirm that all files have migrated successfully.
- Verify that permissions and metadata are intact as expected.
Rerun Tasks if Necessary:
- If new or updated files need to be migrated, rerun the task to perform an incremental migration.
- This step ensures that your data is fully transitioned and accessible in Microsoft 365.
Conclusion
Migrating files to Microsoft 365 using the Migration Agent from the SharePoint Admin Center is a straightforward yet powerful process that can revolutionize how your organization operates. By following this step-by-step guide, you can seamlessly transition your files to the cloud, unlocking enhanced collaboration, security, and productivity through Microsoft 365’s innovative tools. The Migration Manager simplifies the process by providing an intuitive interface, automated task distribution, and detailed monitoring capabilities. Embrace this opportunity to modernize your workflow and ensure a successful migration today!