


![[The AI Show Episode 144]: ChatGPT’s New Memory, Shopify CEO’s Leaked “AI First” Memo, Google Cloud Next Releases, o3 and o4-mini Coming Soon & Llama 4’s Rocky Launch](https://www.marketingaiinstitute.com/hubfs/ep%20144%20cover.png)


![Is this too much for a modular monolith system? [closed]](https://i.sstatic.net/pYL1nsfg.png)


_Andreas_Prott_Alamy.jpg?width=1280&auto=webp&quality=80&disable=upscale#)


![What features do you get with Gemini Advanced? [April 2025]](https://i0.wp.com/9to5google.com/wp-content/uploads/sites/4/2024/02/gemini-advanced-cover.jpg?resize=1200%2C628&quality=82&strip=all&ssl=1)


![Apple Shares Official Trailer for 'Long Way Home' Starring Ewan McGregor and Charley Boorman [Video]](https://www.iclarified.com/images/news/97069/97069/97069-640.jpg)
![Apple Watch Series 10 Back On Sale for $299! [Lowest Price Ever]](https://www.iclarified.com/images/news/96657/96657/96657-640.jpg)
![EU Postpones Apple App Store Fines Amid Tariff Negotiations [Report]](https://www.iclarified.com/images/news/97068/97068/97068-640.jpg)
![Apple Slips to Fifth in China's Smartphone Market with 9% Decline [Report]](https://www.iclarified.com/images/news/97065/97065/97065-640.jpg)


Zero-Downtime Application Deployment Using Blue-Green Architecture (Django App deploy)
Continuous Integration and Continuous Deployment (CI/CD) have become the backbone of DevOps, allowing faster delivery of applications. However, deployment failures can introduce downtime and affect user experience. To combat this, Blue-Green Deployment offers a mechanism to deploy new versions with zero downtime by running two environments simultaneously — one active (Green) and one standby (Blue). This project implements an automated CI/CD pipeline with integrated security and quality tools, along with containerization and Kubernetes-based orchestration to achieve safe and efficient deployments. Literature Review CI/CD Pipelines: CI/CD automates the process of software delivery and deployment. Jenkins is a widely adopted open-source automation tool for CI/CD. Code Quality Tools: Tools like SonarQube evaluate code quality by checking for bugs, vulnerabilities, and code smells. Security Scanning: OWASP Dependency Check and Trivy help identify security flaws in dependencies and container images respectively. Blue-Green Deployment: This deployment technique provides a safe way to roll out changes without affecting live traffic. Amazon EKS: A managed Kubernetes service that simplifies deploying, managing, and scaling containerized applications. Methodology The project methodology is based on an agile and iterative approach where each phase of the CI/CD pipeline is independently developed, tested, and integrated. Key tools and technologies used include: Jenkins for pipeline orchestration. SonarQube for static code analysis. OWASP Dependency Check for third-party vulnerability scanning. Trivy for Docker image vulnerability scanning. Docker Hub for image storage. Amazon EKS for orchestrating Blue-Green deployments. Setting Up the Foundation Spinning up EC2 instances (t2.large for Jenkins, t2.small for EKS management). Download Following tools in Jenkins Server (t2.large) Jenkins : Install Jenkins https://dev.to/bhaktraj/how-to-install-jenkins-in-ubuntu-2735 Docker : Install Docker https://dev.to/bhaktraj/docker-install-in-ubuntu-or-on-cloud-aws-provisioning-mfi SonarQube : After the docker installation, we create a sonarqube container (Remember to add 9000 ports in the security group). docker run -d --name sonarqube \ --restart always \ -p 9000:9000 \ -v sonarqube_conf:/opt/sonarqube/conf \ -v sonarqube_data:/opt/sonarqube/data \ -v sonarqube_extensions:/opt/sonarqube/extensions \ -v sonarqube_logs:/opt/sonarqube/logs \ sonarqube:lts-community Now our sonarqube is up and running on 9000 port Enter username and password, click on login and change password username admin password admin Update New password, This is Sonar Dashboard. Trivy : Install Trivy vim trivy.sh sudo apt-get install wget apt-transport-https gnupg lsb-release -y wget -qO - https://aquasecurity.github.io/trivy-repo/deb/public.key | gpg --dearmor | sudo tee /usr/share/keyrings/trivy.gpg > /dev/null echo "deb [signed-by=/usr/share/keyrings/trivy.gpg] https://aquasecurity.github.io/trivy-repo/deb $(lsb_release -sc) main" | sudo tee -a /etc/apt/sources.list.d/trivy.list sudo apt-get update sudo apt-get install trivy -y AWS CLI : Configure AWS With the help of IAM user Create a IAM User and and access with the command line IAM _Create a user “eks-admin” with AdministratorAccess Create Security Credentials Access Key and Secret access key _ Install AWS CLI v2 curl "https://awscli.amazonaws.com/awscli-exe-linux-x86_64.zip" -o "awscliv2.zip" sudo apt install unzip unzip awscliv2.zip sudo ./aws/install -i /usr/local/aws-cli -b /usr/local/bin --update Setup your access by aws configure kubectl : Install curl -o kubectl https://amazon-eks.s3.us-west-2.amazonaws.com/1.19.6/2021-01-05/bin/linux/amd64/kubectl chmod +x ./kubectl sudo mv ./kubectl /usr/local/bin kubectl version --short --client Next, we will log in to Jenkins and start to configure our Pipeline in Jenkins its running on 8080 ports http://ip_address:8080 Password is available on sudo cat sudo cat /var/lib/jenkins/secrets/initialAdminPassword copy it and paste to jenkins login and then configure it First some basic configure you have to configue and then after Install Plugins like Goto Manage Jenkins →Plugins → Available Plugins search these plugin and install it Sonarqube Scanner, OWASP Dependency Check, Docker, Docker Commons, Docker Pipeline, Docker API, docker-build-step Slack Notification Kubernetes CLI Plugin, Kubernetes Client API Plugin, Kubernetes Credentials Plugin, Kubernetes plugin Configure Sonar Server in Manage Jenkins: Grab the Public IP Address of your EC2 Instance, Sonarqube works on Port 9000, so :9000. Goto your Sonarqube Server. Click on Administration → Security → Users → Click on Tokens and Update Token → Give it a name → and click on Generate Token copy Token Goto Jenkins Dashboard → Manage Jenkins → Credentials → Add Secret Text.
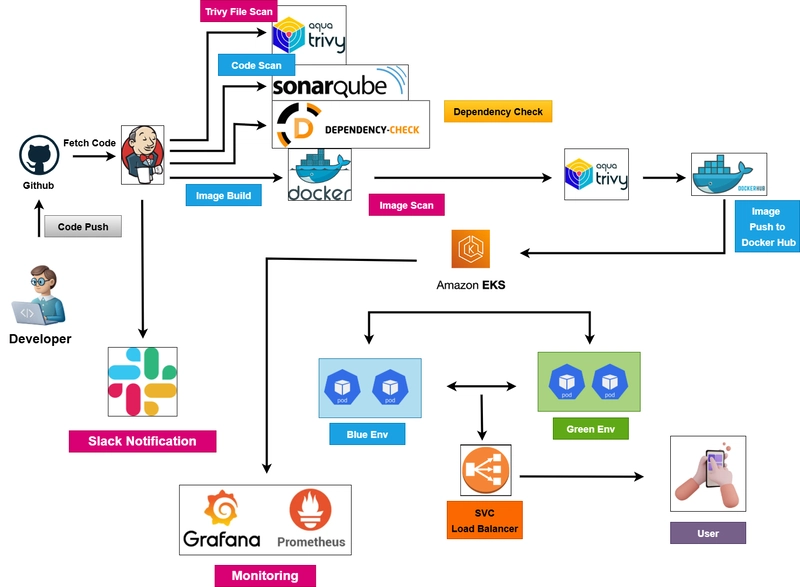
Continuous Integration and Continuous Deployment (CI/CD) have become the backbone of DevOps, allowing faster delivery of applications. However, deployment failures can introduce downtime and affect user experience. To combat this, Blue-Green Deployment offers a mechanism to deploy new versions with zero downtime by running two environments simultaneously — one active (Green) and one standby (Blue). This project implements an automated CI/CD pipeline with integrated security and quality tools, along with containerization and Kubernetes-based orchestration to achieve safe and efficient deployments.
Literature Review
CI/CD Pipelines: CI/CD automates the process of software delivery and deployment. Jenkins is a widely adopted open-source automation tool for CI/CD.
Code Quality Tools: Tools like SonarQube evaluate code quality by checking for bugs, vulnerabilities, and code smells.
Security Scanning: OWASP Dependency Check and Trivy help identify security flaws in dependencies and container images respectively.
Blue-Green Deployment: This deployment technique provides a safe way to roll out changes without affecting live traffic.
Amazon EKS: A managed Kubernetes service that simplifies deploying, managing, and scaling containerized applications.
Methodology
The project methodology is based on an agile and iterative approach where each phase of the CI/CD pipeline is independently developed, tested, and integrated. Key tools and technologies used include:
Jenkins for pipeline orchestration.
SonarQube for static code analysis.
OWASP Dependency Check for third-party vulnerability scanning.
Trivy for Docker image vulnerability scanning.
Docker Hub for image storage.
Amazon EKS for orchestrating Blue-Green deployments.
Setting Up the Foundation
Spinning up EC2 instances (t2.large for Jenkins, t2.small for EKS management).
Download Following tools in Jenkins Server (t2.large)
Jenkins : Install Jenkins https://dev.to/bhaktraj/how-to-install-jenkins-in-ubuntu-2735
Docker : Install Docker https://dev.to/bhaktraj/docker-install-in-ubuntu-or-on-cloud-aws-provisioning-mfi
SonarQube : After the docker installation, we create a sonarqube container (Remember to add 9000 ports in the security group).
docker run -d --name sonarqube \
  --restart always \
  -p 9000:9000 \
  -v sonarqube_conf:/opt/sonarqube/conf \
  -v sonarqube_data:/opt/sonarqube/data \
  -v sonarqube_extensions:/opt/sonarqube/extensions \
  -v sonarqube_logs:/opt/sonarqube/logs \
  sonarqube:lts-community
Now our sonarqube is up and running on 9000 port
Enter username and password, click on login and change password
username admin
password admin
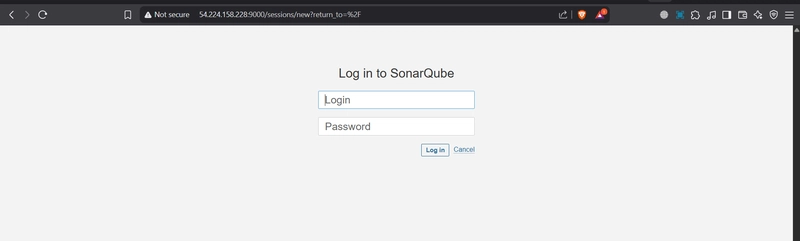
Update New password, This is Sonar Dashboard.
- Trivy : Install Trivy
vim trivy.sh
sudo apt-get install wget apt-transport-https gnupg lsb-release -y
wget -qO - https://aquasecurity.github.io/trivy-repo/deb/public.key | gpg --dearmor | sudo tee /usr/share/keyrings/trivy.gpg > /dev/null
echo "deb [signed-by=/usr/share/keyrings/trivy.gpg] https://aquasecurity.github.io/trivy-repo/deb $(lsb_release -sc) main" | sudo tee -a /etc/apt/sources.list.d/trivy.list
sudo apt-get update
sudo apt-get install trivy -y
- AWS CLI : Configure AWS With the help of IAM user Create a IAM User and and access with the command line
IAM
_Create a user “eks-admin” with AdministratorAccess
Create Security Credentials Access Key and Secret access key _
Install AWS CLI v2
curl "https://awscli.amazonaws.com/awscli-exe-linux-x86_64.zip" -o "awscliv2.zip"
sudo apt install unzip
unzip awscliv2.zip
sudo ./aws/install -i /usr/local/aws-cli -b /usr/local/bin --update
Setup your access by
aws configure
- kubectl : Install
curl -o kubectl https://amazon-eks.s3.us-west-2.amazonaws.com/1.19.6/2021-01-05/bin/linux/amd64/kubectl
chmod +x ./kubectl
sudo mv ./kubectl /usr/local/bin
kubectl version --short --client
Next, we will log in to Jenkins and start to configure our Pipeline in Jenkins its running on 8080 ports
Password is available on
sudo cat sudo cat /var/lib/jenkins/secrets/initialAdminPassword
copy it and paste to jenkins login
and then configure it
First some basic configure you have to configue
and then after
Install Plugins like
Goto Manage Jenkins →Plugins → Available Plugins
search these plugin and install it
- Sonarqube Scanner,
- OWASP Dependency Check,
- Docker, Docker Commons, Docker Pipeline, Docker API, docker-build-step
- Slack Notification
- Kubernetes CLI Plugin, Kubernetes Client API Plugin, Kubernetes Credentials Plugin, Kubernetes plugin
Configure Sonar Server in Manage Jenkins:
Grab the Public IP Address of your EC2 Instance, Sonarqube works on Port 9000,
so :9000.
Goto your Sonarqube Server. Click on Administration → Security → Users → Click on Tokens and Update Token → Give it a name → and click on Generate Token

copy Token
Goto Jenkins Dashboard → Manage Jenkins → Credentials → Add Secret Text. It should look like this
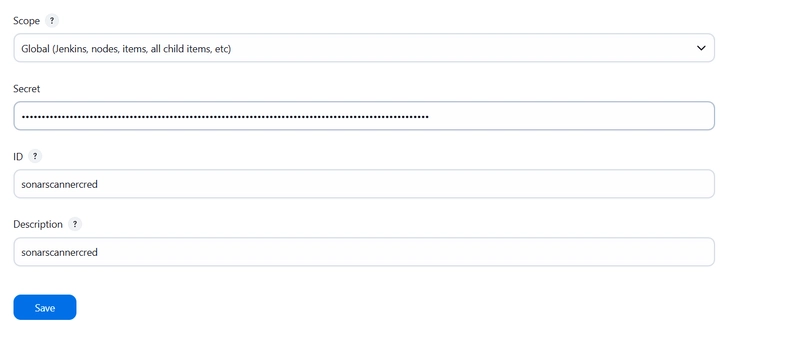
You will this page once you click on create
Now, go to Dashboard → Manage Jenkins → System and Add like the below image.
you can leave the server url because sonarqube is running in local host or you can paste the public ip
like
http://ip_address:9000
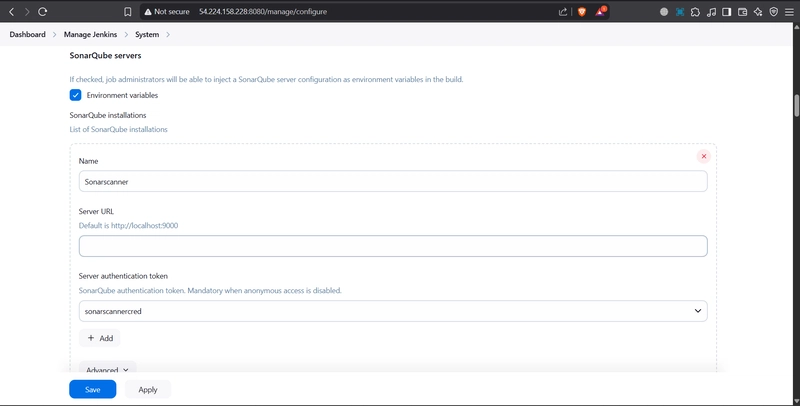
Click on Apply and Save
The Configure System option is used in Jenkins to configure different server
Global Tool Configuration is used to configure different tools that we install using Plugins
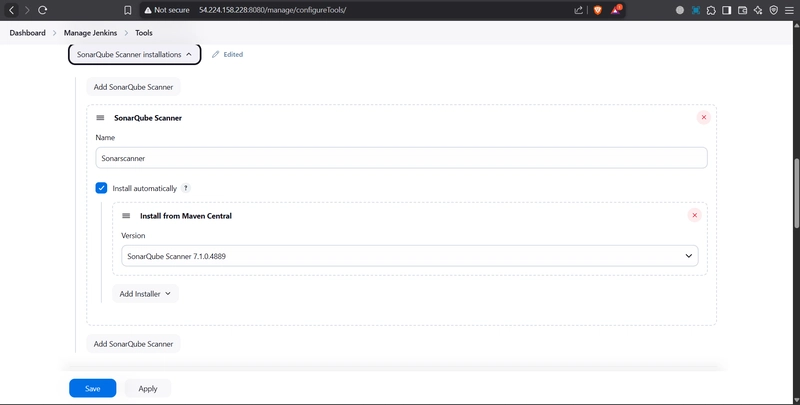
We will install a sonar scanner in the tools.
Configure OWASP Dependency Check Tool:
Plugin is install now we had to configure the Tool
Goto Dashboard → Manage Jenkins → Tools →
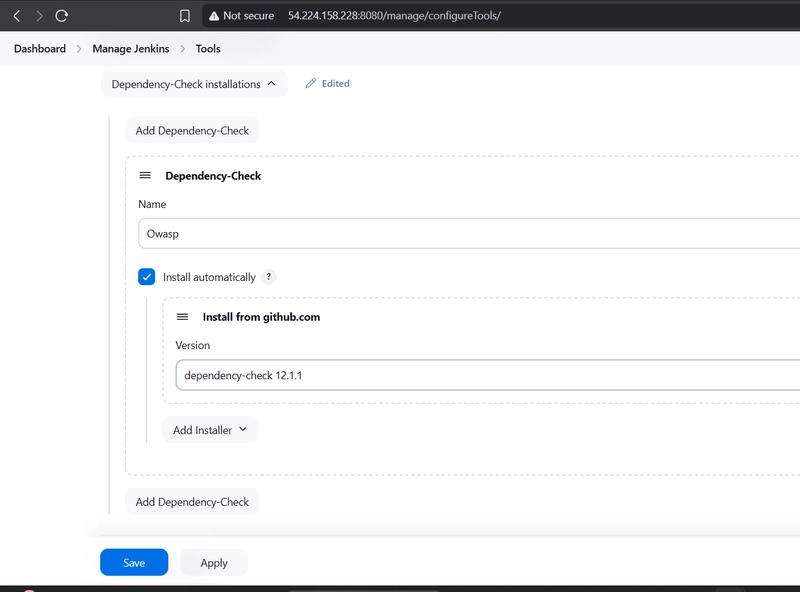
Click on Apply and Save here.
Configure Docker Tools:
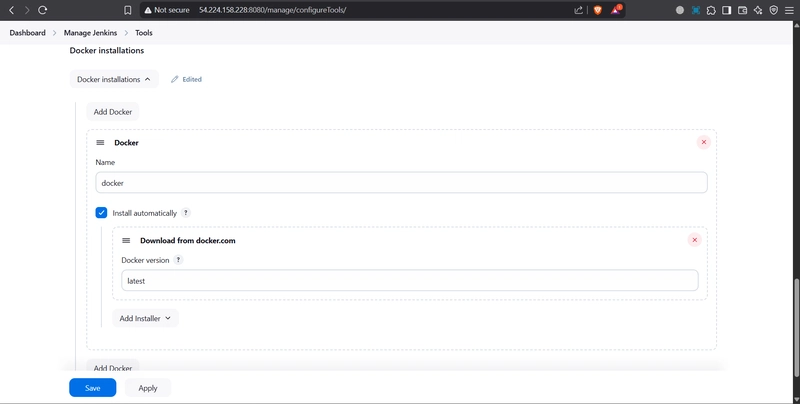
Add DockerHub Username and Password under Global Credentials
Goto Jenkins Dashboard → Manage Jenkins → Credentials → set username and password It should look like this
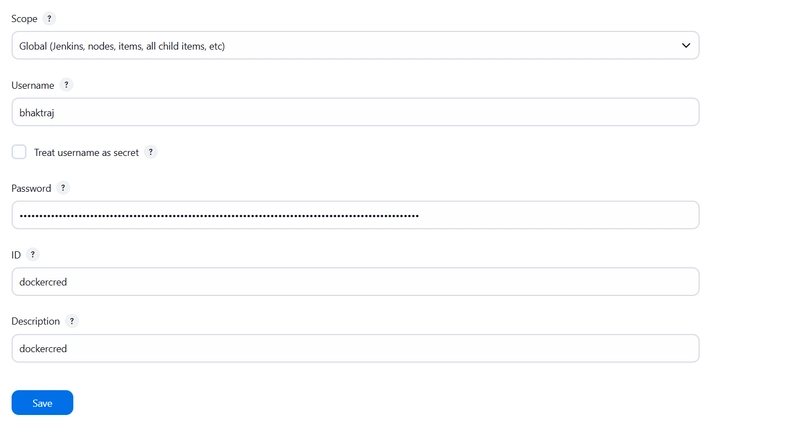
For more Security
Create a token on docker hub and paste it on password
Goto DockerHub Dashboard → Account Setting → Personal access tokens → It should look like this
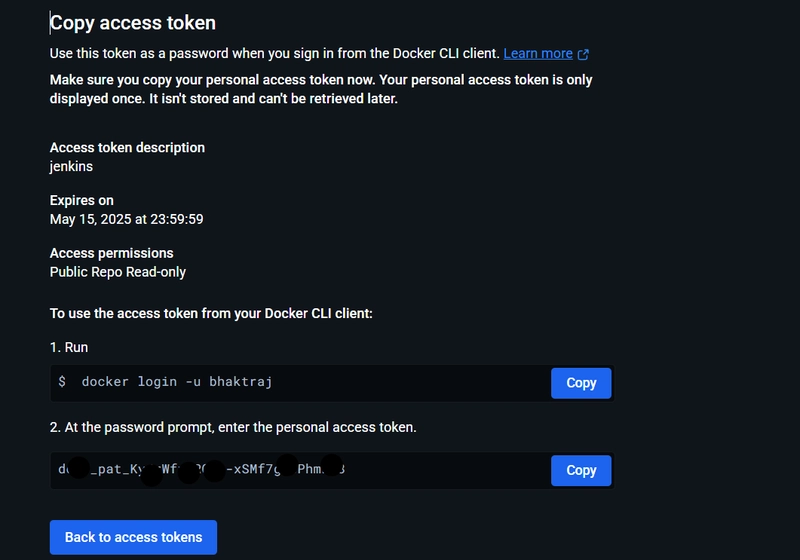
Password Prompt paste it to password section of jenkins credential
Now configure Slack For notification
goto https://slack.com/marketplace/A0F7VRFKN-jenkins-ci
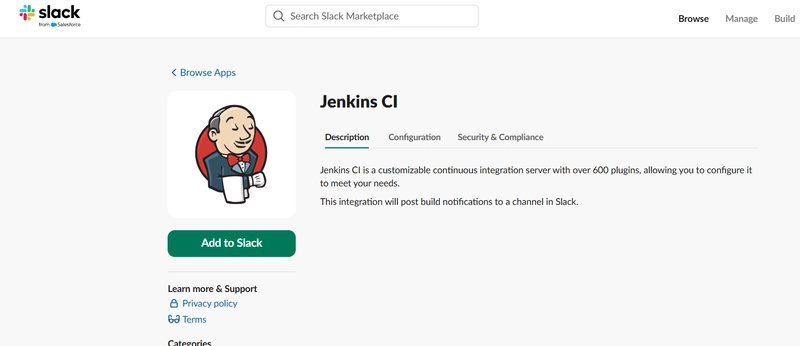
Click on add to slack
Select the channel and add jenkins ci integration
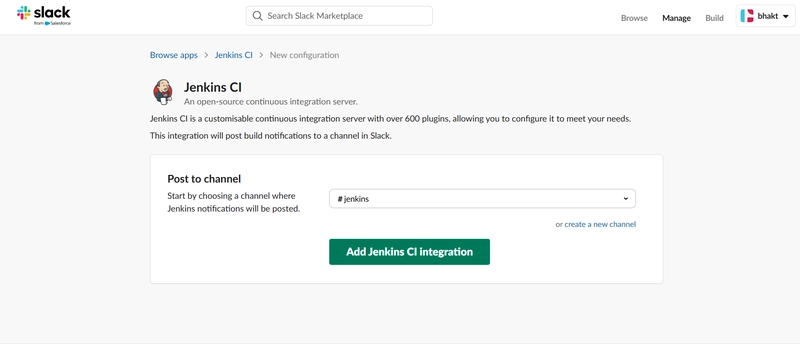
Follow the steps that are mention or simply copy the token and paste to jenkins Credential
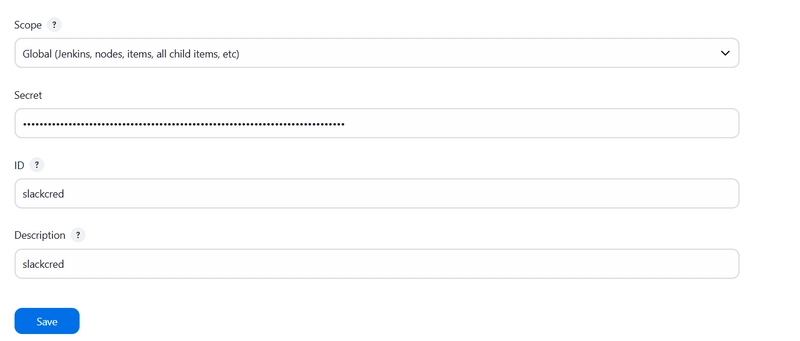
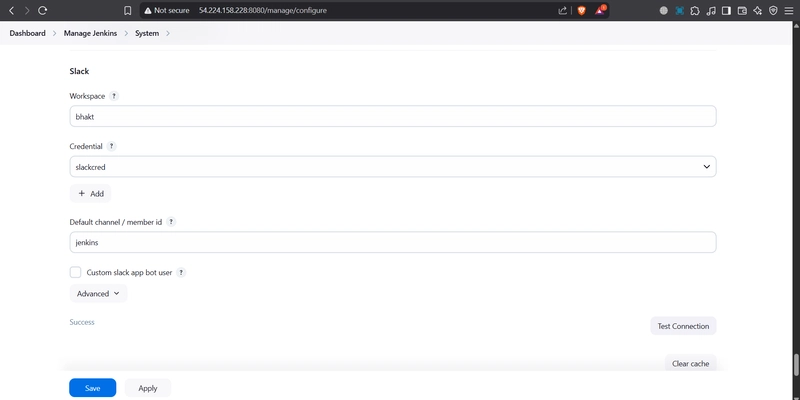
and update the slack setting in jenkins
by
go to Dashboard → Manage Jenkins → System and Add like the below image.
and details are taken by slack dashboard of that channel check it is it wokking properly or not if success message show that means slack is connected
Now Setting a EKS Management server
Launch a EC2 Instance with t2small instance type
Configure the following things
IAM
_Create a user “eks-admin” with AdministratorAccess
Create Security Credentials Access Key and Secret access key _
Install AWS CLI v2
curl "https://awscli.amazonaws.com/awscli-exe-linux-x86_64.zip" -o "awscliv2.zip"
sudo apt install unzip
unzip awscliv2.zip
sudo ./aws/install -i /usr/local/aws-cli -b /usr/local/bin --update
Setup your access by
aws configure
curl -o kubectl https://amazon-eks.s3.us-west-2.amazonaws.com/1.19.6/2021-01-05/bin/linux/amd64/kubectl
chmod +x ./kubectl
sudo mv ./kubectl /usr/local/bin
kubectl version --short --client
Install eksctl
curl --silent --location "https://github.com/weaveworks/eksctl/releases/latest/download/eksctl_$(uname -s)_amd64.tar.gz" | tar xz -C /tmp
sudo mv /tmp/eksctl /usr/local/bin
eksctl version
Setup EKS Cluster
eksctl create cluster --name blue-green-deployment --region us-east-1 --node-type t2.medium --nodes-min 2 --nodes-max 2 --node-volume-size 10
aws eks update-kubeconfig --region us-east-1 --name blue-green-deployment
kubectl get nodes
Kubernetes Configuration for Jenkins Deployment Access
Run Kubernetes manifest files to:
- Create a Service Account for Jenkins.
vi serviceaccount.yml
apiVersion: v1
kind: ServiceAccount
metadata:
  name: jenkins
  namespace: webapps
note: edit the intent
- Create a Role.
vi role.yml
apiVersion: rbac.authorization.k8s.io/v1
kind: Role
metadata:
  name: app-role
  namespace: webapps
rules:
  - apiGroups:
        - ""
        - apps
        - autoscaling
        - batch
        - extensions
        - policy
        - rbac.authorization.k8s.io
    resources:
      - pods
      - componentstatuses
      - configmaps
      - daemonsets
      - deployments
      - events
      - endpoints
      - horizontalpodautoscalers
      - ingress
      - jobs
      - limitranges
      - namespaces
      - nodes
      - secrets
      - pods
      - persistentvolumes
      - persistentvolumeclaims
      - resourcequotas
      - replicasets
      - replicationcontrollers
      - serviceaccounts
      - services
    verbs: ["get", "list", "watch", "create", "update", "patch", "delete"]
- Create a Role and bind it to the service account.
vi rolebindservice.yml
apiVersion: rbac.authorization.k8s.io/v1
kind: RoleBinding
metadata:
  name: app-rolebinding
  namespace: webapps
roleRef:
  apiGroup: rbac.authorization.k8s.io
  kind: Role
  name: app-role
subjects:
- namespace: webapps
  kind: ServiceAccount
  name: jenkins
- Create a ClusterRole and bind it as well.
apiVersion: rbac.authorization.k8s.io/v1
kind: ClusterRole
metadata:
  name: jenkins-cluster-role
rules:
- apiGroups: [""]
  resources: ["persistentvolumes"]
  verbs: ["get", "list", "watch", "create", "update", "patch", "delete"]

---

apiVersion: rbac.authorization.k8s.io/v1
kind: ClusterRoleBinding
metadata:
  name: jenkins-cluster-role-binding
subjects:
- kind: ServiceAccount
  name: jenkins
  namespace: webapps
roleRef:
  kind: ClusterRole
  name: jenkins-cluster-role
  apiGroup: rbac.authorization.k8s.io
- Generate token using service account in the namespace
create token
vi token.yml
apiVersion: v1
kind: Secret
type: kubernetes.io/service-account-token
metadata:
  name: mysecretname
  annotations:
    kubernetes.io/service-account.name: jenkins
Run Manifests
kubectl create namespace webapps
kubectl apply -f . -n webapps
Copy the token and add it to Jenkins credentials to allow Jenkins to deploy applications onto EKS securely.
kubectl describe secret mysecretname -n webapps
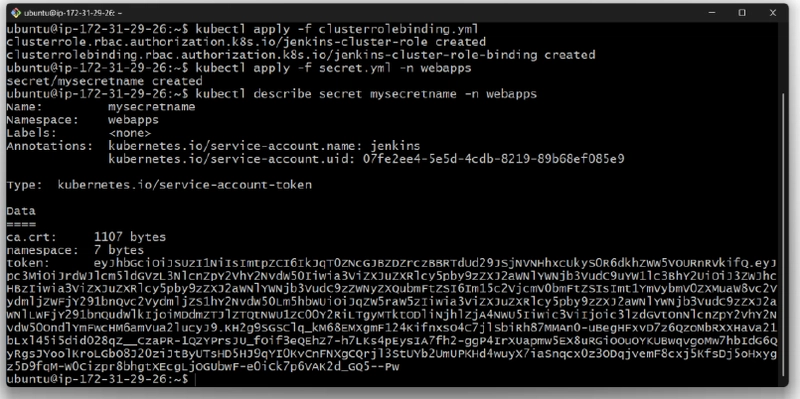
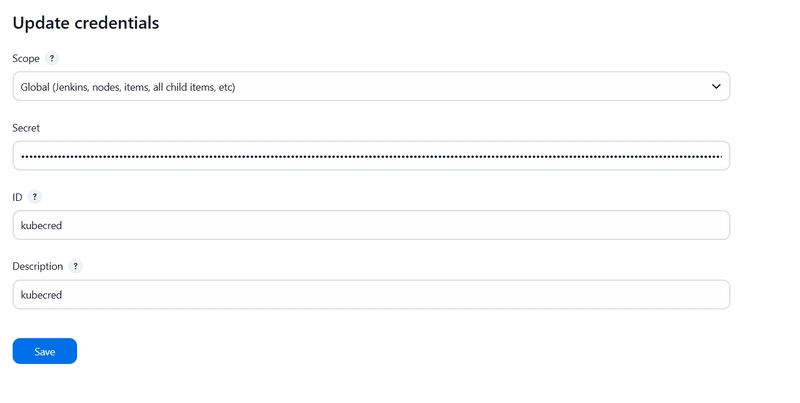
Paste this token to jenkns credential
Goto Jenkins Dashboard → Manage Jenkins → Credentials → set Secret key
It should look like this
Create a Job on Jenkins
Dashboard and then New Item name the job "Blue-green-Deployment"(What every you want) and then click on ok
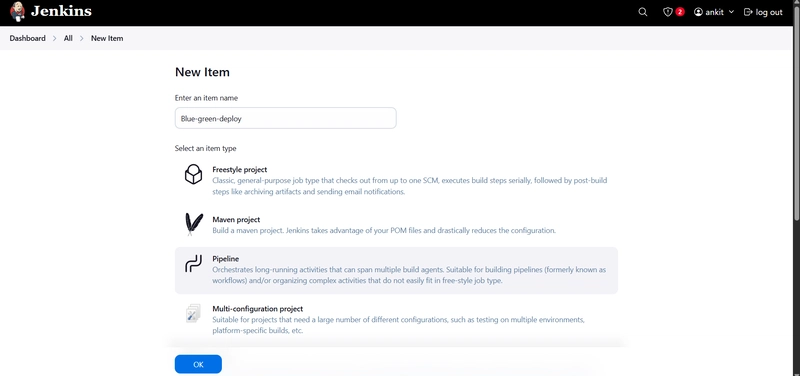
Upload the Script And Click on OK
def COLOR_MAP = [
    'success': 'good',
    'FAILURE': 'danger',
]
pipeline {

    agent any


    parameters {
        choice(name: 'DEPLOY_ENV', choices: ['blue', 'green'], description: 'Choose which environment to deploy: Blue or Green')
        booleanParam(name: 'SWITCH_TRAFFIC', defaultValue: false, description: 'Switch traffic between Blue and Green')
    }

    stages{
        stage('clean workspace'){
            steps{
                cleanWs()
            }
        }

        stage('Fetch the code'){
            steps{
                git url: 'https://github.com/bhaktraj/vkonsec.git', branch: 'kubernetes'

            }
        }

        stage('TRIVY FS SCAN') {
            steps {
                sh "trivy fs . > trivyfs.txt"
            }
        }

        stage('sonarqube scan'){
            environment {
             scannerHome = tool 'Sonarscanner'
          }

          steps {
            withSonarQubeEnv('Sonarscanner') {
               sh '''${scannerHome}/bin/sonar-scanner -Dsonar.projectKey=vkonsec \
                   -Dsonar.projectName=vkonsec \
                   -Dsonar.projectVersion=1.0 \
                   -Dsonar.sources=. \
                   '''
            }
        }
        }
        stage('OWASP Dependency Check') {
            steps {
                dependencyCheck additionalArguments: '--scan ./ --format XML --out dependency-check-report --project vkonsec-django --enableExperimental', odcInstallation: 'Owasp'
                dependencyCheckPublisher pattern: '**/dependency-check-report.xml'

            }
        }
        stage('Build docker images'){
            steps{
                script{
                    dockerimage = docker.build('vkonsec' + ":$BUILD_NUMBER", ".")
                    dockerimage = docker.build('nginx' + ":$BUILD_NUMBER", "./nginx")

                }

            }
        }
        stage("TRIVY"){
            steps{
                sh "trivy image vkonsec:$BUILD_NUMBER > trivy.txt"
            }
        }
        stage("Docker Push"){
            steps{
                script{
                   withDockerRegistry(credentialsId: 'dockercred', toolName: 'docker'){
                       sh "docker tag vkonsec:$BUILD_NUMBER bhaktraj/vkonsec:$BUILD_NUMBER "
                       sh "docker tag nginx:$BUILD_NUMBER bhaktraj/nginx:$BUILD_NUMBER "
                       sh "docker push bhaktraj/vkonsec:$BUILD_NUMBER "
                       sh "docker push bhaktraj/nginx:$BUILD_NUMBER "
                    }
                }
            }
        }
        stage('Persistent Volume Claim for MySQL') {
            steps {
                script {
                    withKubeConfig(caCertificate: '', clusterName: 'blue-green-deployment', contextName: '', credentialsId: 'kubecred', namespace: 'webapps', restrictKubeConfigAccess: false, serverUrl: 'https://3CA6E485D43C0E5E4EB7B7108ECACEA2.gr7.us-east-1.eks.amazonaws.com') {
                        sh """ if ! kubectl get pvc mysql-pvc -n webapps; then
                                kubectl apply -f k8/mysql-pvc.yaml -n webapps
                            fi
                        """
                    }
                }
            }
        }
        stage('Deploying MySQL') {
            steps {
                script {
                    withKubeConfig(caCertificate: '', clusterName: 'blue-green-deployment', contextName: '', credentialsId: 'kubecred', namespace: 'webapps', restrictKubeConfigAccess: false, serverUrl: 'https://3CA6E485D43C0E5E4EB7B7108ECACEA2.gr7.us-east-1.eks.amazonaws.com') {
                        sh """
                        kubectl apply -f k8/mysql-deployment.yaml -n webapps
                        kubectl apply -f k8/mysql-service.yaml -n webapps
                        """
                    }
                }
            }
        }

        stage('Update K8s Manifest') {
            steps {
                sh " sed -i 's/buildid/$BUILD_NUMBER/g' k8/django-blue-deployment.yaml "
                sh " sed -i 's/buildid/$BUILD_NUMBER/g' k8/django-green-deployment.yaml "
                sh " sed -i 's/buildid/$BUILD_NUMBER/g' k8/nginx-deployment.yaml "
            }
        }

        stage('Application deployment') {
            steps {
                script {
                    def deploymentFile = ""
                    if (params.DEPLOY_ENV == 'blue') {
                        deploymentFile = 'k8/django-blue-deployment.yaml'
                    } else {
                        deploymentFile = 'k8/django-green-deployment.yaml'
                    }

                    withKubeConfig(caCertificate: '', clusterName: 'blue-green-deployment', contextName: '', credentialsId: 'kubecred', namespace: 'webapps', restrictKubeConfigAccess: false, serverUrl: 'https://3CA6E485D43C0E5E4EB7B7108ECACEA2.gr7.us-east-1.eks.amazonaws.com')
                    {
                        sh "kubectl apply -f ${deploymentFile} -n webapps"
                        sh "kubectl apply -f k8/django-service.yaml -n webapps"
                    }
                }
            }
        }

        stage('Switch Traffic Between Blue & Green Environment') {
            when {
                expression { return params.SWITCH_TRAFFIC }
            }
            steps {
                script {
                    def newEnv = params.DEPLOY_ENV

                    // Always switch traffic based on DEPLOY_ENV
                    withKubeConfig(caCertificate: '', clusterName: 'blue-green-deployment', contextName: '', credentialsId: 'kubecred', namespace: 'webapps', restrictKubeConfigAccess: false, serverUrl: 'https://3CA6E485D43C0E5E4EB7B7108ECACEA2.gr7.us-east-1.eks.amazonaws.com') {
                        sh '''
                            kubectl patch service djangoapp -p "{\\"spec\\": {\\"selector\\": {\\"app\\": \\"djangoapp\\", \\"version\\": \\"''' + newEnv + '''\\"}}}" -n webapps
                        '''
                    }
                    echo "Traffic has been switched to the ${newEnv} environment."
                }
            }
        }
        stage('Deploy Nginx') {
            steps {
                script {
                    withKubeConfig(caCertificate: '', clusterName: 'blue-green-deployment', contextName: '', credentialsId: 'kubecred', namespace: 'webapps', restrictKubeConfigAccess: false, serverUrl: 'https://3CA6E485D43C0E5E4EB7B7108ECACEA2.gr7.us-east-1.eks.amazonaws.com') {
                        sh """
                        kubectl apply -f k8/nginx-deployment.yaml -n webapps
                        kubectl apply -f k8/nginx-service.yaml -n webapps
                        """
                    }
                }
            }
        }

        stage('Verify Deployment') {
            steps {
                script {
                    def verifyEnv = params.DEPLOY_ENV
                    withKubeConfig(caCertificate: '', clusterName: 'blue-green-deployment', contextName: '', credentialsId: 'kubecred', namespace: 'webapps', restrictKubeConfigAccess: false, serverUrl: 'https://3CA6E485D43C0E5E4EB7B7108ECACEA2.gr7.us-east-1.eks.amazonaws.com') {
                        sh """
                        kubectl get pods -l version=${verifyEnv} -n webapps
                        kubectl get svc nginx -n webapps
                        """
                    }
                }
            }
        }


    }
    post {
        always {
            echo 'slack Notification'
            slackSend channel: '#jenkins',
                color:  COLOR_MAP[currentBuild.currentResult],
                message:"*${currentBuild.currentResult}:* Job ${env.JOB_NAME} build ${env.BUILD_NUMBER} \n more info at : ${env.BUILD_URL}"
            slackUploadFile channel: '#jenkins',
                filePath: '/var/lib/jenkins/workspace/pipeline/trivy.txt',
                initialComment: "