.jpg)


![[Webinar] AI Is Already Inside Your SaaS Stack — Learn How to Prevent the Next Silent Breach](https://blogger.googleusercontent.com/img/b/R29vZ2xl/AVvXsEiOWn65wd33dg2uO99NrtKbpYLfcepwOLidQDMls0HXKlA91k6HURluRA4WXgJRAZldEe1VReMQZyyYt1PgnoAn5JPpILsWlXIzmrBSs_TBoyPwO7hZrWouBg2-O3mdeoeSGY-l9_bsZB7vbpKjTSvG93zNytjxgTaMPqo9iq9Z5pGa05CJOs9uXpwHFT4/s1600/ai-cyber.jpg?#)


![[The AI Show Episode 144]: ChatGPT’s New Memory, Shopify CEO’s Leaked “AI First” Memo, Google Cloud Next Releases, o3 and o4-mini Coming Soon & Llama 4’s Rocky Launch](https://www.marketingaiinstitute.com/hubfs/ep%20144%20cover.png)


![Rogue Company Elite tier list of best characters [April 2025]](https://media.pocketgamer.com/artwork/na-33136-1657102075/rogue-company-ios-android-tier-cover.jpg?#)


_Andreas_Prott_Alamy.jpg?width=1280&auto=webp&quality=80&disable=upscale#)


![What’s new in Android’s April 2025 Google System Updates [U: 4/18]](https://i0.wp.com/9to5google.com/wp-content/uploads/sites/4/2025/01/google-play-services-3.jpg?resize=1200%2C628&quality=82&strip=all&ssl=1)


![Apple Watch Series 10 Back On Sale for $299! [Lowest Price Ever]](https://www.iclarified.com/images/news/96657/96657/96657-640.jpg)
![EU Postpones Apple App Store Fines Amid Tariff Negotiations [Report]](https://www.iclarified.com/images/news/97068/97068/97068-640.jpg)
![Apple Slips to Fifth in China's Smartphone Market with 9% Decline [Report]](https://www.iclarified.com/images/news/97065/97065/97065-640.jpg)


Using NFS in Kubernetes – A Simple Guide to Shared Storage
Kubernetes is powerful when it comes to managing containerized workloads, but things get tricky when your applications need shared storage. That’s where NFS (Network File System) comes in. It's a tried-and-tested way to share files across multiple pods and services in a cluster. In this blog, we’ll walk through why and when to use NFS in Kubernetes, how to set it up using Persistent Volumes (PV) and Persistent Volume Claims (PVC), and key things to watch out for. we will set up a simple NFS server on Ubuntu and make use of it in a nginx container running on a Kubernetes cluster NFS is pretty straightforward to set up, you install the server, export a share and away you go. However it seems that there's a lot of struggles around permissions and I have had some issues my self so I thought I'd create a short write up, mostly for my own reference. Step 1: Launch an EC2 Instance for Your Lab To begin, we need a Linux machine that will act as our NFS server and possibly host a lightweight Kubernetes cluster (like Minikube or K3s). For this setup, I'm using an Amazon EC2 instance with the following specs: AMI: Ubuntu 22.04 LTS Instance Type: t2.medium (2 vCPUs, 4 GB RAM) Storage: 20 GB (or more, depending on your needs) Security Group: Allow SSH (port 22) and NFS (ports 2049, 111) Step 2: we need to check if the existing file system is mounted for that use fdisk -l here you can see root partition is xvda1 now we will check if its mounted or not for this we will use mount | grep xvda1 step 3 :Install NFS server apt-get install nfs-kernel-server Step 4 : Configure exports We'll add our directory to the exports of the server in the /etc/exports file. Now we need to actually tell the server to export the directory exportfs -ar We can verify that the directory has been shared with the -v parameter exportfs -v step 4: Now we will verify which directories are shared (exported) by an NFS server. showmount -e Configure firewall If the firewall is active we need to tell it to allow NFS traffic ufw allow from 34.229.82.109/24 to any port nfs step 5:Test mount from container To test the mounting of this directory from a container let's first create a file in the directory. here I created a file call myfile.txt step 6:Now let's try to mount the nfs share from a container/pod. we will install a Kubernetes cluster using kubeadm , we can use the below code just run the script #!/bin/bash swapoff -a cat
Kubernetes is powerful when it comes to managing containerized workloads, but things get tricky when your applications need shared storage.
That’s where NFS (Network File System) comes in. It's a tried-and-tested way to share files across multiple pods and services in a cluster.
In this blog, we’ll walk through why and when to use NFS in Kubernetes, how to set it up using Persistent Volumes (PV) and Persistent Volume Claims (PVC), and key things to watch out for.
we will set up a simple NFS server on Ubuntu and make use of it in a nginx container running on a Kubernetes cluster
NFS is pretty straightforward to set up, you install the server, export a share and away you go. However it seems that there's a lot of struggles around permissions and I have had some issues my self so I thought I'd create a short write up, mostly for my own reference.
Step 1: Launch an EC2 Instance for Your Lab
To begin, we need a Linux machine that will act as our NFS server and possibly host a lightweight Kubernetes cluster (like Minikube or K3s).
For this setup, I'm using an Amazon EC2 instance with the following specs:
AMI: Ubuntu 22.04 LTS
Instance Type: t2.medium (2 vCPUs, 4 GB RAM)
Storage: 20 GB (or more, depending on your needs)
Security Group: Allow SSH (port 22) and NFS (ports 2049, 111)
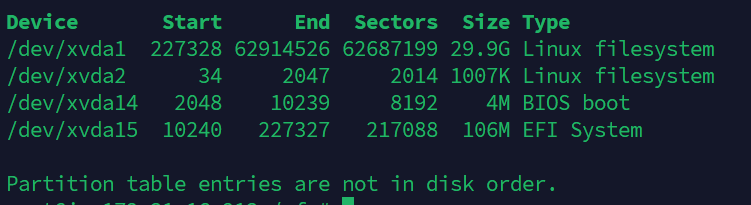
Step 2: we need to check if the existing file system is mounted
for that use
fdisk -l
here you can see root partition is xvda1
now we will check if its mounted or not for this we will use
mount | grep xvda1

step 3 :Install NFS server
apt-get install nfs-kernel-server
Step 4 : Configure exports
We'll add our directory to the exports of the server in the /etc/exports file.
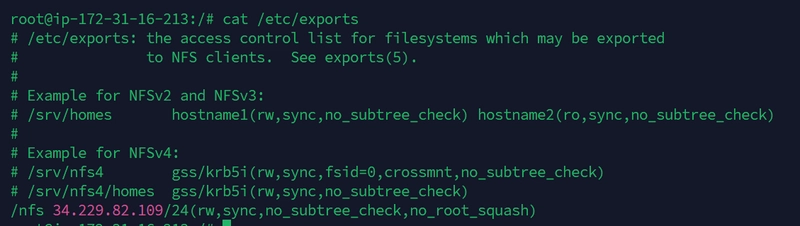
Now we need to actually tell the server to export the directory
exportfs -ar
We can verify that the directory has been shared with the -v parameter
exportfs -v

step 4: Now we will verify which directories are shared (exported) by an NFS server.
showmount -e

Configure firewall
If the firewall is active we need to tell it to allow NFS traffic
ufw allow from 34.229.82.109/24 to any port nfs

step 5:Test mount from container
To test the mounting of this directory from a container let's first create a file in the directory.
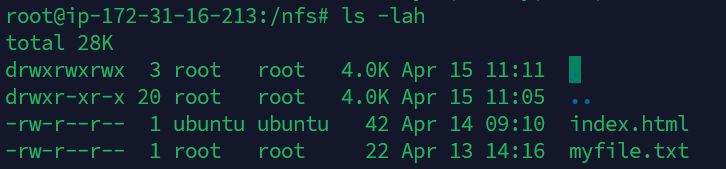
here I created a file call myfile.txt
step 6:Now let's try to mount the nfs share from a container/pod.
we will install a Kubernetes cluster using kubeadm , we can use the below code just run the script
#!/bin/bash
swapoff -a
cat < /etc/containerd/config.toml
sudo sed -i 's/            SystemdCgroup = false/            SystemdCgroup = true/' /etc/containerd/config.toml
sudo systemctl restart containerd
sudo systemctl restart kubelet

kubeadm config images pull
kubeadm init --pod-network-cidr=192.168.0.0/16

mkdir -p $HOME/.kube
sudo cp -i /etc/kubernetes/admin.conf $HOME/.kube/config
sudo chown $(id -u):$(id -g) $HOME/.kube/config

kubectl create -f https://raw.githubusercontent.com/projectcalico/calico/v3.26.1/manifests/tigera-operator.yaml
curl https://raw.githubusercontent.com/projectcalico/calico/v3.26.1/manifests/custom-resources.yaml -O
kubectl create -f custom-resources.yaml
kubectl taint nodes --all node-role.kubernetes.io/control-plane-

UUID=85538820-9e86-47ea-9d4a-f18019b855c3
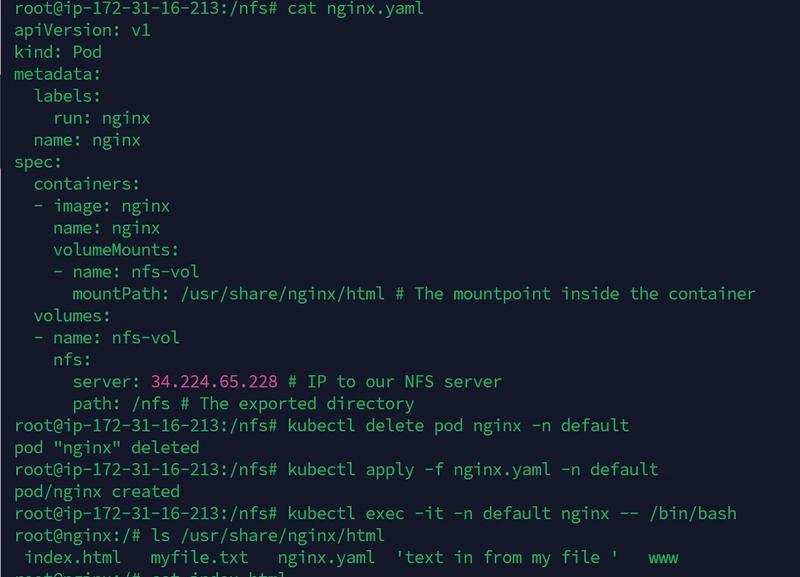
step 7: Now we will deploy a nginx pod
root@ip-172-31-16-213:/nfs# cat nginx.yaml
apiVersion: v1
kind: Pod
metadata:
  labels:
    run: nginx
  name: nginx
spec:
  containers:
  - image: nginx
    name: nginx
    volumeMounts:
    - name: nfs-vol
      mountPath: /var/nfs # The mountpoint inside the container
  volumes:
  - name: nfs-vol
    nfs:
      server: 34.224.65.228 # IP to our NFS server
      path: /nfs # The exported directory
step 8: Now we will check the mount directory which was set into yaml file as /var/nfs

we can see that my.txt and other files which are inside /nfs directory is mounted to inside container /var/nfs directory so its a success
A big note with NFS, and what's creating issues for users are the permission and user mappings. Normally an NFS share will not be shared with root access (root_squash) and the user that needs access to the share will need to exist on the NFS server.
Refer to this NFS how-to for more information
Use NFS for the static content
Now that we know that we can mount a NFS share in the container let's see if we can use it to host our static html files
By default nginx serves files from the /usr/share/nginx/html directory which we can verify from our running container
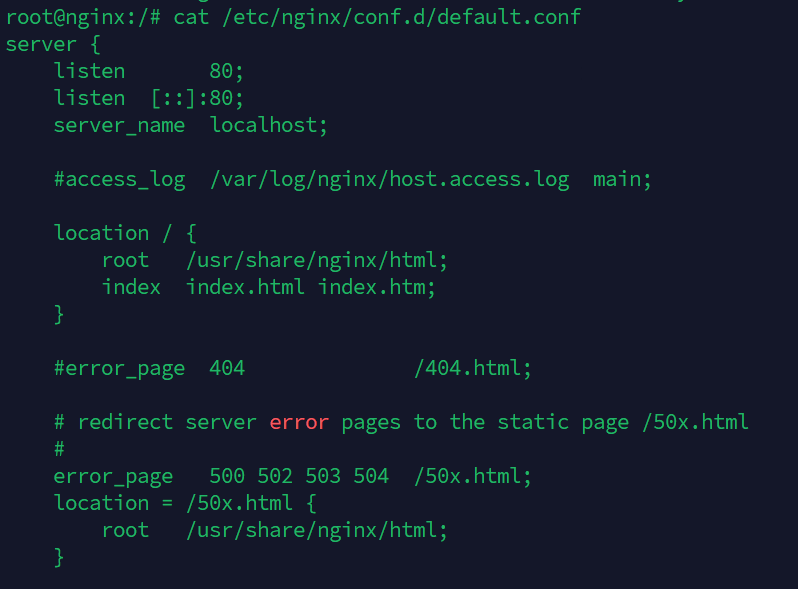
With this knowledge, let's create a new directory for NFS to export, add a static html file to the directory and mount this directory to the directory inside of the container

step 9: Recreate pod with mountpoint to correct directory

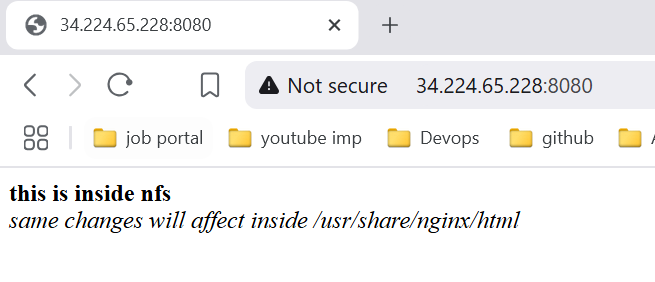
As we can see our container sees the html file, now let's try to see if we can get it to work through http as well.
First we'll expose our pod so that it we can access it from outside the cluster, and then let's open it up in a browser
we will create a node port service and expose to web


what ever changes we have done inside /nfs/index.html file it will affect inside pod