


![[The AI Show Episode 144]: ChatGPT’s New Memory, Shopify CEO’s Leaked “AI First” Memo, Google Cloud Next Releases, o3 and o4-mini Coming Soon & Llama 4’s Rocky Launch](https://www.marketingaiinstitute.com/hubfs/ep%20144%20cover.png)


_Andreas_Prott_Alamy.jpg?width=1280&auto=webp&quality=80&disable=upscale#)


![What features do you get with Gemini Advanced? [April 2025]](https://i0.wp.com/9to5google.com/wp-content/uploads/sites/4/2024/02/gemini-advanced-cover.jpg?resize=1200%2C628&quality=82&strip=all&ssl=1)


![Apple Shares Official Trailer for 'Long Way Home' Starring Ewan McGregor and Charley Boorman [Video]](https://www.iclarified.com/images/news/97069/97069/97069-640.jpg)
![Apple Watch Series 10 Back On Sale for $299! [Lowest Price Ever]](https://www.iclarified.com/images/news/96657/96657/96657-640.jpg)
![EU Postpones Apple App Store Fines Amid Tariff Negotiations [Report]](https://www.iclarified.com/images/news/97068/97068/97068-640.jpg)


Sharing Docker Images: Docker Hub & Private Registries
Docker simplifies the process of developing, shipping, and running applications. One of its core strengths is the ability to package your entire application—including the OS, dependencies, and configurations—into a portable image. But building an image is only part of the story. What makes Docker truly powerful is the ability to share these images easily, either with your team or to deploy them across multiple environments. This blog will walk you through how to share Docker images using: Docker Hub (Free and Public/Private) Private Registries (For internal or secure sharing) Why Share Docker Images? Imagine you're building a Node.js or Python application. With Docker, your teammates or production systems don’t need to install dependencies locally—they just pull the image and run it. This: Ensures consistency across machines Saves setup time Simplifies CI/CD and deployments Sharing via Docker Hub What is Docker Hub? Docker Hub is a cloud-based repository for Docker images. It hosts: Official Images: Maintained and verified by Docker (e.g., python, node, nginx) Public Repositories: Visible to everyone Private Repositories: Visible only to you or your team Steps to Share an Image 1. Create a Docker Hub Account Go to hub.docker.com Sign up and create a new repository from the UI (e.g., python-random-number-generator) 2. Tag the Image Docker Hub requires the image name to be in the format: / If your image is named python-app, tag it like this: docker tag python-app mayankcse1/python-random-number-generator This doesn’t copy the image, it just assigns a new name (alias) to the same image. 3. Login to Docker Hub docker login Enter your Docker Hub username and password when prompted. 4. Push the Image docker push mayankcse1/python-random-number-generator If everything’s set up correctly, the image layers will begin uploading. If you get an “Access Denied” error, it’s usually because you're not logged in or the repository doesn’t exist. 5. Pull the Image (From Another Machine) Try pulling my image yourself using the following command: docker pull mayankcse1/python-random-number-generator Once the image is downloaded, you can run it locally with: docker run mayankcse1/python-random-number-generator Sharing via Private Registries Why Use a Private Registry? For enterprise needs, security concerns, or internal use cases, teams often prefer self-hosted or cloud-based private registries. Some common options: Amazon ECR (Elastic Container Registry) Google Container Registry Azure Container Registry Harbor (Open-source) JFrog Artifactory Steps to Share via Private Registry Tagging the Image with Host docker tag python-app myregistry.com/myteam/python-app Push the Image docker push myregistry.com/myteam/python-app Pull the Image (on another machine) docker pull myregistry.com/myteam/python-app You’ll need to authenticate using: docker login myregistry.com Bonus Tip: Inspecting Docker Images for Debugging & Insights When working with Docker, understanding image metadata can be incredibly useful. To inspect an image and view its internal details, use: docker image inspect This command provides crucial information, including: ✔ Creation Date → Helps track when the image was built ✔ Docker Version Used → Ensures compatibility with your setup ✔ Environment Variables → Shows preset configurations ✔ Layers Used → Displays how the image was structured ✔ Configuration Instructions → Helps understand what happens when the container runs Example Output (Simplified) [ { "Id": "sha256:abc123...", "Created": "2024-04-19T10:22:36.124Z", "Config": { "Env": ["NODE_ENV=production"] }, "Os": "linux", "Architecture": "amd64" } ]
Docker simplifies the process of developing, shipping, and running applications. One of its core strengths is the ability to package your entire application—including the OS, dependencies, and configurations—into a portable image.
But building an image is only part of the story. What makes Docker truly powerful is the ability to share these images easily, either with your team or to deploy them across multiple environments. This blog will walk you through how to share Docker images using:
- Docker Hub (Free and Public/Private)
- Private Registries (For internal or secure sharing)
Why Share Docker Images?
Imagine you're building a Node.js or Python application. With Docker, your teammates or production systems don’t need to install dependencies locally—they just pull the image and run it. This:
- Ensures consistency across machines
- Saves setup time
- Simplifies CI/CD and deployments
Sharing via Docker Hub
What is Docker Hub?
Docker Hub is a cloud-based repository for Docker images. It hosts:
-
Official Images: Maintained and verified by Docker (e.g.,
python,node,nginx) - Public Repositories: Visible to everyone
- Private Repositories: Visible only to you or your team
Steps to Share an Image
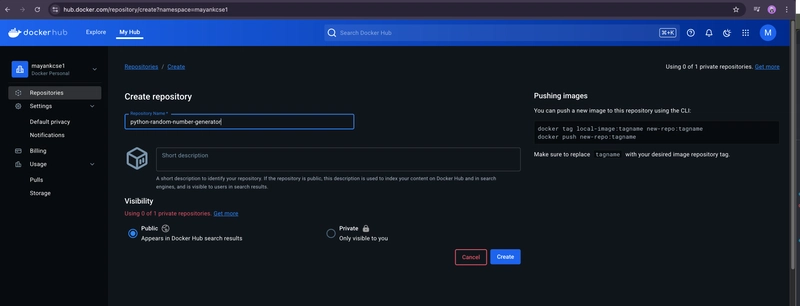
1. Create a Docker Hub Account
- Go to hub.docker.com
- Sign up and create a new repository from the UI (e.g.,
python-random-number-generator)
2. Tag the Image
Docker Hub requires the image name to be in the format:
If your image is named python-app, tag it like this:
docker tag python-app mayankcse1/python-random-number-generator
This doesn’t copy the image, it just assigns a new name (alias) to the same image.
3. Login to Docker Hub
docker login
- Enter your Docker Hub username and password when prompted.
4. Push the Image
docker push mayankcse1/python-random-number-generator
If everything’s set up correctly, the image layers will begin uploading.
If you get an “Access Denied” error, it’s usually because you're not logged in or the repository doesn’t exist.
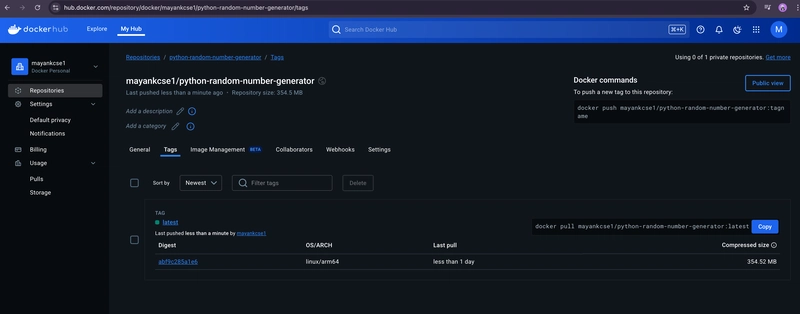
5. Pull the Image (From Another Machine)
Try pulling my image yourself using the following command:
docker pull mayankcse1/python-random-number-generator
Once the image is downloaded, you can run it locally with:
docker run mayankcse1/python-random-number-generator
Sharing via Private Registries
Why Use a Private Registry?
For enterprise needs, security concerns, or internal use cases, teams often prefer self-hosted or cloud-based private registries.
Some common options:
- Amazon ECR (Elastic Container Registry)
- Google Container Registry
- Azure Container Registry
- Harbor (Open-source)
- JFrog Artifactory
Steps to Share via Private Registry
Tagging the Image with Host
docker tag python-app myregistry.com/myteam/python-app
Push the Image
docker push myregistry.com/myteam/python-app
Pull the Image (on another machine)
docker pull myregistry.com/myteam/python-app
You’ll need to authenticate using:
docker login myregistry.com
Bonus Tip: Inspecting Docker Images for Debugging & Insights
When working with Docker, understanding image metadata can be incredibly useful. To inspect an image and view its internal details, use:
docker image inspect
This command provides crucial information, including:
✔ Creation Date → Helps track when the image was built
✔ Docker Version Used → Ensures compatibility with your setup
✔ Environment Variables → Shows preset configurations
✔ Layers Used → Displays how the image was structured
✔ Configuration Instructions → Helps understand what happens when the container runs
Example Output (Simplified)
[
  {
    "Id": "sha256:abc123...",
    "Created": "2024-04-19T10:22:36.124Z",
    "Config": {
      "Env": ["NODE_ENV=production"]
    },
    "Os": "linux",
    "Architecture": "amd64"
  }
]