


![[The AI Show Episode 144]: ChatGPT’s New Memory, Shopify CEO’s Leaked “AI First” Memo, Google Cloud Next Releases, o3 and o4-mini Coming Soon & Llama 4’s Rocky Launch](https://www.marketingaiinstitute.com/hubfs/ep%20144%20cover.png)


![BPMN-procesmodellering [closed]](https://i.sstatic.net/l7l8q49F.png)
![Roll Based Web App [closed]](https://cdn.sstatic.net/Sites/softwareengineering/Img/apple-touch-icon@2.png?v=1ef7363febba)


.jpg?#)


_Tanapong_Sungkaew_via_Alamy.jpg?width=1280&auto=webp&quality=80&disable=upscale#)

_Andreas_Prott_Alamy.jpg?width=1280&auto=webp&quality=80&disable=upscale#)


![Lenovo shows off its next 8.8-inch Legion Tab with vague AI promises [Gallery]](https://i0.wp.com/9to5google.com/wp-content/uploads/sites/4/2025/04/lenovo-legion-tab-y700-2025-1.jpg?resize=1200%2C628&quality=82&strip=all&ssl=1)


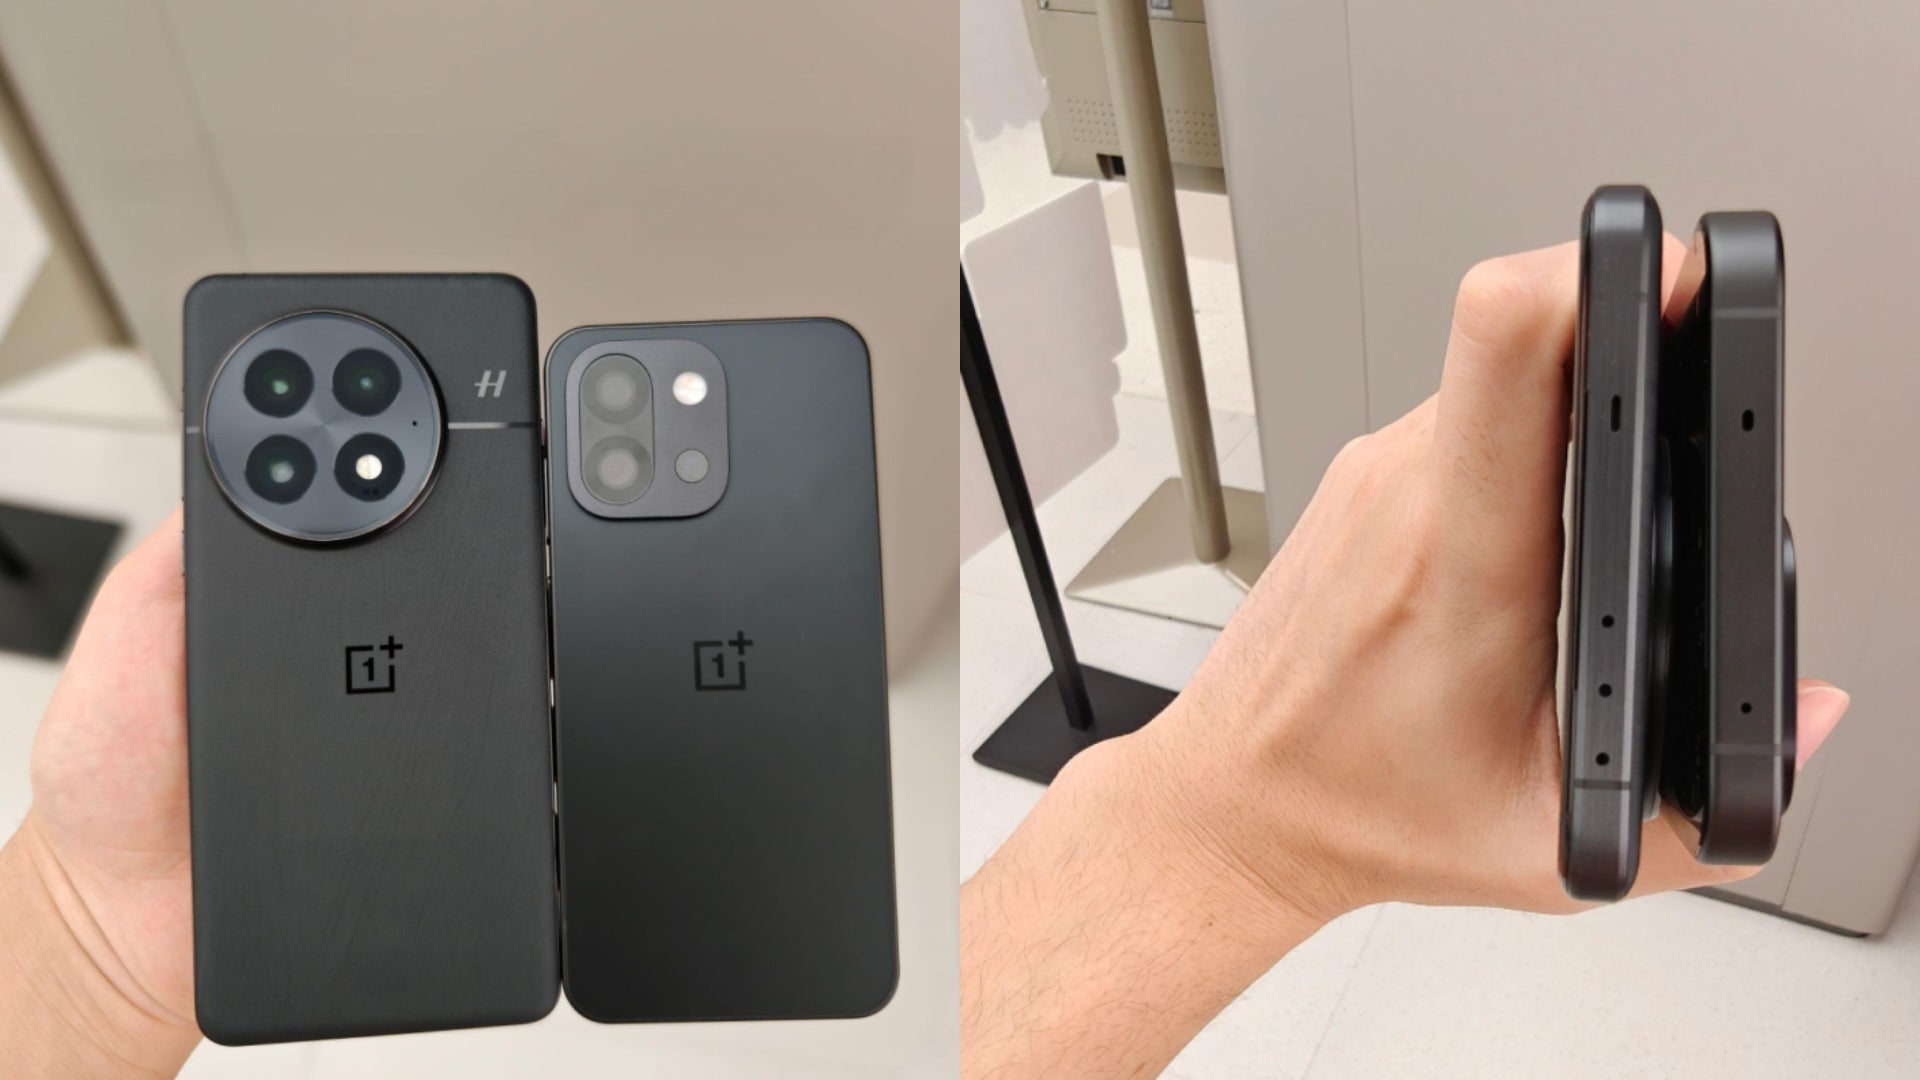
![OnePlus 13T has a 6,260 mAh battery as first camera samples arrive [Gallery]](https://i0.wp.com/9to5google.com/wp-content/uploads/sites/4/2025/04/oneplus-13t-teaser-2.jpg?resize=1200%2C628&quality=82&strip=all&ssl=1)


![Samsung Targets Late 2026 Launch for Advanced Texas Chip Fab Following Delays [Report]](https://www.iclarified.com/images/news/97073/97073/97073-640.jpg)

![Apple Shares Official Trailer for 'Long Way Home' Starring Ewan McGregor and Charley Boorman [Video]](https://www.iclarified.com/images/news/97069/97069/97069-640.jpg)
![Apple Watch Series 10 Back On Sale for $299! [Lowest Price Ever]](https://www.iclarified.com/images/news/96657/96657/96657-640.jpg)


![Mobile Legends: Bang Bang [MLBB] Free Redeem Codes April 2025](https://www.talkandroid.com/wp-content/uploads/2024/07/Screenshot_20240704-093036_Mobile-Legends-Bang-Bang.jpg)


Midjourney Imagine API Application and Usage
AceData: All-in-One AI Creative Studio offers comprehensive AI services, including Q&A, image generation, QR codes, music, and more, along with diverse API platform integrations to meet your varied needs. New users receive free usage credits to help you create with ease!" Midjourney is a very powerful AI drawing tool that can generate exquisite images in just one or two minutes by inputting keywords. Midjourney stands out in the industry for its outstanding drawing capabilities and has been widely used across various industries and fields, with its influence becoming increasingly significant. This document mainly introduces the usage process of the Imagine operation in the Midjourney API, enabling us to easily generate the required images through text. Application Process To use the Midjourney Imagine API, first visit the Midjourney Imagine API page and click the "Acquire" button to obtain the credentials needed for the request: If you are not logged in or registered, you will be automatically redirected to the login page inviting you to register and log in. After logging in or registering, you will be automatically returned to the current page. When applying for the first time, there will be a free quota provided, allowing you to use the API for free. Basic Usage Next, you can fill in the corresponding content on the interface, as shown in the image: When using the interface for the first time, we need to fill in at least two pieces of content: one is authorization, which you can select directly from the dropdown list. The other parameter is prompt, which is the description of the image we want to generate. It is recommended to use English descriptions for more accurate results. Here we used the example content Lamborghini speeds inside a volcano, which means we want to draw a Lamborghini speeding inside a volcano. You can also notice that there is a corresponding code generation on the right side. You can copy the code to run it directly or simply click the "Try" button for testing. After calling, we find the returned result as follows: { "image_url": "https://midjourney.cdn.acedata.cloud/attachments/1233387694839697411/1234197197067915365/36rgqit64j90qptsxnyq_Lamborghini_speeds_inside_a_volcano_id0494_f47263b6-ff92-44a3-88ee-51cf0e706aae.png?ex=662fdb36&is=662e89b6&hm=ca9be54907726937ed02517a13466bef2afb2825b7cda4b313de56a3c3310d0d&width=1024&height=1024", "image_width": 1024, "image_height": 1024, "image_id": "1234197197067915365", "raw_image_url": "https://midjourney.cdn.acedata.cloud/attachments/1233387694839697411/1234197197067915365/36rgqit64j90qptsxnyq_Lamborghini_speeds_inside_a_volcano_id0494_f47263b6-ff92-44a3-88ee-51cf0e706aae.png?ex=662fdb36&is=662e89b6&hm=ca9be54907726937ed02517a13466bef2afb2825b7cda4b313de56a3c3310d0d&", "raw_image_width": 2048, "raw_image_height": 2048, "progress": 100, "actions": [ "upscale1", "upscale2", "upscale3", "upscale4", "reroll", "variation1", "variation2", "variation3", "variation4" ], "task_id": "1bae3bec-3ac4-4180-a148-74ee6cb68b98", "success": true } The returned result contains multiple fields, as described below: task_id: The ID of the task for generating this image, used to uniquely identify the image generation task. image_id: The unique identifier for the image, which needs to be passed for transformation operations on the image next time. image_url: The URL of the thumbnail, which can be opened directly to view the generated effect. image_width: The pixel width of the thumbnail. image_height: The pixel height of the thumbnail. raw_image_url: The URL of the original image, which is the same as the thumbnail content but has higher resolution, and the loading speed may be slower. raw_image_width: The pixel width of the original image. raw_image_height: The pixel height of the original image. actions: A list of further operations that can be performed on the generated image. Here, a total of 8 options are listed, where upscale represents enlargement, and variation represents transformation. Therefore, upscale1 represents the enlargement operation on the top-left first image, and variation3 indicates transformation based on the bottom-left third image. Opening the link corresponding to image_url or raw_image_url shows the image as illustrated. It can be seen that a 2x2 preview image has been generated here. Up to now, the first API call has been completed. Image Enlargement and Transformation Next, we will attempt to perform further operations on the currently generated photo. For example, if we find the second image in the upper right corner quite satisfactory but want to make some transformations, we can set the action to variation2 and pass the image_id accordingly: The result obtained at this time is as follows: { "image_url": "https://midjourney.cdn.acedata.cloud/attachments/1233387694839697411/1234201336543969401/

AceData: All-in-One AI Creative Studio offers comprehensive AI services, including Q&A, image generation, QR codes, music, and more, along with diverse API platform integrations to meet your varied needs. New users receive free usage credits to help you create with ease!"
Midjourney is a very powerful AI drawing tool that can generate exquisite images in just one or two minutes by inputting keywords. Midjourney stands out in the industry for its outstanding drawing capabilities and has been widely used across various industries and fields, with its influence becoming increasingly significant.
This document mainly introduces the usage process of the Imagine operation in the Midjourney API, enabling us to easily generate the required images through text.
Application Process
To use the Midjourney Imagine API, first visit the Midjourney Imagine API page and click the "Acquire" button to obtain the credentials needed for the request:
If you are not logged in or registered, you will be automatically redirected to the login page inviting you to register and log in. After logging in or registering, you will be automatically returned to the current page.
When applying for the first time, there will be a free quota provided, allowing you to use the API for free.
Basic Usage
Next, you can fill in the corresponding content on the interface, as shown in the image:
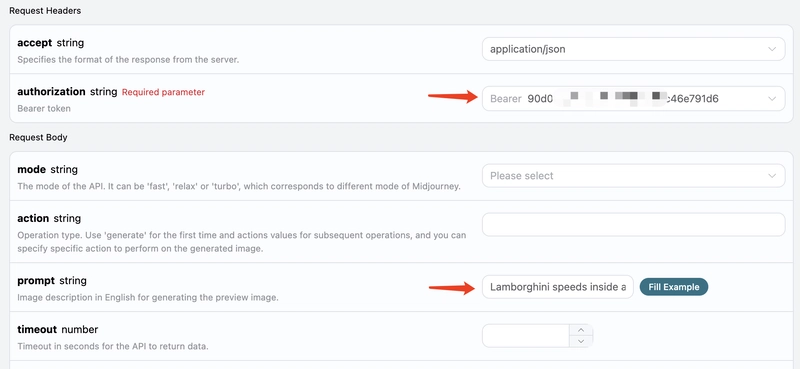
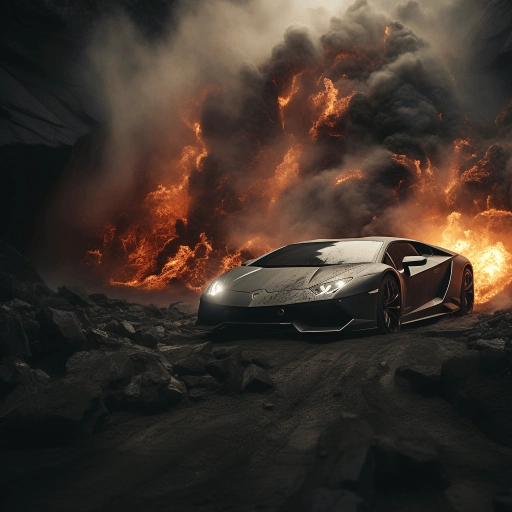
When using the interface for the first time, we need to fill in at least two pieces of content: one is authorization, which you can select directly from the dropdown list. The other parameter is prompt, which is the description of the image we want to generate. It is recommended to use English descriptions for more accurate results. Here we used the example content Lamborghini speeds inside a volcano, which means we want to draw a Lamborghini speeding inside a volcano.
You can also notice that there is a corresponding code generation on the right side. You can copy the code to run it directly or simply click the "Try" button for testing.

After calling, we find the returned result as follows:
{
  "image_url": "https://midjourney.cdn.acedata.cloud/attachments/1233387694839697411/1234197197067915365/36rgqit64j90qptsxnyq_Lamborghini_speeds_inside_a_volcano_id0494_f47263b6-ff92-44a3-88ee-51cf0e706aae.png?ex=662fdb36&is=662e89b6&hm=ca9be54907726937ed02517a13466bef2afb2825b7cda4b313de56a3c3310d0d&width=1024&height=1024",
  "image_width": 1024,
  "image_height": 1024,
  "image_id": "1234197197067915365",
  "raw_image_url": "https://midjourney.cdn.acedata.cloud/attachments/1233387694839697411/1234197197067915365/36rgqit64j90qptsxnyq_Lamborghini_speeds_inside_a_volcano_id0494_f47263b6-ff92-44a3-88ee-51cf0e706aae.png?ex=662fdb36&is=662e89b6&hm=ca9be54907726937ed02517a13466bef2afb2825b7cda4b313de56a3c3310d0d&",
  "raw_image_width": 2048,
  "raw_image_height": 2048,
  "progress": 100,
  "actions": [
    "upscale1",
    "upscale2",
    "upscale3",
    "upscale4",
    "reroll",
    "variation1",
    "variation2",
    "variation3",
    "variation4"
  ],
  "task_id": "1bae3bec-3ac4-4180-a148-74ee6cb68b98",
  "success": true
}
The returned result contains multiple fields, as described below:
-
task_id: The ID of the task for generating this image, used to uniquely identify the image generation task. -
image_id: The unique identifier for the image, which needs to be passed for transformation operations on the image next time. -
image_url: The URL of the thumbnail, which can be opened directly to view the generated effect. -
image_width: The pixel width of the thumbnail. -
image_height: The pixel height of the thumbnail. -
raw_image_url: The URL of the original image, which is the same as the thumbnail content but has higher resolution, and the loading speed may be slower. -
raw_image_width: The pixel width of the original image. -
raw_image_height: The pixel height of the original image. -
actions: A list of further operations that can be performed on the generated image. Here, a total of 8 options are listed, whereupscalerepresents enlargement, andvariationrepresents transformation. Therefore,upscale1represents the enlargement operation on the top-left first image, andvariation3indicates transformation based on the bottom-left third image.
Opening the link corresponding to image_url or raw_image_url shows the image as illustrated.
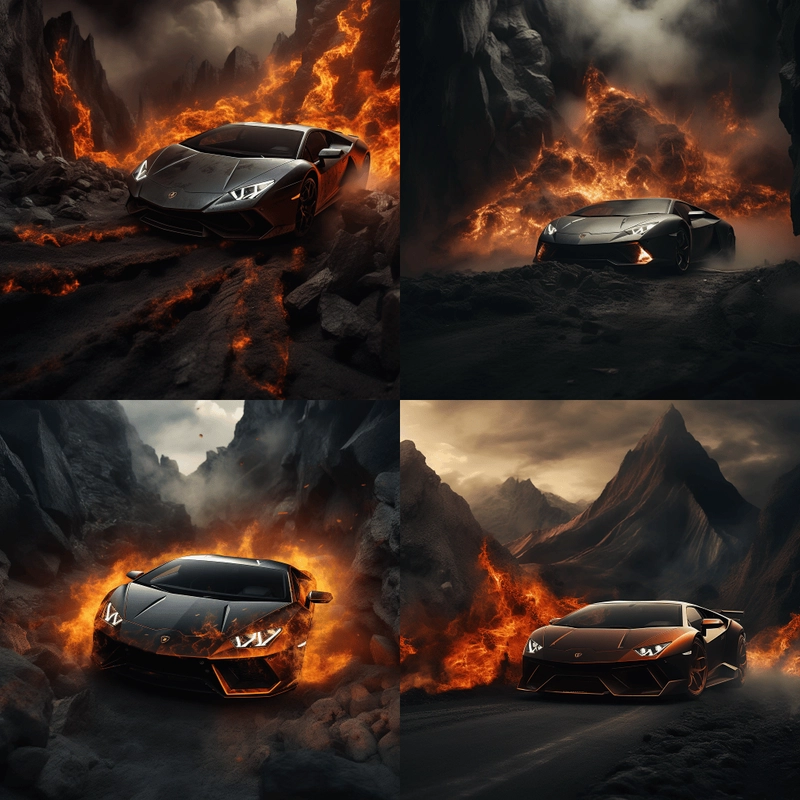
It can be seen that a 2x2 preview image has been generated here. Up to now, the first API call has been completed.
Image Enlargement and Transformation
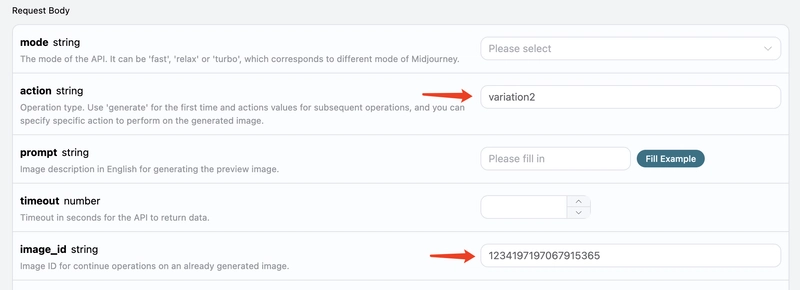
Next, we will attempt to perform further operations on the currently generated photo. For example, if we find the second image in the upper right corner quite satisfactory but want to make some transformations, we can set the action to variation2 and pass the image_id accordingly:
The result obtained at this time is as follows:
{
  "image_url": "https://midjourney.cdn.acedata.cloud/attachments/1233387694839697411/1234201336543969401/36rgqit64j90qptsxnyq_Lamborghini_speeds_inside_a_volcano_id0494_10dc56a7-ec16-4bac-878e-2338f2ae5f5d.png?ex=662fdf10&is=662e8d90&hm=9aec96bca35ae20b6f9ab536101b9c4ea255eb6216cbf7000ac554937da071f3&width=1024&height=1024",
  "image_width": 1024,
  "image_height": 1024,
  "image_id": "1234201336543969401",
  "raw_image_url": "https://midjourney.cdn.acedata.cloud/attachments/1233387694839697411/1234201336543969401/36rgqit64j90qptsxnyq_Lamborghini_speeds_inside_a_volcano_id0494_10dc56a7-ec16-4bac-878e-2338f2ae5f5d.png?ex=662fdf10&is=662e8d90&hm=9aec96bca35ae20b6f9ab536101b9c4ea255eb6216cbf7000ac554937da071f3&",
  "raw_image_width": 2048,
  "raw_image_height": 2048,
  "progress": 100,
  "actions": [
    "upscale1",
    "upscale2",
    "upscale3",
    "upscale4",
    "reroll",
    "variation1",
    "variation2",
    "variation3",
    "variation4"
  ],
  "task_id": "f4961620-1104-409f-9dc1-ba3ed15c2f4d",
  "success": true
}
Open image_url, the newly generated image is shown below:
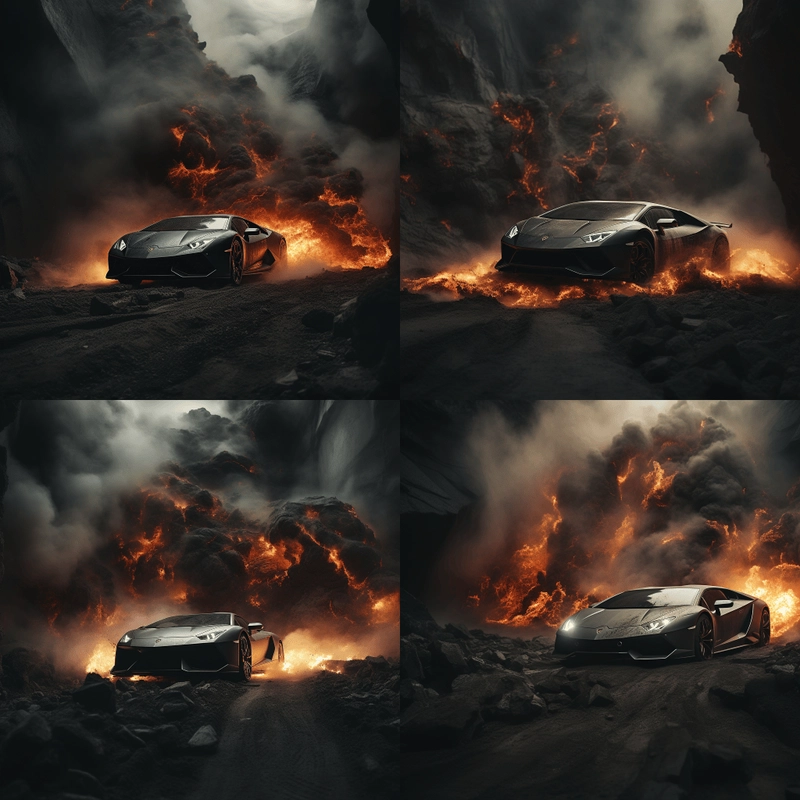
As you can see, for the last image in the top right corner, we have once again obtained four similar photos.
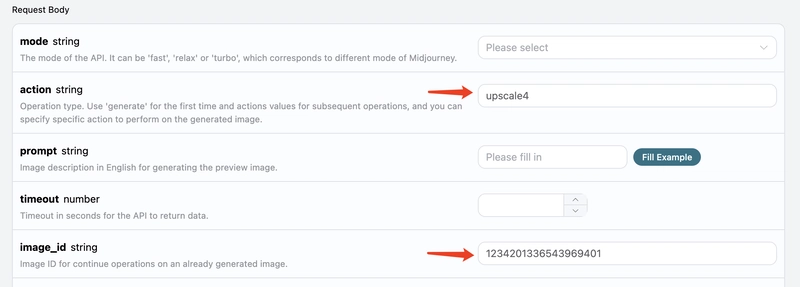
At this point, we can select one for detailed upscale operation, for example, if we choose the fourth one, we can pass action as upscale4 and then pass the current image's ID via image_id again.
Note: The
upscaleoperation will take less time compared tovariationin Midjourney.
The return result is as follows:
{
  "image_url": "https://midjourney.cdn.acedata.cloud/attachments/1233387694839697411/1234202545208033400/36rgqit64j90qptsxnyq_Lamborghini_speeds_inside_a_volcano_id0494_34edc3f5-2bd0-4f5b-a372-03270b02289b.png?ex=662fe031&is=662e8eb1&hm=f8006c4d33a03dfd027dffe4eb46ab0d113a4910aef07497f0b335c8998b7858&width=512&height=512",
  "image_width": 512,
  "image_height": 512,
  "image_id": "1234202545208033400",
  "raw_image_url": "https://midjourney.cdn.acedata.cloud/attachments/1233387694839697411/1234202545208033400/36rgqit64j90qptsxnyq_Lamborghini_speeds_inside_a_volcano_id0494_34edc3f5-2bd0-4f5b-a372-03270b02289b.png?ex=662fe031&is=662e8eb1&hm=f8006c4d33a03dfd027dffe4eb46ab0d113a4910aef07497f0b335c8998b7858&",
  "raw_image_width": 1024,
  "raw_image_height": 1024,
  "progress": 100,
  "actions": [
    "upscale_2x",
    "upscale_4x",
    "variation_subtle",
    "variation_strong",
    "zoom_out_2x",
    "zoom_out_1_5x",
    "pan_left",
    "pan_right",
    "pan_up",
    "pan_down"
  ],
  "task_id": "03f62b17-a6f1-4c8e-9b4d-1fc7bd5b1180",
  "success": true
}
Among them, image_url is shown as follows:
Thus, we successfully obtained a photo of a Lamborghini.
At the same time, note that the actions include several operations that can be performed, as described below:
-
upscale_2x: Upscale the image by 2 times, obtaining a 2x high-definition image. -
upscale_4x: Upscale the image by 4 times, obtaining a 4x high-definition image. -
zoom_out_2x: Perform a zoom out operation of two times (filling in the surrounding area). -
zoom_out_1_5x: Perform a zoom out operation of 1.5 times (filling in the surrounding area). -
pan_left: Perform a left panning operation on the image. -
pan_right: Perform a right panning operation on the image. -
pan_up: Perform an upward panning operation on the image. -
pan_down: Perform a downward panning operation on the image.
You can continue to input the corresponding transformation instructions according to the above process for continuous image generation operations.
Image Rewrite (Base Image)
This API also supports image rewriting, commonly known as base image. We can input an image URL and the description text to be rewritten, and this API will return the rewritten image.
Note: The input image URL must be a pure image, not an image displayed within a webpage; otherwise, it cannot be rewritten. It is advisable to use an image hosting service to upload and obtain the image URL.
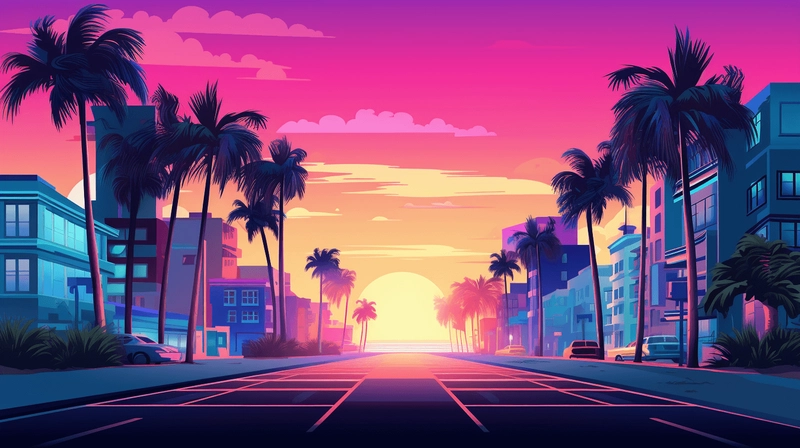
For example, we have an image of a sunset on a road, with some trees and buildings beside the road, as shown below:
Now we want to rewrite it to a beach scene with a car parked on the side of the road. We can construct the following prompt:
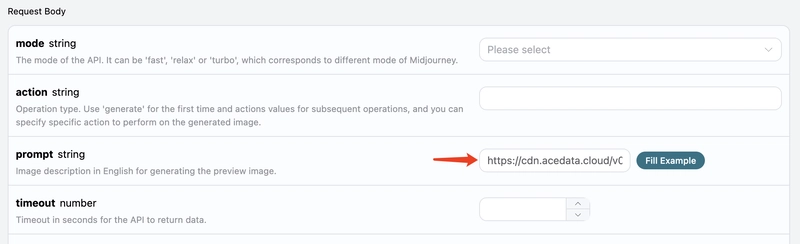
https://cdn.acedata.cloud/v014oc.png an illustration of a car parked on the beach --iw 2
As you can see, the beginning of our prompt is an HTTPS-starting image link, followed by a space and then the content of the prompt text. Here we also used some additional advanced parameters, such as —iw 2 to adjust the image weight.
We can send the above content as a whole to the prompt field, as shown below:
The output result is as follows:
{
  "image_url": "https://midjourney.cdn.acedata.cloud/attachments/1234427310434947145/1234539663515975690/atmateosa5693_An_illustration_of_a_car_parked_on_the_beach_id26_cc8650ec-7e4b-4685-8911-78172430d8a7.png?ex=66311a28&is=662fc8a8&hm=c39707a1f22bc7f12874060ea6ed58ba37c188139ccc9a13c61ed9f37e66ea74&width=1456&height=816",
  "image_width": 1456,
  "image_height": 816,
  "image_id": "1234539663515975690",
  "raw_image_url": "https://midjourney.cdn.acedata.cloud/attachments/1234427310434947145/1234539663515975690/atmateosa5693_An_illustration_of_a_car_parked_on_the_beach_id26_cc8650ec-7e4b-4685-8911-78172430d8a7.png?ex=66311a28&is=662fc8a8&hm=c39707a1f22bc7f12874060ea6ed58ba37c188139ccc9a13c61ed9f37e66ea74&",
  "raw_image_width": 2912,
  "raw_image_height": 1632,
  "progress": 100,
  "actions": [
    "upscale1",
    "upscale2",
    "upscale3",
    "upscale4",
    "reroll",
    "variation1",
    "variation2",
    "variation3",
    "variation4"
  ],
  "task_id": "24a79e8b-a79d-471a-aef7-089dc0627ee8",
  "success": true
}
At this point, we have obtained the following generated image:
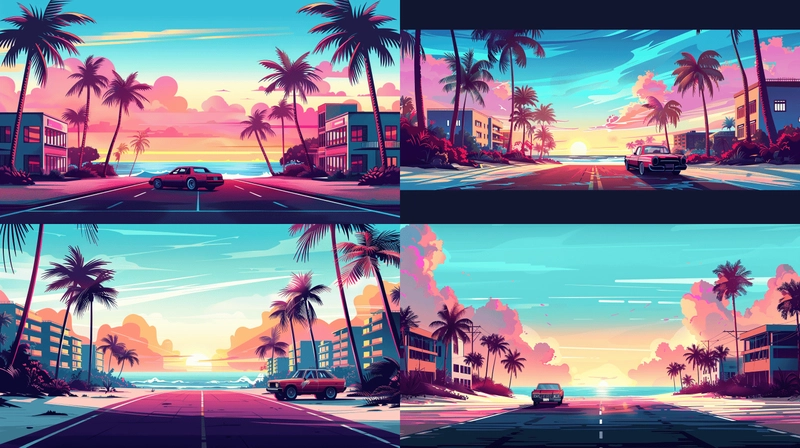
As you can see, with the overall style and composition of the original image remaining unchanged, the entire scene has been transformed into a beach scene, and a car has appeared on the road. This is Prompt with Image.
Image Fusion
This API also supports image fusion, allowing us to pass in multiple images to achieve different image fusion effects.
For example, here we have two images: one is a teddy bear, and the other is a chainsaw, shown below:


Now we want to combine the two, making the bear hold the chainsaw. How do we do that?
We can construct the following prompt:
https://cdn.acedata.cloud/8fapzl.png https://cdn.acedata.cloud/c1igbw.png The bear is holding the chainsaw --iw 2
It can be seen that similar to Image with Prompt, we place multiple image URLs at the beginning of the prompt, separated by spaces, and then add the text prompt at the end, passing the above content as a whole to the prompt parameter. The effect of running it is as follows:
{
  "image_url": "https://midjourney.cdn.acedata.cloud/attachments/1234291876639674388/1234547236830973972/kcisok_The_bear_is_holding_the_chainsaw_id8873344_ad605bc4-ba19-4807-b94f-367dab672f7a.png?ex=66312136&is=662fcfb6&hm=0fb1e2261c9a30b04de9da9b23b7562eb73677f1bbda1fae52c7243b12d25aac&width=1024&height=1024",
  "image_width": 1024,
  "image_height": 1024,
  "image_id": "1234547236830973972",
  "raw_image_url": "https://midjourney.cdn.acedata.cloud/attachments/1234291876639674388/1234547236830973972/kcisok_The_bear_is_holding_the_chainsaw_id8873344_ad605bc4-ba19-4807-b94f-367dab672f7a.png?ex=66312136&is=662fcfb6&hm=0fb1e2261c9a30b04de9da9b23b7562eb73677f1bbda1fae52c7243b12d25aac&",
  "raw_image_width": 2048,
  "raw_image_height": 2048,
  "progress": 100,
  "actions": [
    "upscale1",
    "upscale2",
    "upscale3",
    "upscale4",
    "reroll",
    "variation1",
    "variation2",
    "variation3",
    "variation4"
  ],
  "task_id": "891f2645-ee15-4c7b-ac24-d98163c8e57e",
  "success": true
}
We have obtained the following result:
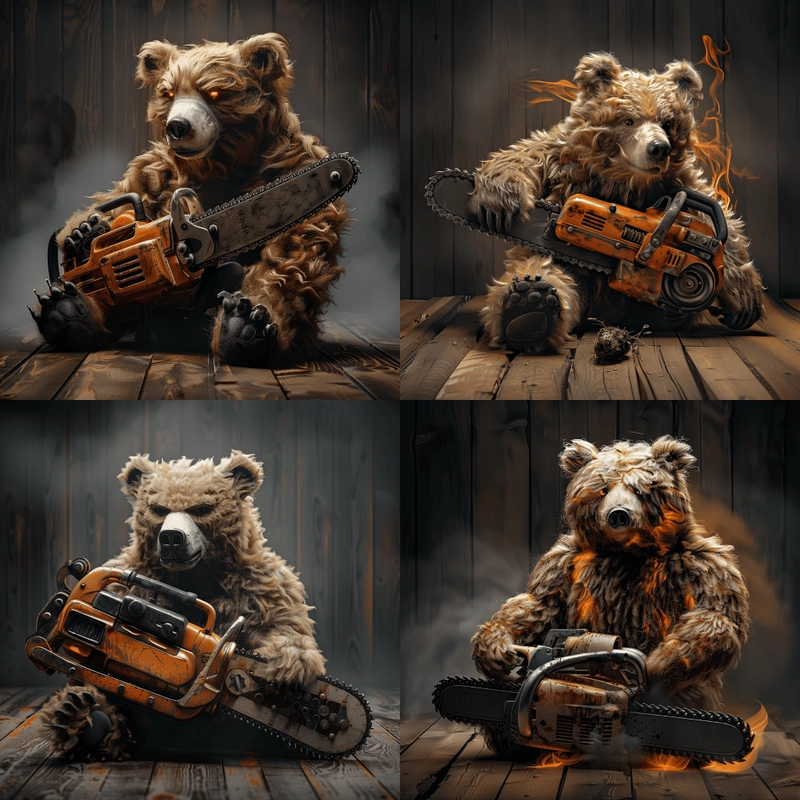
It can be seen that we have successfully achieved image fusion.
Note: Image fusion can support up to 5 image URLs as input, meaning it can support fusing up to 5 images, with the input format as above.
Local Transformation
This API also supports the localized drawing function for images, but it only supports generating images based on the content mentioned above. We can pass in a unique ID for the generated image, the action parameter for local redrawing action, and the mask for the area to be redrawn, in order to achieve redrawing in the masked area.
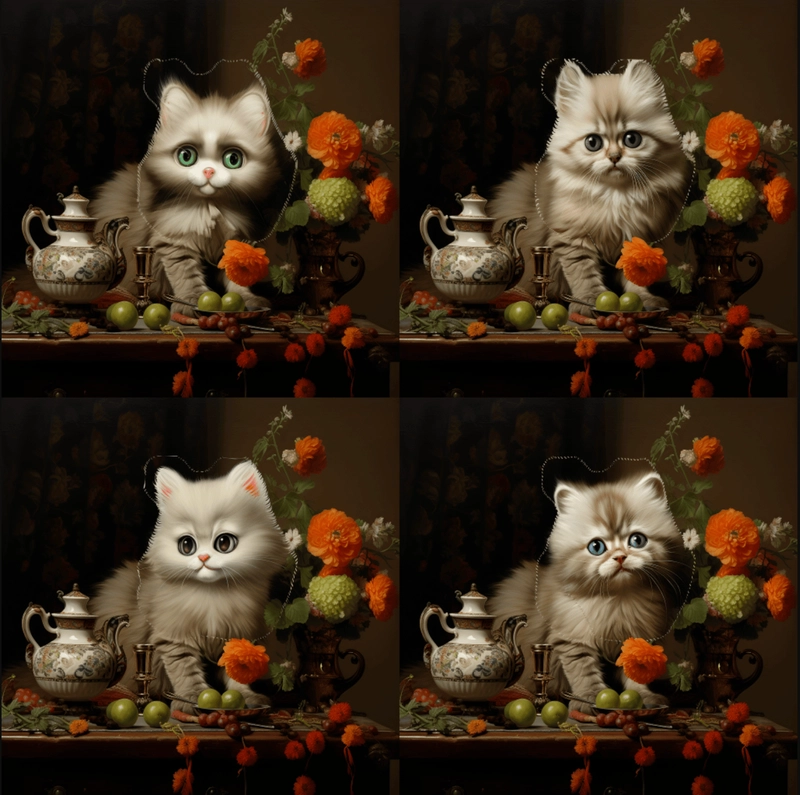
For example, here we have a generated image of a cat:

Now we want to redraw the cat's face. How do we do that?
First, we need to obtain the mask for that area. This mask is obtained through a grayscale image encoded in Base64. Below is some code to get the mask:
Example Python code to obtain the mask:
import sys
import os
from PySide6.QtWidgets import *
from PySide6.QtGui import QPainter, QMouseEvent, QPen, QColor, QImage
from PySide6.QtCore import Qt, QPoint

class DrawingWidget(QWidget):
    def __init__(self, imagePath):
        super().__init__()
        self.setAttribute(Qt.WA_StaticContents)
        self.background_image = QImage(imagePath)
        imageSize = self.background_image.size()*0.8
        self.setFixedSize(imageSize)
        self.foreground_image = QImage(self.size(), QImage.Format_ARGB32)
        self.foreground_image.fill(Qt.transparent)
        self.drawing = False
        self.lastPoint = QPoint()
        self.pen_color = QColor(255, 255, 255, 255)
        self.pen_size = 50

    def set_pen_size(self, size):
        self.pen_size = size

    def mousePressEvent(self, event: QMouseEvent):
        if event.button() == Qt.LeftButton:
            self.drawing = True
            self.lastPoint = event.pos()

    def mouseMoveEvent(self, event: QMouseEvent):
        if event.buttons() & Qt.LeftButton and self.drawing:
            painter = QPainter(self.foreground_image)
            painter.setRenderHint(QPainter.Antialiasing, True)
            pen = QPen(self.pen_color, self.pen_size,
                       Qt.SolidLine, Qt.RoundCap, Qt.RoundJoin)
            painter.setPen(pen)
            painter.drawLine(self.lastPoint, event.pos())
            self.lastPoint = event.pos()
            self.update()

    def mouseReleaseEvent(self, event: QMouseEvent):
        if event.button() == Qt.LeftButton and self.drawing:
            self.drawing = False

    def paintEvent(self, event):
        canvasPainter = QPainter(self)
        canvasPainter.drawImage(
            self.rect(), self.background_image, self.background_image.rect())
        canvasPainter.drawImage(
            self.rect(), self.foreground_image, self.foreground_image.rect())

    def save_image(self, path):
        self.foreground_image.save(path)

class MainWindow(QDialog):
    def __init__(self, imagePath):
        super().__init__()
        self.setWindowTitle("mask tool")
        self.drawing_widget = DrawingWidget(imagePath)
        self.currentPath = os.getcwd().replace("\\", "/")
        self.tempPath = self.currentPath + "/temp.jpg"
        self.projectPath = ""
        self.setDone = False

    def init_ui(self):
        layout = QVBoxLayout()
        layout.addWidget(self.drawing_widget)
        controls_layout = QHBoxLayout()
        size_label = QLabel("pen size:")
        controls_layout.addWidget(size_label)
        self.size_slider = QSlider(Qt.Horizontal)
        self.size_slider.setMinimum(100)
        self.size_slider.setMaximum(400)
        self.size_slider.setValue(400)
        self.size_slider.valueChanged.connect(self.update_pen_size)
        controls_layout.addWidget(self.size_slider)
        self.lineEdit_addPromp = QLineEdit()
        layout.addWidget(self.lineEdit_addPromp)
        save_button = QPushButton("   Start partial redrawing   ")
        save_button.clicked.connect(self.save_image)
        controls_layout.addWidget(save_button)
        dont_button = QPushButton("   Cancel partial redraw   ")
        dont_button.clicked.connect(self.dont_image)
        controls_layout.addWidget(dont_button)
        layout.addLayout(controls_layout)
        self.setLayout(layout)

    def update_pen_size(self):
        size = self.size_slider.value()
        self.drawing_widget.set_pen_size(size)

    def save_image(self):
        tempImage = self.currentPath + "/temp.jpg"
        self.drawing_widget.save_image(self.tempPath)
        self.prompt = self.lineEdit_addPromp.text()
        self.setDone = True
        self.close()

    def dont_image(self):
        self.setDone = False
        self.close()

    def closeEvent(self, event):
        if self.setDone:
            pass
        else:
            self.setDone = False
        event.accept()

if __name__ == '__main__':
    imagePath = "test.png"
    app = QApplication(sys.argv)
    mainWindow = MainWindow(imagePath)
    mainWindow.init_ui()
    mainWindow.exec()
By using the above code, a mask image can be obtained. During this process, we need to ensure that the mask image is the same size as the original image. The white area in the mask image indicates the area to be redrawn. Below is a comparison of the mask image for the cat that needs to be redrawn with the original image:
Original image:

Mask image:

Finally, we also need to convert the mask image to Base64 encoding. Below is the code for converting to Base64 encoding:
import cv2
import base64

image_path = 'temp.jpg'
gray_image = cv2.imread(image_path)
_, buffer = cv2.imencode('.jpg', gray_image)
base64_encoded = base64.b64encode(buffer).decode('utf-8')
with open('grayscale_image_base64.txt', 'w') as f:
    f.write(base64_encoded)

print("success!")
Note: The above Python code describes the process of generating a mask. If you want to integrate it into your product, please write the corresponding language code based on its principles.
With the above code, we obtained the mask mask that needs to be redrawn. Next, we also need to set the parameter action to variation_region, generate the image ID image_id (reference this parameter based on the content above), and pass the corresponding mask mask. Other parameter information is as follows:
-
action: The behavior for manipulating the image; here it isvariation_region, indicating partial redrawing of the image. -
prompt: Description words for partial redrawing of the image (optional parameter). -
image_id: Unique identification of the image, facilitating partial redrawing. -
mask: Base64 encoding of the corresponding mask area of the image (the image specified by the above image_id).
Therefore, based on the above rules, we need to set the correct parameters. The parameter prompt is a non-mandatory parameter; for convenience in comparison, the prompt for the mask area is set to A cute cat. The specific parameter settings are shown in the figure below:

Code Example
It can be observed that various language codes have been automatically generated on the right side of the page, as shown in the figure:

Some code examples are shown below:
Response Example
After a successful request, the API will return the image results after face swapping. For example:
{
  "image_url": "https://platform.cdn.acedata.cloud/midjourney/6c9450d8-1c22-4f85-a527-e7a7bfb4a61b.png?imageMogr2/thumbnail/!50p",
  "image_width": 1024,
  "image_height": 1024,
  "actions": [
    "upscale1",
    "upscale2",
    "upscale3",
    "upscale4",
    "reroll",
    "variation1",
    "variation2",
    "variation3",
    "variation4"
  ],
  "raw_image_url": "https://platform.cdn.acedata.cloud/midjourney/6c9450d8-1c22-4f85-a527-e7a7bfb4a61b.png",
  "raw_image_width": 2048,
  "raw_image_height": 2048,
  "progress": 100,
  "image_id": "1265876571323891712",
  "task_id": "6c9450d8-1c22-4f85-a527-e7a7bfb4a61b",
  "success": true
}
It can be seen that this is a redrawing operation of the image in the mask area, and the returned result is consistent with the above-mentioned content, as shown in the figure below:
As can be seen, we have successfully achieved partial redrawing of the generated image in a custom area.
CURL
curl -X POST 'https://api.acedata.cloud/midjourney/imagine' \
-H 'accept: application/json' \
-H 'authorization: Bearer {token}' \
-H 'content-type: application/json' \
-d '{
  "prompt": "A cute cat",
  "action": "variation_region",
  "image_id": "1265875488702726144",
  "mask": "/9j/4AAQSkZJRgABAQAAAQABAAD/2wBDAAIBAQEBAQIBAQECAgICAgQDAgICAgUEBAMEBgUGBgYFBgYGBwkIBgcJBwYGCAsICQoKCgoKBggLDAsKDAkKCgr/2wBDAQICAgICAgUDAwUKBwYHCgoKCgoKCgoKCgoKCgoKCgoKCgoKCgoKCgoKCgoKCgoKCgoKCgoKCgoKCgoKCgoKCgr/wAARCAGaAZoDASIAAhEBAxEB/8QAHwAAAQUBAQEBAQEAAAAAAAAAAAECAwQFBgcICQoL/8QAtRAAAgEDAwIEAwUFBAQAAAF9AQIDAAQRBRIhMUEGE1FhByJxFDKBkaEII0KxwRVS0fAkM2JyggkKFhcYGRolJicoKSo0NTY3ODk6Q0RFRkdISUpTVFVWV1hZWmNkZWZnaGlqc3R1dnd4eXqDhIWGh4iJipKTlJWWl5iZmqKjpKWmp6ipqrKztLW2t7i5usLDxMXGx8jJytLT1NXW19jZ2uHi4+Tl5ufo6erx8vP09fb3+Pn6/8QAHwEAAwEBAQEBAQEBAQAAAAAAAAECAwQFBgcICQoL/8QAtREAAgECBAQDBAcFBAQAAQJ3AAECAxEEBSExBhJBUQdhcRMiMoEIFEKRobHBCSMzUvAVYnLRChYkNOEl8RcYGRomJygpKjU2Nzg5OkNERUZHSElKU1RVVldYWVpjZGVmZ2hpanN0dXZ3eHl6goOEhYaHiImKkpOUlZaXmJmaoqOkpaanqKmqsrO0tba3uLm6wsPExcbHyMnK0tPU1dbX2Nna4uPk5ebn6Onq8vP09fb3+Pn6/9oADAMBAAIRAxEAPwD+f+iiigAooooAKKKKACiiigAooooAKKKKACiiigAooooAKKKKACiiigAooooAKKKKACiiigAooooAKKKKACiiigAooooAKKKKACiiigAooooAKKKKACiiigAooooAKKKKACiiigAooooAKKKKACiiigAooooAKKKKACiiigAooooAKKKKACiiigAooooAKKKKACiiigAooooAKKKKACiiigAooooAKKKKACiiigAooooAKKKKACiiigAooooAKKKKACiiigAooooAKKKKACiiigAooooAKKKKACiiigAooooAKKKKACiiigAooooAKKKKACiiigAooooAKKKKACiiigAooooAKKKKACiiigAooooAKKKKACiiigAooooAKKKKACiiigAooooAKKKKACiiigAooooAKKKKACiiigAooooAKKKKACiiigAooooAKKKKACiiigAooooAKKKKACiiigAooooAKKKKACiiigAooooAKKKKACiiigAooooAKKKKACiiigAooooAKKKKACiiigAooooAKKKKACiiigAooooAKKKKACiiigAooooAKKKKACiiigAooooAKKKKACiiigAooooAKKKKACiiigAooooAKKKKACiiigAooooAKKKKACiiigAooooAKKKKACiiigAooooAKKKKACiiigAooooAKKKKACiiigAooooAKKKKACiiigAooooAKKKKACiiigAooooAKKKKACiiigAooooAKKKKACiiigAooooAKKKKACiiigAooooAKKKKACiiigAooooAKKKKACiiigAooooAKKKKACiiigAooooAKKKKACiiigAooooAKKKKACiiigAooooAKKKKACiiigAooooAKKKKACiiigAooooAKKKKACiiigAooooAKKKKACiiigAooooAKKKKACiiigAooooAKKKKACiiigAooooAKKKKACiiigAooooAKKKKACiiigAooooAKKKKACiiigAooooAKKKKACiiigAooooAKKKKACiiigAooooAKKKKACiiigAooooAKKKKACiiigAooooAKKKKACiiigAooooAKKKKACiiigAooooAKKKKACiiigAooooAKKKKACiiigAooooAKKKKACiiigAooooAKKKKACiiigAooooAKKKKACiiigAooooAKKKKACiiigAooooAKKKKACiiigAooooAKKKKACiiigAooooAKKKKACiiigAooooAKKKKACiiigAooooAKKKKACiiigAooooAKKKKACiiigAooooAKKKKA//Z"
}'
Python
import requests

url = "https://api.acedata.cloud/midjourney/imagine"

headers = {
    "accept": "application/json",
    "authorization": "Bearer {token}",
    "content-type": "application/json"
}

payload =
{
    "prompt": "A cute cat ",
    "action": "variation_region",
    "image_id": "1265875488702726144",
    "mask": "/9j/4AAQSkZJRgABAQAAAQABAAD/2wBDAAIBAQEBAQIBAQECAgICAgQDAgICAgUEBAMEBgUGBgYFBgYGBwkIBgcJBwYGCAsICQoKCgoKBggLDAsKDAkKCgr/2wBDAQICAgICAgUDAwUKBwYHCgoKCgoKCgoKCgoKCgoKCgoKCgoKCgoKCgoKCgoKCgoKCgoKCgoKCgoKCgoKCgoKCgr/wAARCAGaAZoDASIAAhEBAxEB/8QAHwAAAQUBAQEBAQEAAAAAAAAAAAECAwQFBgcICQoL/8QAtRAAAgEDAwIEAwUFBAQAAAF9AQIDAAQRBRIhMUEGE1FhByJxFDKBkaEII0KxwRVS0fAkM2JyggkKFhcYGRolJicoKSo0NTY3ODk6Q0RFRkdISUpTVFVWV1hZWmNkZWZnaGlqc3R1dnd4eXqDhIWGh4iJipKTlJWWl5iZmqKjpKWmp6ipqrKztLW2t7i5usLDxMXGx8jJytLT1NXW19jZ2uHi4+Tl5ufo6erx8vP09fb3+Pn6/8QAHwEAAwEBAQEBAQEBAQAAAAAAAAECAwQFBgcICQoL/8QAtREAAgECBAQDBAcFBAQAAQJ3AAECAxEEBSExBhJBUQdhcRMiMoEIFEKRobHBCSMzUvAVYnLRChYkNOEl8RcYGRomJygpKjU2Nzg5OkNERUZHSElKU1RVVldYWVpjZGVmZ2hpanN0dXZ3eHl6goOEhYaHiImKkpOUlZaXmJmaoqOkpaanqKmqsrO0tba3uLm6wsPExcbHyMnK0tPU1dbX2Nna4uPk5ebn6Onq8vP09fb3+Pn6/9oADAMBAAIRAxEAPwD+f+iiigAooooAKKKKACiiigAooooAKKKKACiiigAooooAKKKKACiiigAooooAKKKKACiiigAooooAKKKKACiiigAooooAKKKKACiiigAooooAKKKKACiiigAooooAKKKKACiiigAooooAKKKKACiiigAooooAKKKKACiiigAooooAKKKKACiiigAooooAKKKKACiiigAooooAKKKKACiiigAooooAKKKKACiiigAooooAKKKKACiiigAooooAKKKKACiiigAooooAKKKKACiiigAooooAKKKKACiiigAooooAKKKKACiiigAooooAKKKKACiiigAooooAKKKKACiiigAooooAKKKKACiiigAooooAKKKKACiiigAooooAKKKKACiiigAooooAKKKKACiiigAooooAKKKKACiiigAooooAKKKKACiiigAooooAKKKKACiiigAooooAKKKKACiiv12/4Jcf8GoX7XX7X+nab8af2y9Tvfgt4GmvZYZPDOpaHIni7VIYbmGOTFncxxx6dHLH9pEdzceZKJIY5PsssUschAPyJor+tT4X/wDBqr/wRb8B+AbLwf4i/Z51/wAb6naCaOfxP4n8f6ol9fb5ZHAmj0+5tbVfLB8oeVDHxHk5kzIen/4hdP8Aghd/0Y1/5kzxP/8ALSgD+QSiv3u/b4/4Myb/AMOeFZPF/wDwTc+POoa9d6fYO9z4F+KU9rHdajLFHcyZtdStYoohLL/osMVtNDFECZJZbuMYjr8Ufj/8Bfi3+yx8YvEPwD/aD+H1/wCF/GPhfUjaa1oN9jzbV8Eg5GY5Y5I/LkjljJjlikjkjLxuDQB5/RRRQAUUUUAFFfrt+wH/AMGi37dP7U3hGL4hftS+MdP+BGj32nCbSdP1fSTq+u3JeO2liaSxjnhjtIjHLKCJrhLqKW2MclqAfMH6Ef8AEFh/wSy/6L78ff8AwqdC/wDlNQB/MDRX9Mviz/gy0/4JzXfhvUtO8D/tFfG3TtafT5o9Kv8AVdX0e9tbe5MZEM0tvHp8LzRiTJMQliLhcCSMkGvzQ/4Kdf8ABsN+3V/wT18M618bfh3e6b8YfhdoWny3us+JvD9l9i1LSbaOK3Es15pksskgiEksh320t0I4rWWaX7MOAAfmTRRRQAUUUUAFFFFABRRRQAUUUUAFFFFABRRRQAUUUUAFFFFABRRRQAUUUUAFFFFABRRRQAUUUUAFFFFABRRRQAUUUUAFFFFABRRRQB+5/wDwaS/8EgIPij4sb/gqR+0F4N0288OeHtUm0/4VaDrej3LGbWIpI/N16JpCsMkdsfMtoT++H2rzpP3MtjEZP6La8i/Yj/Zf8PfsafsmfD39lPwm+nyWngTwtY6VPe6dpEenR6hcxwr9pvvs8RIikubnzbqUb5CZZ5CZJDkn12gAooooAK+RP+Cvv/BLP4P/APBU79krV/g34w8N2K+OtHsbu8+FHiy4mMEuh6y0f7rzJkhlk+wzSpHHdReXKHixIB5sUMsX13RQB/CH8f8A4C/Fv9lj4xeIfgH+0H8Pr/wv4x8L6kbTWtBvsebavgkHIzHLHJH5ckcsZMcsUkckZeNwa8/r+yL/AIK2f8EQP2Vv+CuXhew1H4pvqXhX4g+HNPubTwt8QvDyRfaYYpI5fKtb2OQf6fYx3MnneSTFKCJBFND50xl/CD9n3/g09/4Kk/Fn9onW/hL8TfDeg+AvCvhfWzp+r/ErWL8zWWpQg2shm0m2ixc3++2uTLF5kdvCTDLbSzW1xHJFGAfl5X9NH/BrF/wRq8Lfs3fAjRv+CiH7RHgPTLn4m+P9L+2/Dq4fUo7z/hHfDF1bxGGaOMR+XDe3Uck3mSeZJJHayQw/uTLdxH6N/wCCbP8Awbkf8E5f+Cdn9k+Po/AX/Cz/AImae0M7ePvHlnHcfYbyL7LIZdOsv+Paw8u6tvOilxLdw+bJH9qkFfoPQAUUUUAFFFFAH8+v/B2R/wAEZvDHgPS5/wDgqd+y/wCAtN0m0mv8fHOxtdQjt0e6urmKOy1mK28sZkluZjDdGOTMksttN5OftU1fgbX953xe+FPgf41fCnxN8GPiZoDaj4b8X6FfaN4g04XkkX2uxuonhuIvMiIkTzI5HH7sgjsRX8fP/BaP/glR48/4JR/tj6r8G/J8Qah8OtaIv/hh431u0iQazYeXEZYTJD+7NzayyC2lGIj/AKqbyoormIUAfG9FFFABRRRQAUUUUAFFFFABRRRQAUUUUAFFFFABRRRQAUUUUAFFFFABRRRQAUUUUAFFFFABRRRQAUUUUAFFFFABRRRQAUUUUAfpP/AMG73/BaG3/4Jd/tCXnw4+PHiPXpvgh47UJ4isbJ/Pg8Pap+5EWvJbeWZJPLjjMU0duY5JYmEmLmS1toT/VR8I/i58MPjn4Asfij8G/iVoPi/wAN6o039n+IfDOrxahYXRimkil8m5hJilEcsckeQTzI5UjNcGJw+HX7bc1Lk86BNcKz1H9Gm7bmHBIX9kUsxtEkz1TpRUkBqHnUr4gmbHH9pk4v1xPJKmOlOu7WiuJlxZ6H6GlBrvBygjFSZlfYIJdB6YY1OwW3AWtLe3hUk09+b+BOm8Hv8H60bPI4fJh/KBcUfDPPrY3bKpKtG9uLJ6VDceText/iBB7JiYEkGJI4eEgnHIFcs8jPTEe4odwY0fHW6cX8/Xx+45GFl1IeSJE5Hh+HJvA+q7HxaDwvF03mvxgfdH+V8U2dMflhAsufPPf8h15/wDgsi8Vc5uHRUibr3HeXywWcNjKe3qz1aJhff7f9l+K3g27nxToNFJpb6nATEaHIkj3Loe/iODckAWx7ikokg7Ym/s7ID5Y71J/rGpK8Rn/jzT/al4Efo2uPfx+/wv2T5VIn4sR8T9DsNBk1NKgpRHginU4Od7iY59Ol7v3MNbfL/wC0Un4PtxfjtG+k7ZL98FAVV8t3Dwv0a8/wDA/IYXhzDB2llIdncV29Rzg+RpDGeZOv1VYm8adUwx1U8MrCMh/mMAAAAAABX5yZtuwQhG1GH1x6uxbLlg1h0j3ieEycEExSIdw5vDKAQAAAAAwqj4c8bcylIwpaZHVjKwTgItRklgAs1JZSd2cUSI/AwAAAAB6WqnPyCjsr4dlZk3hDK9So1czJXkh9TJNerL1dolMclrccscZIkkgIvKeCM8QlLU/2WbvcgfjQmE753GI9OnLgokyCQAAAAwGzH4S5S3RUw/e3w3/reE74p89QXDhWIylTtSvZoW1ZitaVpUNPftLsD4rVGUkG/8At9B5V4clKNB498coWCDVjbL1/pY0yM0eYJt0R0p/fgMmBM0qxuleYsn/AiLAE9L8q8myRZ9S/4DjsUlSvuim+3dd6kSYBJGeZJh2VMG7qmZT40kOBmpKCOI7c5UVIdSxlR8qPUCqW9g1cDv5vENQLGLuPS43/rPD9e7ffrNfRefoG4kvF1XH+LNnsHhzL3YnAYzpzZWCe20iMRkU2/dVUm4u2zHu8zI4hweOqgl7R0dUHgZWrgX3gbfWf+Lqbw8iJetq1HneUcCMswV4Ke0n4mcJVEimJo9Eq5oB5IgAk9Z9UibfyJZZy/r5o7KvPZ7IHGwnFeA7PcA0w1RtKZywPW07OFHuEZMLQrvHrNTGWW6/iLRbiH96yHJsOY4Wcd1nAWzyXtoZgr5/mq7VgAAAAAAkH9h9e9/ywvr1PgY67h92IvcFVK9ULGHVS/mgBp7Vvv+H7Av8RfgtN5ODzz97+C3Qeq0EGzzElEA63B+FJXnMCf+Yc1e5AcsGAS6lA/88AwiRhqqZjGZG+pDkt5D5nU8PCD0fQtScActwzS0+50A+3GYerOdQbIu30VgPgM0FHz3vlGvB2Eu9BteDbNEHo91jd9NNSqkGVL0A0twUtNnlFRHDp2+Hp3xzjP/SwyDnpT5D9UCAAAAAAAABM+d+nLy8Pyh8KkZOlVFnYwvJfTxfFV5YVQ6ePq0yFErWDlRdM5t+4xajjhy1vGZnURueJBmfB/2yzsvmbwz20Yv/YtHBeVcGnhBTjje3ID/Sp8epj0RFvd+/en/QdPYwr0+8cUzWsewm9Utk8wNedWhoP8g9Wct6Dur14Yzbb0zbxWy+5W4fzsCq3MmxpzJskhu2HxeEf8A9zjBNBE5ltYshExMccXR7kFP9FhfxIejUsZFFW2XeNyN5FZzQY417mx0yH1m3/1QegAIAAAAAAAAAB57n0FFya2LZevnFD15mTpKBnk+HEM9HqqA/cVwERNGqSSJaPMETzRsqrMchTd8c0WF25BHaKT+1VW3to4awe5oobNtv2yGlZHZPI15+r5+Jh4Ak8UoKH5-gdHgQW10+iwr/hFL3eS4m06UhiMIgyU2jyH/ORendWf//ZpHd53ylS+awKkTheOc82+b8Kt4keYbRGx9mOwm43q2heVBjbXF6pAPuSBqg+OWarH/+y1qwf8/8Ab7dsFfdH6pmUF1F3EOI8lSvS/A+mbawXgV0D/SVfVsIK6UU9Zmv9kJG+GIAbY4H3HGgtEP9gMcsMwDbyA1mVBuUCY8DxrZ8AQBchzMkFgMkcOBNNIVdpTyflMbQWBuuyzZ10WSwE84xzz7TEAiolkUEeoieUy4UlMjhVgbigDgJJAsAwD+wVpEybG7aOwzMg7WsTuOH+UAA3eBrIhgU9TUnU4t55as4+p+TUThufA2NSmbvaJe8TOyV7dade9tkAAM7KdzRPS+FUzMIXlN5LZ2sbj6Gql11A7G0IiSbkd06ejVEh4lKOOp4WINdmKgHPsp8+ZXB4BQcMhxbkdloiUjWGGGrDgDCBG//AN+fJ5uO/5I8iGa24UbtSBRubPyQPqYAdDZoTPwJJHp7B4eWmqpsnr7xdAo0uO53AXnwpEJoinedBR1ssnr0R6bgO8VxmXq4FJWh+2Dba1tOV0WsZFuMSGnIi8gfedEqEC1m/sp+iFTfh4nN35NKe5cvZmB0TdvVd8N3SK09vDAAaVsbBeZa0+1mN3iiiC2oQFAg5pjgMJpMkWaDrEzowkBQZUt5IzxOXnZELLZUEPUEGUjNSxUpuZxWDGh3nRMnGls0alupeWhTPiDlIVda4mZLF4E5XsW0NgBHzqFG0uxQE//FKeBCVYXVLupmyW+GpjZ1CSMmmDACbXeumlVJjk9WTJlXUolb7CDN/FlD+UIPAU7EMa2q07+4rMvsklTZCN5XVcmpmKayh7SuU4TmazE2BqxW
python
response = requests.post(url, json=payload, headers=headers)
print(response.text)
## Asynchronous Callback
Since generating images with Midjourney requires a waiting period, this API is also designed by default for long wait mode. However, in certain scenarios, long waits may incur additional resource overhead, so this API also provides an asynchronous Webhook callback method. When the image generation is successful or fails, the result will be sent to the specified Webhook callback URL via an HTTP request. The callback URL can then perform further processing upon receiving the result.
Below demonstrates the specific calling process.
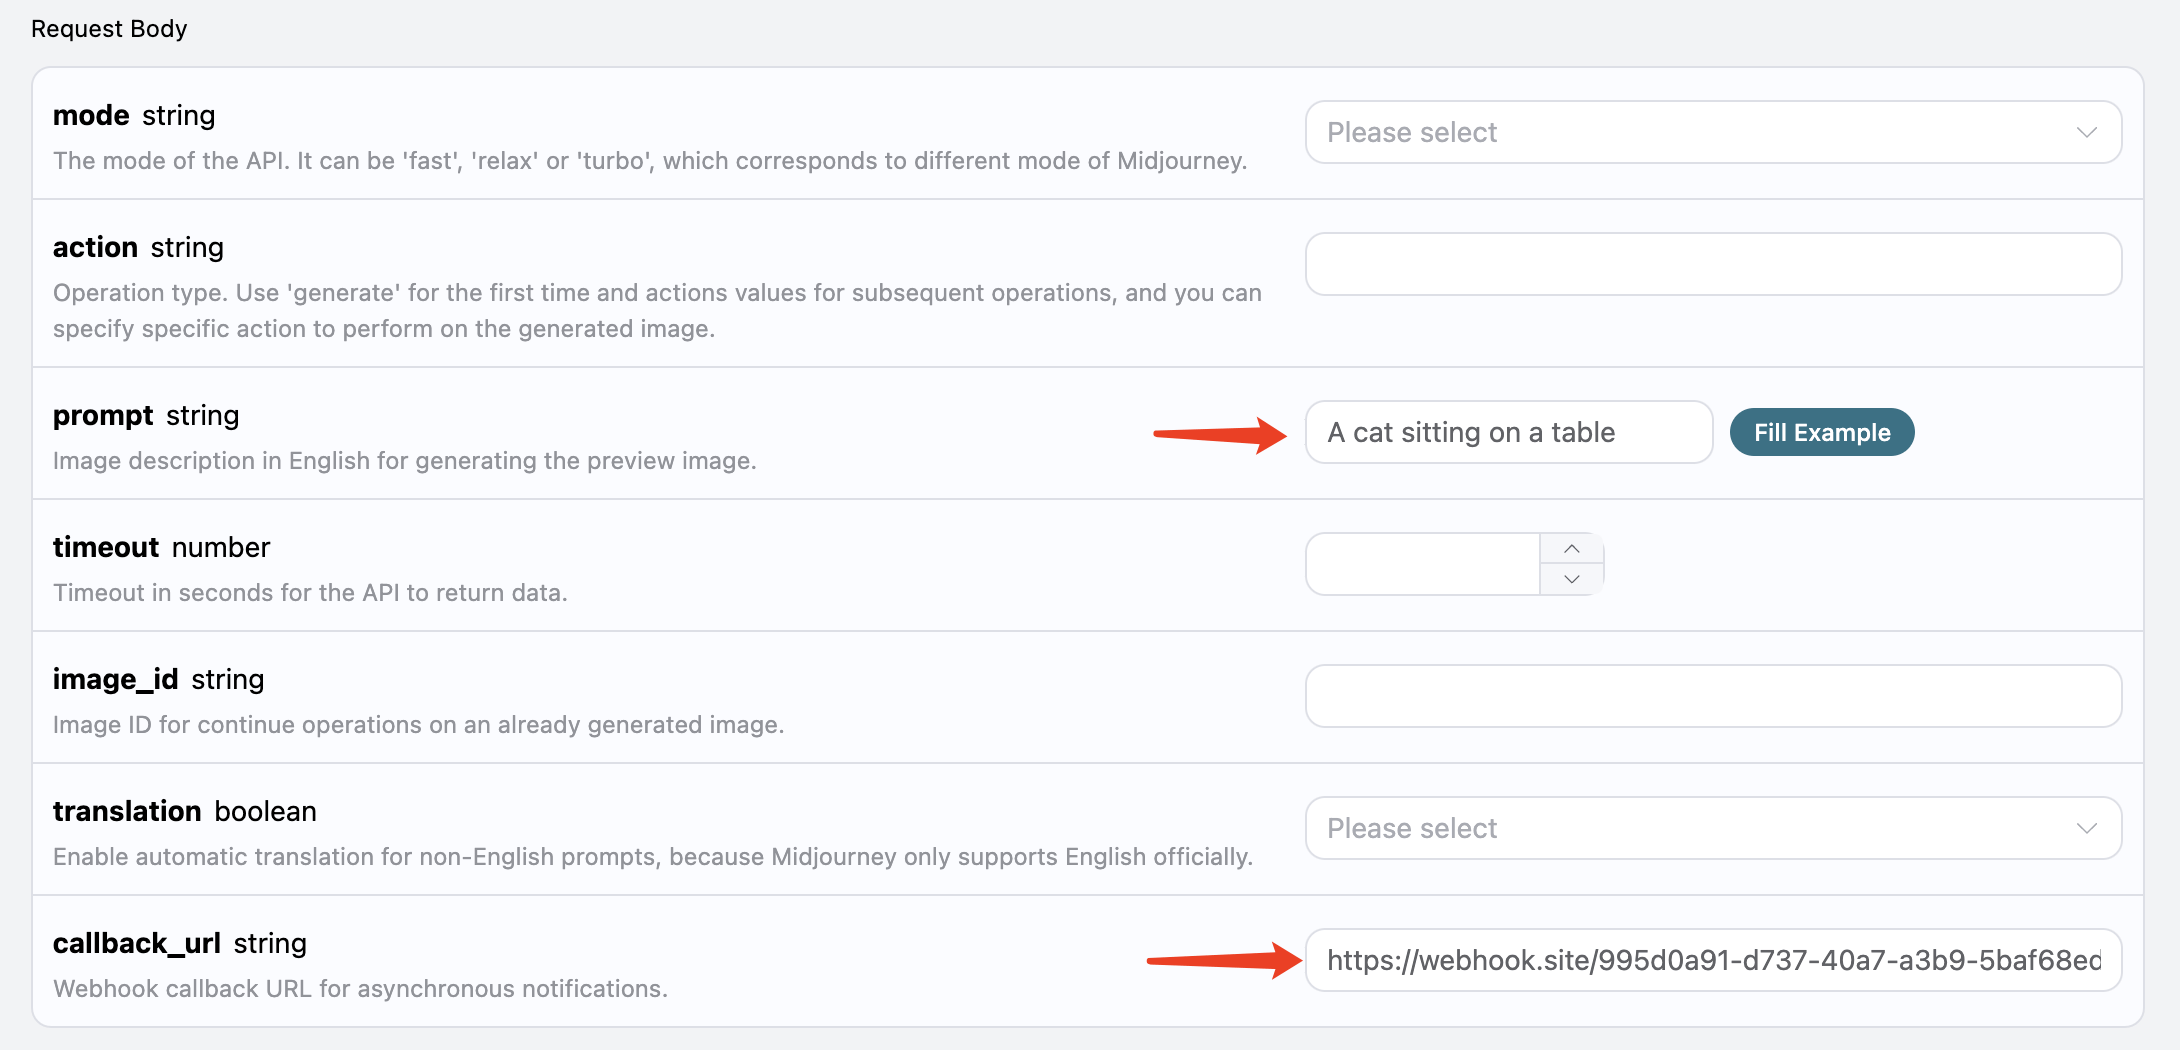
First, the Webhook callback is a service that can receive HTTP requests, and developers should replace it with the URL of their own HTTP server. For demonstration purposes, a public webhook sample site [https://webhook.site/](https://webhook.site/ "https://webhook.site/") is used here, opening the site will provide a Webhook URL, as shown in the figure:

Copy this URL to use as the Webhook. The sample here is [https://webhook.site/995d0a91-d737-40a7-a3b9-5baf68ed924c](https://webhook.site/995d0a91-d737-40a7-a3b9-5baf68ed924c "https://webhook.site/995d0a91-d737-40a7-a3b9-5baf68ed924c").
Next, we can set the field `callback_url` to the above Webhook URL and fill in `prompt`, as shown in the figure:
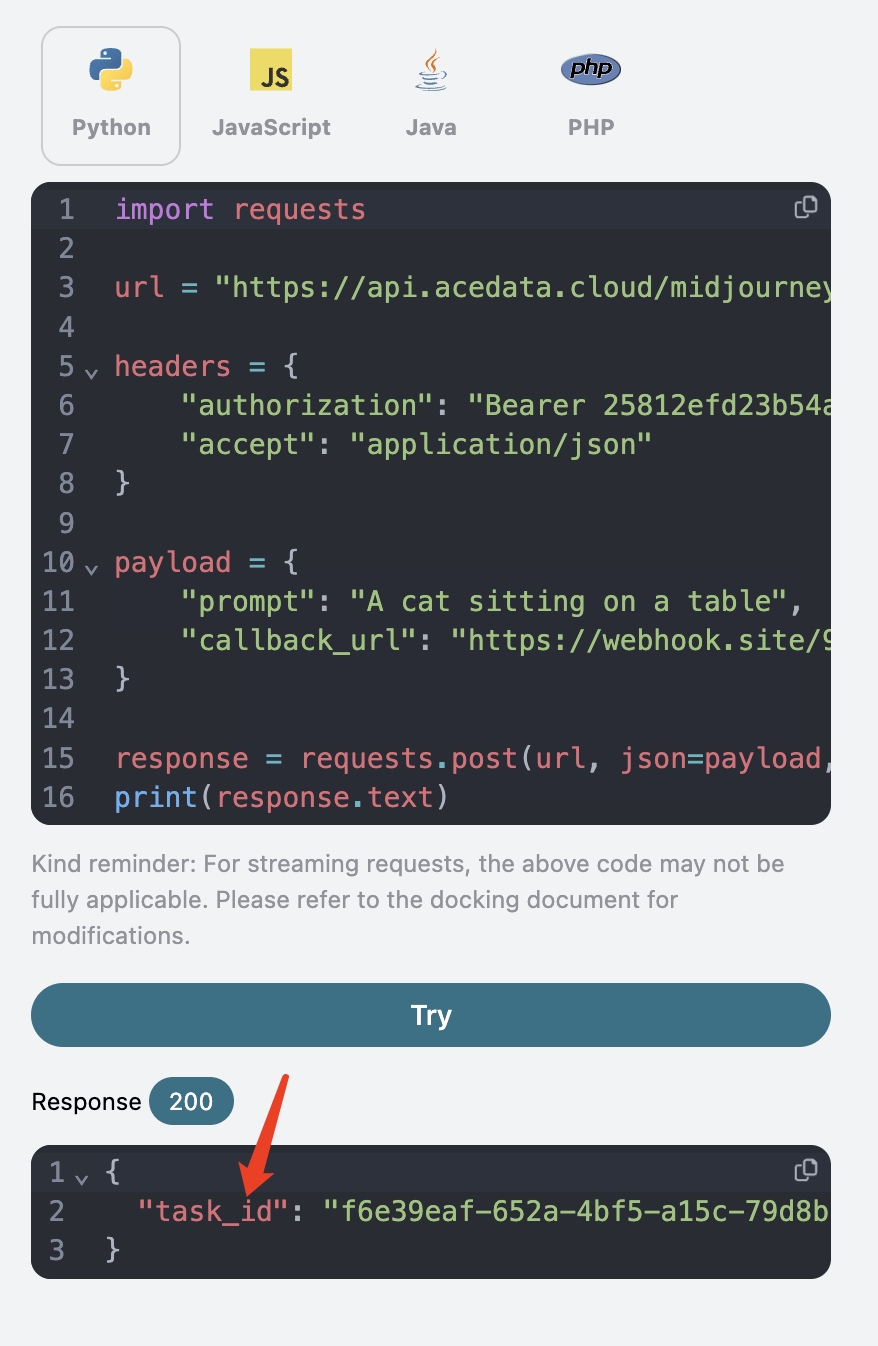
After clicking test, a response with a `task_id` will be received immediately, used to identify the current generation task's ID, as shown in the figure:
 After a brief wait, once the image generation is complete, the Webhook URL will receive an HTTP request, as shown in the figure:
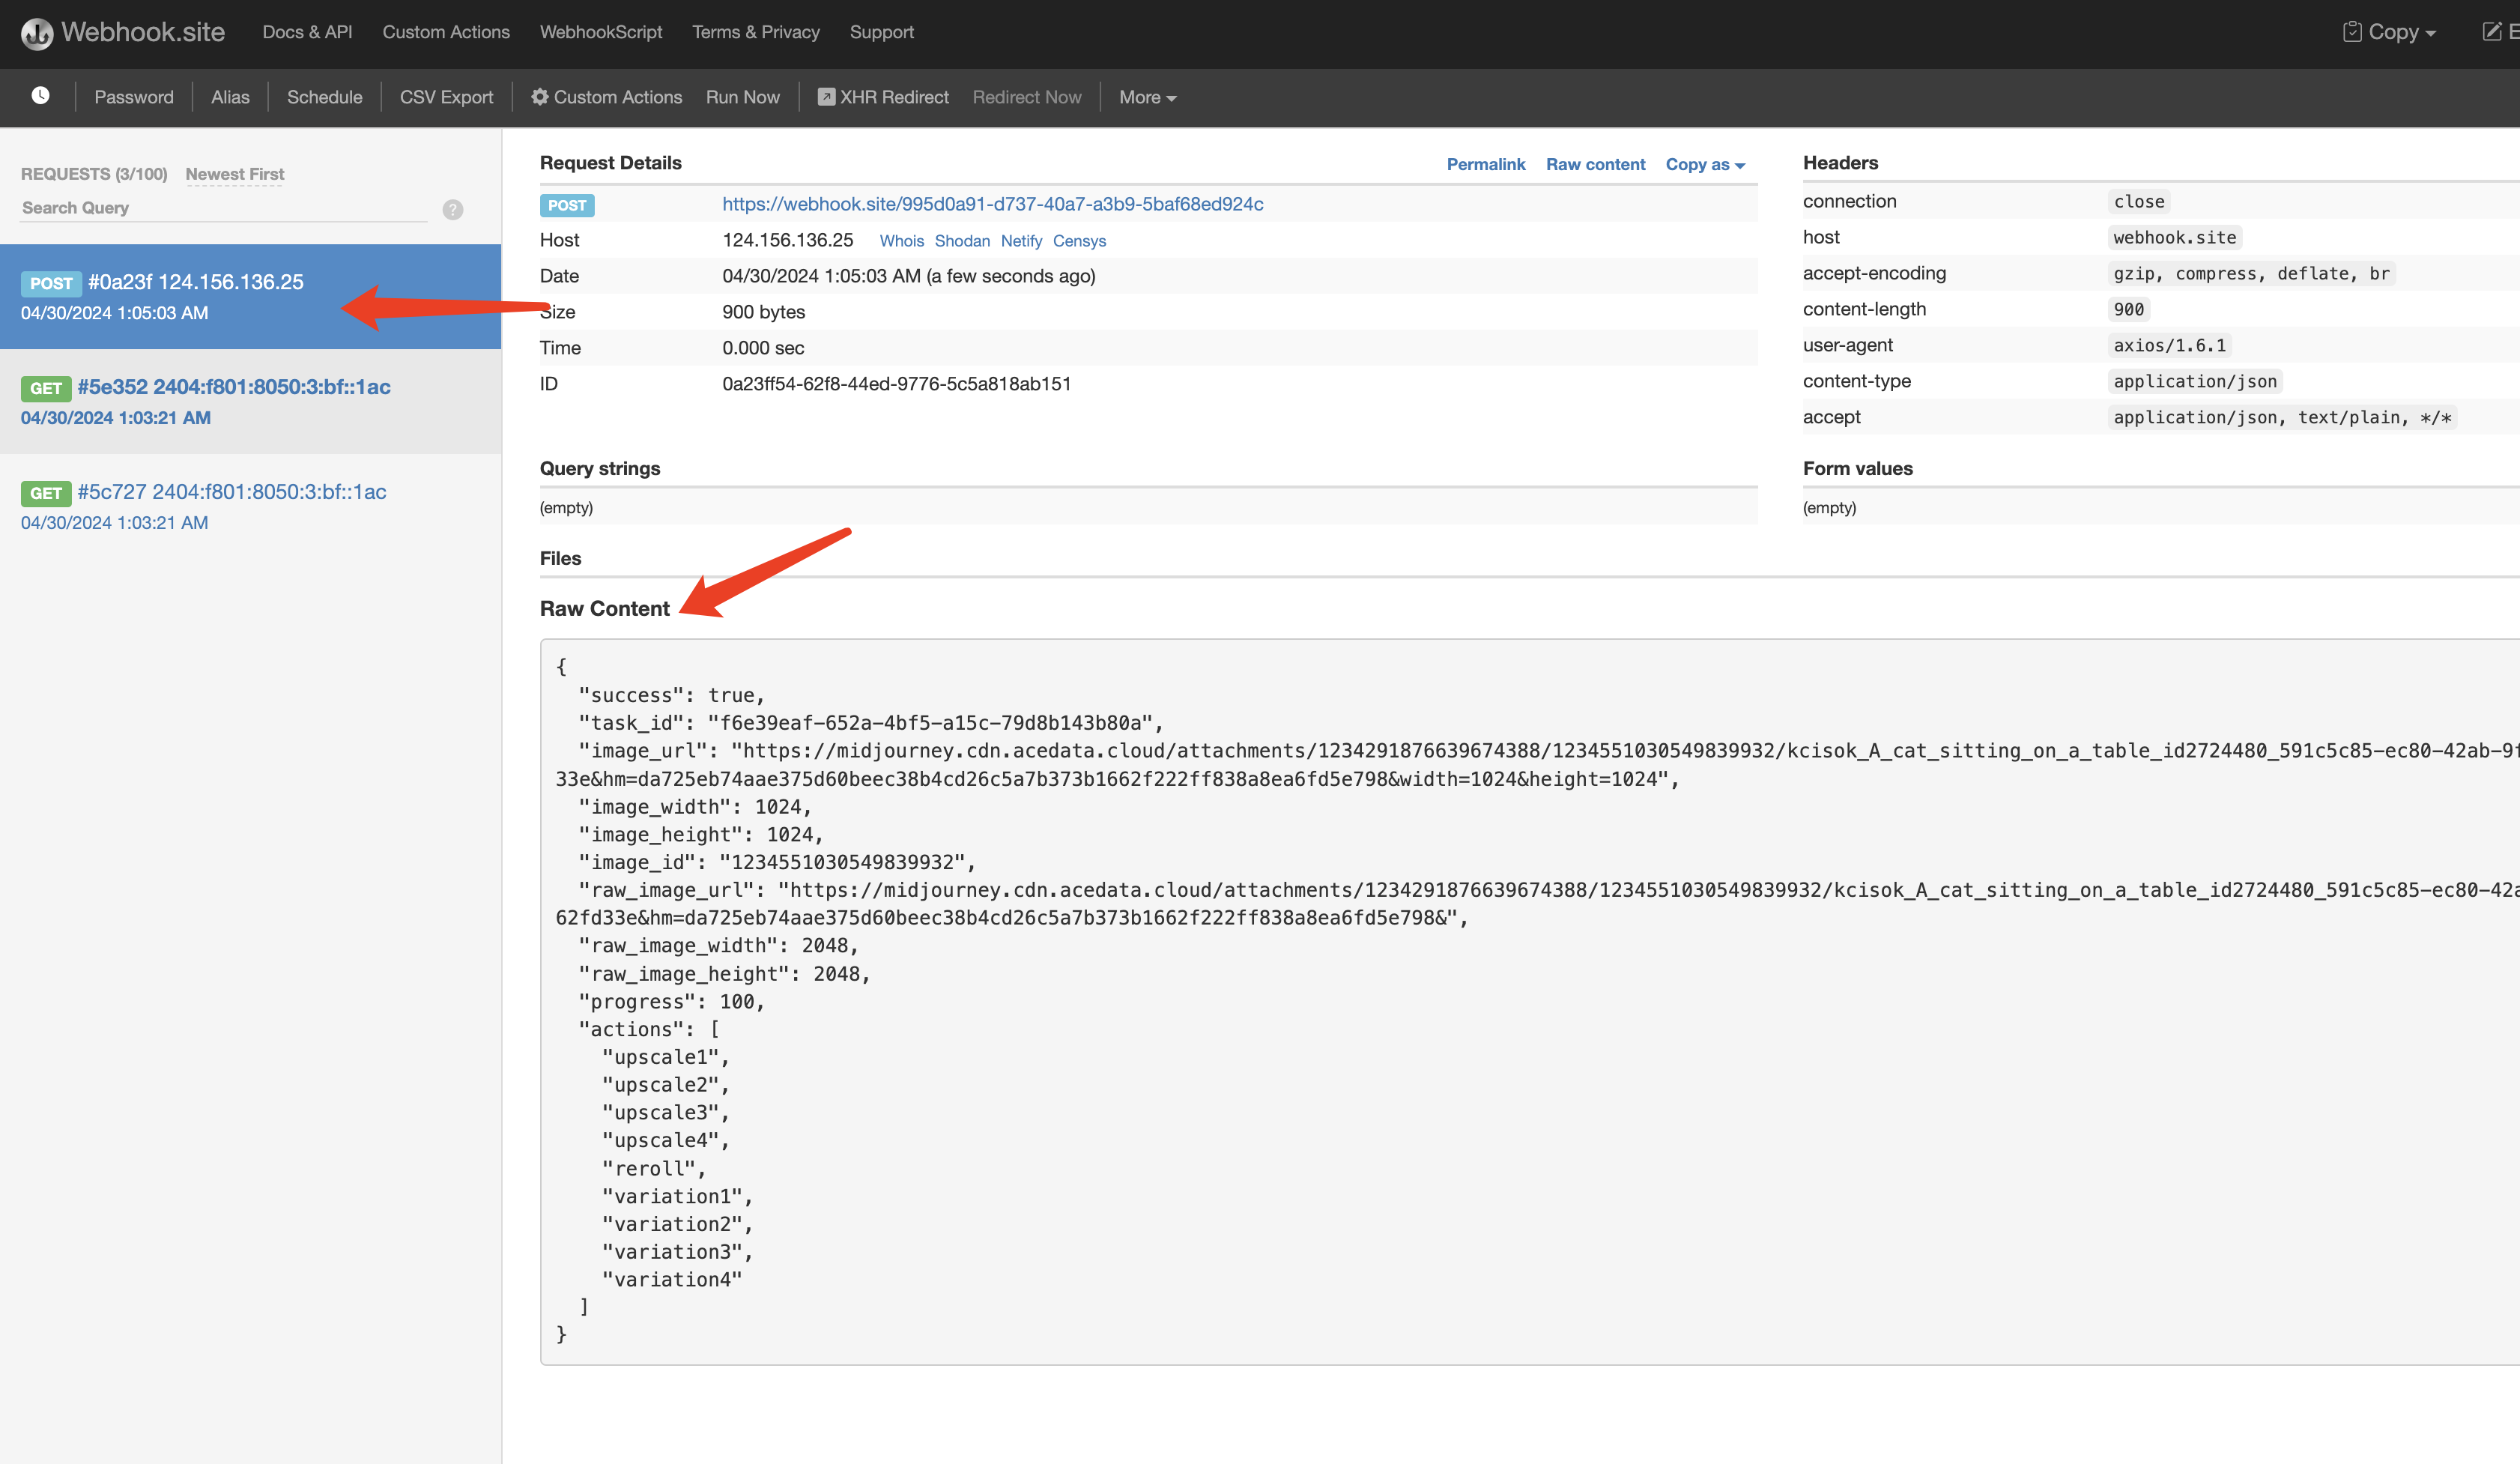
The result contains the current task's result, as follows:
After a brief wait, once the image generation is complete, the Webhook URL will receive an HTTP request, as shown in the figure:

The result contains the current task's result, as follows:
json
{
"success": true,
"task_id": "f6e39eaf-652a-4bf5-a15c-79d8b143b80a",
"image_url": "https://midjourney.cdn.acedata.cloud/attachments/1234291876639674388/1234551030549839932/kcisok_A_cat_sitting_on_a_table_id2724480_591c5c85-ec80-42ab-9fe5-9adfbed192e4.png?ex=663124be&is=662fd33e&hm=da725eb74aae375d60beec38b4cd26c5a7b373b1662f222ff838a8ea6fd5e798&width=1024&height=1024",
"image_width": 1024,
"image_height": 1024,
"image_id": "1234551030549839932",
"raw_image_url": "https://midjourney.cdn.acedata.cloud/attachments/1234291876639674388/1234551030549839932/kcisok_A_cat_sitting_on_a_table_id2724480_591c5c85-ec80-42ab-9fe5-9adfbed192e4.png?ex=663124be&is=662fd33e&hm=da725eb74aae375d60beec38b4cd26c5a7b373b1662f222ff838a8ea6fd5e798&",
"raw_image_width": 2048,
"raw_image_height": 2048,
"progress": 100,
"actions": [
"upscale1",
"upscale2",
"upscale3",
"upscale4",
"reroll",
"variation1",
"variation2",
"variation3",
"variation4"
]
}
The `success` field indicates whether the task was executed successfully. If successful, there will also be the same `actions`, `image_id`, `image_url` fields, and the return result is the same as mentioned earlier. Additionally, there is a `task_id` to identify the task, associating the Webhook result with the original API request.

If the image generation fails, the Webhook URL will receive a similar content as follows:
json
{
"success": false,
"task_id": "7ba0feaf-d20b-4c22-a35a-31ec30fc7715",
"error": {
"code": "bad_request",
"message": "Unrecognized argument(s): -c, x"
}
}
Here, the `success` field will be `false`, and there will also be `error.code` and `error.message` fields describing the details of the task error, allowing the Webhook server to process according to the respective results.

## Streaming Output

Midjourney officially has progress while generating images. Initially, it starts as a blurry photo, and after several iterations, the image gradually becomes clear, resulting in a complete image.

Therefore, the image generation process can be roughly divided into the stages of "sending command" -> "starting image generation (gradually becoming clear through multiple iterations)" -> "image generation complete".

Without enabling streaming output, this API's process from initiating the request to returning the result actually encompasses the whole "sending command" -> "image generation complete" process, with the intermediate image generation process included. Due to Midjourney's relatively slow image generation speed, the entire process may take about a minute or longer.

To enhance user experience, this API supports streaming output, meaning that results are returned as soon as "image generation starts," streaming the result each time there is a change in drawing progress until the image generation is finished.

If you want to return a response in streaming mode, you can change the `accept` parameter in the request header to `application/x-ndjson`, but the calling code needs corresponding modifications to support streaming response.

Python sample code:
python
import requests
url = 'https://api.acedata.cloud/midjourney/imagine'
headers = {
'content-type': 'application/json',
'accept': 'application/x-ndjson',
'authorization': 'Bearer {token}'
}
body = {
"prompt": "a beautiful cat --v 6"
}
r = requests.post(url, headers=headers, json=body, stream=True)
for line in r.iter_lines():
print(line.decode())
Running result:
json
{"image_url":"https://midjourney.cdn.acedata.cloud/attachments/1234291876639674388/1234558451443699803/eae94f0f-0ba5-4b3c-9bad-59fb33ac2cbc_grid_0.webp?ex=66312ba7&is=662fda27&hm=4625d5f12158bffc07c4faaf6ce75af6f1396122f148b33b91f3e20b48fecc8b&width=256&height=256","image_width":256,"image_height":256,"image_id":"1234558451443699803","raw_image_url":"https://midjourney.cdn.acedata.cloud/attachments/1234291876639674388/1234558451443699803/eae94f0f-0ba5-4b3c-9bad-59fb33ac2cbc_grid_0.webp?ex=66312ba7&is=662fda27&hm=4625d5f12158bffc07c4faaf6ce75af6f1396122f148b33b91f3e20b48fecc8b&","raw_image_width":512,"raw_image_height":512,"progress":35,"actions":[],"task_id":"49589d2c-b6b3-4fbf-9f82-93068509c76f","success":true}
{"image_url":"https://midjourney.cdn.acedata.cloud/attachments/1234291876639674388/1234558458595115149/eae94f0f-0ba5-4b3c-9bad-59fb33ac2cbc_grid_0.webp?ex=66312ba9&is=662fda29&hm=9af53fa645127131a88dfbb3930add7abda710c12a3d6c30c457d6a067b36bab&width=256&height=256","image_width":256,"image_height":256,"image_id":"1234558458595115149","raw_image_url":"https://midjourney.cdn.acedata.cloud/attachments/1234291876639674388/1234558458595115149/eae94f0f-0ba5-4b3c-9bad-59fb33ac2cbc_grid_0.webp?ex=66312ba9&is=662fda29&hm=9af53fa645127131a88dfbb3930add7abda710c12a3d6c30c457d6a067b36bab&","raw_image_width":512,"raw_image_height":512,"progress":75,"actions":[],"task_id":"49589d2c-b6b3-4fbf-9f82-93068509c76f","success":true}
{"image_url":"https://midjourney.cdn.acedata.cloud/attachments/1234291876639674388/1234558483408490566/kcisok_A_landscape_painting_of_a_beautiful_sunset_id5963392_eae94f0f-0ba5-4b3c-9bad-59fb33ac2cbc.png?ex=66312baf&is=662fda2f&hm=185ea8f130806bf8bd96911bd251808455fd65596edcdb459f9b3cfd7860387c&width=1024&height=1024","image_width":1024,"image_height":1024,"image_id":"1234558483408490566","raw_image_url":"https://midjourney.cdn.acedata.cloud/attachments/1234291876639674388/1234558483408490566/kcisok_A_landscape_painting_of_a_beautiful_sunset_id5963392_eae94f0f-0ba5-4b3c-9bad-59fb33ac2cbc.png?ex=66312baf&is=662fda2f&hm=185ea8f130806bf8bd96911bd251808455fd65596edcdb459f9b3cfd7860387c&","raw_image_width":2048,"raw_image_height":2048,"progress":100,"actions":["upscale1","upscale2","upscale3","upscale4","reroll","variation1","variation2","variation3","variation4"],"task_id":"49589d2c-b6b3-4fbf-9f82-93068509c76f","success":true}
You can see that after enabling streaming output, the returned result is a line-by-line JSON.

In the Node.js environment, the implementation code can be written as follows:
javascript
const axios = require("axios");
const url = "https://api.acedata.cloud/midjourney/imagine";
const headers = {
"content-type": "application/json",
accept: "application/x-ndjson",
authorization: "Bearer {token}",
};
const body = {
prompt: "a beautiful cat --v 6",
action: "generate",
};
axios
.post(url, body, { headers: headers, responseType: "stream" })
.then((response) => {
console.log(response.status);
response.data.on("data", (chunk) => {
console.log(chunk.toString());
});
})
.catch((error) => {
console.error(error);
});
The results of these examples are all similar.

Please note that there is a field called progress in the streaming output result, which indicates the generation progress, ranging from 0 to 100. If needed, you can display this information on the page.

> Note: When the generation is not fully completed, the actions field is empty, indicating that no further processing operations can be performed on the intermediate image. After completion, the image_url generated in the process will be destroyed.

Additionally, you can combine streaming results with asynchronous callbacks by specifying the request header accept=application/x-ndjson and the request body callback_url, which can receive multiple POST requests of streaming results.


![https://midjourney.cdn.acedata.cloud/attachments/1234291876639674388/1234558451443699803/eae94f0f-0ba5-4b3c-9bad-59fb33ac2cbc_grid_0.webp?ex=66312ba7&is=662fda27&hm=4625d5f12158bffc07c4faaf6ce75af6f1396122f148b33b91f3e20b48fecc8b&width=256&height=256","image_width":256,"image_height":256,"image_id":"1234558451443699803","raw_image_url":"https://midjourney.cdn.acedata.cloud/attachments/1234291876639674388/1234558451443699803/eae94f0f-0ba5-4b3c-9bad-59fb33ac2cbc_grid_0.webp?ex=66312ba7&is=662fda27&hm=4625d5f12158bffc07c4faaf6ce75af6f1396122f148b33b91f3e20b48fecc8b&","raw_image_width":512,"raw_image_height":512,"progress":35,"actions":[],"task_id":"49589d2c-b6b3-4fbf-9f82-93068509c76f","success":true](https://midjourney.cdn.acedata.cloud/attachments/1234291876639674388/1234558451443699803/eae94f0f-0ba5-4b3c-9bad-59fb33ac2cbc_grid_0.webp?ex=66312ba7&is=662fda27&hm=4625d5f12158bffc07c4faaf6ce75af6f1396122f148b33b91f3e20b48fecc8b&width=256&height=256%22,%22image_width%22:256,%22image_height%22:256,%22image_id%22:%221234558451443699803%22,%22raw_image_url%22:%22https://midjourney.cdn.acedata.cloud/attachments/1234291876639674388/1234558451443699803/eae94f0f-0ba5-4b3c-9bad-59fb33ac2cbc_grid_0.webp?ex=66312ba7&is=662fda27&hm=4625d5f12158bffc07c4faaf6ce75af6f1396122f148b33b91f3e20b48fecc8b&%22,%22raw_image_width%22:512,%22raw_image_height%22:512,%22progress%22:35,%22actions%22:%5B%5D,%22task_id%22:%2249589d2c-b6b3-4fbf-9f82-93068509c76f%22,%22success%22:true)
![https://midjourney.cdn.acedata.cloud/attachments/1234291876639674388/1234558458595115149/eae94f0f-0ba5-4b3c-9bad-59fb33ac2cbc_grid_0.webp?ex=66312ba9&is=662fda29&hm=9af53fa645127131a88dfbb3930add7abda710c12a3d6c30c457d6a067b36bab&width=256&height=256","image_width":256,"image_height":256,"image_id":"1234558458595115149","raw_image_url":"https://midjourney.cdn.acedata.cloud/attachments/1234291876639674388/1234558458595115149/eae94f0f-0ba5-4b3c-9bad-59fb33ac2cbc_grid_0.webp?ex=66312ba9&is=662fda29&hm=9af53fa645127131a88dfbb3930add7abda710c12a3d6c30c457d6a067b36bab&","raw_image_width":512,"raw_image_height":512,"progress":75,"actions":[],"task_id":"49589d2c-b6b3-4fbf-9f82-93068509c76f","success":true](https://midjourney.cdn.acedata.cloud/attachments/1234291876639674388/1234558458595115149/eae94f0f-0ba5-4b3c-9bad-59fb33ac2cbc_grid_0.webp?ex=66312ba9&is=662fda29&hm=9af53fa645127131a88dfbb3930add7abda710c12a3d6c30c457d6a067b36bab&width=256&height=256%22,%22image_width%22:256,%22image_height%22:256,%22image_id%22:%221234558458595115149%22,%22raw_image_url%22:%22https://midjourney.cdn.acedata.cloud/attachments/1234291876639674388/1234558458595115149/eae94f0f-0ba5-4b3c-9bad-59fb33ac2cbc_grid_0.webp?ex=66312ba9&is=662fda29&hm=9af53fa645127131a88dfbb3930add7abda710c12a3d6c30c457d6a067b36bab&%22,%22raw_image_width%22:512,%22raw_image_height%22:512,%22progress%22:75,%22actions%22:%5B%5D,%22task_id%22:%2249589d2c-b6b3-4fbf-9f82-93068509c76f%22,%22success%22:true)
![https://midjourney.cdn.acedata.cloud/attachments/1234291876639674388/1234558483408490566/kcisok_A_landscape_painting_of_a_beautiful_sunset_id5963392_eae94f0f-0ba5-4b3c-9bad-59fb33ac2cbc.png?ex=66312baf&is=662fda2f&hm=185ea8f130806bf8bd96911bd251808455fd65596edcdb459f9b3cfd7860387c&width=1024&height=1024","image_width":1024,"image_height":1024,"image_id":"1234558483408490566","raw_image_url":"https://midjourney.cdn.acedata.cloud/attachments/1234291876639674388/1234558483408490566/kcisok_A_landscape_painting_of_a_beautiful_sunset_id5963392_eae94f0f-0ba5-4b3c-9bad-59fb33ac2cbc.png?ex=66312baf&is=662fda2f&hm=185ea8f130806bf8bd96911bd251808455fd65596edcdb459f9b3cfd7860387c&","raw_image_width":2048,"raw_image_height":2048,"progress":100,"actions":["upscale1","upscale2","upscale3","upscale4","reroll","variation1","variation2","variation3","variation4"],"task_id":"49589d2c-b6b3-4fbf-9f82-93068509c76f","success":true](https://midjourney.cdn.acedata.cloud/attachments/1234291876639674388/1234558483408490566/kcisok_A_landscape_painting_of_a_beautiful_sunset_id5963392_eae94f0f-0ba5-4b3c-9bad-59fb33ac2cbc.png?ex=66312baf&is=662fda2f&hm=185ea8f130806bf8bd96911bd251808455fd65596edcdb459f9b3cfd7860387c&width=1024&height=1024%22,%22image_width%22:1024,%22image_height%22:1024,%22image_id%22:%221234558483408490566%22,%22raw_image_url%22:%22https://midjourney.cdn.acedata.cloud/attachments/1234291876639674388/1234558483408490566/kcisok_A_landscape_painting_of_a_beautiful_sunset_id5963392_eae94f0f-0ba5-4b3c-9bad-59fb33ac2cbc.png?ex=66312baf&is=662fda2f&hm=185ea8f130806bf8bd96911bd251808455fd65596edcdb459f9b3cfd7860387c&%22,%22raw_image_width%22:2048,%22raw_image_height%22:2048,%22progress%22:100,%22actions%22:%5B%22upscale1%22,%22upscale2%22,%22upscale3%22,%22upscale4%22,%22reroll%22,%22variation1%22,%22variation2%22,%22variation3%22,%22variation4%22%5D,%22task_id%22:%2249589d2c-b6b3-4fbf-9f82-93068509c76f%22,%22success%22:true)