


![[The AI Show Episode 143]: ChatGPT Revenue Surge, New AGI Timelines, Amazon’s AI Agent, Claude for Education, Model Context Protocol & LLMs Pass the Turing Test](https://www.marketingaiinstitute.com/hubfs/ep%20143%20cover.png)


_Muhammad_R._Fakhrurrozi_Alamy.jpg?width=1280&auto=webp&quality=80&disable=upscale#)
_NicoElNino_Alamy.jpg?width=1280&auto=webp&quality=80&disable=upscale#)


![What Google Messages features are rolling out [April 2025]](https://i0.wp.com/9to5google.com/wp-content/uploads/sites/4/2023/12/google-messages-name-cover.png?resize=1200%2C628&quality=82&strip=all&ssl=1)


![M4 MacBook Air Drops to Just $849 - Act Fast! [Lowest Price Ever]](https://www.iclarified.com/images/news/97140/97140/97140-640.jpg)
![Apple Smart Glasses Not Close to Being Ready as Meta Targets 2025 [Gurman]](https://www.iclarified.com/images/news/97139/97139/97139-640.jpg)
![iPadOS 19 May Introduce Menu Bar, iOS 19 to Support External Displays [Rumor]](https://www.iclarified.com/images/news/97137/97137/97137-640.jpg)


Local Kubernetes Development Made Easy with Telepresence Replace Mode
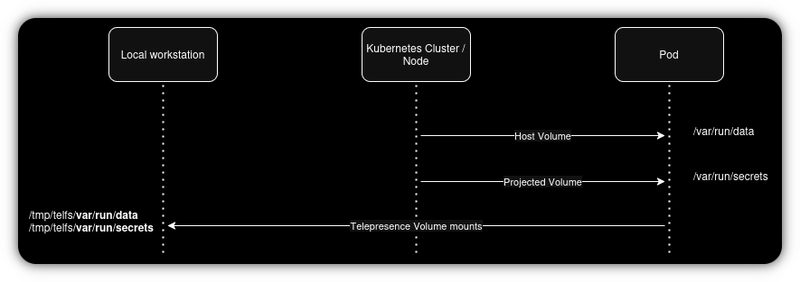
Debugging Kubernetes applications locally can be overwhelming, especially when dealing with complex microservices that require environment variables, mounted volumes, and webhook traffic. In this post, I’ll walk you through how I tackled this challenge while contributing to Dapr, using Telepresence Replace mode to turn my local machine into a full Kubernetes pod — and how you can do it too. In the past few days, I started investigating an issue in one of the components of the CNCF-graduated project, Dapr. This was my first time contributing to the project, which meant I initially knew nothing about the codebase. Dapr is composed of components that can run as microservices in Kubernetes. On top of that, the issue I'm trying to fix requires configuring Kubernetes Mutating Webhooks. As you can imagine, debugging and testing locally would be a nightmare without the right tools. To run this microservice component locally, we need to: Have all other components up and running. Send and receive traffic from other components. Receive traffic from the Kubernetes Webhook. Access mounted volumes and environment variables. I’ll revisit these requirements toward the end of this post here. When working with a complex application like this, there’s usually a Helm chart that defines all the defaults needed to deploy and run it. However, depending on the size and complexity of the templates, it can be challenging to find all the necessary environment variables and required files. This is where Telepresence shines, offering three powerful development modes: Replace: Telepresence removes (or sidecars) the original pod, allowing your local machine to fully act as the pod inside the cluster. Intercept: Telepresence forwards specific port traffic from the remote pod to your local machine, enabling local development for network traffic while keeping the actual pod alive for everything else. Injest: Telepresence injects a traffic agent to make the remote environment available locally, providing read-only access to volumes without rerouting traffic. In this post, I’ll focus on Replace mode, which I find the most powerful of the three. This feature was added in version 2.22.0 (March 14 release), so if you have an older version of Telepresence installed, you’ll need to upgrade to use it. https://telepresence.io/docs/install/client Using Telepresence Before using Telepresence, we need to have a development cluster up and running. I recommend using kind but any Kubernetes distribution will work. Caution
Debugging Kubernetes applications locally can be overwhelming, especially when dealing with complex microservices that require environment variables, mounted volumes, and webhook traffic.
In this post, I’ll walk you through how I tackled this challenge while contributing to Dapr, using Telepresence Replace mode to turn my local machine into a full Kubernetes pod — and how you can do it too.
In the past few days, I started investigating an issue in one of the components of the CNCF-graduated project, Dapr. This was my first time contributing to the project, which meant I initially knew nothing about the codebase.
Dapr is composed of components that can run as microservices in Kubernetes. On top of that, the issue I'm trying to fix requires configuring Kubernetes Mutating Webhooks. As you can imagine, debugging and testing locally would be a nightmare without the right tools.
To run this microservice component locally, we need to:
- Have all other components up and running.
- Send and receive traffic from other components.
- Receive traffic from the Kubernetes Webhook.
- Access mounted volumes and environment variables.
I’ll revisit these requirements toward the end of this post here.
When working with a complex application like this, there’s usually a Helm chart that defines all the defaults needed to deploy and run it. However, depending on the size and complexity of the templates, it can be challenging to find all the necessary environment variables and required files.
This is where Telepresence shines, offering three powerful development modes:
- Replace: Telepresence removes (or sidecars) the original pod, allowing your local machine to fully act as the pod inside the cluster.
- Intercept: Telepresence forwards specific port traffic from the remote pod to your local machine, enabling local development for network traffic while keeping the actual pod alive for everything else.
- Injest: Telepresence injects a traffic agent to make the remote environment available locally, providing read-only access to volumes without rerouting traffic.
In this post, I’ll focus on Replace mode, which I find the most powerful of the three. This feature was added in version 2.22.0 (March 14 release), so if you have an older version of Telepresence installed, you’ll need to upgrade to use it.
https://telepresence.io/docs/install/client
Using Telepresence
Before using Telepresence, we need to have a development cluster up and running. I recommend using kind but any Kubernetes distribution will work.
Caution