Integration Tests for Plugin Developers: GitHub Actions and Setting Up Continuous Integration
In our previous blog posts, we created integration tests that interact with UI components, assert different properties of UI components, and interact with APIs. Now, it’s time to look at how to set up continuous integration to ensure that we don’t break them in the next commit. We will be creating continuous integration using GitHub […]

In our previous blog posts, we created integration tests that interact with UI components, assert different properties of UI components, and interact with APIs. Now, it’s time to look at how to set up continuous integration to ensure that we don’t break them in the next commit.
We will be creating continuous integration using GitHub Actions as the majority of community plugins are there, but the main flow applies to any CI like TeamCity, GitLab, and more.
Setting up machines
Integration tests require the IDE to be run in headful mode (with the UI visible) – headless mode is not supported. This makes them different from the usual unit tests, which usually don’t need any UI environment.
The requirement for a UI environment creates challenges for continuous integration. The good news is that running integration tests on Linux machines is no different from running unit tests. On Linux, the tests work out of the box without any additional configuration. Before starting a test, the Starter framework will check whether the DISPLAY environment variable exists. If it exists, the IDE will be started immediately. If not, a virtual display (Xvfb) will be initialized and the IDE will show its UI there.
The next OS we’re going to look at is Windows. For a JVM that runs tests to be able to simultaneously run another application with a UI and interact with the mouse and keyboard, the JVM has to be started as a command-line application and not as a service. This usually depends on how the build agent is configured.
On clean Windows 11 machines, the Start menu is opened by default and overlaps any application, so clicking on IDE UI components may end up running some applications. To avoid this, you can run:
Stop-Process -Name \"StartMenuExperienceHost\" -Force -ea 0.
There is also a popup advertisement for Edge, which can be turned off using
Set-ItemProperty -Path \"HKLM:\SOFTWARE\Policies\Microsoft\Edge\" -Name \"HideFirstRunExperience\"-Value 1 -Type DWord.
The hardest OS to run integration tests on is macOS due to its accessibility permissions. There is no known way to change the settings without user interaction or without using MDM (mobile device management) with PPPC (Privacy Preferences Policy Control). Setting those up is not a trivial task. Integrating into the dynamic fleet of macOS agents (like we do at JetBrains) is even more difficult.
There is a way to turn off permissions automatically, but we can’t recommend it for everybody since it has security implications. The main risk is that Apple’s SIP (System Integrity Protection) must be disabled, since the method requires the modification of internal OS databases. When SIP is disabled, the brew utility tccutil can be used to modify TCC.db – the database that stores the accessibility permissions.
In this database, the application starting the IDE must be added, not the IDE itself. In our case, we start tests from Bash (which starts the JVM with tests, which in turn starts the IDE), so we use the following commands to enable screen recording and keyboard and mouse interaction:
sudo /opt/homebrew/bin/tccutil -s kTCCServicePostEvent --insert "$bash_path"
sudo /opt/homebrew/bin/tccutil -s kTCCServiceAccessibility --insert "$bash_path"
sudo /opt/homebrew/bin/tccutil -s kTCCServiceScreenCapture --insert "$bash_path"
sudo /opt/homebrew/bin/tccutil -s kTCCServiceListenEvent --insert "$bash_path".
Luckily, there is usually little difference between different operating systems in terms of how the IDE behaves. Since Linux is the most straightforward OS, we will demonstrate how to run tests on it.
GitHub Actions
Running integration tests using GitHub Actions on Linux is similar to running unit tests. We need to perform the following operations:
- Check out sources.
- Build project, plugin, and tests.
- Run tests.
- Collect build and IDE logs.
To accomplish these steps, we need to create a .yml file inside the .github/workflows folder with the following content:
name: Integration tests

on:
 push:
 pull_request:

permissions:
 contents: read

jobs:
 runExamples:
   runs-on: ubuntu-latest
   steps:
     - uses: actions/checkout@v4
     - name: Set up JDK 17
       uses: actions/setup-java@v4
       with:
         java-version: '17'
         distribution: 'temurin'
     - name: Setup Gradle
       uses: gradle/actions/setup-gradle@v4
     - name: Run tests
       run: ./gradlew clean build test
     - name: Upload build reports
       uses: actions/upload-artifact@v4
       with:
         name: build
         path: |
           **/build/reports/
           **/build/test-results/
     - name: Upload IDE test logs
       uses: actions/upload-artifact@v4
       with:
         name: logs
         path: '**/out/ide-tests/tests/**/log'
The result should look like this:
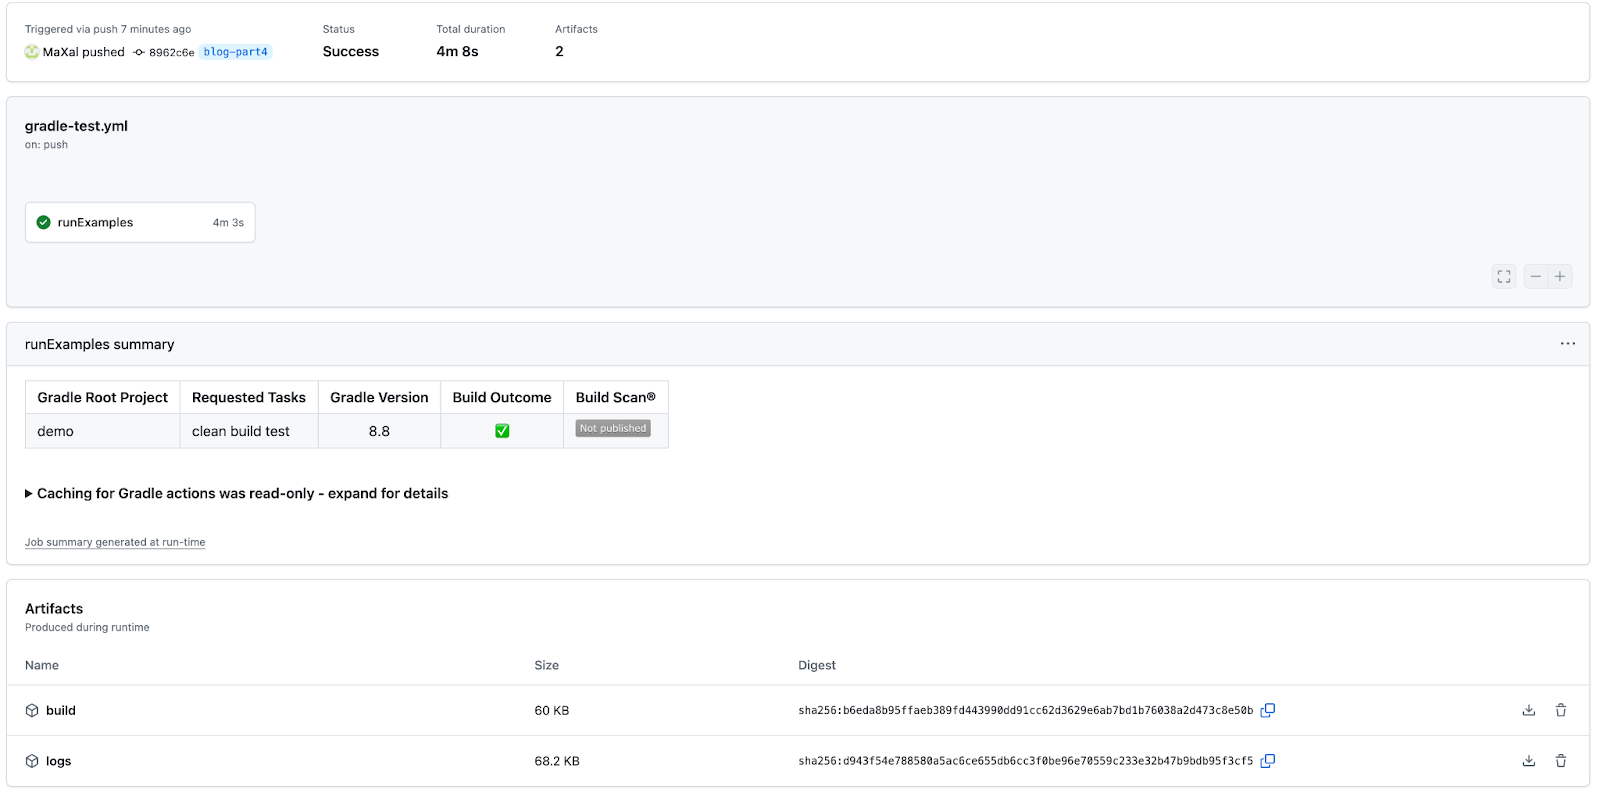
The build.zip artifact contains the Gradle output, and the logs.zip artifact contains the IDE logs, various metrics, and screenshots captured during the tests.
The structure of logs is the following: out/ide-tests/tests/
What’s next?
Stay tuned for the last blog post in this series, where we’ll cover common pitfalls, tips, and tricks for stable UI tests.







![[The AI Show Episode 144]: ChatGPT’s New Memory, Shopify CEO’s Leaked “AI First” Memo, Google Cloud Next Releases, o3 and o4-mini Coming Soon & Llama 4’s Rocky Launch](https://www.marketingaiinstitute.com/hubfs/ep%20144%20cover.png)















![Blue Archive tier list [April 2025]](https://media.pocketgamer.com/artwork/na-33404-1636469504/blue-archive-screenshot-2.jpg?#)







.png?#)




-Baldur’s-Gate-3-The-Final-Patch---An-Animated-Short-00-03-43.png?width=1920&height=1920&fit=bounds&quality=70&format=jpg&auto=webp#)


![Apple to Split Enterprise and Western Europe Roles as VP Exits [Report]](https://www.iclarified.com/images/news/97032/97032/97032-640.jpg)















![Nanoleaf Announces New Pegboard Desk Dock With Dual-Sided Lighting [Video]](https://www.iclarified.com/images/news/97030/97030/97030-640.jpg)

![Apple's Foldable iPhone May Cost Between $2100 and $2300 [Rumor]](https://www.iclarified.com/images/news/97028/97028/97028-640.jpg)


