![[The AI Show Episode 142]: ChatGPT’s New Image Generator, Studio Ghibli Craze and Backlash, Gemini 2.5, OpenAI Academy, 4o Updates, Vibe Marketing & xAI Acquires X](https://www.marketingaiinstitute.com/hubfs/ep%20142%20cover.png)


![From drop-out to software architect with Jason Lengstorf [Podcast #167]](https://cdn.hashnode.com/res/hashnode/image/upload/v1743796461357/f3d19cd7-e6f5-4d7c-8bfc-eb974bc8da68.png?#)


.png?#)


_Christophe_Coat_Alamy.jpg?#)
 (1).webp?#)


![Apple Considers Delaying Smart Home Hub Until 2026 [Gurman]](https://www.iclarified.com/images/news/96946/96946/96946-640.jpg)
![iPhone 17 Pro Won't Feature Two-Toned Back [Gurman]](https://www.iclarified.com/images/news/96944/96944/96944-640.jpg)
![Tariffs Threaten Apple's $999 iPhone Price Point in the U.S. [Gurman]](https://www.iclarified.com/images/news/96943/96943/96943-640.jpg)


Implementation of a notification system using AWS part 2 - Lambda function and AWS SES setup
INTRODUCTION In this post, we'll continue from where we left off and set up a Lambda function to process messages from the SQS queue and send emails using Amazon SES. Resources to be created Lambda AWS SES Step 1 Create a lambda function that consumes the messages from the sqs queue, processes it and send it to the receiver's email address or send it to a dead letter queue when faced with a problem. Choose Author from scratch Enter the function name emailNotificationFunction Under runtime, choose python from the dropdown list Then click on create function. This will automatically create an IAM role. Follow the steps below to see the role created and to also update the policy to what is required. Click on the function you just created to see the overview. Scroll down a bit, click on the configuration tab. On the left pane, click on permissions. Locate the execution role and click on the link under the role name to take you to the role created. You will see a policy name that starts with AWSLambdaBasicExecutionRole-. Edit it with the permission below and save it. { "Version": "2012-10-17", "Statement": [ { "Effect": "Allow", "Action": "logs:CreateLogGroup", "Resource": "arn:aws:logs:REGION:ACCOUNT_ID:*" }, { "Effect": "Allow", "Action": [ "logs:CreateLogStream", "logs:PutLogEvents" ], "Resource": [ "arn:aws:logs:REGION:ACCOUNT_ID:log-group:/aws/lambda/emailNotificationFunction:*" ] }, { "Effect": "Allow", "Action": [ "sqs:ReceiveMessage", "sqs:GetQueueAttributes", "sqs:DeleteMessage" ], "Resource": [ "arn:aws:sqs:REGION:ACCOUNT_ID:emailNotificationQueue" ] }, { "Effect": "Allow", "Action": "ses:SendEmail", "Resource": "*" } ] } Leave everything else as it is. We will update it later. Check the images below for pictorial reference EMAIL SETUP The next thing we will doing is to setup the email address that our notification will go to. Once you have your email address handy, head over to the step below to verify your email address. SUBSCRIPTION Subscribe lambda to SQS Click on the sqs queue you created, scroll down a bit and click on the lambda triggers tab. Click on configure lambda function trigger, choose your lambda function from the drop down or type in the lambda arn and click on save. See images below for reference LAMBDA FUNCTION LOGIC Step One: Write the code to process messages from the SQS queue and send emails using SES. Step Two: Deploy the function and test it to ensure it works correctly. Example lambda logic import json import logging import boto3 from botocore.exceptions import ClientError # Set up logging logger = logging.getLogger() logger.setLevel(logging.INFO) # Initialize SES client ses_client = boto3.client('ses', region_name='REGION-NAME') # Replace 'REGION-NAME' with the AWS region where SES is available SENDER = "Your Name " # Replace with your sender email CHARSET = "UTF-8" def send_email(to_email, subject, body): try: response = ses_client.send_email( Destination={ 'ToAddresses': [ to_email, ], }, Message={ 'Body': { 'Text': { 'Charset': CHARSET, 'Data': body, }, }, 'Subject': { 'Charset': CHARSET, 'Data': subject, }, }, Source=SENDER, ) except ClientError as e: logger.error(f"Failed to send email: {e.response['Error']['Message']}") return False else: logger.info(f"Email sent! Message ID: {response['MessageId']}") return True def process_message(message_body): try: msg = json.loads(message_body) except json.JSONDecodeError: logger.error(f"Failed to decode message: {message_body}") return try: message = json.loads(msg.get('Message')) except json.JSONDecodeError: logger.error(f"Failed to decode message: {msg.get('Message')}") return print(message) event_type = message.get('eventType') if event_type == 'UserRegistration': user_name = message.get('userName') email = message.get('email') if user_name and email: subject = "Welcome to Our Service!" body = f"Hello {user_name},\n\nThank you for registering with us.\n\nBest regards,\nYour Company" send_email(email, subject, body) else: logger.error(f"Missing userName or email in message: {message}")

INTRODUCTION
In this post, we'll continue from where we left off and set up a Lambda function to process messages from the SQS queue and send emails using Amazon SES.
Resources to be created
Lambda
AWS SES
Step 1
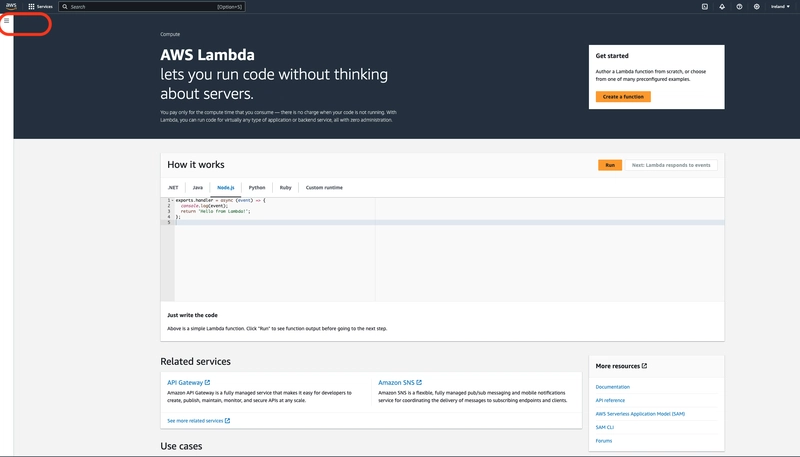
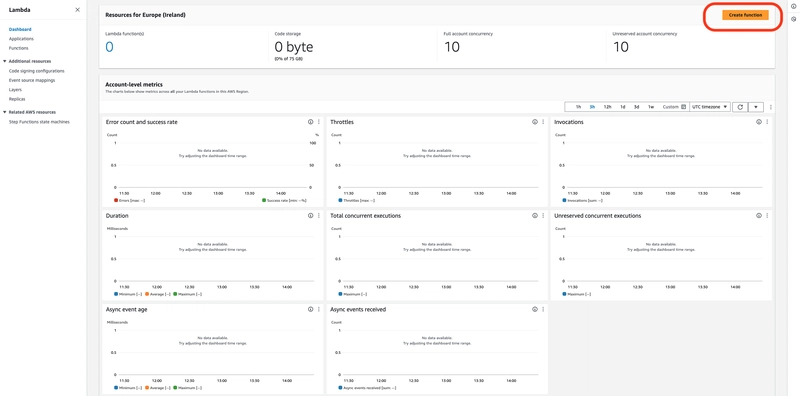
Create a lambda function that consumes the messages from the sqs queue, processes it and send it to the receiver's email address or send it to a dead letter queue when faced with a problem.
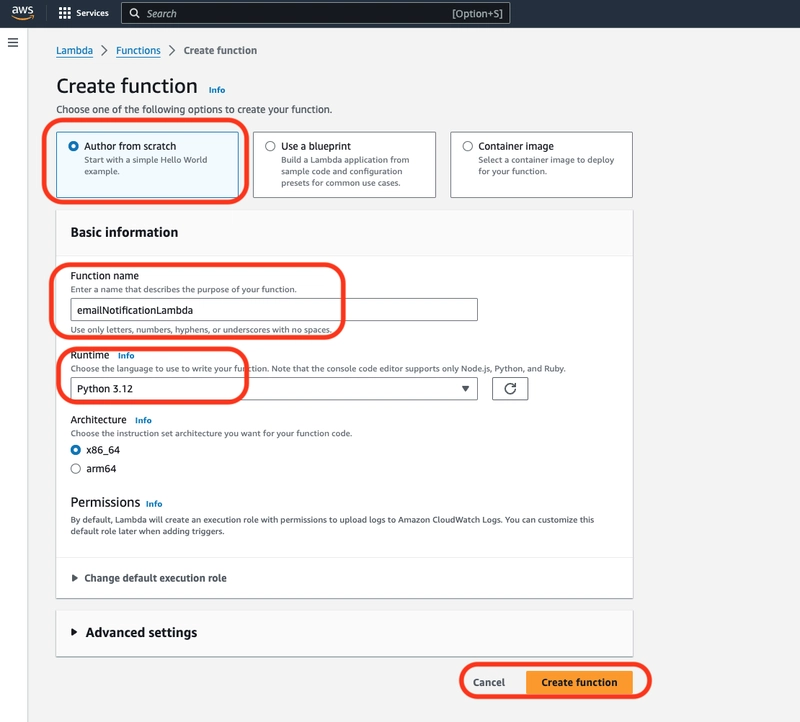
- Choose
Author from scratch - Enter the function name
emailNotificationFunction - Under
runtime, choosepythonfrom the dropdown list - Then click on create function. This will automatically create an IAM role. Follow the steps below to see the role created and to also update the policy to what is required.
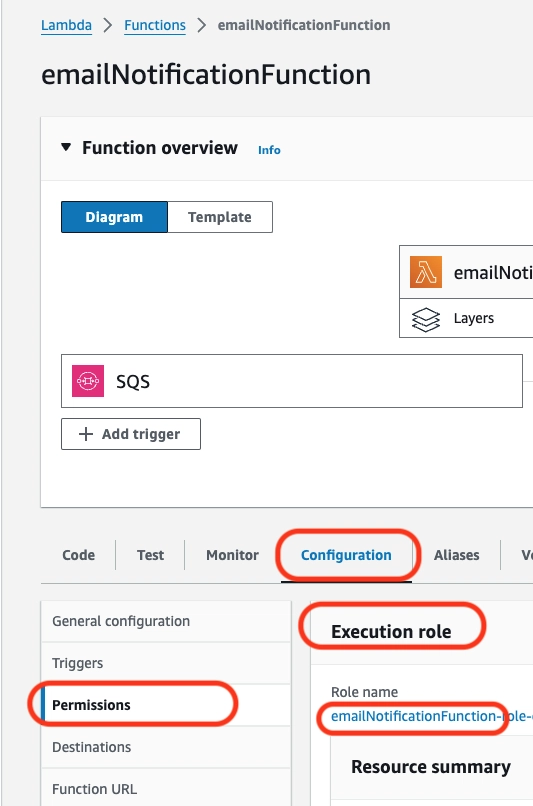
- Click on the function you just created to see the overview. Scroll down a bit, click on the configuration tab.
- On the left pane, click on permissions. Locate the execution role and click on the link under the role name to take you to the role created.
- You will see a policy name that starts with
AWSLambdaBasicExecutionRole-. Edit it with the permission below and save it.
{
    "Version": "2012-10-17",
    "Statement": [
        {
            "Effect": "Allow",
            "Action": "logs:CreateLogGroup",
            "Resource": "arn:aws:logs:REGION:ACCOUNT_ID:*"
        },
        {
            "Effect": "Allow",
            "Action": [
                "logs:CreateLogStream",
                "logs:PutLogEvents"
            ],
            "Resource": [
                "arn:aws:logs:REGION:ACCOUNT_ID:log-group:/aws/lambda/emailNotificationFunction:*"
            ]
        },
        {
            "Effect": "Allow",
            "Action": [
                "sqs:ReceiveMessage",
                "sqs:GetQueueAttributes",
                "sqs:DeleteMessage"
            ],
            "Resource": [
                "arn:aws:sqs:REGION:ACCOUNT_ID:emailNotificationQueue"
            ]
        },
        {
            "Effect": "Allow",
            "Action": "ses:SendEmail",
            "Resource": "*"
        }
    ]
}
Leave everything else as it is. We will update it later.
Check the images below for pictorial reference

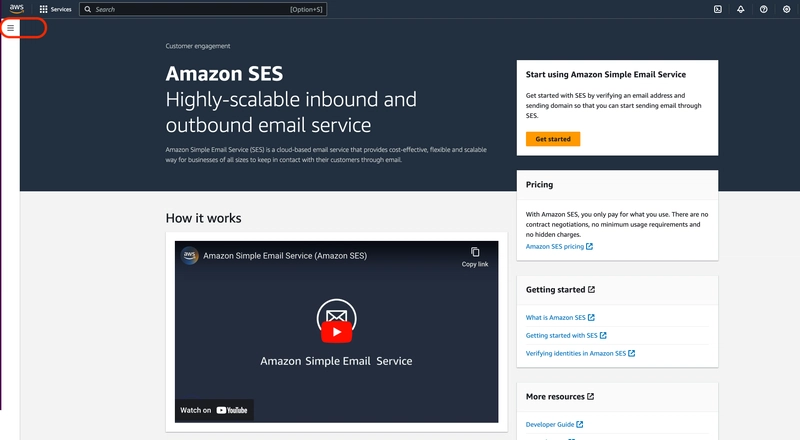
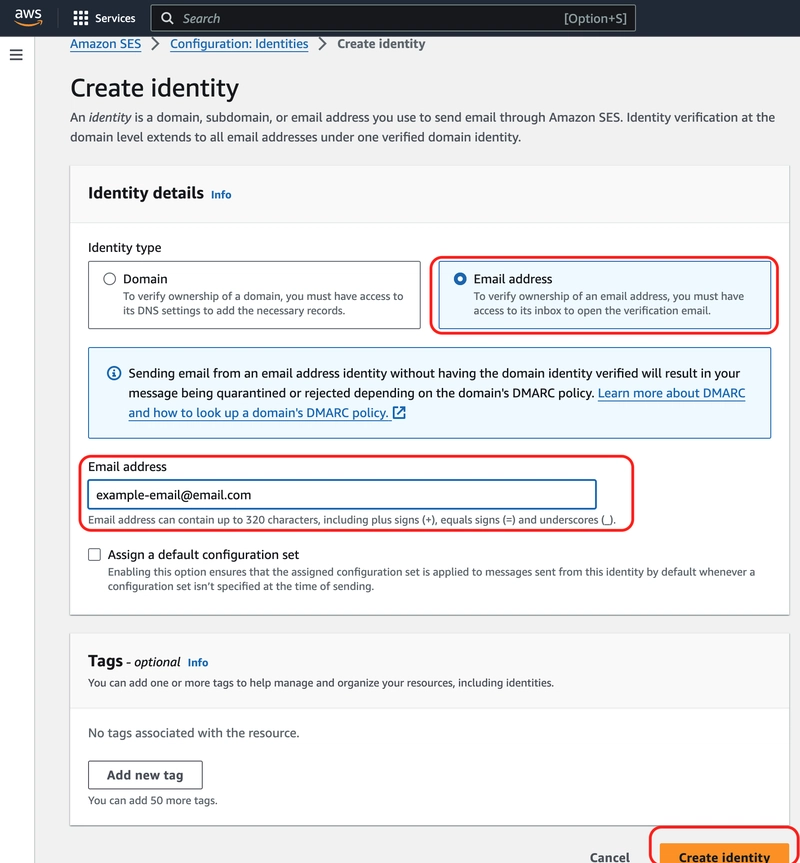
EMAIL SETUP
The next thing we will doing is to setup the email address that our notification will go to. Once you have your email address handy, head over to the step below to verify your email address.

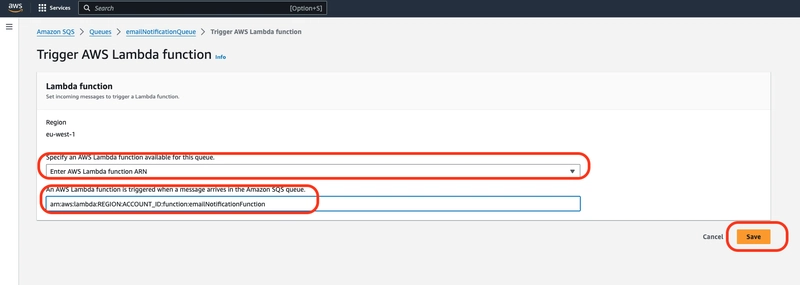
SUBSCRIPTION
Subscribe lambda to SQS
- Click on the sqs queue you created, scroll down a bit and click on the lambda triggers tab.
- Click on configure lambda function trigger, choose your lambda function from the drop down or type in the lambda arn and click on save. See images below for reference

LAMBDA FUNCTION LOGIC
Step One: Write the code to process messages from the SQS queue and send emails using SES.
Step Two: Deploy the function and test it to ensure it works correctly.
Example lambda logic
import json
import logging
import boto3
from botocore.exceptions import ClientError

# Set up logging
logger = logging.getLogger()
logger.setLevel(logging.INFO)

# Initialize SES client
ses_client = boto3.client('ses', region_name='REGION-NAME')  # Replace 'REGION-NAME' with the AWS region where SES is available

SENDER = "Your Name "  # Replace with your sender email
CHARSET = "UTF-8"

def send_email(to_email, subject, body):
    try:
        response = ses_client.send_email(
            Destination={
                'ToAddresses': [
                    to_email,
                ],
            },
            Message={
                'Body': {
                    'Text': {
                        'Charset': CHARSET,
                        'Data': body,
                    },
                },
                'Subject': {
                    'Charset': CHARSET,
                    'Data': subject,
                },
            },
            Source=SENDER,
        )
    except ClientError as e:
        logger.error(f"Failed to send email: {e.response['Error']['Message']}")
        return False
    else:
        logger.info(f"Email sent! Message ID: {response['MessageId']}")
        return True

def process_message(message_body):
    try:
        msg = json.loads(message_body)
    except json.JSONDecodeError:
        logger.error(f"Failed to decode message: {message_body}")
        return

    try:
        message = json.loads(msg.get('Message'))
    except json.JSONDecodeError:
        logger.error(f"Failed to decode message: {msg.get('Message')}")
        return

    print(message)

    event_type = message.get('eventType')
    if event_type == 'UserRegistration':
        user_name = message.get('userName')
        email = message.get('email')

        if user_name and email:
            subject = "Welcome to Our Service!"
            body = f"Hello {user_name},\n\nThank you for registering with us.\n\nBest regards,\nYour Company"
            send_email(email, subject, body)
        else:
            logger.error(f"Missing userName or email in message: {message}")
    else:
        logger.warning(f"Unknown event type: {event_type}")
        raise ValueError("Unknown EventType")

def lambda_handler(event, context):
    for record in event['Records']:
        message_body = record['body']
        logger.info(f"Received message: {message_body}")
        process_message(message_body)

    return {
        'statusCode': 200,
        'body': json.dumps('Messages processed successfully!')
    }
CONCLUSION
By following these steps, you've successfully created a Lambda function and set up Amazon SES to send email notifications. Your system is now ready to process messages and send emails based on the notifications received.