![[The AI Show Episode 142]: ChatGPT’s New Image Generator, Studio Ghibli Craze and Backlash, Gemini 2.5, OpenAI Academy, 4o Updates, Vibe Marketing & xAI Acquires X](https://www.marketingaiinstitute.com/hubfs/ep%20142%20cover.png)


![From drop-out to software architect with Jason Lengstorf [Podcast #167]](https://cdn.hashnode.com/res/hashnode/image/upload/v1743796461357/f3d19cd7-e6f5-4d7c-8bfc-eb974bc8da68.png?#)


.png?#)


_Christophe_Coat_Alamy.jpg?#)


.webp?#)


![Apple Considers Delaying Smart Home Hub Until 2026 [Gurman]](https://www.iclarified.com/images/news/96946/96946/96946-640.jpg)
![iPhone 17 Pro Won't Feature Two-Toned Back [Gurman]](https://www.iclarified.com/images/news/96944/96944/96944-640.jpg)
![Tariffs Threaten Apple's $999 iPhone Price Point in the U.S. [Gurman]](https://www.iclarified.com/images/news/96943/96943/96943-640.jpg)


How to register sprite clicks in mini micro
CODE clear sp = new Sprite sp.image = file.loadImage("/sys/pics/Block.png") sp.x = 600 sp.y = 500 sp.scale = [3,1] sp.localBounds = new Bounds sp.localBounds.width = sp.image.width sp.localBounds.height = sp.image.height display(4).sprites.push sp wasDown = false while true // press Control-C to exit isDown = mouse.button if sp.contains(mouse) then sp.tint = "#CCCCFF" if isDown and not wasDown then print "Sprite clicked!" end if else sp.tint = color.white end if wasDown = isDown yield end while EXPLANATION LINE 1-6 & 9 Lines 1-6 and line 9 are dedicated to rendering sprites, a process I have already explained in detail in this blog. How to render sprite Since I’ve already covered how they work in a previous post, I won’t be explaining them again here. sp.localBounds = new Bounds sp.localBounds.width = sp.image.width sp.localBounds.height = sp.image.height sp.localBounds = new Bounds - Creates a new local boundary for sp sp.localBounds.width = sp.image.width sp.localBounds.height = sp.image.height - Sets width and height of boundary we just created LOOP PART If you’ve programmed in any language before, this should be easy to understand. But if MiniMicro is your first programming language, this might look like a wizard’s spell. No worries—let’s understand it together using this chart. "This graph doesn't tell what the whole loop is about, but it helps in understanding the result of the condition applied. Another condition used in this program is in line: if sp.contains(mouse) then sp.tint = "#CCCCFF" This condition checks if the mouse pointer is hovering over the sprite (sp.contains(mouse)). If true, it changes the sprite’s tint color to #CCCCFF SOURCE - Miniscript Wiki
CODE
clear
sp = new Sprite
sp.image = file.loadImage("/sys/pics/Block.png")
sp.x = 600
sp.y = 500
sp.scale = [3,1]
sp.localBounds = new Bounds
sp.localBounds.width = sp.image.width
sp.localBounds.height = sp.image.height
display(4).sprites.push sp
wasDown = false
while true  // press Control-C to exit
    isDown = mouse.button
    if sp.contains(mouse) then
        sp.tint = "#CCCCFF"
        if isDown and not wasDown then
            print "Sprite clicked!"
        end if
    else
        sp.tint = color.white
    end if
    wasDown = isDown
    yield
end while
EXPLANATION
LINE 1-6 & 9
Lines 1-6 and line 9 are dedicated to rendering sprites, a process I have already explained in detail in this blog.
How to render sprite
Since I’ve already covered how they work in a previous post, I won’t be explaining them again here.
sp.localBounds = new Bounds
sp.localBounds.width = sp.image.width

sp.localBounds.height = sp.image.height
sp.localBounds = new Bounds - Creates a new local boundary for sp
sp.localBounds.width = sp.image.width - Sets width and height of boundary we just created
sp.localBounds.height = sp.image.height
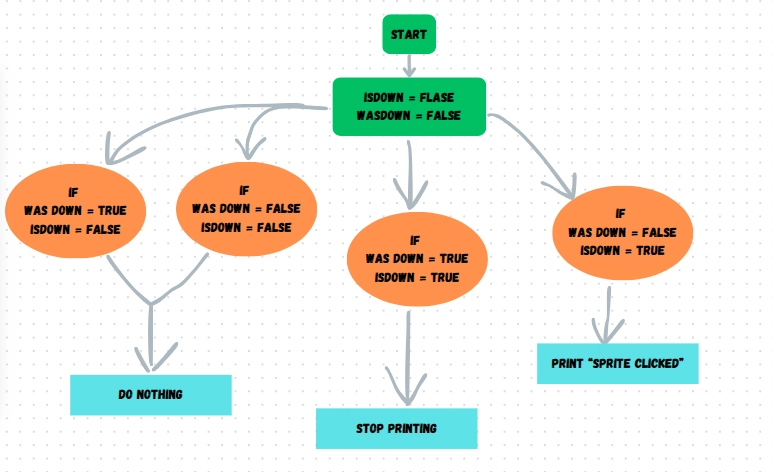
LOOP PART
If you’ve programmed in any language before, this should be easy to understand. But if MiniMicro is your first programming language, this might look like a wizard’s spell. No worries—let’s understand it together using this chart.
"This graph doesn't tell what the whole loop is about, but it helps in understanding the result of the condition applied.
Another condition used in this program is in line:
if sp.contains(mouse) then

        sp.tint = "#CCCCFF"
This condition checks if the mouse pointer is hovering over the sprite (sp.contains(mouse)). If true, it changes the sprite’s tint color to #CCCCFF
SOURCE - Miniscript Wiki