


![[Webinar] AI Is Already Inside Your SaaS Stack — Learn How to Prevent the Next Silent Breach](https://blogger.googleusercontent.com/img/b/R29vZ2xl/AVvXsEiOWn65wd33dg2uO99NrtKbpYLfcepwOLidQDMls0HXKlA91k6HURluRA4WXgJRAZldEe1VReMQZyyYt1PgnoAn5JPpILsWlXIzmrBSs_TBoyPwO7hZrWouBg2-O3mdeoeSGY-l9_bsZB7vbpKjTSvG93zNytjxgTaMPqo9iq9Z5pGa05CJOs9uXpwHFT4/s1600/ai-cyber.jpg?#)


![[The AI Show Episode 144]: ChatGPT’s New Memory, Shopify CEO’s Leaked “AI First” Memo, Google Cloud Next Releases, o3 and o4-mini Coming Soon & Llama 4’s Rocky Launch](https://www.marketingaiinstitute.com/hubfs/ep%20144%20cover.png)


![Rogue Company Elite tier list of best characters [April 2025]](https://media.pocketgamer.com/artwork/na-33136-1657102075/rogue-company-ios-android-tier-cover.jpg?#)


_Andreas_Prott_Alamy.jpg?width=1280&auto=webp&quality=80&disable=upscale#)


![What’s new in Android’s April 2025 Google System Updates [U: 4/18]](https://i0.wp.com/9to5google.com/wp-content/uploads/sites/4/2025/01/google-play-services-3.jpg?resize=1200%2C628&quality=82&strip=all&ssl=1)


![Apple Watch Series 10 Back On Sale for $299! [Lowest Price Ever]](https://www.iclarified.com/images/news/96657/96657/96657-640.jpg)
![EU Postpones Apple App Store Fines Amid Tariff Negotiations [Report]](https://www.iclarified.com/images/news/97068/97068/97068-640.jpg)
![Apple Slips to Fifth in China's Smartphone Market with 9% Decline [Report]](https://www.iclarified.com/images/news/97065/97065/97065-640.jpg)


How to install OCI Management Agent into a Ubuntu 22.04 instance
How to install an Oracle Cloud Management Agent into a Ubuntu 22.04 VM compute instance in the Oracle Cloud Infrastructure. Within the Oracle Cloud Infrastructure, you can monitor your VM compute instance through a variety of ways. Although the native Oracle Linux OS images can be more easily monitored through native OCI services like Oracle Cloud Agent, OS Management Hub, and Oracle Unified Monitoring Agent, non-Oracle Linux images require a little bit more work to display its metrics and logs in OCI. Enter the OCI Management Agent--a service plug-in to collect data from the host and connect with OCI directly to monitor and collect data from the sources that on the host. Steps to install 1. Go to OCI Console > Management Agents > Download and Keys 2. Create and download an Install Key from the page, name it input.rsp Screenshot of Download and Keys page to create a new key 3. Modify the downloaded key input.rsp so that: Service.plugin.appmgmt.download=true Optionally, modify AgentDisplayName to your liking Full file example ######################################################################### Please refer the following Management Agent Installation Guide for more details.## ## Since this file has sensitive information, please make sure that after# executing setup.sh you either delete this file or store it in a secure# location.# ######################################################################## ManagementAgentInstallKey = Mi4wLHVzLWFzaGJ1cm4tMSxvY2lkMS50ZW5hbmN5Lm9jMS4uYWFhYWFhYWFudzVtcWQydndpeHJ5c282a2Fxd2FncmNhM3p2eGltaXNjYWQ1ZXFtc3d4ZDVrdGZjbXBxLG9jaWQxLm1hbmFnZW1lbnRhZ2VudGluc3RhbGSXr6U46yVWAhrjEdNH73YCUhpTdpZXlveXFhYm1pbnpsdjU2ZWgzN2h4eXNmdjRhZTR5aGJqdDMyamRtb2FzYnpjbnBoeGEsSU5WUU1LbnJ4MFY2bFY1ODNvcTI0b0xpS3FueVNabTlqbTJfcmRNcA== AgentDisplayName = Testf13 Agent #Please uncomment the below tags properties and provide values as needed #FreeFormTags = [{"":""}, {"":""}] #DefinedTags = [{"namespace1":{"":""}}, {"namespace2":{"":""}}] CredentialWalletPassword = #Service.plugin.osmh.download=true #Service.plugin.logan.download=true #Service.plugin.jms.download=true #Service.plugin.dbaas.download=true #Service.plugin.jm.download=true Service.plugin.appmgmt.download=true #Service.plugin.opsiHost.download=true 4. In the same page, download the agent installation ZIP package Agent for LINUX (X86_64), name it omagent.zip Screenshot of downloading the Linux Agent Installation files 5. Download Oracle Java 8 x64 tarball for Linux from Oracle here, name it jdk-8u441-linux-x64.tar.gz Screenshot of downloading Oracle Java tarball 6. scp the files input.rcp, omagent.zip, and jdk-8u441-linux-x64.tar.gz into the new instance. Replace the path of your SSH private key and the IP address of the instance # Copy the files to the server scp -i path/to/ssh-key.pem input.rsp ubuntu@10.145.8.64:~/ scp -i path/to/ssh-key.pem jdk-8u441-linux-x64.tar.gz ubuntu@10.145.8.64:~/ scp -i path/to/ssh-key.pem omagent.zip ubuntu@10.145.8.64:~/ 7. In the new instance, run the following commands: # Unzip the installation agent sudo apt install unzip unzip omagent.zip # Install Java 8 and set java in PATH sudo mkdir -p /usr/lib/jvm sudo tar -xvf jdk-8u441-linux-x64.tar.gz -C /usr/lib/jvm/ sudo update-alternatives --install /usr/bin/java java /usr/lib/jvm/jdk1.8.0_441/bin/java 1 sudo update-alternatives --set java /usr/lib/jvm/jdk1.8.0_441/bin/java # Run the installation agent, this will error out saying "input.rsp file is either not present ...", don't worry about this sudo ./mgmt_agent/installer.sh /home/ubuntu/input.rsp # Allow the mgmt_agent to read the input.rsp file sudo usermod -aG ubuntu mgmt_agent # Run the installation agent again sudo ./mgmt_agent/uninstaller.sh sudo ./mgmt_agent/installer.sh /home/ubuntu/input.rsp # Remove the mgmt_agent's read access sudo gpasswd -d mgmt_agent ubuntu # Remove installation files rm input.rsp rm jdk-8u441-linux-x64.tar.gz rm omagent.zip rm -r mgmt_agent References OCI - Create Install Key OCI - Install Management Agent on Linux (ZIP file) Safe harbor statement The information provided on this channel/article/story is solely intended for informational purposes and cannot be used as a part of any contractual agreement. The content does not guarantee the delivery of any material, code, or functionality, and should not be the sole basis for making purchasing decisions. The postings on this site are my own and do not necessarily reflect the views or work of Oracle or Mythics, LLC. This work is licensed under a Creative Commons Attribution 4.0 International License.
How to install an Oracle Cloud Management Agent into a Ubuntu 22.04 VM compute instance in the Oracle Cloud Infrastructure.
Within the Oracle Cloud Infrastructure, you can monitor your VM compute instance through a variety of ways. Although the native Oracle Linux OS images can be more easily monitored through native OCI services like Oracle Cloud Agent, OS Management Hub, and Oracle Unified Monitoring Agent, non-Oracle Linux images require a little bit more work to display its metrics and logs in OCI. Enter the OCI Management Agent--a service plug-in to collect data from the host and connect with OCI directly to monitor and collect data from the sources that on the host.
Steps to install
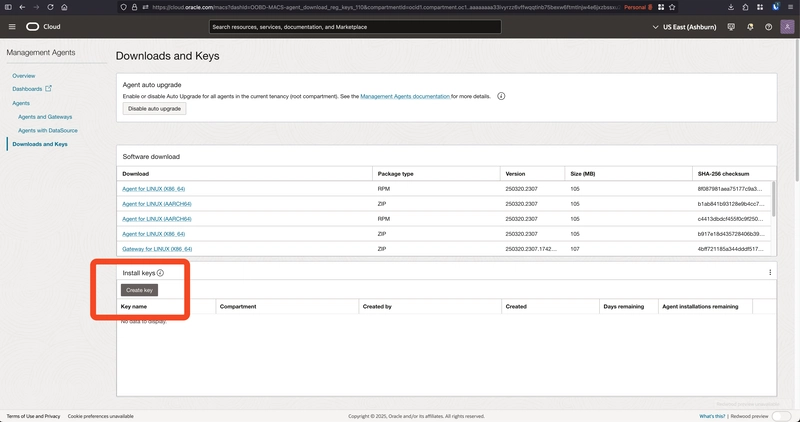
1. Go to OCI Console > Management Agents > Download and Keys
2. Create and download an Install Key from the page, name it input.rsp
Screenshot of Download and Keys page to create a new key
3. Modify the downloaded key input.rsp so that:
Service.plugin.appmgmt.download=true- Optionally, modify
AgentDisplayNameto your liking
Full file example
######################################################################### Please refer the following Management Agent Installation Guide for more details.## ## Since this file has sensitive information, please make sure that after# executing setup.sh you either delete this file or store it in a secure# location.#
########################################################################
ManagementAgentInstallKey = Mi4wLHVzLWFzaGJ1cm4tMSxvY2lkMS50ZW5hbmN5Lm9jMS4uYWFhYWFhYWFudzVtcWQydndpeHJ5c282a2Fxd2FncmNhM3p2eGltaXNjYWQ1ZXFtc3d4ZDVrdGZjbXBxLG9jaWQxLm1hbmFnZW1lbnRhZ2VudGluc3RhbGSXr6U46yVWAhrjEdNH73YCUhpTdpZXlveXFhYm1pbnpsdjU2ZWgzN2h4eXNmdjRhZTR5aGJqdDMyamRtb2FzYnpjbnBoeGEsSU5WUU1LbnJ4MFY2bFY1ODNvcTI0b0xpS3FueVNabTlqbTJfcmRNcA==
AgentDisplayName = Testf13 Agent
#Please uncomment the below tags properties and provide values as needed
#FreeFormTags = [{"":""}, {"":""}]
#DefinedTags = [{"namespace1":{"":""}}, {"namespace2":{"":""}}]
CredentialWalletPassword =
#Service.plugin.osmh.download=true
#Service.plugin.logan.download=true
#Service.plugin.jms.download=true
#Service.plugin.dbaas.download=true
#Service.plugin.jm.download=true
Service.plugin.appmgmt.download=true
#Service.plugin.opsiHost.download=true
4. In the same page, download the agent installation ZIP package Agent for LINUX (X86_64), name it omagent.zip
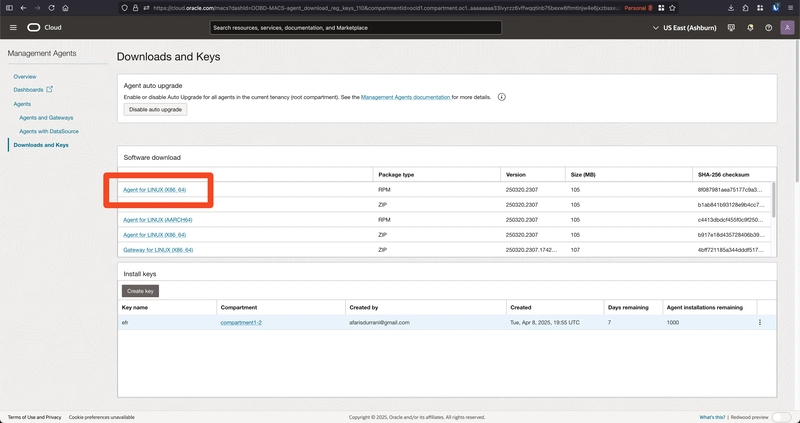
Screenshot of downloading the Linux Agent Installation files
5. Download Oracle Java 8 x64 tarball for Linux from Oracle here, name it jdk-8u441-linux-x64.tar.gz
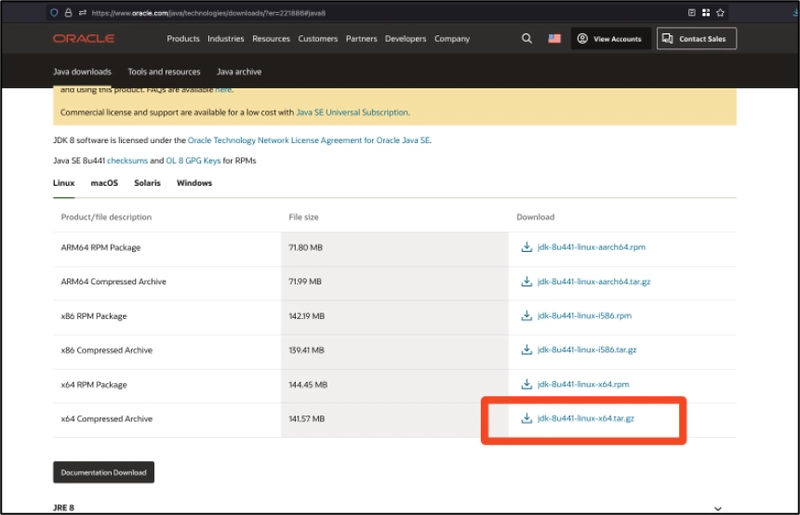
Screenshot of downloading Oracle Java tarball
6. scp the files input.rcp, omagent.zip, and jdk-8u441-linux-x64.tar.gz into the new instance. Replace the path of your SSH private key and the IP address of the instance
# Copy the files to the server
scp -i path/to/ssh-key.pem input.rsp ubuntu@10.145.8.64:~/
scp -i path/to/ssh-key.pem jdk-8u441-linux-x64.tar.gz ubuntu@10.145.8.64:~/
scp -i path/to/ssh-key.pem omagent.zip ubuntu@10.145.8.64:~/
7. In the new instance, run the following commands:
# Unzip the installation agent
sudo apt install unzip
unzip omagent.zip

# Install Java 8 and set java in PATH
sudo mkdir -p /usr/lib/jvm
sudo tar -xvf jdk-8u441-linux-x64.tar.gz -C /usr/lib/jvm/
sudo update-alternatives --install /usr/bin/java java /usr/lib/jvm/jdk1.8.0_441/bin/java 1
sudo update-alternatives --set java /usr/lib/jvm/jdk1.8.0_441/bin/java

# Run the installation agent, this will error out saying "input.rsp file is either not present ...", don't worry about this
sudo ./mgmt_agent/installer.sh /home/ubuntu/input.rsp

# Allow the mgmt_agent to read the input.rsp file
sudo usermod -aG ubuntu mgmt_agent

# Run the installation agent again
sudo ./mgmt_agent/uninstaller.sh
sudo ./mgmt_agent/installer.sh /home/ubuntu/input.rsp

# Remove the mgmt_agent's read access
sudo gpasswd -d mgmt_agent ubuntu

# Remove installation files
rm input.rsp
rm jdk-8u441-linux-x64.tar.gz
rm omagent.zip
rm -r mgmt_agent
References
Safe harbor statement
The information provided on this channel/article/story is solely intended for informational purposes and cannot be used as a part of any contractual agreement. The content does not guarantee the delivery of any material, code, or functionality, and should not be the sole basis for making purchasing decisions. The postings on this site are my own and do not necessarily reflect the views or work of Oracle or Mythics, LLC.
This work is licensed under a Creative Commons Attribution 4.0 International License.