


![[The AI Show Episode 144]: ChatGPT’s New Memory, Shopify CEO’s Leaked “AI First” Memo, Google Cloud Next Releases, o3 and o4-mini Coming Soon & Llama 4’s Rocky Launch](https://www.marketingaiinstitute.com/hubfs/ep%20144%20cover.png)


![From fast food worker to cybersecurity engineer with Tae'lur Alexis [Podcast #169]](https://cdn.hashnode.com/res/hashnode/image/upload/v1745242807605/8a6cf71c-144f-4c91-9532-62d7c92c0f65.png?#)


![BPMN-procesmodellering [closed]](https://i.sstatic.net/l7l8q49F.png)


.webp?#)


![Next Generation iPhone 17e Nears Trial Production [Rumor]](https://www.iclarified.com/images/news/97083/97083/97083-640.jpg)
![Apple Releases iOS 18.5 Beta 3 and iPadOS 18.5 Beta 3 [Download]](https://www.iclarified.com/images/news/97076/97076/97076-640.jpg)
![Apple Seeds visionOS 2.5 Beta 3 to Developers [Download]](https://www.iclarified.com/images/news/97077/97077/97077-640.jpg)
![Apple Seeds tvOS 18.5 Beta 3 to Developers [Download]](https://www.iclarified.com/images/news/97078/97078/97078-640.jpg)


How to Host a Scalable Full-Stack App for Free Using Cloudflare Pages, Workers, and Supabase
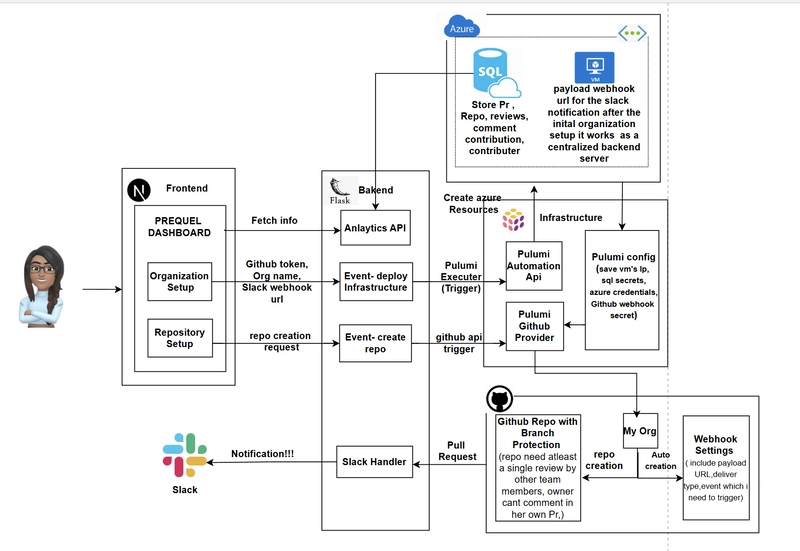
Deploying a full-stack app usually comes with hosting costs, backend limitations, and pricing tiers that scale poorly. But with the right modern stack, you can host a surprisingly powerful and scalable full-stack application — completely free. In this guide, you'll learn how to deploy a full-stack app using Cloudflare Pages (frontend), Cloudflare Workers (serverless backend), and Supabase (backend-as-a-service) — all without paying a cent. Why This Stack? Cloudflare Pages: Fast global CDN for your frontend. Cloudflare Workers: Serverless functions with generous free limits. Supabase: Free hosted PostgreSQL, Auth, and Storage APIs. 1. Set Up the Frontend With Cloudflare Pages Push your React/Vite/Next.js app to a GitHub repo. Go to Cloudflare Pages and link your repo. Use defaults for most settings. Set the build command (e.g. npm run build) and output folder (dist or out). Cloudflare Pages handles deployment and CDN edge caching for your frontend out of the box. 2. Add Dynamic Back-End With Cloudflare Workers To create dynamic server-side logic (like handling form data, API calls, etc.): npm install -g wrangler wrangler init my-worker cd my-worker Inside src/index.ts: export default { async fetch(request: Request): Promise { return new Response("Hello from Cloudflare Worker!"); } } Deploy it: wrangler deploy Now your worker lives at a custom subdomain like https://your-project.workers.dev. 3. Connect to Supabase Create an account at Supabase and create a new project. You’ll get: A full PostgreSQL database with SQL editor Built-in auth with social logins RESTful and real-time APIs In your frontend or Workers code, install the Supabase client: npm install @supabase/supabase-js Then use it like this: import { createClient } from '@supabase/supabase-js' const supabase = createClient('https://your-project.supabase.co', 'public-anon-key') const { data, error } = await supabase.from('todos').select('*') You can call this from either frontend or Workers depending on your security needs. Pros and Cons ✅ Pros Completely free for indie-level usage Edge-deployed, low-latency APIs No vendor lock-in — all parts are modular ⚠️ Cons Cloudflare Workers have some limitations (128MB memory, 10ms CPU) Cold start latency may affect performance for low-traffic projects Supabase Auth and Storage limits may require upgrades at scale

Deploying a full-stack app usually comes with hosting costs, backend limitations, and pricing tiers that scale poorly. But with the right modern stack, you can host a surprisingly powerful and scalable full-stack application — completely free.
In this guide, you'll learn how to deploy a full-stack app using Cloudflare Pages (frontend), Cloudflare Workers (serverless backend), and Supabase (backend-as-a-service) — all without paying a cent.
Why This Stack?
- Cloudflare Pages: Fast global CDN for your frontend.
- Cloudflare Workers: Serverless functions with generous free limits.
- Supabase: Free hosted PostgreSQL, Auth, and Storage APIs.
1. Set Up the Frontend With Cloudflare Pages
- Push your React/Vite/Next.js app to a GitHub repo.
- Go to Cloudflare Pages and link your repo.
- Use defaults for most settings. Set the build command (e.g.
npm run build) and output folder (distorout).
Cloudflare Pages handles deployment and CDN edge caching for your frontend out of the box.
2. Add Dynamic Back-End With Cloudflare Workers
To create dynamic server-side logic (like handling form data, API calls, etc.):
npm install -g wrangler
wrangler init my-worker
cd my-worker
Inside src/index.ts:
export default {
  async fetch(request: Request): Promise {
    return new Response("Hello from Cloudflare Worker!");
  }
}
Deploy it:
wrangler deployNow your worker lives at a custom subdomain like https://your-project.workers.dev.
3. Connect to Supabase
Create an account at Supabase and create a new project. You’ll get:
- A full PostgreSQL database with SQL editor
- Built-in auth with social logins
- RESTful and real-time APIs
In your frontend or Workers code, install the Supabase client:
npm install @supabase/supabase-jsThen use it like this:
import { createClient } from '@supabase/supabase-js'

const supabase = createClient('https://your-project.supabase.co', 'public-anon-key')

const { data, error } = await supabase.from('todos').select('*')
You can call this from either frontend or Workers depending on your security needs.
Pros and Cons
✅ Pros
- Completely free for indie-level usage
- Edge-deployed, low-latency APIs
- No vendor lock-in — all parts are modular
⚠️ Cons
- Cloudflare Workers have some limitations (128MB memory, 10ms CPU)
- Cold start latency may affect performance for low-traffic projects
- Supabase Auth and Storage limits may require upgrades at scale