HOW TO CREATE A SHARED FILED STORAGE FOR OFFICES IN AZURE.
INTRODUCTION Shared file storage in Azure refers to Azure Files, a fully managed file storage service provided by Microsoft Azure that allows you to create and manage file shares in the cloud. These file shares can be accessed by multiple users, applications, or virtual machines (VMs) simultaneously over standard protocols like Server Message Block (SMB) or Network File System (NFS), depending on the configuration. It’s designed to provide a centralized, scalable, and highly available solution for storing and sharing files, similar to traditional on-premises file servers but with the benefits of cloud infrastructure. Key Features of Azure Files: Shared Access: Multiple clients (e.g., VMs, on-premises servers, or applications) can mount the same file share and access it concurrently, making it ideal for collaboration or distributed workloads. Scalability: You can scale storage and performance dynamically based on your needs, with options for Standard (general-purpose) and Premium (high-performance) tiers. Integration: Works seamlessly with Azure services like Azure Virtual Machines, Azure Kubernetes Service (AKS), and Azure Blob Storage (via sync tools like Azure File Sync). Security: Supports encryption at rest and in transit, private endpoints, and integration with Azure Active Directory for access control. Snapshots: Provides point-in-time file share snapshots for backup and recovery. Types of Shared Files Storage Solutions There are three primary types of storage solutions businesses can adopt to provide shared file storage. They are cloud-based, on-premises, and hybrid models. Cloud-Based Storage Cloud-based storage is increasingly popular due to its scalability and ease of access. With cloud storage services like Dropbox, Google Drive, and Microsoft OneDrive, users may store files on remote servers and retrieve them from any location with an internet connection. On-Premises Storage On-premises storage refers to physical hardware that is kept within the organization's infrastructure, such as Storage Area Networks (SAN) or Network Attached Storage (NAS). Although it can demand a large amount of IT resources, this strategy gives total control over data. Hybrid Storage Hybrid storage offers the advantages of both on-premises and cloud systems. Here, data can be stored on-premises for sensitive files and in the cloud for scalability and easy access. STEP 1: Create and configure a storage account for Azure Files. On this article I will be creating a storage account for operation department. In the Azure portal, search for and select Storage accounts. select + create For Resource group select Create new. Give your resource group a name and select OK to save your changes. Provide a storage account name and set the performance to premium. Set the premium account type to File shares. Set the Redundancy to Zone-redundant storage. Then select Review and then Create the storage account. Wait for the resource to deploy and Select Go to resource. Step 2: Create and configure a file share with directory. In the Data storage section, select the File shares blade. Select + File share . Select + File share and provide a Name. Review the other options, but take the defaults. Select Create Add a directory to the file share for the operation department. Select + Add directory and name the new directory finance. Select browse and then select the finance directory. Notice you can Add directory to further organize your file share. Upload a file of your choosing. STEP 3: Configure and test snapshots. Select your file share in the Operations section, select the Snapshots blade. Select + Add snapshot. Select your snapshot and verify your file directory and uploaded file are included. The comment is optional. Select OK. Mine is there Practice using snapshots to restore a file. Return to your file share. Browse to your file directory. Locate your uploaded file and in the Properties pane select Delete. Select Yes to confirm the deletion. Select the Snapshots blade and then select your snapshot. Navigate to the file you want to restore, select the file and the select restore. Provide a Restored file name and press Ok. Verify your file directory has the restored file. STEP 4: Configure restricting storage access to selected virtual networks. Search for and select Virtual networks. Select Create Select your resource group and give the virtual network a name. Take the defaults for other parameters, select Review + create, and then Create. Wait for the resource to deploy and select go to resource. In the Settings section, select the Subnets blade. Select the default subnet. In the Service endpoints section choose Microsoft.Storage in the Services drop-down. Do not make any other changes. Be sure to **save **your changes. The storage account

INTRODUCTION
Shared file storage in Azure refers to Azure Files, a fully managed file storage service provided by Microsoft Azure that allows you to create and manage file shares in the cloud. These file shares can be accessed by multiple users, applications, or virtual machines (VMs) simultaneously over standard protocols like Server Message Block (SMB) or Network File System (NFS), depending on the configuration. It’s designed to provide a centralized, scalable, and highly available solution for storing and sharing files, similar to traditional on-premises file servers but with the benefits of cloud infrastructure.
Key Features of Azure Files:
Shared Access: Multiple clients (e.g., VMs, on-premises servers, or applications) can mount the same file share and access it concurrently, making it ideal for collaboration or distributed workloads.
Scalability: You can scale storage and performance dynamically based on your needs, with options for Standard (general-purpose) and Premium (high-performance) tiers.
Integration: Works seamlessly with Azure services like Azure Virtual Machines, Azure Kubernetes Service (AKS), and Azure Blob Storage (via sync tools like Azure File Sync).
Security: Supports encryption at rest and in transit, private endpoints, and integration with Azure Active Directory for access control.
Snapshots: Provides point-in-time file share snapshots for backup and recovery.
Types of Shared Files Storage Solutions
There are three primary types of storage solutions businesses can adopt to provide shared file storage. They are cloud-based, on-premises, and hybrid models.
Cloud-Based Storage
Cloud-based storage is increasingly popular due to its scalability and ease of access. With cloud storage services like Dropbox, Google Drive, and Microsoft OneDrive, users may store files on remote servers and retrieve them from any location with an internet connection.
On-Premises Storage
On-premises storage refers to physical hardware that is kept within the organization's infrastructure, such as Storage Area Networks (SAN) or Network Attached Storage (NAS). Although it can demand a large amount of IT resources, this strategy gives total control over data.
Hybrid Storage
Hybrid storage offers the advantages of both on-premises and cloud systems. Here, data can be stored on-premises for sensitive files and in the cloud for scalability and easy access.
STEP 1: Create and configure a storage account for Azure Files.
On this article I will be creating a storage account for operation department.
In the Azure portal, search for and select Storage accounts.
select + create
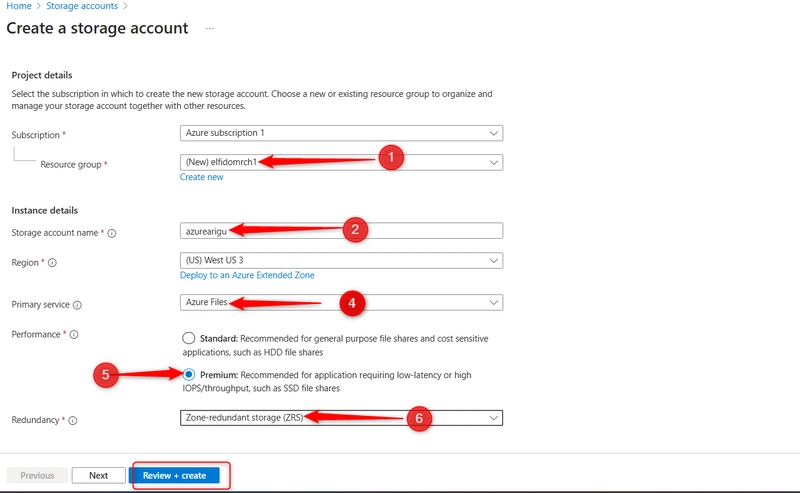
For Resource group select Create new. Give your resource group a name and select OK to save your changes. Provide a storage account name and set the performance to premium. Set the premium account type to File shares. Set the Redundancy to Zone-redundant storage. Then select Review and then Create the storage account.
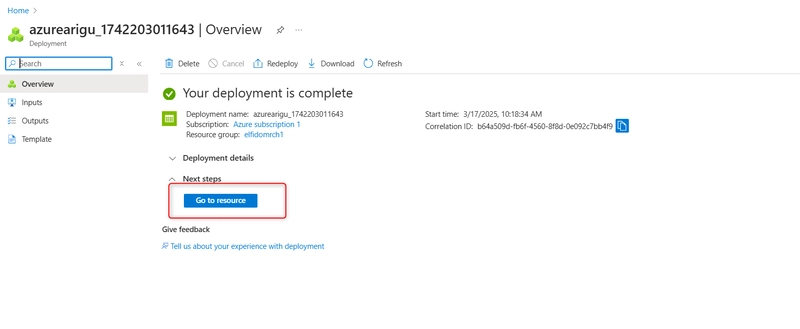
Wait for the resource to deploy and Select Go to resource.
Step 2: Create and configure a file share with directory.
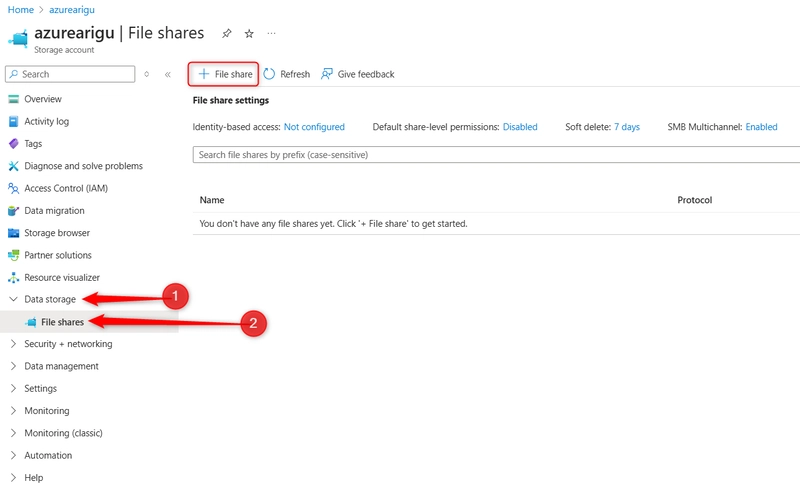
In the Data storage section, select the File shares blade. Select + File share .
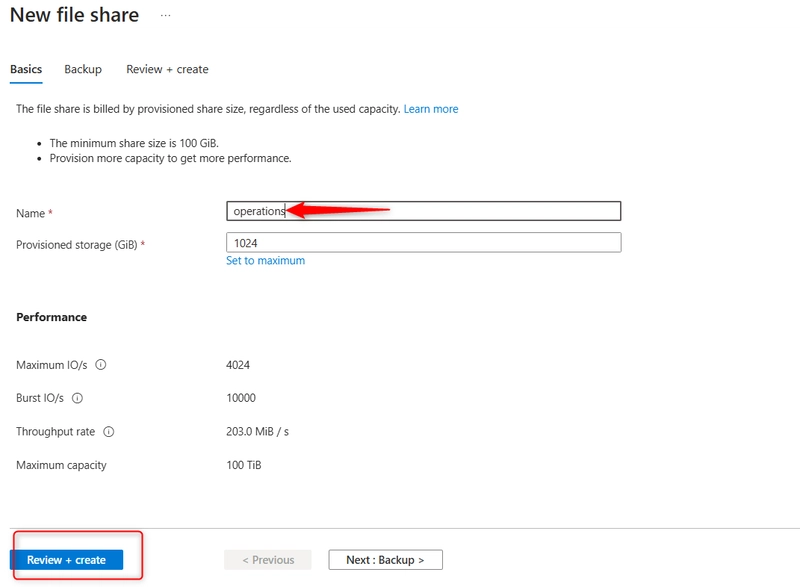
Select + File share and provide a Name. Review the other options, but take the defaults. Select Create
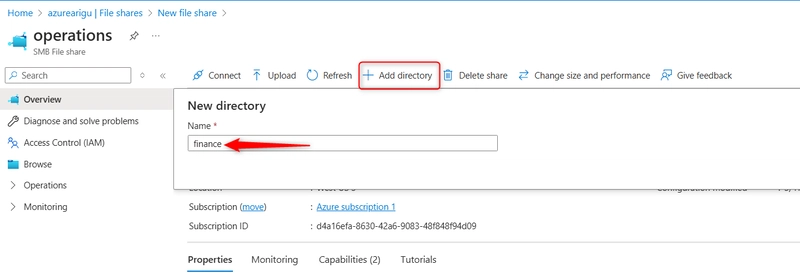
Add a directory to the file share for the operation department. Select + Add directory and name the new directory finance.
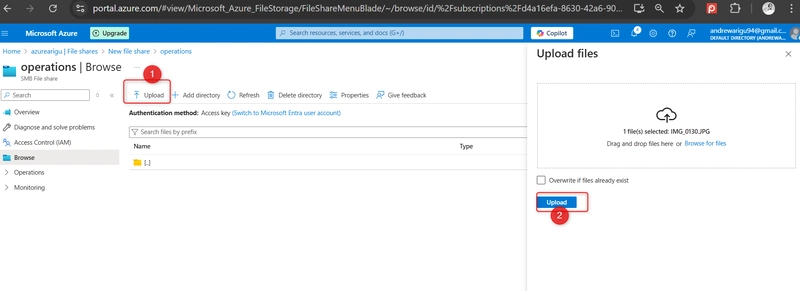
Select browse and then select the finance directory. Notice you can Add directory to further organize your file share.
Upload a file of your choosing.
STEP 3: Configure and test snapshots.
Select your file share in the Operations section, select the Snapshots blade. Select + Add snapshot.
Select your snapshot and verify your file directory and uploaded file are included. The comment is optional. Select OK.
Practice using snapshots to restore a file.
Return to your file share. Browse to your file directory. Locate your uploaded file and in the Properties pane select Delete. Select Yes to confirm the deletion.
Select the Snapshots blade and then select your snapshot.
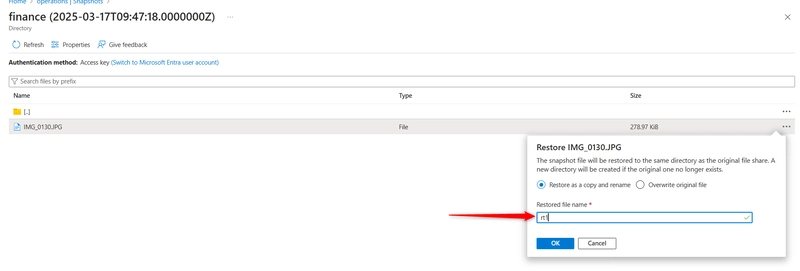
Navigate to the file you want to restore, select the file and the select restore.
Provide a Restored file name and press Ok.
Verify your file directory has the restored file.
STEP 4: Configure restricting storage access to selected virtual networks.
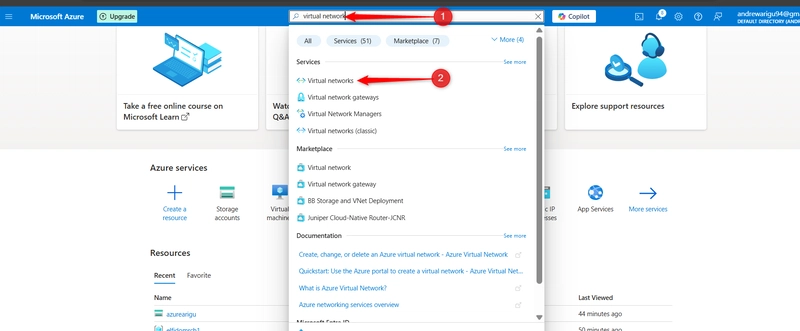
Search for and select Virtual networks.
Select Create
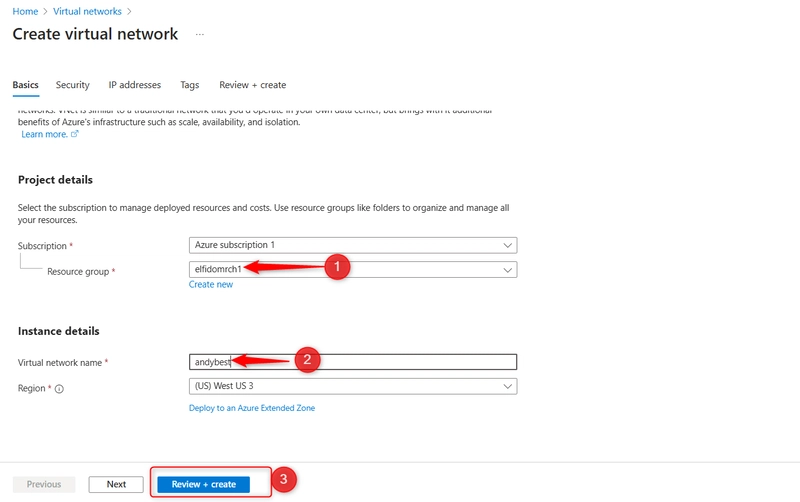
Select your resource group and give the virtual network a name. Take the defaults for other parameters, select Review + create, and then Create.
Wait for the resource to deploy and select go to resource.
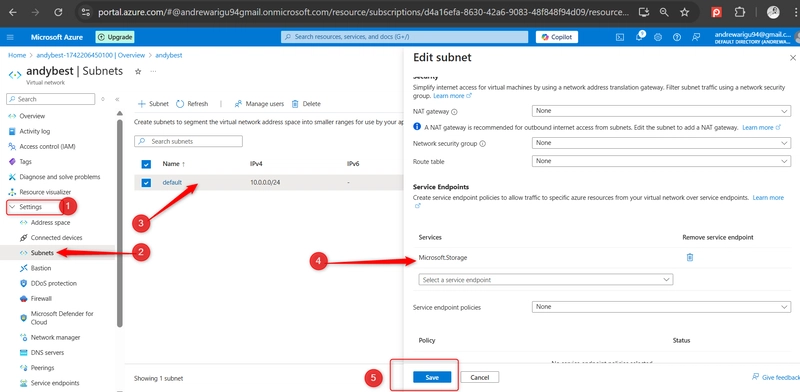
In the Settings section, select the Subnets blade.
Select the default subnet. In the Service endpoints section choose Microsoft.Storage in the Services drop-down. Do not make any other changes. Be sure to **save **your changes.
The storage account should only be accessed from the virtual network you just created.
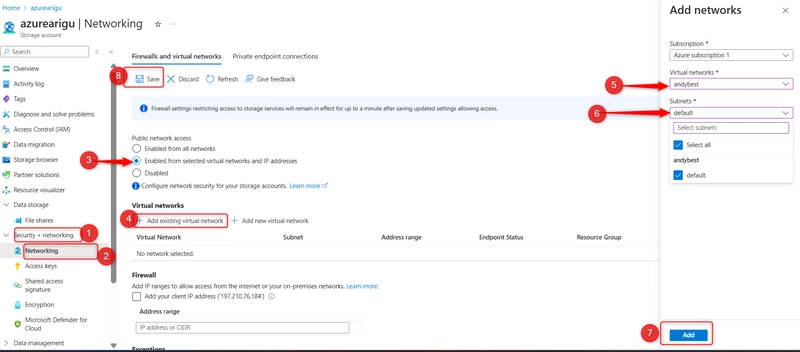
Return to your files storage account. In the Security + networking section, select the Networking blade. Change the Public network access to Enabled from selected virtual networks and IP addresses. In the Virtual networks section, select Add existing virtual network. Select your virtual network and subnet, select Add. Be sure to Save your changes.
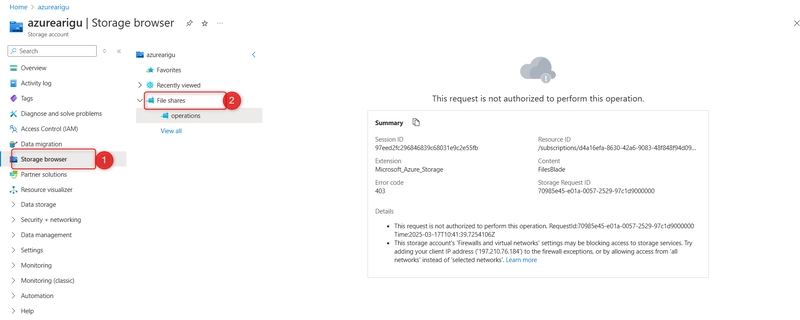
Select the storage browser and navigate to your file share. Verify the message "not authorized to perform this operation."
CONCLUSION
It's important to evaluate your organization's needs, set up proper infrastructure, and apply best practices for security and administration regardless of whether you choose a cloud-based, on-premises, or hybrid storage solution.
DONT FORGET TO LIKE SHARE AND COMMENT!


![[The AI Show Episode 142]: ChatGPT’s New Image Generator, Studio Ghibli Craze and Backlash, Gemini 2.5, OpenAI Academy, 4o Updates, Vibe Marketing & xAI Acquires X](https://www.marketingaiinstitute.com/hubfs/ep%20142%20cover.png)




![[FREE EBOOKS] The Kubernetes Bible, The Ultimate Linux Shell Scripting Guide & Four More Best Selling Titles](https://www.javacodegeeks.com/wp-content/uploads/2012/12/jcg-logo.jpg)


![From drop-out to software architect with Jason Lengstorf [Podcast #167]](https://cdn.hashnode.com/res/hashnode/image/upload/v1743796461357/f3d19cd7-e6f5-4d7c-8bfc-eb974bc8da68.png?#)


.png?#)


.jpg?#)


 (1).webp?#)


_Christophe_Coat_Alamy.jpg?#)


![Rapidus in Talks With Apple as It Accelerates Toward 2nm Chip Production [Report]](https://www.iclarified.com/images/news/96937/96937/96937-640.jpg)


