![[The AI Show Episode 142]: ChatGPT’s New Image Generator, Studio Ghibli Craze and Backlash, Gemini 2.5, OpenAI Academy, 4o Updates, Vibe Marketing & xAI Acquires X](https://www.marketingaiinstitute.com/hubfs/ep%20142%20cover.png)


![From drop-out to software architect with Jason Lengstorf [Podcast #167]](https://cdn.hashnode.com/res/hashnode/image/upload/v1743796461357/f3d19cd7-e6f5-4d7c-8bfc-eb974bc8da68.png?#)


.png?#)


_Christophe_Coat_Alamy.jpg?#)
 (1).webp?#)


![iPhone 17 Pro Won't Feature Two-Toned Back [Gurman]](https://www.iclarified.com/images/news/96944/96944/96944-640.jpg)
![Tariffs Threaten Apple's $999 iPhone Price Point in the U.S. [Gurman]](https://www.iclarified.com/images/news/96943/96943/96943-640.jpg)


How to Build Cross-Platform Desktop Apps in Python with Flet
In today’s rapidly evolving software landscape, the demand for cross-platform desktop applications is higher than ever. Developers and businesses are looking for tools that allow them to build feature-rich, responsive applications that run seamlessly on Windows, macOS, and Linux. Python has long been favored for its simplicity, readability, and extensive library support, making it an excellent choice for developing such applications. Flet emerges as an innovative framework that leverages the robust UI capabilities of Flutter while maintaining Python’s ease of use. This blend offers a unique approach to building desktop applications: developers can quickly prototype and iterate on their designs without delving into the complexities of traditional UI development. By combining Python’s straightforward syntax with Flutter’s dynamic interface components, Flet empowers developers to create visually appealing and highly interactive applications with minimal overhead. This article will guide you through the process of building desktop applications using Flet. Understanding Flet Flet is a versatile framework designed for building interactive multi-user applications across web, desktop, and mobile platforms—all using Python. It enables developers to harness the power of Flutter’s rich UI components while writing code in a language known for its simplicity and rapid development capabilities. This combination allows for the creation of responsive, scalable, and feature-rich applications without the steep learning curve associated with some traditional UI frameworks. Core Principles Flet abstracts the complexities of UI development by offering pre-built widgets and a declarative syntax that simplifies the construction of application interfaces. Its key principles include: UI Abstraction: Developers can work with high-level components rather than dealing directly with lower-level UI code. State Management: Flet efficiently manages the state of your application, ensuring that UI elements are updated dynamically in response to user interactions. Event Handling: Built-in event handling mechanisms allow for responsive and interactive interfaces, making it easy to capture and react to user actions like clicks, text inputs, or other events. Comparisons When compared to other popular GUI frameworks, Flet stands out for several reasons: Tkinter & PyQt: While Tkinter offers simplicity and is included with Python, and PyQt provides a robust set of tools for creating professional-grade applications, both can be limiting in terms of modern UI design and cross-platform consistency. Flet, leveraging Flutter's modern UI paradigms, provides a more contemporary look and a smoother development experience without needing to juggle multiple programming languages. Electron: Electron enables developers to build desktop applications using web technologies like HTML, CSS, and JavaScript. However, it often comes with performance overhead and larger application sizes. In contrast, Flet delivers a native-like experience using Python, making it a lighter and more efficient alternative while still offering cross-platform compatibility. Setting Up the Development Environment Before diving into Flet development, ensure that your system meets the following prerequisites: Python Installation: Make sure you have Python 3.7 or later installed on your machine. Python can be downloaded from the official Python website. Installing Flet Installing Flet is straightforward using Python’s package manager, pip. Follow these steps to get started: Install Flet using pip: pip install flet Project Structure A well-organized project structure is crucial for maintaining and scaling your application. Consider the following layout as a starting point: my_flet_app/ ├── main.py # Entry point of the application ├── components/ # Folder for reusable UI components and widgets │ ├── __init__.py │ └── custom_button.py ├── assets/ # Folder for images, icons, and other static files ├── requirements.txt # List of dependencies (including Flet) └── README.md # Project overview and setup instructions Building Your First Desktop App with Flet To get started, let’s create a simple “Hello World” desktop application. This initial example will introduce you to the basic structure of a Flet app, where you define a main function that handles the page setup and adds UI elements. UI Components Flet provides a collection of essential widgets that form the building blocks of your application. Some of these include: Text: For displaying static text. Buttons (e.g., ElevatedButton): For triggering actions. Text Fields: For user input. Containers and Layout Widgets: For organizing your UI elements in a structured manner. Event Handling One of the powerful features of Flet is its straightforward approach to
In today’s rapidly evolving software landscape, the demand for cross-platform desktop applications is higher than ever.
Developers and businesses are looking for tools that allow them to build feature-rich, responsive applications that run seamlessly on Windows, macOS, and Linux.
Python has long been favored for its simplicity, readability, and extensive library support, making it an excellent choice for developing such applications.
Flet emerges as an innovative framework that leverages the robust UI capabilities of Flutter while maintaining Python’s ease of use.
This blend offers a unique approach to building desktop applications: developers can quickly prototype and iterate on their designs without delving into the complexities of traditional UI development.
By combining Python’s straightforward syntax with Flutter’s dynamic interface components, Flet empowers developers to create visually appealing and highly interactive applications with minimal overhead.
This article will guide you through the process of building desktop applications using Flet.
Understanding Flet
Flet is a versatile framework designed for building interactive multi-user applications across web, desktop, and mobile platforms—all using Python.
It enables developers to harness the power of Flutter’s rich UI components while writing code in a language known for its simplicity and rapid development capabilities.
This combination allows for the creation of responsive, scalable, and feature-rich applications without the steep learning curve associated with some traditional UI frameworks.
Core Principles
Flet abstracts the complexities of UI development by offering pre-built widgets and a declarative syntax that simplifies the construction of application interfaces.
Its key principles include:
- UI Abstraction: Developers can work with high-level components rather than dealing directly with lower-level UI code.
- State Management: Flet efficiently manages the state of your application, ensuring that UI elements are updated dynamically in response to user interactions.
- Event Handling: Built-in event handling mechanisms allow for responsive and interactive interfaces, making it easy to capture and react to user actions like clicks, text inputs, or other events.
Comparisons
When compared to other popular GUI frameworks, Flet stands out for several reasons:
Tkinter & PyQt: While Tkinter offers simplicity and is included with Python, and PyQt provides a robust set of tools for creating professional-grade applications, both can be limiting in terms of modern UI design and cross-platform consistency.
Flet, leveraging Flutter's modern UI paradigms, provides a more contemporary look and a smoother development experience without needing to juggle multiple programming languages.
Electron: Electron enables developers to build desktop applications using web technologies like HTML, CSS, and JavaScript.
However, it often comes with performance overhead and larger application sizes. In contrast, Flet delivers a native-like experience using Python, making it a lighter and more efficient alternative while still offering cross-platform compatibility.
Setting Up the Development Environment
Before diving into Flet development, ensure that your system meets the following prerequisites:
Python Installation: Make sure you have Python 3.7 or later installed on your machine. Python can be downloaded from the official Python website.
Installing Flet
Installing Flet is straightforward using Python’s package manager, pip. Follow these steps to get started:
Install Flet using pip:
pip install flet
Project Structure
A well-organized project structure is crucial for maintaining and scaling your application. Consider the following layout as a starting point:
my_flet_app/
├── main.py          # Entry point of the application
├── components/      # Folder for reusable UI components and widgets
│   ├── __init__.py
│   └── custom_button.py
├── assets/          # Folder for images, icons, and other static files
├── requirements.txt # List of dependencies (including Flet)
└── README.md        # Project overview and setup instructions
Building Your First Desktop App with Flet
To get started, let’s create a simple “Hello World” desktop application.
This initial example will introduce you to the basic structure of a Flet app, where you define a main function that handles the page setup and adds UI elements.
UI Components
Flet provides a collection of essential widgets that form the building blocks of your application. Some of these include:
- Text: For displaying static text.
- Buttons (e.g., ElevatedButton): For triggering actions.
- Text Fields: For user input.
- Containers and Layout Widgets: For organizing your UI elements in a structured manner.
Event Handling
One of the powerful features of Flet is its straightforward approach to event handling.
You can easily define functions that respond to user actions like button clicks or text input changes.
When an event occurs, you update the relevant UI component, and Flet takes care of re-rendering the updated state on the screen.
Code Walkthrough
Below is an annotated code snippet that demonstrates a basic Flet application.
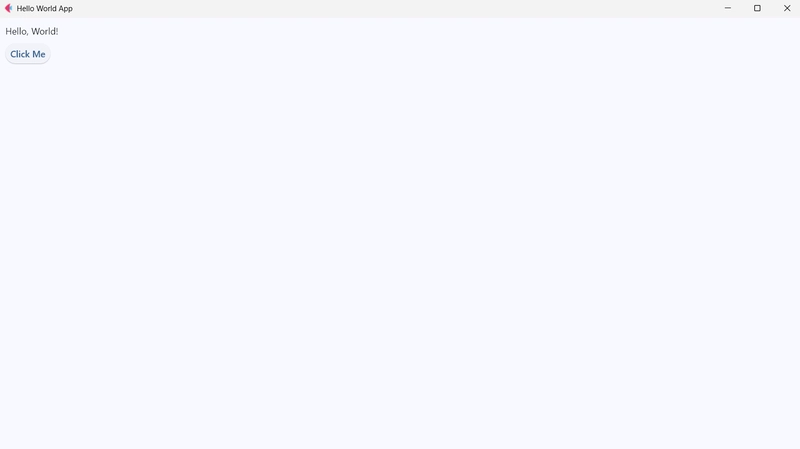
This example displays a greeting message and includes a button that, when clicked, updates the greeting:
import flet as ft
def main(page: ft.Page):
# Set the title of the application window
page.title = "Hello World App"
# Create a text widget to display a greeting message
greeting = ft.Text("Hello, World!")
# Define an event handler for the button click event
def button_clicked(e):
# Update the greeting text upon button click
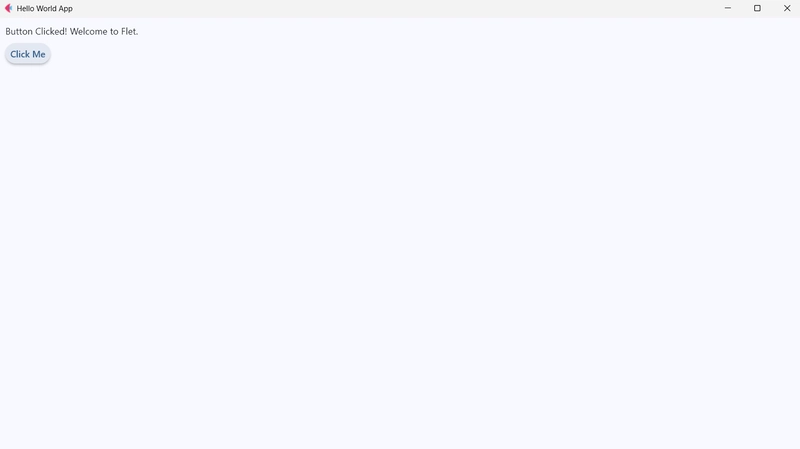
greeting.value = "Button Clicked! Welcome to Flet."
# Refresh the page to reflect the updated UI
page.update()
# Create an elevated button widget with an associated click event handler
click_button = ft.ElevatedButton(text="Click Me", on_click=button_clicked)
# Add the greeting text and button to the page layout
page.add(greeting, click_button)
# Start the Flet application by specifying the main function as the target
ft.app(target=main)
Code Explanation:
-
Initialization: The application starts by importing Flet and defining the
mainfunction that takes apageobject. Thispagerepresents the app window. -
UI Components: A
Textwidget is created to display "Hello, World!" and anElevatedButtonis set up with the label "Click Me." -
Event Handling: The
button_clickedfunction changes the text of thegreetingwidget when the button is clicked, andpage.update()is called to refresh the UI. -
Rendering: Finally, both the text and button are added to the page layout using
page.add(), and the app is launched withft.app(target=main).
You can run the app with:
python main.py
You should then see the following screen:
If you click the button:
Advanced Concepts and Features
In this section, we’ll explore some advanced topics in Flet that empower you to create dynamic, responsive, and robust desktop applications.
State Management
Efficient state management is essential for ensuring that your app’s UI remains in sync with its underlying data.
Flet’s reactive model makes it straightforward to update UI elements when the application state changes.
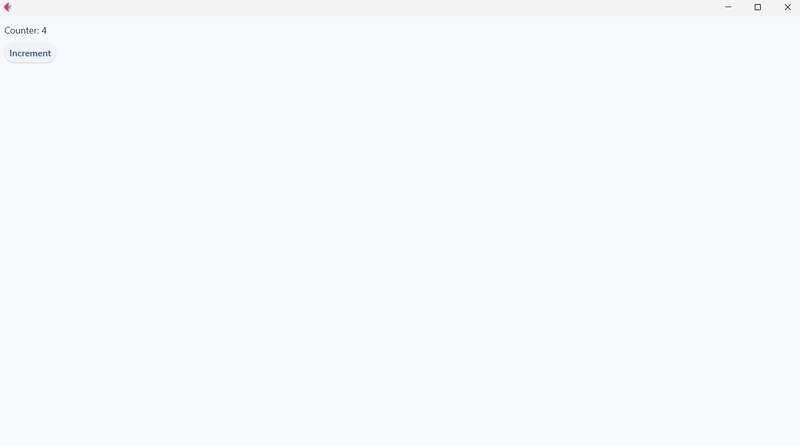
In the following example, we maintain a counter state that updates a text widget each time a button is clicked:
import flet as ft

def main(page: ft.Page):
    counter = 0
    counter_text = ft.Text("Counter: 0")

    def increment(e):
        nonlocal counter
        counter += 1
        counter_text.value = f"Counter: {counter}"
        page.update()  # Refresh the UI to show the new counter value

    inc_button = ft.ElevatedButton("Increment", on_click=increment)
    page.add(counter_text, inc_button)

ft.app(target=main)
Explanation:
-
State Variable: A local variable
counterholds the current count. -
Event Handler: The
incrementfunction updates this variable and the associated text widget. -
UI Update: Calling
page.update()re-renders the UI to reflect changes.
Running the app and clicking the button, you will see:
Responsive Design
Designing an app that adapts gracefully to different screen sizes is crucial for a good user experience.
Flet allows you to create flexible layouts that respond to window resizing.
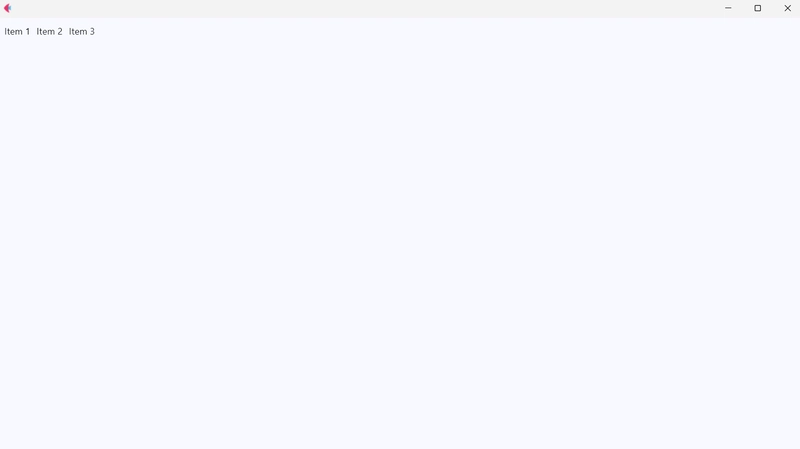
In this example, the layout switches between a row and column arrangement based on the window width:
import flet as ft

def main(page: ft.Page):
    # Create a flexible layout with text items
    layout = ft.Row([ft.Text("Item 1"), ft.Text("Item 2"), ft.Text("Item 3")])

    def update_layout(e):
        # Change layout direction based on window width
        if page.window_width < 600:
            layout.direction = "column"
        else:
            layout.direction = "row"
        page.update()

    # Set the resize handler to update the layout
    page.on_resize = update_layout
    page.add(layout)

ft.app(target=main)
Explanation:
-
Dynamic Direction: The
update_layoutfunction checkspage.window_widthand sets the layout’sdirectionproperty accordingly. -
Event Binding: The
page.on_resizeevent ensures the layout adjusts whenever the window size changes.
Running the app:
Integrating APIs and Data
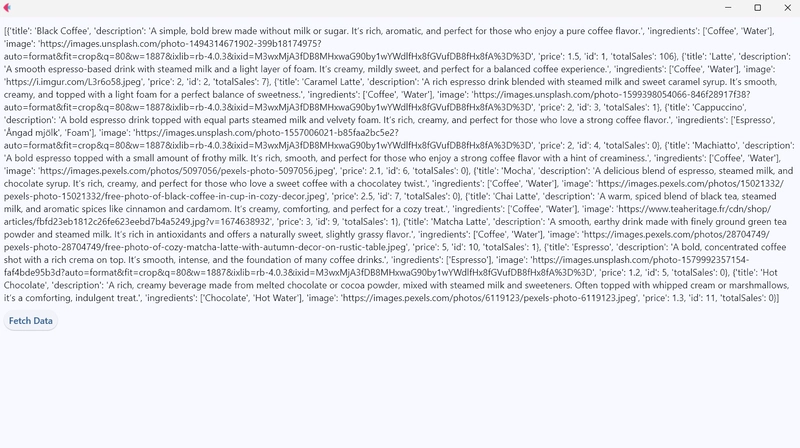
Modern applications often need to fetch and display data from external sources.
By leveraging Python’s HTTP libraries (e.g., requests), you can integrate API calls within your Flet app.
The following snippet demonstrates fetching data from an API and displaying it:
import flet as ft
import requests

def main(page: ft.Page):
    data_text = ft.Text("Fetching data...")

    def fetch_data(e):
        try:
            response = requests.get("https://api.sampleapis.com/coffee/hot")
            if response.ok:
                data = response.json()
                data_text.value = data
            else:
                data_text.value = "Failed to fetch data."
        except Exception as ex:
            data_text.value = f"Error: {ex}"
        page.update()

    fetch_button = ft.ElevatedButton("Fetch Data", on_click=fetch_data)
    page.add(data_text, fetch_button)

ft.app(target=main)
Don't forget to install the requests library:
pip install requests
Explanation:
-
API Request: The
fetch_datafunction makes an HTTP GET request to retrieve data. - Error Handling: Proper error handling ensures the UI remains informative even when data fetching fails.
-
UI Update: The text widget is updated with the fetched data, and the UI refreshes via
page.update().
Running the app and clicking the button:
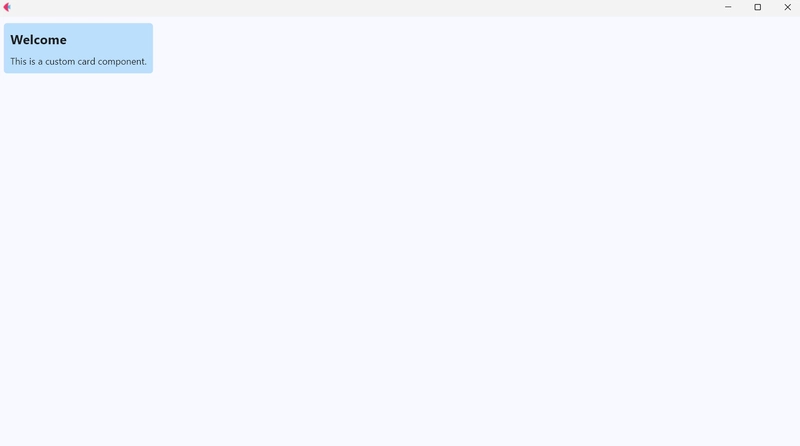
Custom Components and Themes
Creating custom components can help you maintain consistency and reusability across your app.
Flet allows you to build composite widgets and apply global themes to ensure a uniform look and feel.
Below is an example of a custom card component along with theme customization:
import flet as ft

# Define a custom card component by extending a Container
class CustomCard(ft.Container):
    def __init__(self, title: str, content: str, **kwargs):
        super().__init__(
            content=ft.Column([
                ft.Text(title, size=20, weight="bold"),
                ft.Text(content)
            ]),
            padding=10,
            border_radius=5,
            bgcolor=ft.colors.BLUE_100,
            **kwargs
        )

def main(page: ft.Page):
    # Apply a global theme using a color seed
    page.theme = ft.Theme(color_scheme_seed=ft.colors.BLUE)

    card1 = CustomCard("Welcome", "This is a custom card component.")
    page.add(card1)

ft.app(target=main)
Explanation:
-
Custom Component: The
CustomCardclass encapsulates a title and content into a reusable card widget. -
Theming: A global theme is applied via
page.themeto enforce a consistent color scheme across the application. -
Modularization: Custom components like
CustomCardcan be stored in separate modules for better organization and reuse.
Running the app:
Debugging and Optimization
Building robust desktop applications requires not only writing functional code but also being prepared to debug and optimize as your project scales.
In this section, we cover common pitfalls developers face when working with Flet and provide best practices to optimize application performance.
Common Pitfalls
Developing with Flet can sometimes lead to issues that can be resolved with a few troubleshooting strategies:
Widget Update Issues:
-
Pitfall: Forgetting to call
page.update()after changing the state of widgets can result in the UI not reflecting recent changes. - Tip: Always ensure that after modifying any widget property or state, you trigger an update to re-render the UI.
Event Binding Errors:
- Pitfall: Incorrectly binding events or misnaming callback functions may lead to unresponsive components.
- Tip: Double-check that your event handlers are properly assigned to UI elements and that the function signatures match what Flet expects.
Resource Handling:
- Pitfall: Overloading the app with too many heavy widgets or not properly disposing of resources can degrade performance.
- Tip: Use lazy loading techniques to load heavy components only when needed, and consider breaking your UI into smaller, manageable parts.
Debugging Strategy:
- Utilize print statements or logging to trace the flow of execution.
- Test individual components in isolation before integrating them into the main application.
Performance Considerations
Optimizing performance is key to delivering a smooth user experience.
Here are some best practices for ensuring your Flet desktop app performs efficiently:
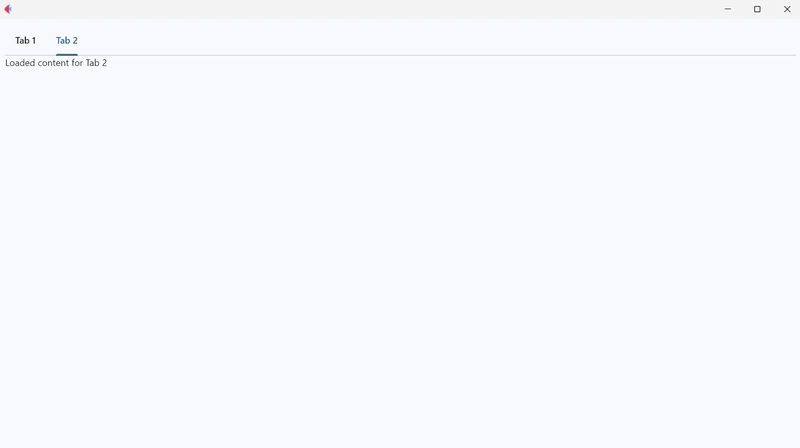
Lazy Loading:
- Concept: Load components or data only when they are required, rather than at the startup of the application.
- Example: If your app contains multiple tabs with heavy data, load the content of a tab only when the user clicks on it.
import flet as ft

def load_tab_content(e):
    # Simulate lazy loading of data for a tab
    content.value = "Loaded content for Tab 2"
    page.update()

def main(page: ft.Page):
    tab1 = ft.Tab(text="Tab 1", content=ft.Text("Static content for Tab 1"))
    # Initially empty content for Tab 2
    content = ft.Text("")
    tab2 = ft.Tab(text="Tab 2", content=content)

    tabs = ft.Tabs(tabs=[tab1, tab2], on_change=lambda e: load_tab_content(e) if e.control.selected_index == 1 else None)
    page.add(tabs)

ft.app(target=main)
Running the app:
Asynchronous Operations:
- Concept: Use asynchronous calls for tasks such as data fetching or heavy computations so that the UI remains responsive.
-
Example: Integrate Python’s
asynciomodule to handle asynchronous tasks, ensuring long-running operations don’t block the main thread.
import flet as ft
import asyncio

async def fetch_data_async():
    # Simulate an asynchronous API call with a delay
    await asyncio.sleep(2)
    return "Data fetched asynchronously!"

def main(page: ft.Page):
    status_text = ft.Text("Click to fetch data asynchronously.")

    async def on_click(e):
        status_text.value = "Fetching..."
        page.update()
        data = await fetch_data_async()
        status_text.value = data
        page.update()

    fetch_button = ft.ElevatedButton(text="Fetch Data", on_click=lambda e: asyncio.create_task(on_click(e)))
    page.add(status_text, fetch_button)

ft.app(target=main)
Running the app:

Efficient State Updates:
- Avoid unnecessary state changes and frequent calls to
page.update()by batching updates where possible. - Use conditional updates to ensure the UI is only refreshed when there are actual changes.
Packaging the App
Packaging your Flet app into a standalone executable ensures that end users don’t need a Python environment to run your application.
One popular tool for this purpose is PyInstaller. Below is a basic walkthrough for packaging your app:
Install PyInstaller:
pip install pyinstaller
Create the Executable:
Navigate to your project directory and run the following command:
pyinstaller --onefile main.py
This command generates a single executable file in the dist/ directory. The --onefile flag bundles your script and its dependencies into one file.
Platform Considerations:
-
Windows: The executable will be a
.exefile. - macOS/Linux: The output will be a binary executable that can be run directly on the target OS.