Hands-On: Working with AWS RDS
**Step 1: Set Up Your AWS Environment Sign in to AWS Console: Go to the AWS Management Console and log in with your credentials. If you don’t have an account, you’ll need to create one. Navigate to RDS: Once logged in, search for RDS in the search bar at the top and click on it to access the RDS dashboard. Step 2: Launch a New RDS Instance Choose Database Engine: On the RDS dashboard, click on Create database. You’ll be presented with different database engine options (e.g., MySQL, PostgreSQL, MariaDB). For this tutorial, let's choose MySQL. Database Settings: Under Settings, provide the following details: DB instance identifier: Give your instance a unique name (e.g., mydb-instance). Master username: Choose a username (e.g., admin). Master password: Set a secure password and confirm it. Choose DB Instance Class: Under DB instance size, you can select the instance class. For testing, you can choose a smaller instance like db.t2.micro (eligible for the AWS Free Tier). Storage: Choose General Purpose (SSD) for the storage type. Set the allocated storage to 20 GB or whatever suits your needs. Database Options: DB name: (Optional) You can specify the initial database name here (e.g., mydb). Leave the default settings for other options unless you need to customize them. Connectivity: VPC: Choose the default VPC (or create a new one if necessary). Public accessibility: Set to Yes if you need to access your database from outside the VPC (e.g., from your local machine). Set up a VPC security group (you can either create a new one or use an existing one). Ensure the security group allows inbound traffic on the port for MySQL (default is 3306). Additional Configuration: Enable Auto minor version upgrade and Backup retention. Enable Multi-AZ deployment for higher availability (optional but recommended). Launch the Database: After you’ve configured all settings, click Create database. AWS will start provisioning your RDS instance. This may take a few minutes. Step 3: Connect to Your RDS Instance Find Your RDS Endpoint: After the instance is created, go to the Databases section in the RDS dashboard. Select your newly created instance, and note the Endpoint (something like mydb-instance.cxjiyz1lgbty.us-west-2.rds.amazonaws.com). Connect Using a MySQL Client: You can connect to your MySQL database instance using a MySQL client (e.g., MySQL Workbench, DBeaver) or through the terminal. Example command for connecting through the terminal: bash Copy Edit mysql -h -u admin -p Replace with your RDS endpoint. You’ll be prompted for the password you created earlier. Create a Database and Table: After logging in, you can create a new database: sql Copy Edit CREATE DATABASE mytestdb; USE mytestdb; Next, create a table: sql Copy Edit CREATE TABLE users ( id INT AUTO_INCREMENT PRIMARY KEY, name VARCHAR(100) NOT NULL, email VARCHAR(100) NOT NULL ); Insert Data: You can now insert some data into the table: sql Copy Edit INSERT INTO users (name, email) VALUES ('John Doe', 'john.doe@example.com'); INSERT INTO users (name, email) VALUES ('Jane Smith', 'jane.smith@example.com'); Query the Data: Query the table to see the inserted data: sql Copy Edit SELECT * FROM users; Step 4: Monitor Your RDS Instance CloudWatch Metrics: AWS CloudWatch automatically monitors your RDS instance. You can check metrics like CPU utilization, storage usage, and I/O activity. Go to CloudWatch in the AWS Console, and you’ll see RDS metrics under RDS -> Per-Database Metrics. Performance Insights (Optional): You can enable Performance Insights to get detailed insights into database performance, query performance, and resource consumption. Step 5: Manage Backups and Snapshots Automated Backups: By default, AWS takes automated backups of your RDS instance. You can adjust the backup retention period under the Backup settings. Create a Manual Snapshot: From the RDS dashboard, select your instance and click Actions -> Take snapshot. This allows you to create a point-in-time backup of your database. Restore from Snapshot: If needed, you can restore your database to a previous snapshot. Simply select the snapshot and click Restore snapshot. Step 6: Clean Up Delete the RDS Instance: If you no longer need the RDS instance, go to the Databases section, select your instance, click Actions, and choose Delete. Follow the prompts to confirm deletion and, if necessary, create a final snapshot before deletion. **
**Step 1: Set Up Your AWS Environment
Sign in to AWS Console: Go to the AWS Management Console and log in with your credentials. If you don’t have an account, you’ll need to create one.
Navigate to RDS: Once logged in, search for RDS in the search bar at the top and click on it to access the RDS dashboard.
Step 2: Launch a New RDS Instance
Choose Database Engine:
On the RDS dashboard, click on Create database.
You’ll be presented with different database engine options (e.g., MySQL, PostgreSQL, MariaDB). For this tutorial, let's choose MySQL.
Database Settings:
Under Settings, provide the following details:
DB instance identifier: Give your instance a unique name (e.g., mydb-instance).
Master username: Choose a username (e.g., admin).
Master password: Set a secure password and confirm it.
Choose DB Instance Class:
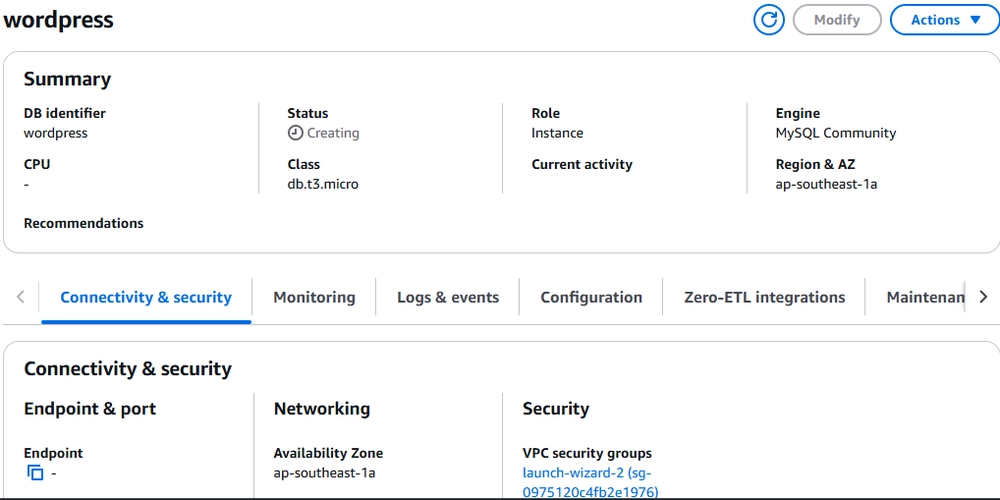
Under DB instance size, you can select the instance class. For testing, you can choose a smaller instance like db.t2.micro (eligible for the AWS Free Tier).
Storage: Choose General Purpose (SSD) for the storage type. Set the allocated storage to 20 GB or whatever suits your needs.
Database Options:
DB name: (Optional) You can specify the initial database name here (e.g., mydb).
Leave the default settings for other options unless you need to customize them.
Connectivity:
VPC: Choose the default VPC (or create a new one if necessary).
Public accessibility: Set to Yes if you need to access your database from outside the VPC (e.g., from your local machine).
Set up a VPC security group (you can either create a new one or use an existing one). Ensure the security group allows inbound traffic on the port for MySQL (default is 3306).
Additional Configuration:
Enable Auto minor version upgrade and Backup retention.
Enable Multi-AZ deployment for higher availability (optional but recommended).
Launch the Database:
After you’ve configured all settings, click Create database. AWS will start provisioning your RDS instance. This may take a few minutes.
Step 3: Connect to Your RDS Instance
Find Your RDS Endpoint:
After the instance is created, go to the Databases section in the RDS dashboard.
Select your newly created instance, and note the Endpoint (something like mydb-instance.cxjiyz1lgbty.us-west-2.rds.amazonaws.com).
Connect Using a MySQL Client:
You can connect to your MySQL database instance using a MySQL client (e.g., MySQL Workbench, DBeaver) or through the terminal.
Example command for connecting through the terminal:
bash
Copy
Edit
mysql -h -u admin -p
Replace with your RDS endpoint. You’ll be prompted for the password you created earlier.
Create a Database and Table:
After logging in, you can create a new database:
sql
Copy
Edit
CREATE DATABASE mytestdb;
USE mytestdb;
Next, create a table:
sql
Copy
Edit
CREATE TABLE users (
id INT AUTO_INCREMENT PRIMARY KEY,
name VARCHAR(100) NOT NULL,
email VARCHAR(100) NOT NULL
);
Insert Data:
You can now insert some data into the table:
sql
Copy
Edit
INSERT INTO users (name, email) VALUES ('John Doe', 'john.doe@example.com');
INSERT INTO users (name, email) VALUES ('Jane Smith', 'jane.smith@example.com');
Query the Data:
Query the table to see the inserted data:
sql
Copy
Edit
SELECT * FROM users;
Step 4: Monitor Your RDS Instance
CloudWatch Metrics:
AWS CloudWatch automatically monitors your RDS instance. You can check metrics like CPU utilization, storage usage, and I/O activity.
Go to CloudWatch in the AWS Console, and you’ll see RDS metrics under RDS -> Per-Database Metrics.
Performance Insights (Optional):
You can enable Performance Insights to get detailed insights into database performance, query performance, and resource consumption.
Step 5: Manage Backups and Snapshots
Automated Backups:
By default, AWS takes automated backups of your RDS instance. You can adjust the backup retention period under the Backup settings.
Create a Manual Snapshot:
From the RDS dashboard, select your instance and click Actions -> Take snapshot. This allows you to create a point-in-time backup of your database.
Restore from Snapshot:
If needed, you can restore your database to a previous snapshot. Simply select the snapshot and click Restore snapshot.
Step 6: Clean Up
Delete the RDS Instance:
If you no longer need the RDS instance, go to the Databases section, select your instance, click Actions, and choose Delete.
Follow the prompts to confirm deletion and, if necessary, create a final snapshot before deletion.
**




![[The AI Show Episode 143]: ChatGPT Revenue Surge, New AGI Timelines, Amazon’s AI Agent, Claude for Education, Model Context Protocol & LLMs Pass the Turing Test](https://www.marketingaiinstitute.com/hubfs/ep%20143%20cover.png)




![Is this too much for a modular monolith system? [closed]](https://i.sstatic.net/pYL1nsfg.png)


![[DEALS] Koofr Cloud Storage: Lifetime Subscription (1TB) (80% off) & Other Deals Up To 98% Off – Offers End Soon!](https://www.javacodegeeks.com/wp-content/uploads/2012/12/jcg-logo.jpg)






 CISO’s Core Focus.webp?#)








![Hostinger Horizons lets you effortlessly turn ideas into web apps without coding [10% off]](https://i0.wp.com/9to5mac.com/wp-content/uploads/sites/6/2025/04/IMG_1551.png?resize=1200%2C628&quality=82&strip=all&ssl=1)


![This new Google TV streaming dongle looks just like a Chromecast [Gallery]](https://i0.wp.com/9to5google.com/wp-content/uploads/sites/4/2025/04/thomson-cast-150-google-tv-1.jpg?resize=1200%2C628&quality=82&strip=all&ssl=1)


![iPadOS 19 May Introduce Menu Bar, iOS 19 to Support External Displays [Rumor]](https://www.iclarified.com/images/news/97137/97137/97137-640.jpg)

![Apple Drops New Immersive Adventure Episode for Vision Pro: 'Hill Climb' [Video]](https://www.iclarified.com/images/news/97133/97133/97133-640.jpg)
