![[Webinar] AI Is Already Inside Your SaaS Stack — Learn How to Prevent the Next Silent Breach](https://blogger.googleusercontent.com/img/b/R29vZ2xl/AVvXsEiOWn65wd33dg2uO99NrtKbpYLfcepwOLidQDMls0HXKlA91k6HURluRA4WXgJRAZldEe1VReMQZyyYt1PgnoAn5JPpILsWlXIzmrBSs_TBoyPwO7hZrWouBg2-O3mdeoeSGY-l9_bsZB7vbpKjTSvG93zNytjxgTaMPqo9iq9Z5pGa05CJOs9uXpwHFT4/s1600/ai-cyber.jpg?#)


![[The AI Show Episode 144]: ChatGPT’s New Memory, Shopify CEO’s Leaked “AI First” Memo, Google Cloud Next Releases, o3 and o4-mini Coming Soon & Llama 4’s Rocky Launch](https://www.marketingaiinstitute.com/hubfs/ep%20144%20cover.png)


![Rogue Company Elite tier list of best characters [April 2025]](https://media.pocketgamer.com/artwork/na-33136-1657102075/rogue-company-ios-android-tier-cover.jpg?#)


_Andreas_Prott_Alamy.jpg?width=1280&auto=webp&quality=80&disable=upscale#)


![What’s new in Android’s April 2025 Google System Updates [U: 4/18]](https://i0.wp.com/9to5google.com/wp-content/uploads/sites/4/2025/01/google-play-services-3.jpg?resize=1200%2C628&quality=82&strip=all&ssl=1)


![Apple Watch Series 10 Back On Sale for $299! [Lowest Price Ever]](https://www.iclarified.com/images/news/96657/96657/96657-640.jpg)
![EU Postpones Apple App Store Fines Amid Tariff Negotiations [Report]](https://www.iclarified.com/images/news/97068/97068/97068-640.jpg)
![Apple Slips to Fifth in China's Smartphone Market with 9% Decline [Report]](https://www.iclarified.com/images/news/97065/97065/97065-640.jpg)


Hands-On Guide: Assigning a Team Policy, Deleting, and Restoring a User in Microsoft Teams
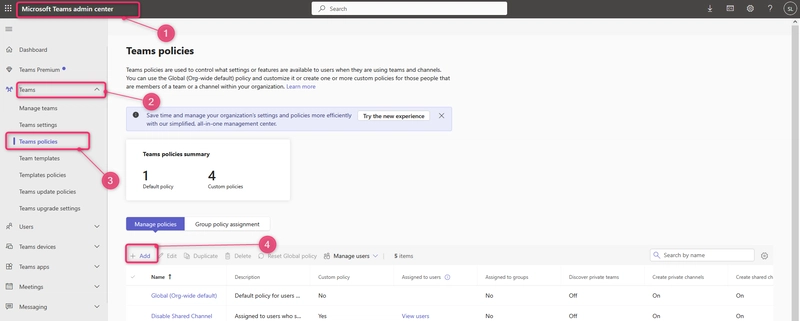
INTRODUCTION Microsoft Teams policies are critical for governing how users collaborate, communicate, and participate in meetings. However, when users are deleted and restored, understanding how their assigned policies behave is essential for maintaining governance and user experience. This guide walks you through assigning a custom policy to a user, deleting the user, and restoring them to test whether policy assignments persist. This exercise is particularly useful for validating backup/restore processes or troubleshooting policy inheritance in dynamic environments. 1. Assign a Policy to a User in Teams Admin Center Prerequisites: Admin access to the Microsoft Teams Admin Center and Microsoft 365 Admin Center. A custom policy (e.g., Messaging Policy, Meeting Policy) already created (or use an existing one). - Steps: Create a Custom Policy (Optional): Go to Microsoft Teams Admin Center → Navigate to the policy type (e.g., Teams Policies under Teams). Click + Add to create a new policy (e.g., name it Disabalecreateprivate&sharedchannel). Configure settings and save. Assign the Policy to the User: In the Teams Admin Center, navigate to Users → Manage Users. Search for the target user (e.g., user@domain.com) and click their name. Under Policies, select the policy type (e.g., Teams Policy) and choose your custom policy (e.g., Disabalecreateprivate&sharedchannel). Click Save. Alternatively: Use Bulk Edit in the Teams Admin Center to assign policies to multiple users. 2. Delete the User Steps: Go to Microsoft 365 Admin Center → Users → Active Users. Search for the user (e.g., user@domain.com). Select the user and click Delete user. Confirm deletion. The user will move to Deleted Users for 30 days. 3. Restore the Deleted User - Steps: In the Microsoft 365 Admin Center, go to Users → Deleted Users. Find the deleted user and select Restore User. Follow prompts to restore the account (e.g., reset password, reassign licenses if required). Click Restore. 4. Verify Policy Assignment After Restoration - Steps: Return to Microsoft Teams Admin Center → Users → Manage Users. Search for the restored user and click their name. Check the Policies section: If the previously assigned policy (e.g., Disabalecreateprivate&sharedchannel) is listed, the policy persisted after restoration. If not, the policy reverted to the global/default policy. CONCLUSION This guide demonstrates how to test policy persistence for users in Microsoft Teams through deletion and restoration. Key takeaways: Directly assigned policies do survive user deletion; restored users revert to the directly assigned policies. For long-term policy management, prioritize group-based assignments to automate policy enforcement and reduce manual reconfiguration. Always test policy behavior during user lifecycle changes to ensure compliance with your organization’s governance standards. Use tools like PowerShell or the Teams Admin Center to audit policies proactively. By mastering these steps, you can confidently manage Teams users while ensuring policies align with your organization’s evolving needs.
INTRODUCTION
Microsoft Teams policies are critical for governing how users collaborate, communicate, and participate in meetings. However, when users are deleted and restored, understanding how their assigned policies behave is essential for maintaining governance and user experience. This guide walks you through assigning a custom policy to a user, deleting the user, and restoring them to test whether policy assignments persist. This exercise is particularly useful for validating backup/restore processes or troubleshooting policy inheritance in dynamic environments.
1. Assign a Policy to a User in Teams Admin Center
Prerequisites:
- Admin access to the Microsoft Teams Admin Center and Microsoft 365 Admin Center.
- A custom policy (e.g., Messaging Policy, Meeting Policy) already created (or use an existing one).
- Steps:
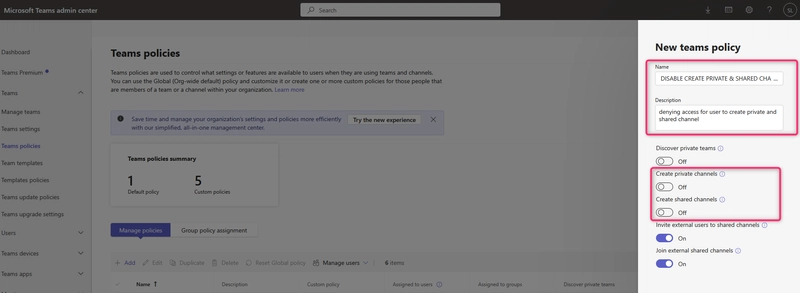
Create a Custom Policy (Optional):
- Go to Microsoft Teams Admin Center → Navigate to the policy type (e.g., Teams Policies under Teams).
- Click + Add to create a new policy (e.g., name it Disabalecreateprivate&sharedchannel). Configure settings and save.
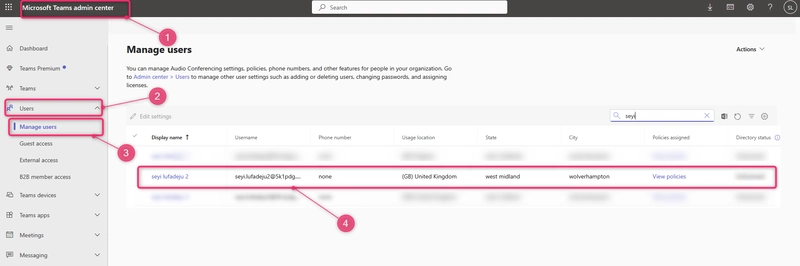
Assign the Policy to the User:
- In the Teams Admin Center, navigate to Users → Manage Users.
- Search for the target user (e.g., user@domain.com) and click their name.
- Under Policies, select the policy type (e.g., Teams Policy) and choose your custom policy (e.g., Disabalecreateprivate&sharedchannel).
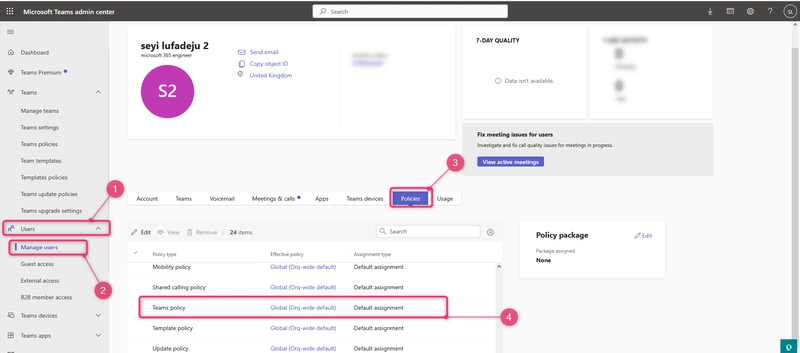
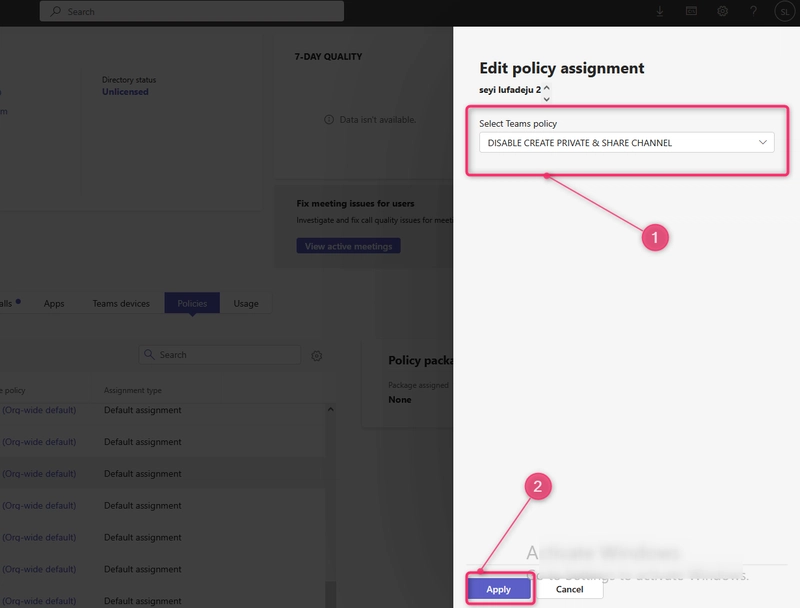
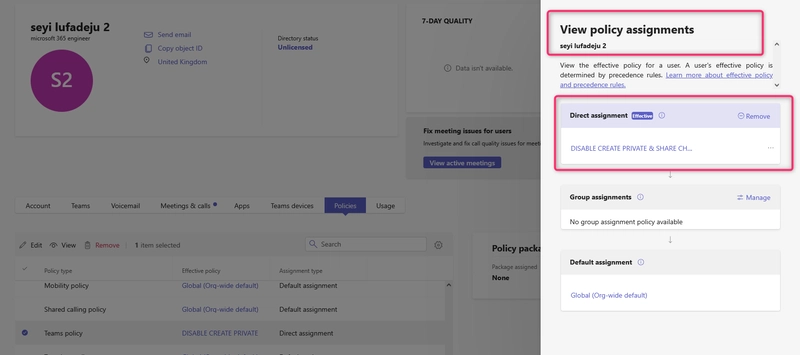
- Click Save.
Alternatively: Use Bulk Edit in the Teams Admin Center to assign policies to multiple users.
2. Delete the User
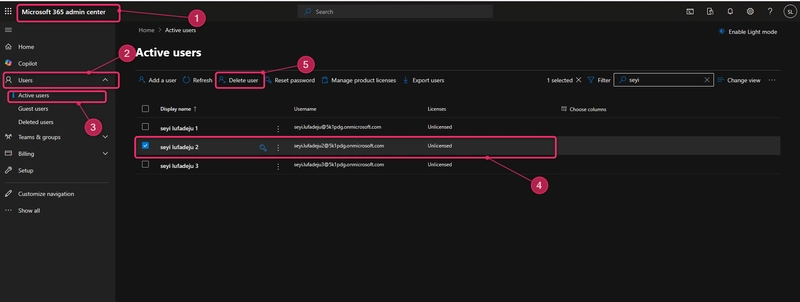
Steps:
- Go to Microsoft 365 Admin Center → Users → Active Users.
- Search for the user (e.g., user@domain.com).
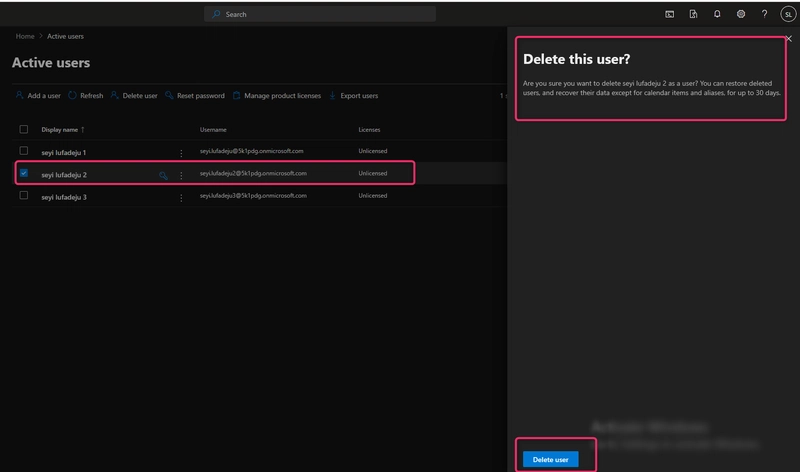
- Select the user and click Delete user.
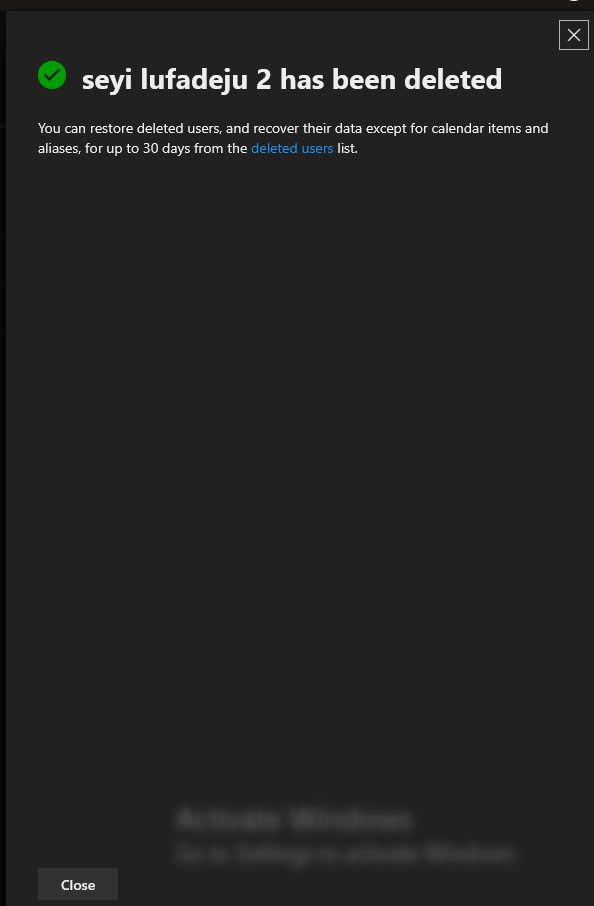
- Confirm deletion. The user will move to Deleted Users for 30 days.
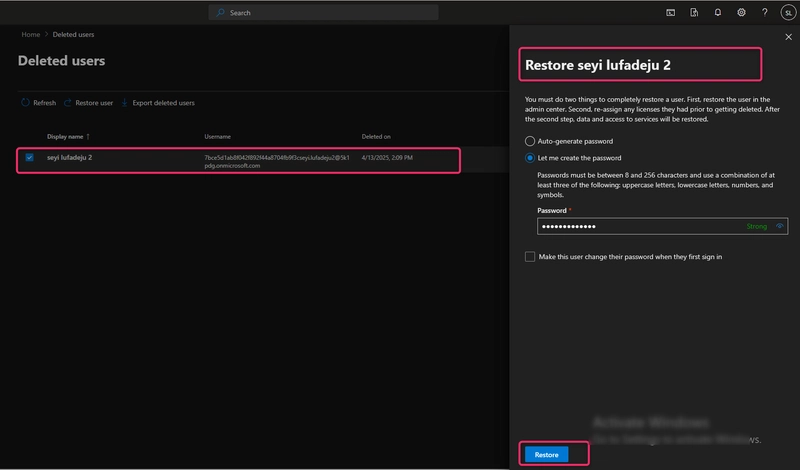
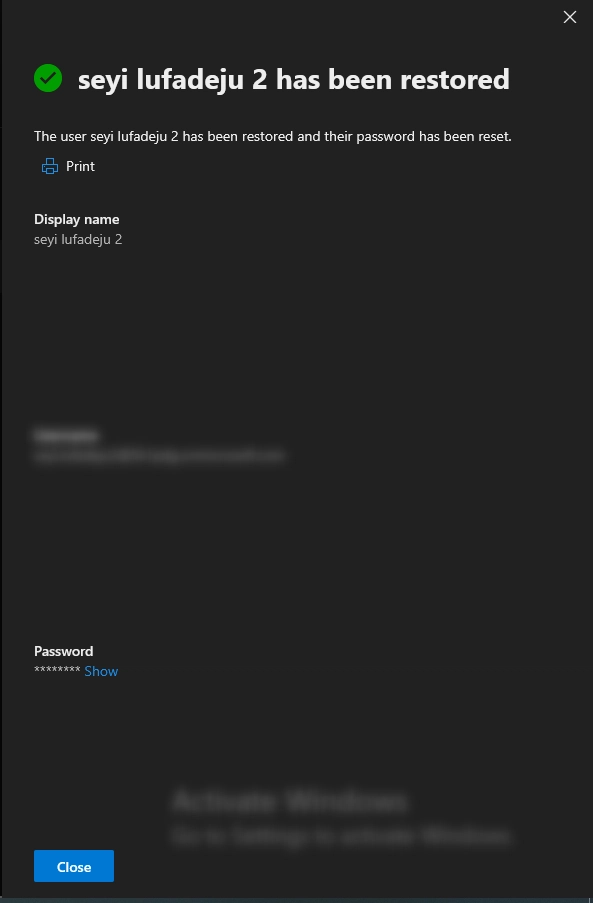
3. Restore the Deleted User
- Steps:
- In the Microsoft 365 Admin Center, go to Users → Deleted Users.
- Find the deleted user and select Restore User.
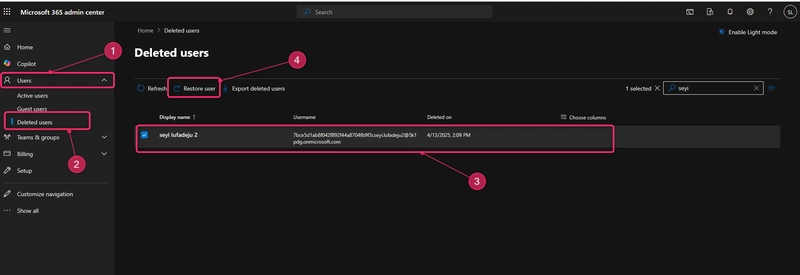
- Follow prompts to restore the account (e.g., reset password, reassign licenses if required).
- Click Restore.
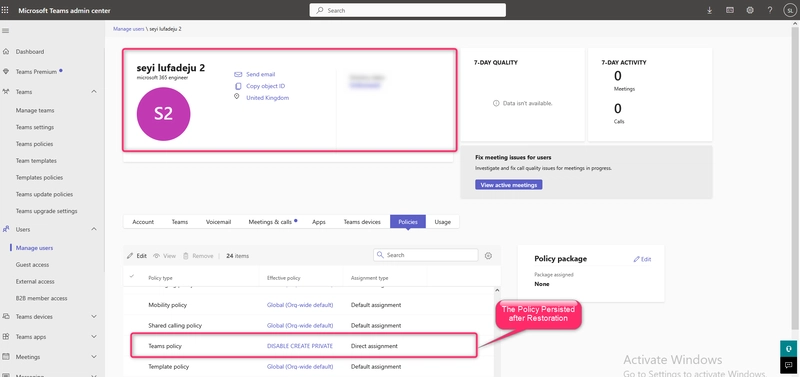
4. Verify Policy Assignment After Restoration
- Steps:
- Return to Microsoft Teams Admin Center → Users → Manage Users.
- Search for the restored user and click their name.
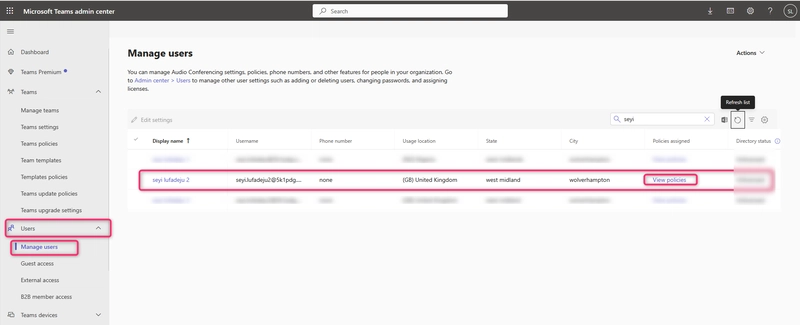
Check the Policies section:
- If the previously assigned policy (e.g., Disabalecreateprivate&sharedchannel) is listed, the policy persisted after restoration.
- If not, the policy reverted to the global/default policy.
CONCLUSION
This guide demonstrates how to test policy persistence for users in Microsoft Teams through deletion and restoration. Key takeaways:
Directly assigned policies do survive user deletion; restored users revert to the directly assigned policies.
For long-term policy management, prioritize group-based assignments to automate policy enforcement and reduce manual reconfiguration. Always test policy behavior during user lifecycle changes to ensure compliance with your organization’s governance standards. Use tools like PowerShell or the Teams Admin Center to audit policies proactively.
By mastering these steps, you can confidently manage Teams users while ensuring policies align with your organization’s evolving needs.