![[Webinar] AI Is Already Inside Your SaaS Stack — Learn How to Prevent the Next Silent Breach](https://blogger.googleusercontent.com/img/b/R29vZ2xl/AVvXsEiOWn65wd33dg2uO99NrtKbpYLfcepwOLidQDMls0HXKlA91k6HURluRA4WXgJRAZldEe1VReMQZyyYt1PgnoAn5JPpILsWlXIzmrBSs_TBoyPwO7hZrWouBg2-O3mdeoeSGY-l9_bsZB7vbpKjTSvG93zNytjxgTaMPqo9iq9Z5pGa05CJOs9uXpwHFT4/s1600/ai-cyber.jpg?#)


![[The AI Show Episode 144]: ChatGPT’s New Memory, Shopify CEO’s Leaked “AI First” Memo, Google Cloud Next Releases, o3 and o4-mini Coming Soon & Llama 4’s Rocky Launch](https://www.marketingaiinstitute.com/hubfs/ep%20144%20cover.png)


![Rogue Company Elite tier list of best characters [April 2025]](https://media.pocketgamer.com/artwork/na-33136-1657102075/rogue-company-ios-android-tier-cover.jpg?#)


_Andreas_Prott_Alamy.jpg?width=1280&auto=webp&quality=80&disable=upscale#)


![Apple Watch Series 10 Back On Sale for $299! [Lowest Price Ever]](https://www.iclarified.com/images/news/96657/96657/96657-640.jpg)
![EU Postpones Apple App Store Fines Amid Tariff Negotiations [Report]](https://www.iclarified.com/images/news/97068/97068/97068-640.jpg)
![Apple Slips to Fifth in China's Smartphone Market with 9% Decline [Report]](https://www.iclarified.com/images/news/97065/97065/97065-640.jpg)


Deploying a Weather Dashboard Application on Azure Kubernetes Service (AKS)
Introduction This documentation outlines the step-by-step process for deploying a sample application, in this case, Weather Dashboard, using Azure cloud services. The goal is to containerize the application, push it to Azure Container Registry (ACR), and deploy it on Azure Kubernetes Service (AKS). This deployment will demonstrate how to manage configurations, secrets, persistent storage, and health checks in a cloud-native environment using Kubernetes best practices Prerequisites: Azure CLI installed and configured kubectl installed and configured to connect to your AKS cluster Docker Installed Basic Understanding of Kubernetes Step 1: Create a Weather Dashboard Application 1. First, create the project structure: mkdir -p weather-dashboard/{public,src,data} cd weather-dashboard 2. Create a file named package.json in this directory: { "name": "weather-dashboard", "version": "1.0.0", "description": "Interactive weather dashboard with persistent storage", "main": "server.js", "scripts": { "start": "node server.js" }, "dependencies": { "express": "^4.18.2", "moment": "^2.29.4", "body-parser": "^1.20.2" } } These are the dependencies required for our application to run 3. Create server.js in the application's root directory: This initializes an Express server that serves the frontend, handles API routes for saving and retrieving weather search history, and reads configuration from environment variables. const express = require('express'); const fs = require('fs'); const path = require('path'); const bodyParser = require('body-parser'); const moment = require('moment'); const app = express(); const port = process.env.PORT || 3000; const dataDir = '/app/data'; // Middleware app.use(express.static('public')); app.use(bodyParser.json()); app.use(bodyParser.urlencoded({ extended: true })); // Read configuration from ConfigMap const apiEndpoint = process.env.WEATHER_API_ENDPOINT || 'https://api.example.com'; const refreshInterval = process.env.REFRESH_INTERVAL || '30'; const defaultCity = process.env.DEFAULT_CITY || 'London'; // Read API key from Secret const apiKey = process.env.WEATHER_API_KEY || 'default-demo-key'; // Ensure data directory exists if (!fs.existsSync(dataDir)) { fs.mkdirSync(dataDir, { recursive: true }); console.log(`Created data directory at ${dataDir}`); } // Initialize history file if it doesn't exist const historyFile = path.join(dataDir, 'search-history.json'); if (!fs.existsSync(historyFile)) { fs.writeFileSync(historyFile, JSON.stringify([], null, 2)); } // API endpoint to get configuration app.get('/api/config', (req, res) => { res.json({ apiEndpoint, refreshInterval, defaultCity, hasApiKey: !!apiKey && apiKey !== 'default-demo-key', serverTime: new Date().toISOString() }); }); // API endpoint to save search app.post('/api/history', (req, res) => { const { city } = req.body; if (!city) { return res.status(400).json({ error: 'City name is required' }); } try { const history = JSON.parse(fs.readFileSync(historyFile, 'utf8')); const newEntry = { city, timestamp: moment().format('YYYY-MM-DD HH:mm:ss') }; history.unshift(newEntry); // Keep only the last 10 entries const updatedHistory = history.slice(0, 10); fs.writeFileSync(historyFile, JSON.stringify(updatedHistory, null, 2)); res.json({ success: true, history: updatedHistory }); } catch (error) { console.error('Error saving to history:', error); res.status(500).json({ error: 'Failed to save search history' }); } }); // API endpoint to get search history app.get('/api/history', (req, res) => { try { const history = JSON.parse(fs.readFileSync(historyFile, 'utf8')); res.json(history); } catch (error) { console.error('Error reading history:', error); res.status(500).json({ error: 'Failed to read search history' }); } }); // Start the server app.listen(port, () => { console.log(`Weather Dashboard running at http://localhost:${port}`); console.log(`API Endpoint: ${apiEndpoint}`); console.log(`Default city: ${defaultCity}`); console.log(`Refresh interval: ${refreshInterval} minutes`); }); 4. Create public/index.html: The main HTML page that provides the structure for the weather dashboard user interface. Weather Dashboard Weather Dashboard Server time: -- Search Current Weather -- --°C -- -- Search History No search history yet Configuration
Introduction
This documentation outlines the step-by-step process for deploying a sample application, in this case, Weather Dashboard, using Azure cloud services. The goal is to containerize the application, push it to Azure Container Registry (ACR), and deploy it on Azure Kubernetes Service (AKS). This deployment will demonstrate how to manage configurations, secrets, persistent storage, and health checks in a cloud-native environment using Kubernetes best practices
Prerequisites:
- Azure CLI installed and configured
- kubectl installed and configured to connect to your AKS cluster
- Docker Installed
- Basic Understanding of Kubernetes
Step 1: Create a Weather Dashboard Application
1. First, create the project structure:
mkdir -p weather-dashboard/{public,src,data}
cd weather-dashboard
2. Create a file named package.json in this directory:
{
  "name": "weather-dashboard",
  "version": "1.0.0",
  "description": "Interactive weather dashboard with persistent storage",
  "main": "server.js",
  "scripts": {
    "start": "node server.js"
  },
  "dependencies": {
    "express": "^4.18.2",
    "moment": "^2.29.4",
    "body-parser": "^1.20.2"
  }
}
These are the dependencies required for our application to run
3. Create server.js in the application's root directory:
This initializes an Express server that serves the frontend, handles API routes for saving and retrieving weather search history, and reads configuration from environment variables.
const express = require('express');
const fs = require('fs');
const path = require('path');
const bodyParser = require('body-parser');
const moment = require('moment');

const app = express();
const port = process.env.PORT || 3000;
const dataDir = '/app/data';

// Middleware
app.use(express.static('public'));
app.use(bodyParser.json());
app.use(bodyParser.urlencoded({ extended: true }));

// Read configuration from ConfigMap
const apiEndpoint = process.env.WEATHER_API_ENDPOINT || 'https://api.example.com';
const refreshInterval = process.env.REFRESH_INTERVAL || '30';
const defaultCity = process.env.DEFAULT_CITY || 'London';

// Read API key from Secret
const apiKey = process.env.WEATHER_API_KEY || 'default-demo-key';

// Ensure data directory exists
if (!fs.existsSync(dataDir)) {
  fs.mkdirSync(dataDir, { recursive: true });
  console.log(`Created data directory at ${dataDir}`);
}

// Initialize history file if it doesn't exist
const historyFile = path.join(dataDir, 'search-history.json');
if (!fs.existsSync(historyFile)) {
  fs.writeFileSync(historyFile, JSON.stringify([], null, 2));
}

// API endpoint to get configuration
app.get('/api/config', (req, res) => {
  res.json({
    apiEndpoint,
    refreshInterval,
    defaultCity,
    hasApiKey: !!apiKey && apiKey !== 'default-demo-key',
    serverTime: new Date().toISOString()
  });
});

// API endpoint to save search
app.post('/api/history', (req, res) => {
  const { city } = req.body;

  if (!city) {
    return res.status(400).json({ error: 'City name is required' });
  }

  try {
    const history = JSON.parse(fs.readFileSync(historyFile, 'utf8'));
    const newEntry = {
      city,
      timestamp: moment().format('YYYY-MM-DD HH:mm:ss')
    };

    history.unshift(newEntry);

    // Keep only the last 10 entries
    const updatedHistory = history.slice(0, 10);

    fs.writeFileSync(historyFile, JSON.stringify(updatedHistory, null, 2));
    res.json({ success: true, history: updatedHistory });
  } catch (error) {
    console.error('Error saving to history:', error);
    res.status(500).json({ error: 'Failed to save search history' });
  }
});

// API endpoint to get search history
app.get('/api/history', (req, res) => {
  try {
    const history = JSON.parse(fs.readFileSync(historyFile, 'utf8'));
    res.json(history);
  } catch (error) {
    console.error('Error reading history:', error);
    res.status(500).json({ error: 'Failed to read search history' });
  }
});

// Start the server
app.listen(port, () => {
  console.log(`Weather Dashboard running at http://localhost:${port}`);
  console.log(`API Endpoint: ${apiEndpoint}`);
  console.log(`Default city: ${defaultCity}`);
  console.log(`Refresh interval: ${refreshInterval} minutes`);
});
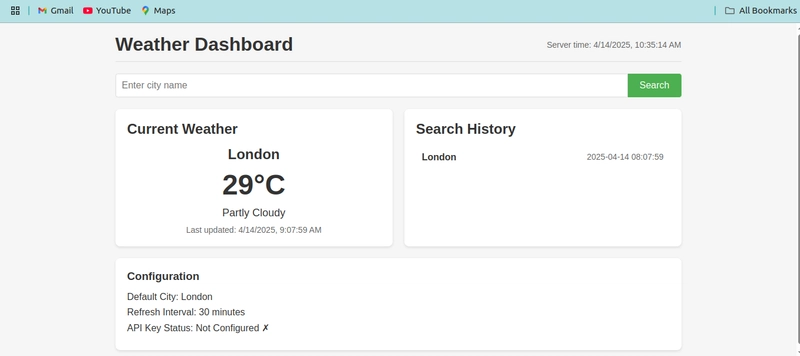
4. Create public/index.html:
The main HTML page that provides the structure for the weather dashboard user interface.
Weather Dashboard
Weather Dashboard
Server time: --
Current Weather
--
--°C
--
--
Search History
No search history yet
Configuration
- Default City: --
- Refresh Interval: -- minutes
- API Key Status: --
5. Create public/styles.css:
Contains all styling rules and layout definitions for making the weather dashboard clean, responsive, and visually appealing.
* {
    box-sizing: border-box;
    margin: 0;
    padding: 0;
    font-family: 'Segoe UI', Tahoma, Geneva, Verdana, sans-serif;
}

body {
    background-color: #f5f5f5;
    color: #333;
}

.container {
    max-width: 1000px;
    margin: 0 auto;
    padding: 20px;
}

header {
    display: flex;
    justify-content: space-between;
    align-items: center;
    margin-bottom: 20px;
    padding-bottom: 10px;
    border-bottom: 1px solid #ddd;
}

.server-info {
    font-size: 14px;
    color: #666;
}

.search-container {
    display: flex;
    margin-bottom: 20px;
}

input {
    flex: 1;
    padding: 10px;
    border: 1px solid #ddd;
    border-radius: 4px 0 0 4px;
    font-size: 16px;
}

button {
    padding: 10px 20px;
    background-color: #4CAF50;
    color: white;
    border: none;
    border-radius: 0 4px 4px 0;
    cursor: pointer;
    font-size: 16px;
    transition: background-color 0.3s;
}

button:hover {
    background-color: #45a049;
}

.dashboard {
    display: grid;
    grid-template-columns: 1fr 1fr;
    gap: 20px;
    margin-bottom: 20px;
}

.current-weather, .search-history, .config-info {
    background-color: white;
    border-radius: 8px;
    padding: 20px;
    box-shadow: 0 2px 4px rgba(0,0,0,0.1);
}

h2, h3 {
    margin-bottom: 15px;
    color: #333;
}

.weather-display {
    text-align: center;
}

#city-name {
    font-size: 24px;
    font-weight: bold;
    margin-bottom: 10px;
}

#temperature {
    font-size: 48px;
    font-weight: bold;
    margin-bottom: 10px;
}

#description {
    font-size: 18px;
    margin-bottom: 10px;
    text-transform: capitalize;
}

#last-updated {
    font-size: 14px;
    color: #666;
}

.config-info ul {
    list-style: none;
}

.config-info li {
    margin-bottom: 8px;
}

#history-list div {
    padding: 10px;
    border-bottom: 1px solid #eee;
    display: flex;
    justify-content: space-between;
}

#history-list div:last-child {
    border-bottom: none;
}

.city-history {
    font-weight: bold;
}

.timestamp {
    color: #666;
    font-size: 14px;
}

@media (max-width: 768px) {
    .dashboard {
        grid-template-columns: 1fr;
    }
}
6. Create public/app.js:
Handles frontend logic: fetching configuration and search history, updating the UI, and simulating weather data responses.
document.addEventListener('DOMContentLoaded', () => {
const cityInput = document.getElementById('city-input');
const searchBtn = document.getElementById('search-btn');
const cityName = document.getElementById('city-name');
const temperature = document.getElementById('temperature');
const description = document.getElementById('description');
const lastUpdated = document.getElementById('last-updated');
const historyList = document.getElementById('history-list');
const serverTime = document.getElementById('server-time');
const defaultCity = document.getElementById('default-city');
const refreshInterval = document.getElementById('refresh-interval');
const apiKeyStatus = document.getElementById('api-key-status');
let config = {};
// Load configuration
fetch('/api/config')
.then(response => response.json())
.then(data => {
config = data;
serverTime.textContent = new Date(data.serverTime).toLocaleString();
defaultCity.textContent = data.defaultCity;
refreshInterval.textContent = data.refreshInterval;
apiKeyStatus.textContent = data.hasApiKey ? 'Configured ✓' : 'Not Configured ✗';
// Load default city
simulateWeatherData(data.defaultCity);
})
.catch(error => console.error('Error loading config:', error));
// Load search history
function loadHistory() {
fetch('/api/history')
.then(response => response.json())
.then(history => {
if (history.length === 0) {
historyList.innerHTML = 'No search history yet';
return;
}
historyList.innerHTML = '';
history.forEach(entry => {
const historyItem = document.createElement('div');
historyItem.innerHTML = `
${entry.city}
`;
historyList.appendChild(historyItem);
// Make history items clickable
historyItem.addEventListener('click', () => {
simulateWeatherData(entry.city);
});
});
})
.catch(error => console.error('Error loading history:', error));
}
loadHistory();
// Simulate weather data (in a real app, this would call an actual weather API)
function simulateWeatherData(city) {
// Update UI immediately
cityName.textContent = city;
const randomTemp = Math.floor(Math.random() * 35 - 5);
temperature.textContent = `${randomTemp}°C`;
const weatherTypes = ['Sunny', 'Cloudy', 'Rainy', 'Partly Cloudy', 'Snowy', 'Windy'];
const randomWeather = weatherTypes[Math.floor(Math.random() * weatherTypes.length)];
description.textContent = randomWeather;
lastUpdated.textContent = `Last updated: ${new Date().toLocaleString()}`;
// Save to history
fetch('/api/history', {
method: 'POST',
headers: {
'Content-Type': 'application/json',
},
body: JSON.stringify({ city })
})
.then(response => response.json())
.then(() => {
loadHistory();
})
.catch(error => console.error('Error saving history:', error));
}
// Search button click event
searchBtn.addEventListener('click', () => {
const city = cityInput.value.trim();
if (city) {
simulateWeatherData(city);
cityInput.value = '';
}
});
// Enter key event
cityInput.addEventListener('keypress', (e) => {
if (e.key === 'Enter') {
const city = cityInput.value.trim();
if (city) {
simulateWeatherData(city);
cityInput.value = '';
}
}
});
// Set up refresh interval
setInterval(() => {
fetch('/api/config')
.then(response => response.json())
.then(data => {
serverTime.textContent = new Date(data.serverTime).toLocaleString();
});
}, 30000); // Update server time every 30 seconds
});
Step 2: Create Dockerfile
Create a Dockerfile in the root of the project:
# Choose a compatible base Image
FROM node:18-alpine

WORKDIR /app

# Copy package.json and package-lock.json files
COPY package*.json ./

# Install dependencies
RUN npm install

# Copy the rest of the application code
COPY . .

# Create the data directory for persistent storage
RUN mkdir -p /app/data && \
    chmod 777 /app/data

# Expose the port the app will run on
EXPOSE 3000

# Start the application
CMD ["node", "server.js"]
Step 3: Build and Push Image to ACR
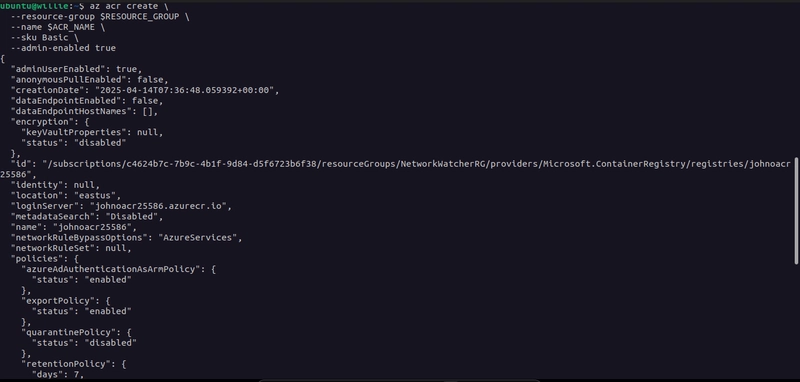
- Connect to Azure and your ACR:
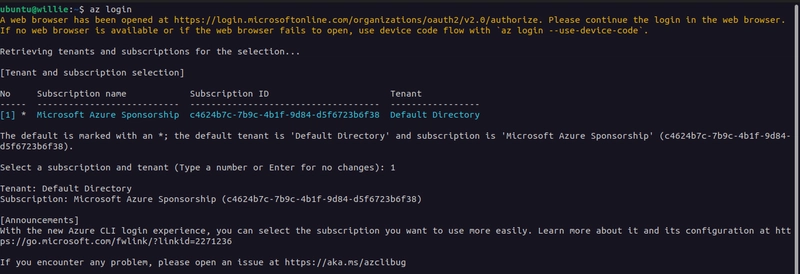
# Login to Azure
az login

# Set environment variables for ACR
RESOURCE_GROUP="
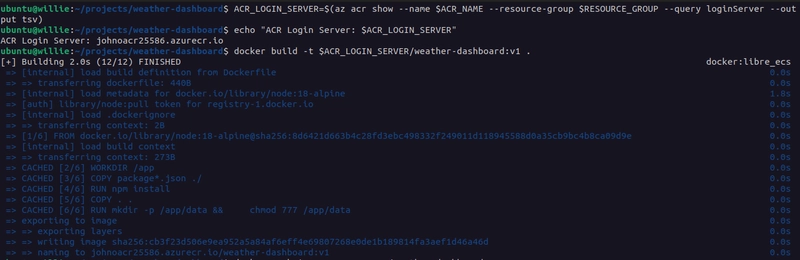
- Build and tag the Docker image:
# Build and tag the image
docker build -t $ACR_LOGIN_SERVER/weather-dashboard:v1 .
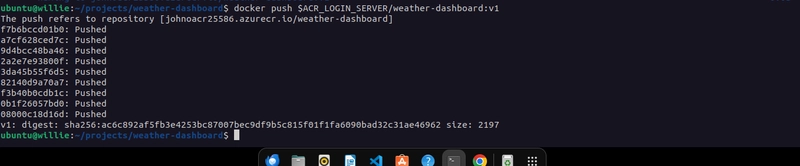
# Push the image to ACR
docker push $ACR_LOGIN_SERVER/weather-dashboard:v1
- Verify the image was pushed successfully:
# List repositories in ACR
az acr repository list --name $ACR_NAME --output table

# List tags for the specific repository
az acr repository show-tags --name $ACR_NAME --repository weather-dashboard --output table
Step 4: Create Kubernetes Manifests
Create a directory for Kubernetes manifests:
mkdir -p k8s

cd k8s
- Create configmap.yaml:
apiVersion: v1
kind: ConfigMap
metadata:
  name: weather-dashboard-config
data:
  WEATHER_API_ENDPOINT: "https://api.weatherapi.com/v1"
  REFRESH_INTERVAL: "15"
  DEFAULT_CITY: "New York"
  LOG_LEVEL: "info"
This YAML configuration defines a ConfigMap in Kubernetes, which stores key-value pairs that can be used by applications running in the cluster. It sets configuration data for our weather dashboard, including the weather API endpoint, refresh interval, default city, and log level.
- Create secret.yaml:
apiVersion: v1
kind: Secret
metadata:
  name: weather-dashboard-secret
type: Opaque
data:
  # Base64 encoded "demo-api-key-12345"
  WEATHER_API_KEY: ZGVtby1hcGkta2V5LTEyMzQ1
This configuration defines a Secret in Kubernetes, which securely stores the API keys for our application in an encoded format. In this case, it stores the API key for accessing the weather service, which is base64-encoded for security purposes.
To encode a string in Base64 on a Linux or macOS system, you can use the following command:
echo -n "your_string_here" | base64
- Create persistent-volume.yaml:
apiVersion: v1
kind: PersistentVolumeClaim
metadata:
  name: weather-dashboard-pvc
spec:
  accessModes:
    - ReadWriteOnce
  resources:
    requests:
      storage: 1Gi
This Configuration defines a PersistentVolumeClaim (PVC) in Kubernetes, which is used to request storage resources for an application. In this case, the PVC is requesting 1Gi of storage with the access mode set to ReadWriteOnce, meaning it can be read and written to by a single node at a time.
- Create deployment.yaml:
apiVersion: apps/v1
kind: Deployment
metadata:
  name: weather-dashboard
  labels:
    app: weather-dashboard
spec:
  replicas: 2
  selector:
    matchLabels:
      app: weather-dashboard
  template:
    metadata:
      labels:
        app: weather-dashboard
    spec:
      # Target the application pool using the node selector
      nodeSelector:
        agentpool: applicationpool
      containers:
      - name: weather-dashboard
        image: ACR_LOGIN_SERVER/weather-dashboard:v1
        ports:
        - containerPort: 3000
        env:
        # Load ConfigMap values
        - name: WEATHER_API_ENDPOINT
          valueFrom:
            configMapKeyRef:
              name: weather-dashboard-config
              key: WEATHER_API_ENDPOINT
        - name: REFRESH_INTERVAL
          valueFrom:
            configMapKeyRef:
              name: weather-dashboard-config
              key: REFRESH_INTERVAL
        - name: DEFAULT_CITY
          valueFrom:
            configMapKeyRef:
              name: weather-dashboard-config
              key: DEFAULT_CITY
        - name: LOG_LEVEL
          valueFrom:
            configMapKeyRef:
              name: weather-dashboard-config
              key: LOG_LEVEL
        # Load Secret values
        - name: WEATHER_API_KEY
          valueFrom:
            secretKeyRef:
              name: weather-dashboard-secret
              key: WEATHER_API_KEY
        volumeMounts:
        - name: data-volume
          mountPath: /app/data
        resources:
          requests:
            memory: "128Mi"
            cpu: "100m"
          limits:
            memory: "256Mi"
            cpu: "200m"
        livenessProbe:
          httpGet:
            path: /
            port: 3000
          initialDelaySeconds: 15
          periodSeconds: 20
        readinessProbe:
          httpGet:
            path: /api/config
            port: 3000
          initialDelaySeconds: 5
          periodSeconds: 10
      volumes:
      - name: data-volume
        persistentVolumeClaim:
          claimName: weather-dashboard-pvc
This Deployment file runs two instances of the weather-dashboard application, pulling configuration and secret values from ConfigMap and Secret resources provisioned above. It also uses persistent storage, defines resource limits, and performs health checks to ensure the app is running smoothly.
- Create service.yaml:
apiVersion: v1
kind: Service
metadata:
  name: weather-dashboard-service
spec:
  selector:
    app: weather-dashboard
  type: NodePort
  ports:
  - port: 80
    targetPort: 3000
    nodePort: 30080  # Specifying a nodePort in the range 30000-32767
This Kubernetes Service file defines a NodePort type service that exposes the weather-dashboard app on port 80, redirecting traffic to the app's internal port 3000. It uses the nodePort 30080 to allow external access to the service through the cluster nodes' IP addresses within the specified port range (30000-32767).
Step 5: Configure AKS to Access ACR
Ensure your AKS cluster has permissions to pull images from your ACR:
# Get the AKS cluster name
AKS_CLUSTER_NAME="yourAKSClusterName"

# Get the AKS Managed Identity ID
AKS_MANAGED_ID=$(az aks show -g $RESOURCE_GROUP -n $AKS_CLUSTER_NAME --query identityProfile.kubeletidentity.objectId -o tsv)

# Assign the AcrPull role to the AKS cluster
az role assignment create \
  --assignee $AKS_MANAGED_ID \
  --role AcrPull \
  --scope $(az acr show --name $ACR_NAME --resource-group $RESOURCE_GROUP --query id --output tsv)

echo "Role assignment created for AKS to pull from ACR"
Step 6: Deploy the Application
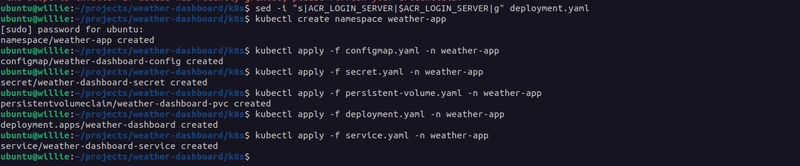
Before applying the manifests, make sure to update the ACR login server in the deployment file:
# Replace ACR_LOGIN_SERVER placeholder with your actual ACR login server
sed -i "s|ACR_LOGIN_SERVER|$ACR_LOGIN_SERVER|g" deployment.yaml
Now apply all Kubernetes manifests:
# Create namespace (optional)
kubectl create namespace weather-app

# Apply all resources
kubectl apply -f configmap.yaml -n weather-app
kubectl apply -f secret.yaml -n weather-app
kubectl apply -f persistent-volume.yaml -n weather-app
kubectl apply -f deployment.yaml -n weather-app
kubectl apply -f service.yaml -n weather-app

# Verify the resources were created
kubectl get all -n weather-app
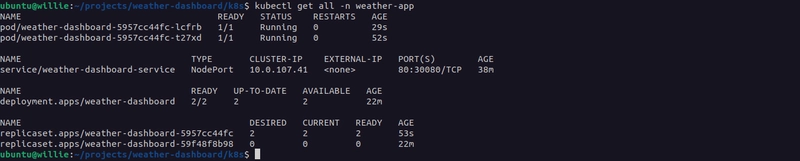
Step 7: Verify the Deployment
Check all resources
# Check all resources in the namespace
kubectl get all -n weather-app

# Check ConfigMap
kubectl get configmap weather-dashboard-config -n weather-app -o yaml

# Check Secret (note: values will be base64 encoded)
kubectl get secret weather-dashboard-secret -n weather-app -o yaml

# Check PVC
kubectl get pvc weather-dashboard-pvc -n weather-app
Access the application
Since we're using NodePort, you can access the application through any node's IP on the specified port (30080):
# Get nodes' external IPs
kubectl get nodes -o wide

# Get the NodePort service details
kubectl get svc weather-dashboard-service -n weather-app
You can access the application by navigating to http://:30080 in your browser.
Troubleshooting(Optional)
If your application was not successfully deployed, follow these steps to diagnose and resolve common issues:
Using kubectl describe
# Describe a pod to get detailed information
POD_NAME=$(kubectl get pods -n weather-app -l app=weather-dashboard -o jsonpath="{.items[0].metadata.name}")
kubectl describe pod $POD_NAME -n weather-app

# Describe the deployment
kubectl describe deployment weather-dashboard -n weather-app

# Describe the service
kubectl describe service weather-dashboard-service -n weather-app

# Describe the PVC to check if it's bound properly
kubectl describe pvc weather-dashboard-pvc -n weather-app
Using kubectl logs
# View logs from a pod
kubectl logs $POD_NAME -n weather-app

# Follow logs in real-time
kubectl logs -f $POD_NAME -n weather-app

# If there are multiple containers in the pod, specify the container name
kubectl logs $POD_NAME -c weather-dashboard -n weather-app
Using kubectl exec
# Execute commands inside a pod
kubectl exec $POD_NAME -n weather-app -- ls -la /app/data

# Get an interactive shell
kubectl exec -it $POD_NAME -n weather-app -- /bin/sh

# Inside the container, you can check:
# - Environment variables
env | grep WEATHER
# - Check if data directory is writable
touch /app/data/test.txt
ls -la /app/data
# - Check application processes
ps aux
# - Check network connectivity
wget -O- localhost:3000/api/config
Step 9: Troubleshooting Common Issues
Image Pull Issues
If pods are stuck in ImagePullBackOff or ErrImagePull status:
# Check pod events
kubectl describe pod $POD_NAME -n weather-app

# Verify that ACR contains the image
az acr repository show --name $ACR_NAME --repository weather-dashboard

# Check if the AKS cluster has permissions to pull from ACR
az role assignment list \
  --assignee $AKS_MANAGED_ID \
  --scope $(az acr show --name $ACR_NAME --resource-group $RESOURCE_GROUP --query id --output tsv)
Volume Mount Issues
If there are persistent volume issues:
# Check if PVC is bound
kubectl get pvc -n weather-app

# Check pod events for volume-related errors
kubectl describe pod $POD_NAME -n weather-app | grep -A 10 Events:

# Check if the storage class exists and is default
kubectl get storageclass

# Check if the volume is correctly mounted
kubectl exec $POD_NAME -n weather-app -- df -h
Application Issues
If the application is running but not working correctly:
# Check logs for application errors
kubectl logs $POD_NAME -n weather-app

# Test the API endpoints
kubectl exec $POD_NAME -n weather-app -- wget -O- localhost:3000/api/config

# Check if the ConfigMap values are loaded as environment variables
kubectl exec $POD_NAME -n weather-app -- env | grep WEATHER

# Check if the data directory is accessible and writable
kubectl exec $POD_NAME -n weather-app -- touch /app/data/test.txt
kubectl exec $POD_NAME -n weather-app -- ls -la /app/data
Node Selector Issues
If pods are not scheduled on the application pool:
# Check if nodes have the correct labels
kubectl get nodes --show-labels

# Verify the node selector in the deployment
kubectl get deployment weather-dashboard -n weather-app -o jsonpath='{.spec.template.spec.nodeSelector}'

# Check pod events for scheduling issues
kubectl describe pod $POD_NAME -n weather-app
Step 10: Scaling and Updates
Scale the deployment
# Scale to more replicas
kubectl scale deployment weather-dashboard -n weather-app --replicas=3

# Check the scaling status
kubectl get pods -n weather-app -l app=weather-dashboard
Update the application
If you need to update the application:
Build and push a new image version:
docker build -t $ACR_LOGIN_SERVER/weather-dashboard:v2 .
docker push $ACR_LOGIN_SERVER/weather-dashboard:v2
Update the deployment:
kubectl set image deployment/weather-dashboard -n weather-app weather-dashboard=$ACR_LOGIN_SERVER/weather-dashboard:v2
Monitor the rollout:
kubectl rollout status deployment/weather-dashboard -n weather-app
Final Verification
Perform a final verification of all components:
# Check all resources
kubectl get all -n weather-app

# Verify that ConfigMap data is accessible
kubectl exec $POD_NAME -n weather-app -- env | grep WEATHER

# Verify that the API is working
NODE_IP=$(kubectl get nodes -o jsonpath='{.items[0].status.addresses[?(@.type=="ExternalIP")].address}')
curl http://$NODE_IP:30080/api/config

# Check that the persistent volume is working
kubectl exec $POD_NAME -n weather-app -- cat /app/data/search-history.json
Cleanup
When you're done with the deployment, you can clean up the resources:
kubectl delete -f service.yaml -n weather-app
kubectl delete -f deployment.yaml -n weather-app
kubectl delete -f persistent-volume.yaml -n weather-app
kubectl delete -f secret.yaml -n weather-app
kubectl delete -f configmap.yaml -n weather-app

# Or delete everything in the namespace
kubectl delete namespace weather-app
Conclusion
By following this guide, you have successfully deployed the Weather Dashboard application to AKS using images stored in ACR. You've also learned how to configure environment variables with ConfigMaps and Secrets, manage storage with PersistentVolumeClaims, and ensure application reliability with readiness and liveness probes. This setup serves as a solid foundation for building scalable and secure cloud-native applications on Azure.