![[The AI Show Episode 142]: ChatGPT’s New Image Generator, Studio Ghibli Craze and Backlash, Gemini 2.5, OpenAI Academy, 4o Updates, Vibe Marketing & xAI Acquires X](https://www.marketingaiinstitute.com/hubfs/ep%20142%20cover.png)


![From drop-out to software architect with Jason Lengstorf [Podcast #167]](https://cdn.hashnode.com/res/hashnode/image/upload/v1743796461357/f3d19cd7-e6f5-4d7c-8bfc-eb974bc8da68.png?#)


.png?#)


_Christophe_Coat_Alamy.jpg?#)


.webp?#)


![Apple Considers Delaying Smart Home Hub Until 2026 [Gurman]](https://www.iclarified.com/images/news/96946/96946/96946-640.jpg)
![iPhone 17 Pro Won't Feature Two-Toned Back [Gurman]](https://www.iclarified.com/images/news/96944/96944/96944-640.jpg)
![Tariffs Threaten Apple's $999 iPhone Price Point in the U.S. [Gurman]](https://www.iclarified.com/images/news/96943/96943/96943-640.jpg)


Deploying A Three Tier Application In AWS Cloud - A Complete WalkThrough
PART-1 1. Understanding the Architecture The AWS three-tier architecture consists of: Presentation Tier: Frontend layer, typically a web server. Application Tier: Backend logic and processing. Database Tier: Data storage and management. 2. Clone the Code from GitHub Repository To get started, clone the repository using the following command: git clone https://github.com/aws-samples/aws-three-tier-web-architecture-workshop?tab=readme-ov-file 3. Create an S3 Bucket (Global) Why choose a particular region? Billing Considerations: Costs may vary by region. Latency Optimization: Choosing the nearest region reduces delay. Steps to create an S3 bucket: Navigate to the S3 service in the AWS Management Console. Click "Create Bucket." Provide a unique name and choose the preferred AWS region. Keep default settings unless specific configurations are needed. Click "Create Bucket." 4. IAM EC2 Instance Role Creation Entry Point AWS IAM roles define permissions to allow services to communicate securely. Roles are preferable over users for automated access management. Three Types of IAM Policies: AWS Managed Policy: Predefined policies by AWS. Customer Managed Policy: Policies created and managed by the user. Inline Policy: Directly assigned to a specific user or role. Why are we creating an IAM Role? To enable EC2 to access S3 and other AWS services securely. We follow the Principle of Least Privilege, granting only necessary permissions instead of full administrator access. Steps to Create an IAM Role: Go to the AWS IAM Dashboard. Select Roles and click Create Role. Choose EC2 as the trusted entity. Attach the following AWS Managed Policies: AmazonSSMManagedInstanceCore AmazonS3ReadOnlyAccess Name the role and create it. PART-2 1.VPC Creation Navigate to the VPC dashboard in the AWS console and go to Your VPCs on the left-hand side. Ensure VPC only is selected and fill out the VPC Settings with a Name tag and a CIDR range of your choice. Note: Ensure you deploy all resources in the same region for consistency. Note: Choose a CIDR range that allows at least 6 subnets. VPC Configuration 2.Subnet Creation Navigate to Subnets on the left side of the dashboard and click Create Subnet. We need six subnets across two availability zones. Three subnets in one AZ, three in another AZ, each corresponding to a three-tier architecture. Note: Naming conventions help distinguish subnet purposes. Note: CIDR ranges of subnets must be subsets of the VPC CIDR range. Subnet Configuration 3.Internet Gateway To allow public subnets internet access, create an Internet Gateway: Navigate to Internet Gateway on the left side of the VPC dashboard. Create a gateway by providing a Name and clicking Create Internet Gateway. Attach it to the VPC created in VPC and Subnet Creation. Internet Gateway Configuration 4.Security Groups Security groups define traffic rules for ELBs and EC2 instances. Public Load Balancer Security Group: Add Inbound Rule for HTTP traffic (your IP). Public Instance Security Group: Allow HTTP traffic from the Public Load Balancer Security Group. Allow HTTP traffic from your IP. Internal Load Balancer Security Group: Allow HTTP traffic from the Public Instance Security Group. Private Instance Security Group: Allow TCP traffic on port 4000 from the Internal Load Balancer Security Group. Allow port 4000 from your IP. Private Database Security Group: Allow MySQL/Aurora traffic (port 3306) from the Private Instance Security Group. Security Group Configuration 5.NAT Gateway To enable private subnet instances to access the internet: Deploy one NAT Gateway in each public subnet. Allocate an Elastic IP for each NAT Gateway. NAT Gateway Configuration 6.Route Table Public Route Table Navigate to Route Tables in the VPC dashboard. Create a Route Table for public subnets. Add a route directing internet traffic to the Internet Gateway. Associate it with Public Web Subnets. Public Route Table Configuration Private Route Table Create two route tables (one per AZ) for private app layer subnets. Add routes directing external traffic to the NAT Gateway. Associate each table with the respective private app subnets. Private Route Table Configuration PART-3 1.Subnet Groups Navigate to the RDS dashboard in the AWS console and click on Subnet groups on the left-hand side. Click Create DB subnet group. Give your subnet group a name, description, and choose the VPC we created. When adding subnets, make sure to add the subnets we created in each availability zone specifically for our database layer. You may have to navigate back to t
PART-1
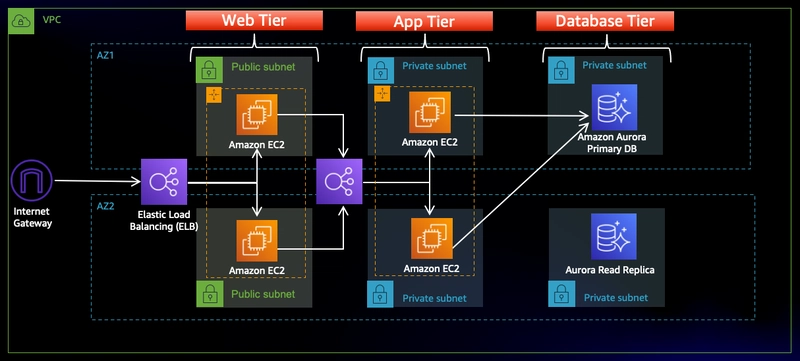
1. Understanding the Architecture
The AWS three-tier architecture consists of:
- Presentation Tier: Frontend layer, typically a web server.
- Application Tier: Backend logic and processing.
- Database Tier: Data storage and management.
2. Clone the Code from GitHub Repository
To get started, clone the repository using the following command:
git clone https://github.com/aws-samples/aws-three-tier-web-architecture-workshop?tab=readme-ov-file
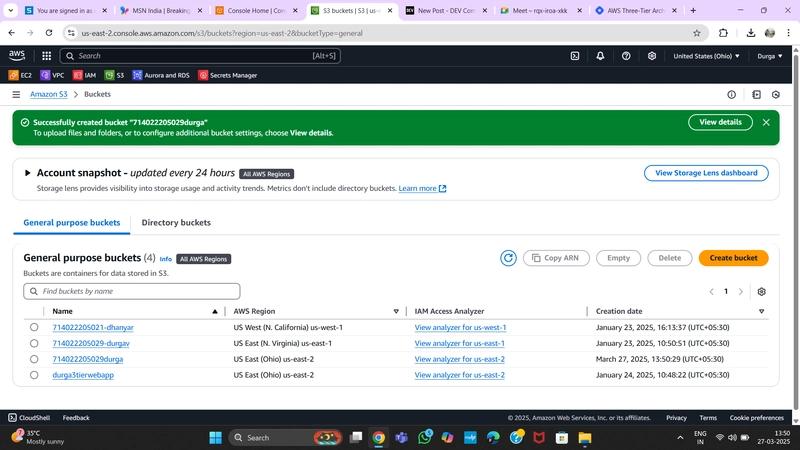
3. Create an S3 Bucket (Global)
Why choose a particular region?
- Billing Considerations: Costs may vary by region.
- Latency Optimization: Choosing the nearest region reduces delay.
Steps to create an S3 bucket:
- Navigate to the S3 service in the AWS Management Console.
- Click "Create Bucket."
- Provide a unique name and choose the preferred AWS region.
- Keep default settings unless specific configurations are needed.
- Click "Create Bucket."
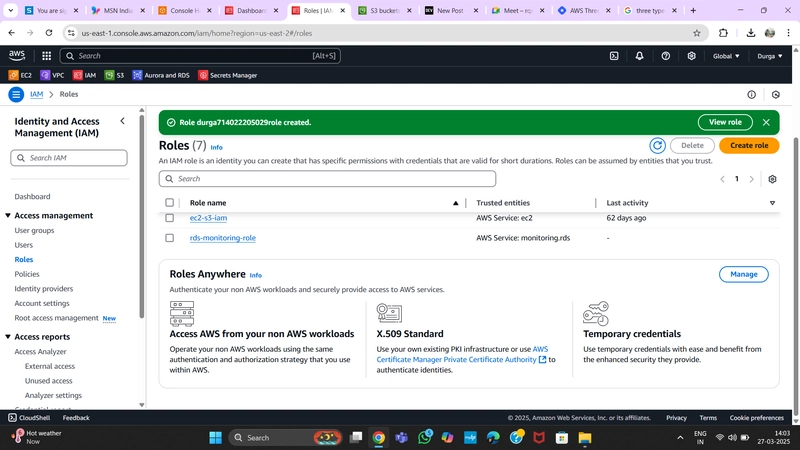
4. IAM EC2 Instance Role Creation
Entry Point
- AWS IAM roles define permissions to allow services to communicate securely.
- Roles are preferable over users for automated access management.
Three Types of IAM Policies:
- AWS Managed Policy: Predefined policies by AWS.
- Customer Managed Policy: Policies created and managed by the user.
- Inline Policy: Directly assigned to a specific user or role.
Why are we creating an IAM Role?
- To enable EC2 to access S3 and other AWS services securely.
- We follow the Principle of Least Privilege, granting only necessary permissions instead of full administrator access.
Steps to Create an IAM Role:
- Go to the AWS IAM Dashboard.
- Select Roles and click Create Role.
- Choose EC2 as the trusted entity.
- Attach the following AWS Managed Policies:
AmazonSSMManagedInstanceCoreAmazonS3ReadOnlyAccess
- Name the role and create it.
PART-2
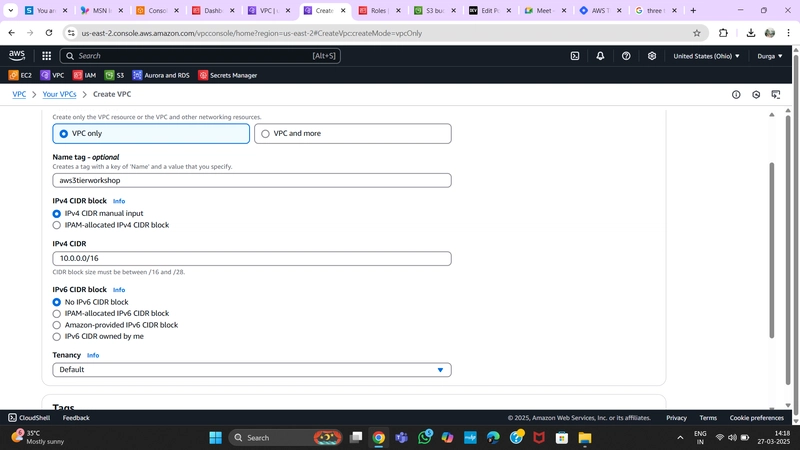
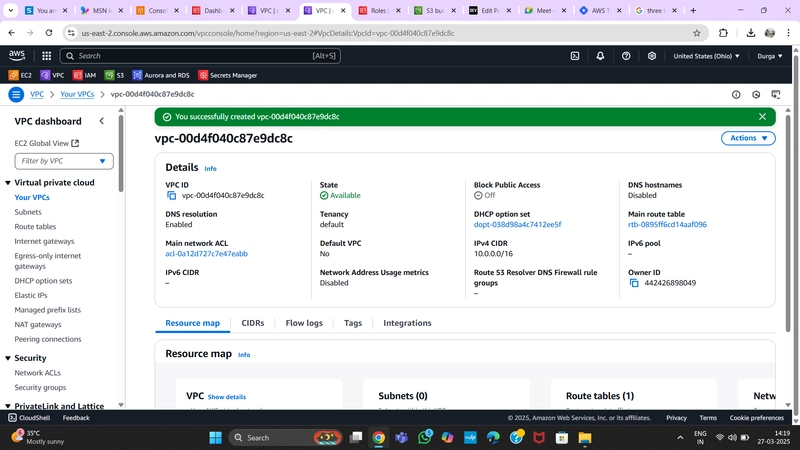
1.VPC Creation
Navigate to the VPC dashboard in the AWS console and go to Your VPCs on the left-hand side.
- Ensure VPC only is selected and fill out the VPC Settings with a Name tag and a CIDR range of your choice.
- Note: Ensure you deploy all resources in the same region for consistency.
- Note: Choose a CIDR range that allows at least 6 subnets.
VPC Configuration
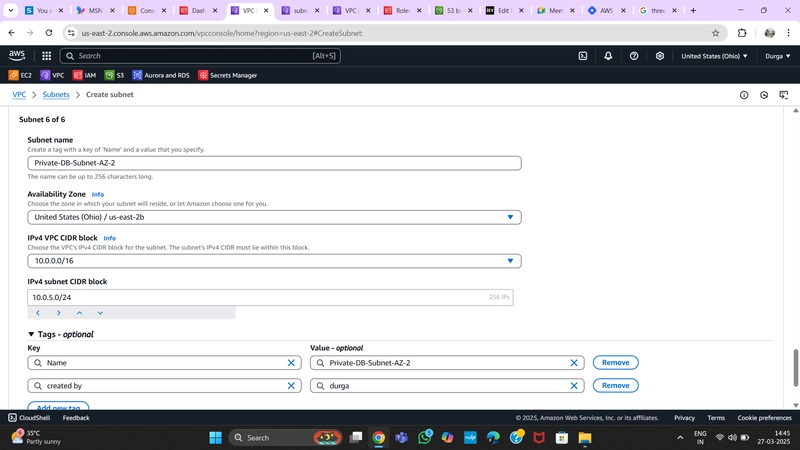
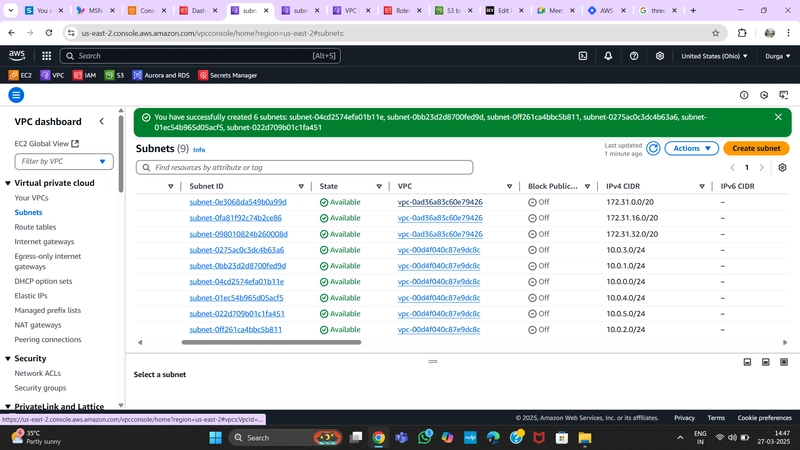
2.Subnet Creation
Navigate to Subnets on the left side of the dashboard and click Create Subnet.
- We need six subnets across two availability zones.
- Three subnets in one AZ, three in another AZ, each corresponding to a three-tier architecture.
- Note: Naming conventions help distinguish subnet purposes.
- Note: CIDR ranges of subnets must be subsets of the VPC CIDR range.
Subnet Configuration

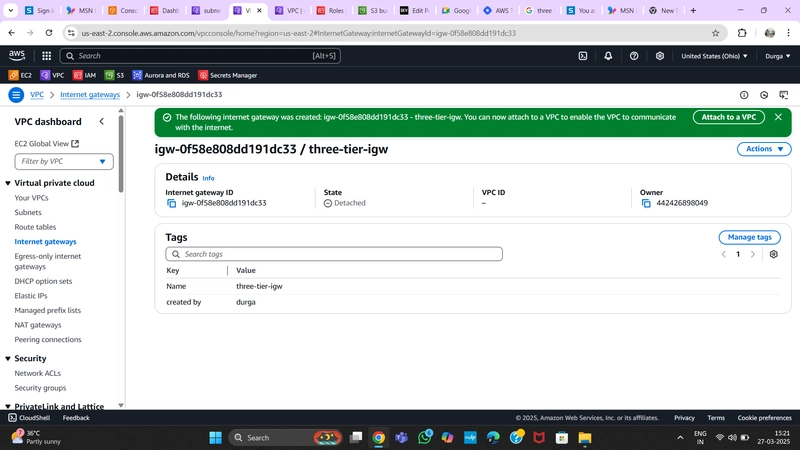
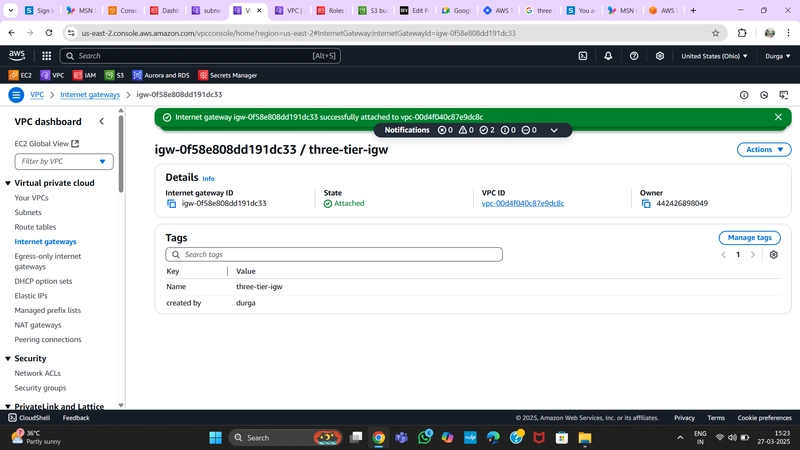
3.Internet Gateway
To allow public subnets internet access, create an Internet Gateway:
- Navigate to Internet Gateway on the left side of the VPC dashboard.
- Create a gateway by providing a Name and clicking Create Internet Gateway.
- Attach it to the VPC created in VPC and Subnet Creation.
Internet Gateway Configuration
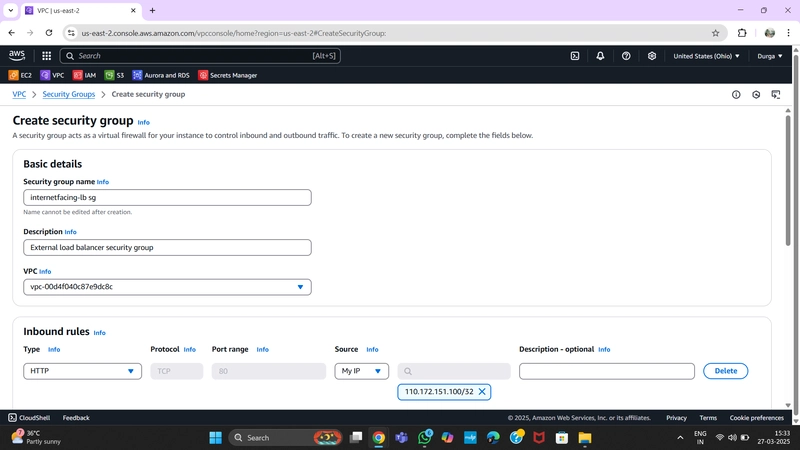
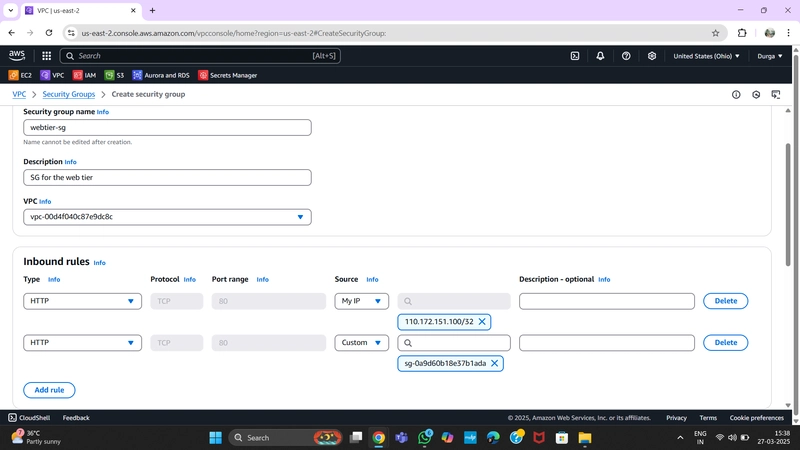
4.Security Groups
Security groups define traffic rules for ELBs and EC2 instances.
-
Public Load Balancer Security Group:
- Add Inbound Rule for HTTP traffic (your IP).
-
Public Instance Security Group:
- Allow HTTP traffic from the Public Load Balancer Security Group.
- Allow HTTP traffic from your IP.
-
Internal Load Balancer Security Group:
- Allow HTTP traffic from the Public Instance Security Group.
-
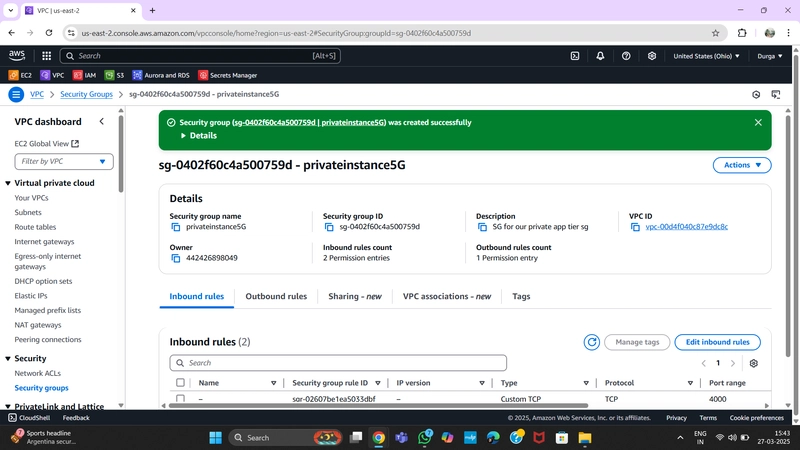
Private Instance Security Group:
- Allow TCP traffic on port 4000 from the Internal Load Balancer Security Group.
- Allow port 4000 from your IP.
-
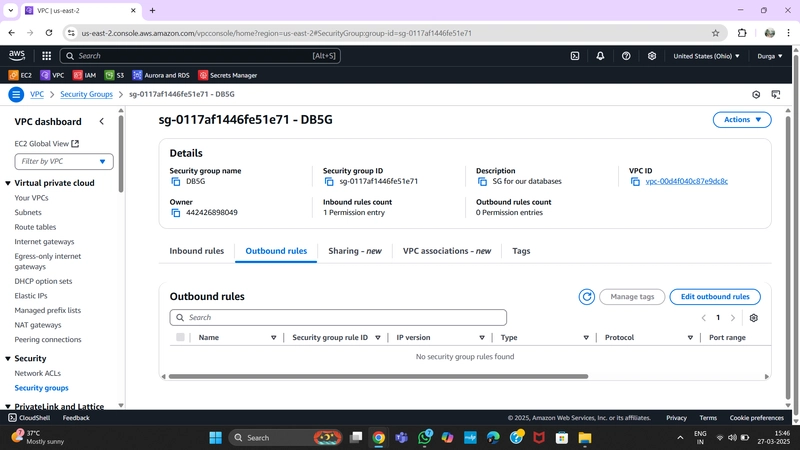
Private Database Security Group:
- Allow MySQL/Aurora traffic (port 3306) from the Private Instance Security Group.
Security Group Configuration

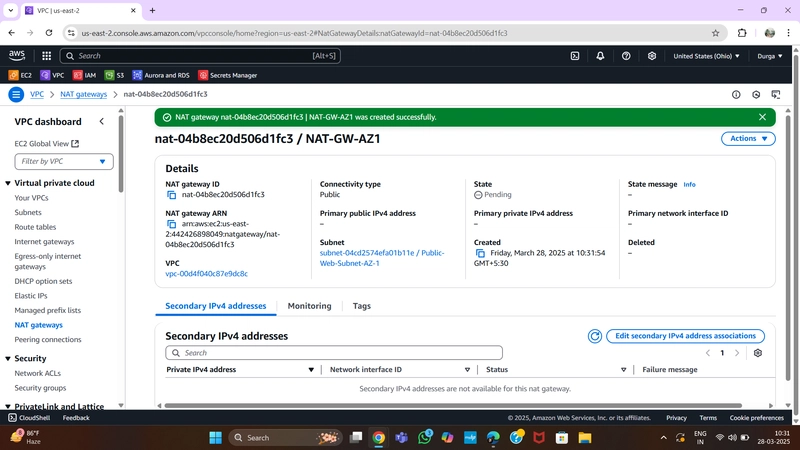
5.NAT Gateway
To enable private subnet instances to access the internet:
- Deploy one NAT Gateway in each public subnet.
- Allocate an Elastic IP for each NAT Gateway.
NAT Gateway Configuration
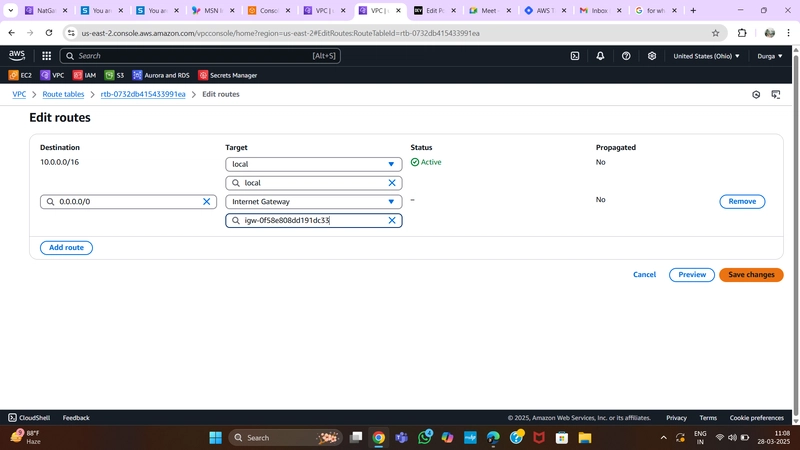
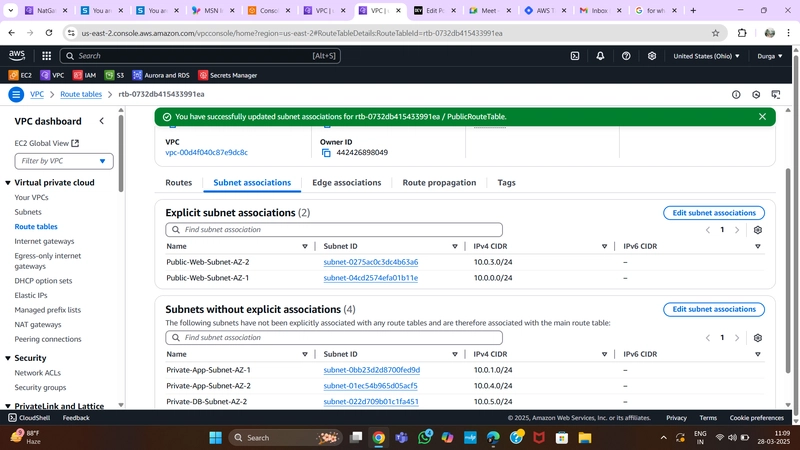
6.Route Table
Public Route Table
- Navigate to Route Tables in the VPC dashboard.
- Create a Route Table for public subnets.
- Add a route directing internet traffic to the Internet Gateway.
- Associate it with Public Web Subnets.
Public Route Table Configuration

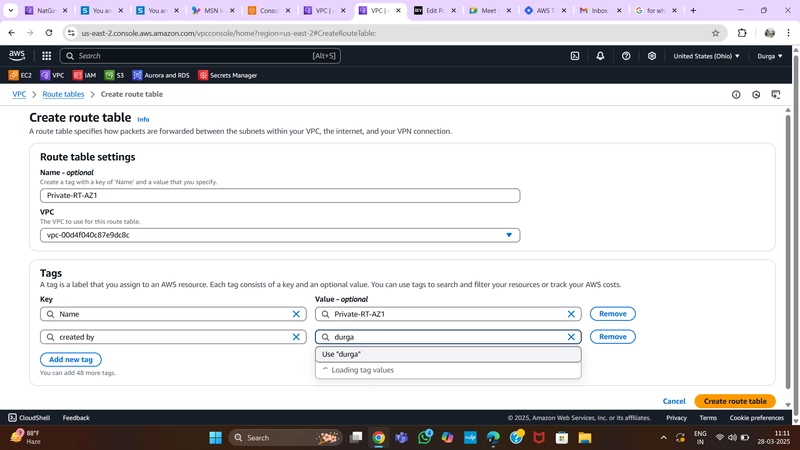
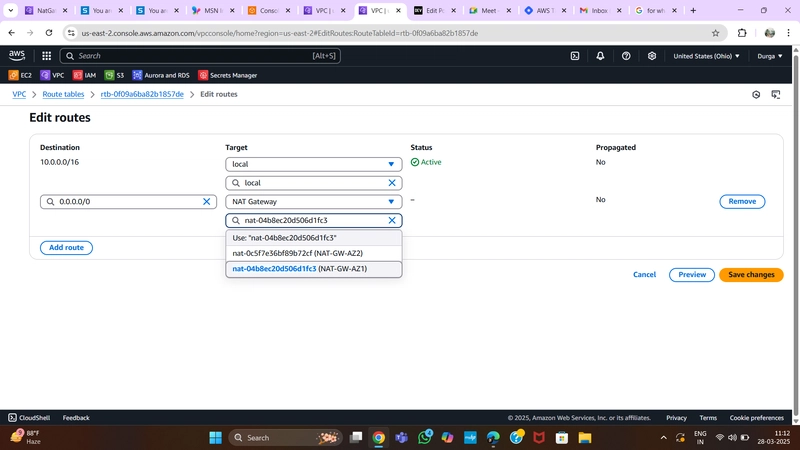
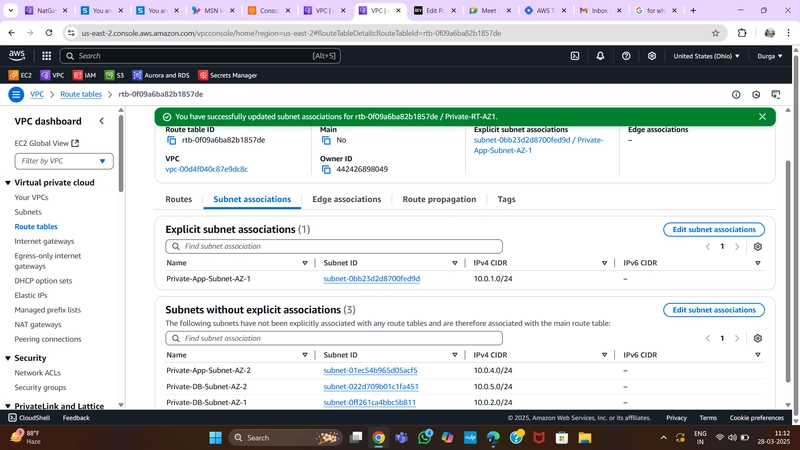
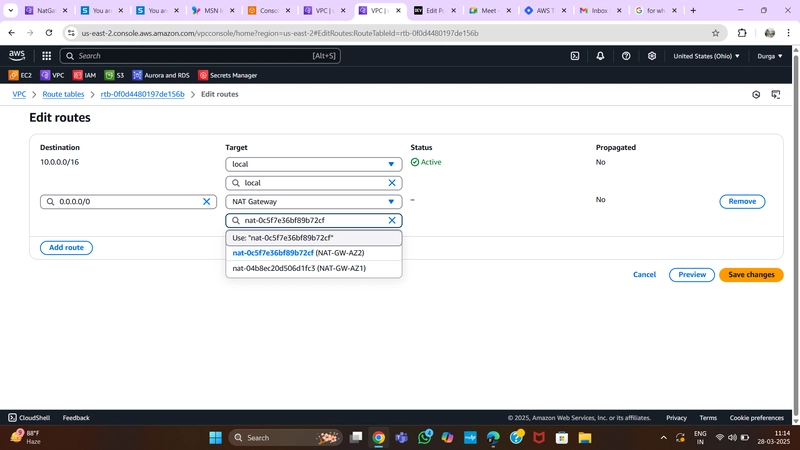
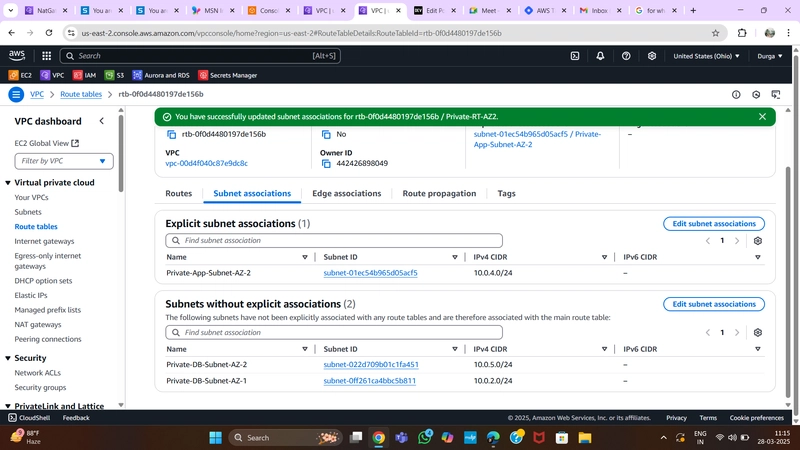
Private Route Table
- Create two route tables (one per AZ) for private app layer subnets.
- Add routes directing external traffic to the NAT Gateway.
- Associate each table with the respective private app subnets.
Private Route Table Configuration
PART-3
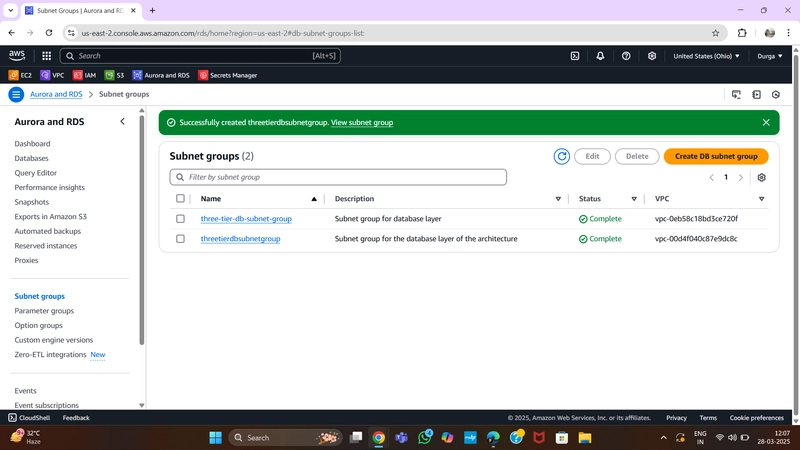
1.Subnet Groups
Navigate to the RDS dashboard in the AWS console and click on Subnet groups on the left-hand side. Click Create DB subnet group.
Give your subnet group a name, description, and choose the VPC we created.
When adding subnets, make sure to add the subnets we created in each availability zone specifically for our database layer. You may have to navigate back to the VPC dashboard and check to make sure you're selecting the correct subnet IDs.
Subnet Groups Configuration
2.Database Deployment
Navigate to Databases on the left-hand side of the RDS dashboard and click Create database.
We'll now go through several configuration steps. Start with a Standard create for this MySQL-Compatible Amazon Aurora database. Leave the rest of the defaults in the Engine options as default.
Under the Templates section choose Dev/Test since this isn't being used for production at the moment. Under Settings, set a username and password of your choice and note them down since we'll be using password authentication to access our database.
Next, under Availability and durability, change the option to create an Aurora Replica or reader node in a different availability zone. Under Connectivity, set the VPC, choose the subnet group we created earlier, and select no for public access.
Set the security group we created for the database layer, make sure password authentication is selected as our authentication choice, and create the database.
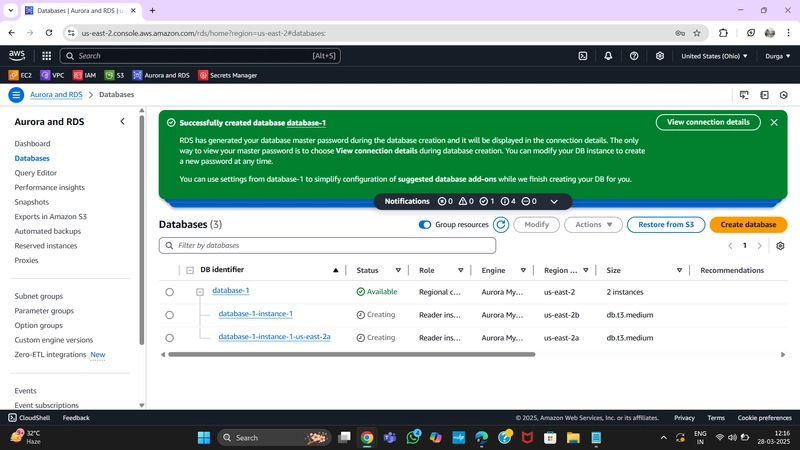
When your database is provisioned, you should see a reader and writer instance in the database subnets of each availability zone. Note down the writer endpoint for your database for later use.
Database Deployment
PART-4
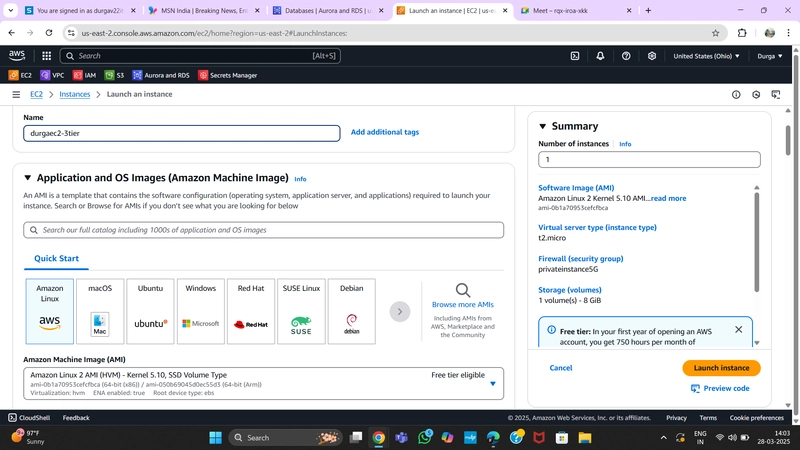
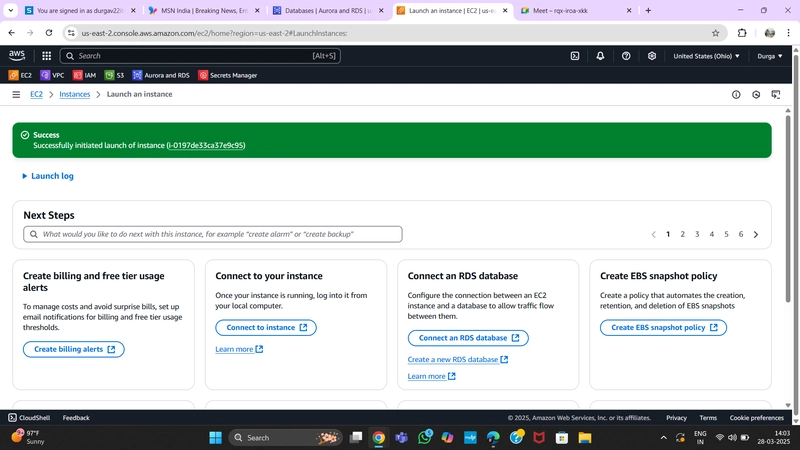
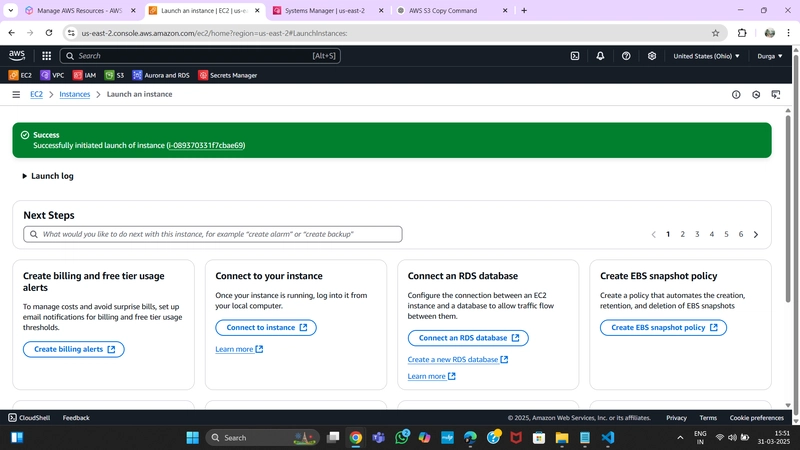
1.App Instance Deployment
Navigate to the EC2 service dashboard and click on Instances on the left-hand side. Then, click Launch Instances.
Select the first Amazon Linux 2 AMI.
We'll be using the free tier eligible T2.micro instance type. Select that and click Next: Configure Instance Details.
Proceed without key-pair because we are going to use EC2 instance login.
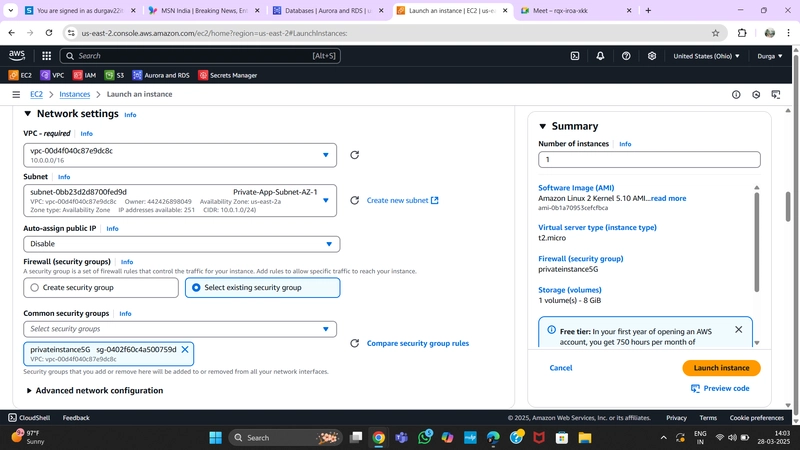
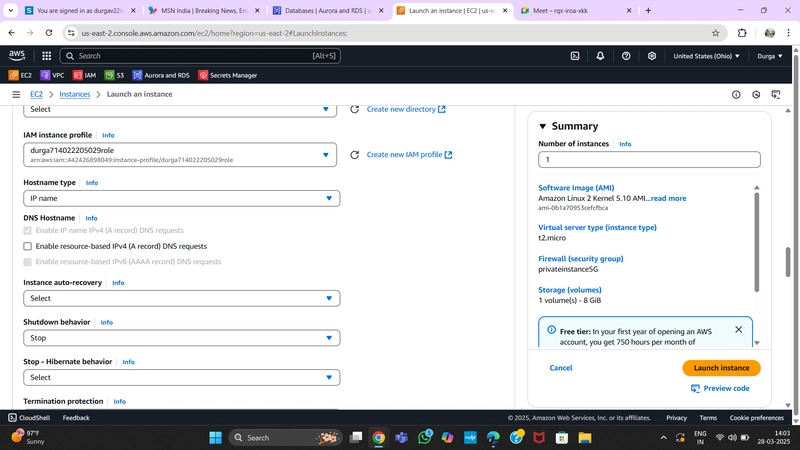
When configuring the instance details, make sure to select the correct Network, subnet, and IAM role we created. Since this is the app layer, use one of the private subnets we created for this layer.
- Using already created VPC and Private Subnet AZ-1
- Using already created private instance security group
- Using already created IAM role
Finally, click Launch Instance.
Connect to Instance
Navigate to your list of running EC2 Instances by clicking on Instances on the left-hand side of the EC2 dashboard. When the instance state is running, connect to your instance by selecting it and clicking the Connect button in the top right corner.
Select the Session Manager tab and click Connect. This will open a new browser tab.
Note: If you get a message saying that you cannot connect via Session Manager, check that your instances can route to your NAT gateways and verify that you have given the necessary permissions on the IAM role for the EC2 instance.
When you first connect to your instance, you will be logged in as ssm-user, which is the default user. Switch to ec2-user by executing the following command in the terminal:
sudo -su ec2-user
Let’s verify internet connectivity via our NAT gateway by pinging Google's DNS servers:
ping 8.8.8.8
You should see a transmission of packets. Stop it by pressing Ctrl + C.
Note: If you can’t reach the internet, double-check your route tables and subnet associations to verify if traffic is being routed to your NAT gateway.
2.Configure Database
Start by downloading the MySQL CLI:
sudo yum install mysql -y
If the above command causes issues, try the following alternative commands:
sudo wget https://dev.mysql.com/get/mysql57-community-release-e17-11.noarch.rpm
sudo rpm --import https://repo.mysql.com/RPM-GPG-KEY-mysql-2022
sudo yum install https://dev.mysql.com/get/mysql57-community-release-e17-11.noarch.rpm
Initiate your DB connection with your Aurora RDS writer endpoint:
mysql -h CHANGE-TO-YOUR-RDS-ENDPOINT -u CHANGE-TO-USER-NAME -p
After entering your password, you should be connected to your database.
Create a database called webappdb:
CREATE DATABASE webappdb;
Verify its creation:
SHOW DATABASES;
Switch to the webappdb database:
USE webappdb;
Create the transactions table:
CREATE TABLE IF NOT EXISTS transactions(
  id INT NOT NULL AUTO_INCREMENT,
  amount DECIMAL(10,2),
  description VARCHAR(100),
  PRIMARY KEY(id)
);
Verify the table creation:
SHOW TABLES;
Insert sample data:
INSERT INTO transactions (amount, description) VALUES ('400', 'groceries');
Verify data insertion:
SELECT * FROM transactions;
Exit MySQL:
exit
3.Configure App Instance
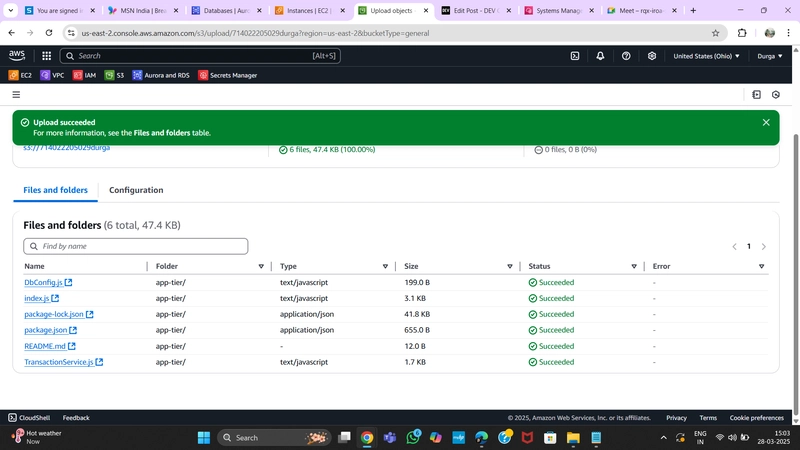
Update the database credentials for the app tier. Open application-code/app-tier/DbConfig.js from the GitHub repo in a text editor and update the hostname, user, password, and database fields with your database credentials.
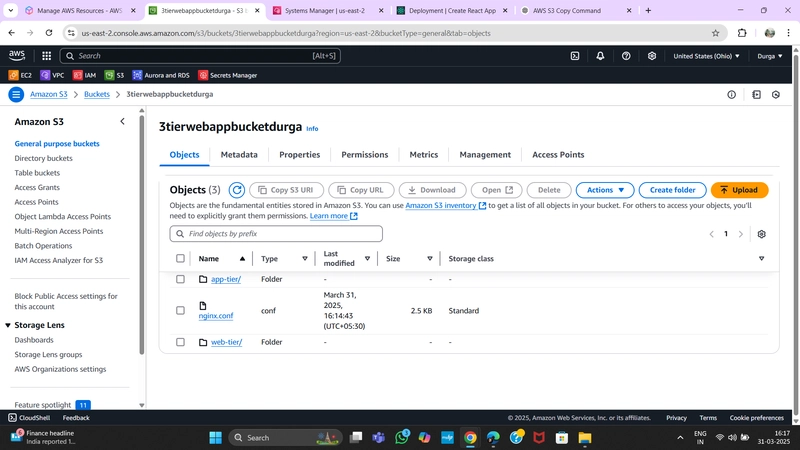
Upload the app-tier folder to your S3 bucket created in Part 1.
Go back to your SSM session and install the necessary components.
Install NVM (Node Version Manager):
curl -o- https://raw.githubusercontent.com/nvm-sh/nvm/v0.38.0/install.sh | bash
source ~/.bashrc
Install Node.js:
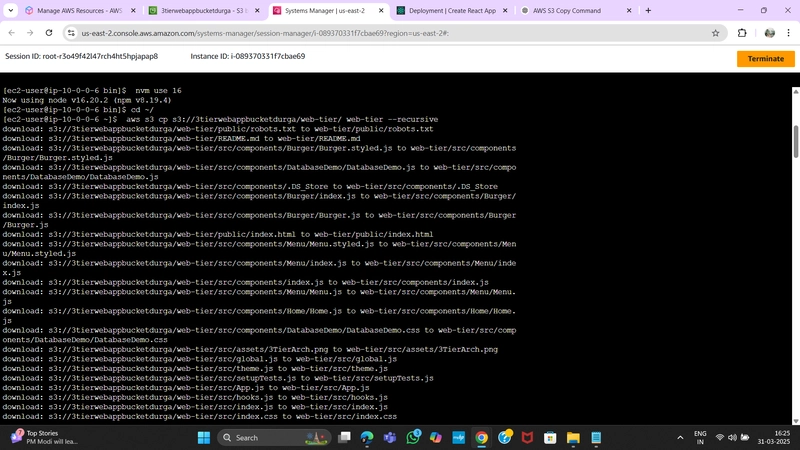
nvm install 16
nvm use 16
Install PM2 (process manager):
npm install -g pm2
Download the app-tier code from the S3 bucket (replace BUCKET_NAME with your actual bucket name):
cd ~/
aws s3 cp s3://BUCKET_NAME/app-tier/ app-tier --recursive
Navigate to the app directory, install dependencies, and start the app:
cd ~/app-tier
npm install
pm2 start index.js
Check if the app is running:
pm2 list
If it shows errored, debug with:
pm2 logs
Enable PM2 startup on reboot:
pm2 startup
Copy and paste the generated command, then run:
pm2 save
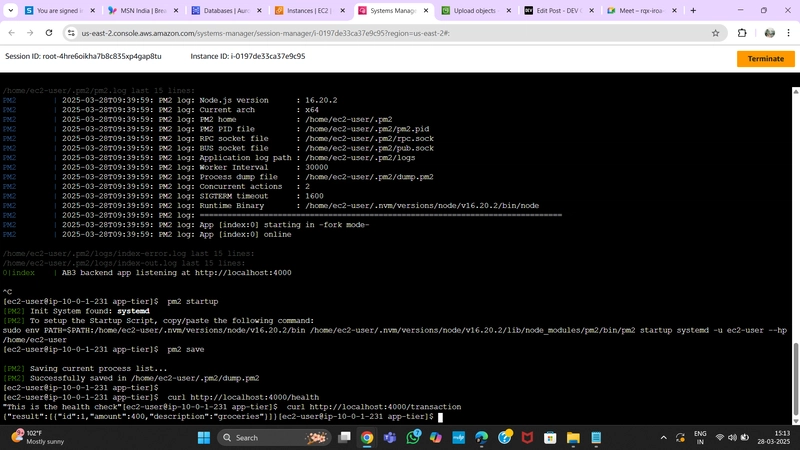
4.Test App Tier
Check the health check endpoint:
curl http://localhost:4000/health
Expected response:
"This is the health check"
Check database connectivity:
curl http://localhost:4000/transaction
Expected response (example data):
{"result":[{"id":1,"amount":400,"description":"groceries"}]}
If both tests return expected results, your app layer is fully configured and ready to go!
5.EC2 Creation Process

PART-5
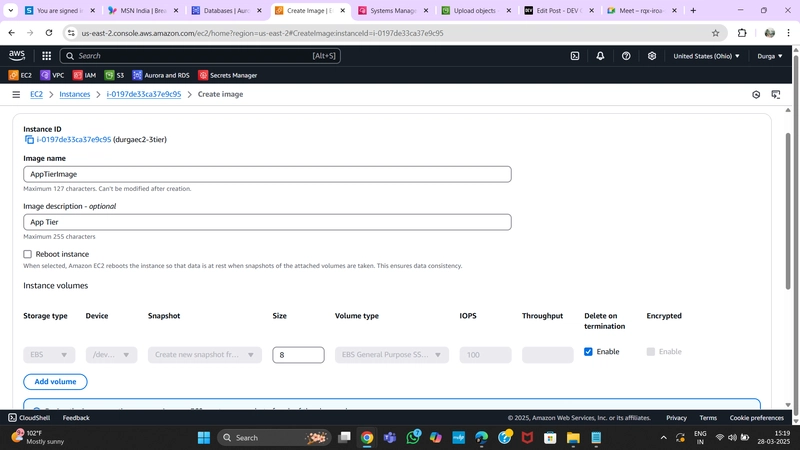
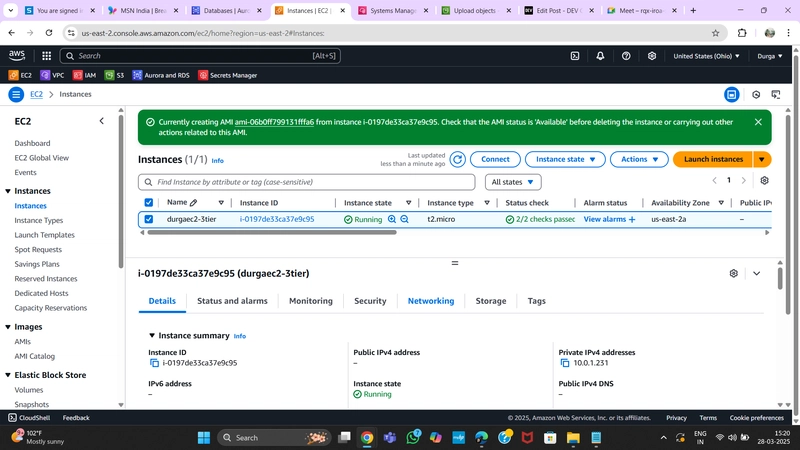
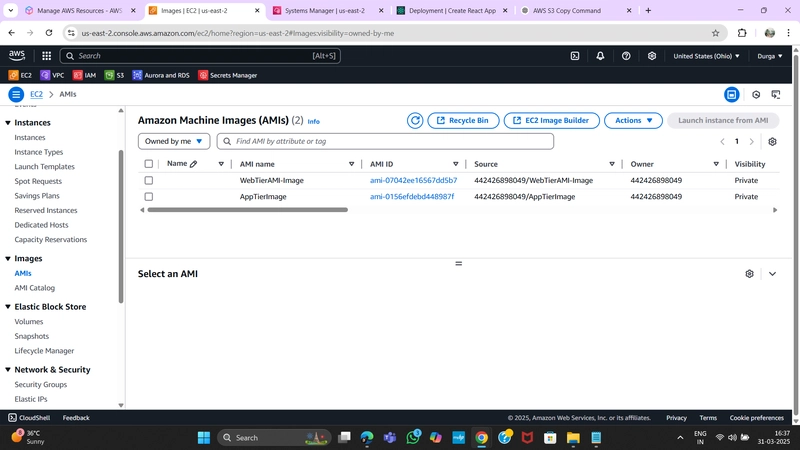
1. App Tier AMI
- Navigate to Instances in the EC2 dashboard.
- Select the App Tier Instance created earlier.
- Under Actions, select Image and Templates > Create Image.
- Provide a name and description for the image and click Create Image.
- To monitor the image creation process, go to AMIs under Images in the EC2 dashboard.
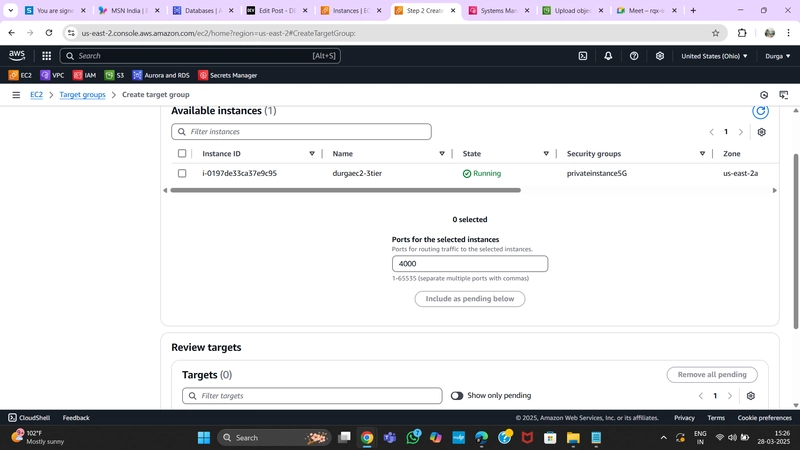
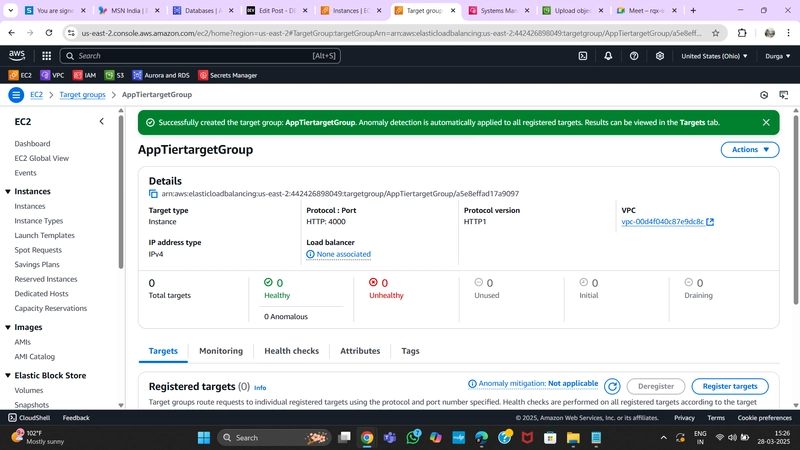
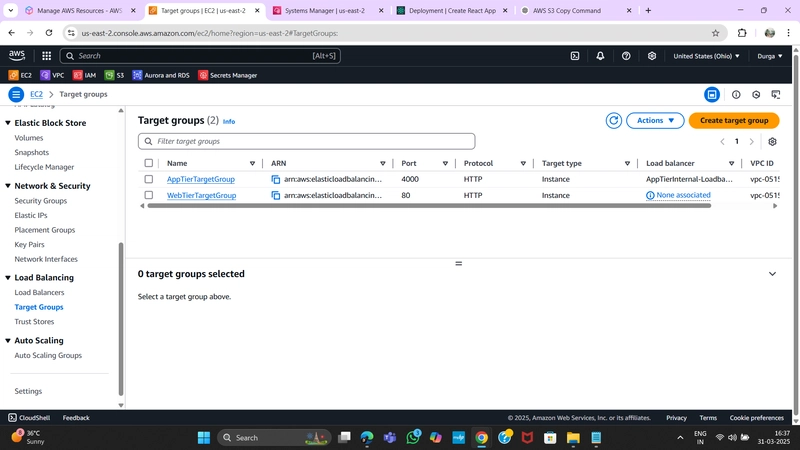
2. Target Group
- While the AMI is being created, go to Target Groups under Load Balancing in the EC2 dashboard.
- Click Create Target Group and select Instances as the target type.
- Provide a name, set protocol to HTTP, and port to 4000 (same as the Node.js app port).
- Choose the VPC in use and change the health check path to /health.
- Click Next, skip target registration, and create the Target Group.
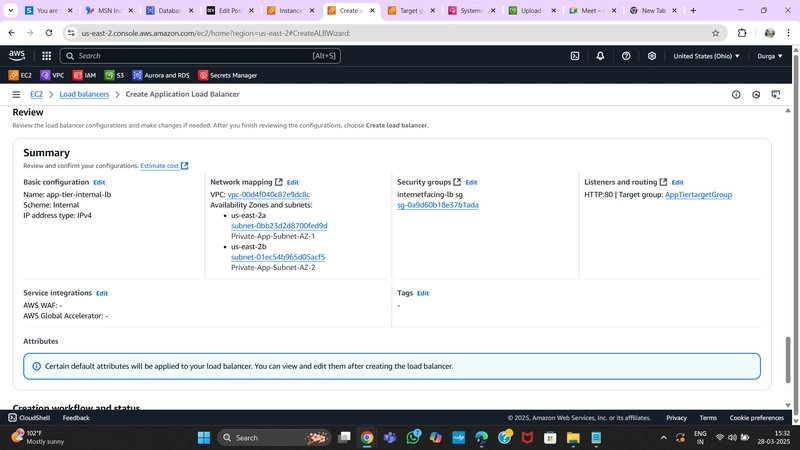
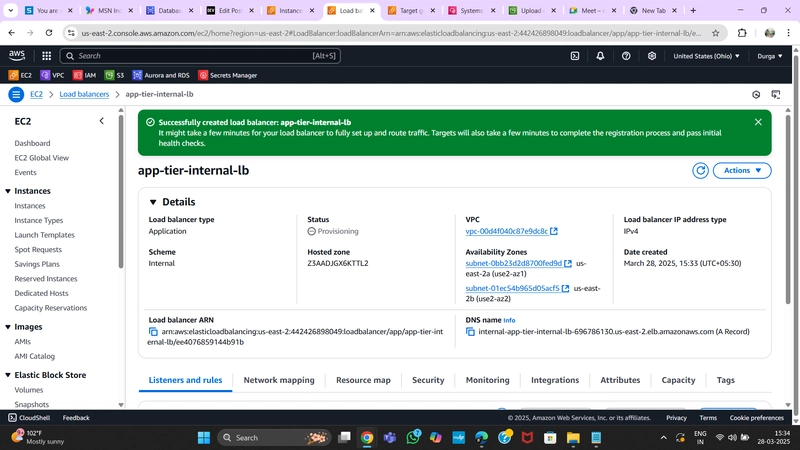
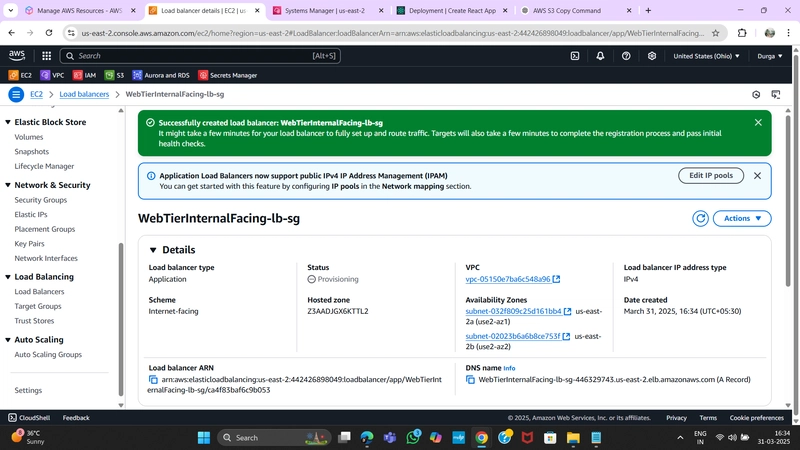
3. Internal Load Balancer
- Navigate to Load Balancers under Load Balancing and click Create Load Balancer.
- Select Application Load Balancer and click Create.
- Provide a name and select Internal to route traffic from the Web Tier to the App Tier.
- Configure the correct VPC and private subnets.
- Assign the security group created for this internal ALB.
- Set Listener Protocol to HTTP (Port 80) and attach the Target Group created earlier.
- Click Create Load Balancer.
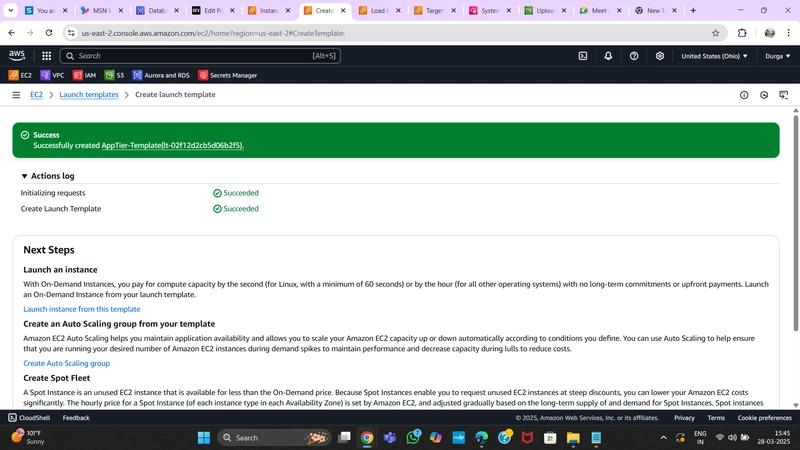
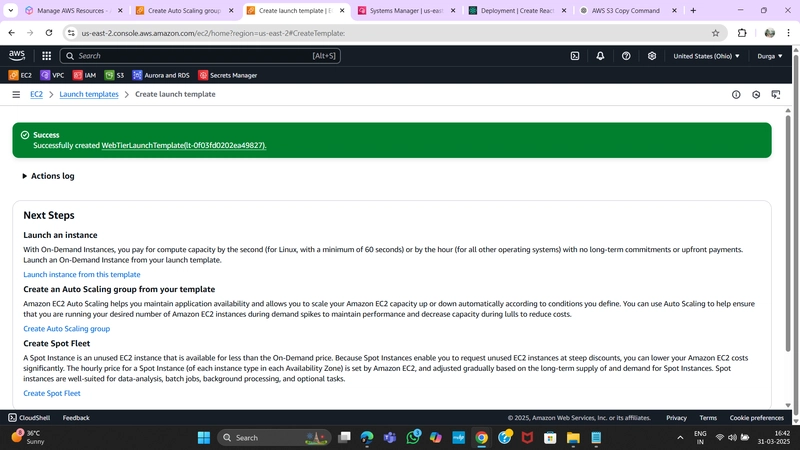
4. Launch Template
- Navigate to Launch Templates under Instances and click Create Launch Template.
- Provide a name and select the App Tier AMI created earlier.
- Set Instance Type to t2.micro.
- Exclude Key Pair and Network Settings from the template.
- Assign the correct security group and IAM instance profile.
- Click Create Launch Template.
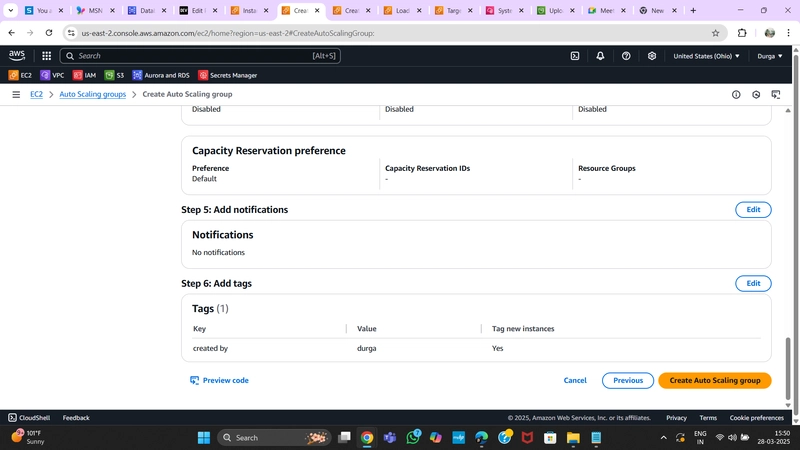
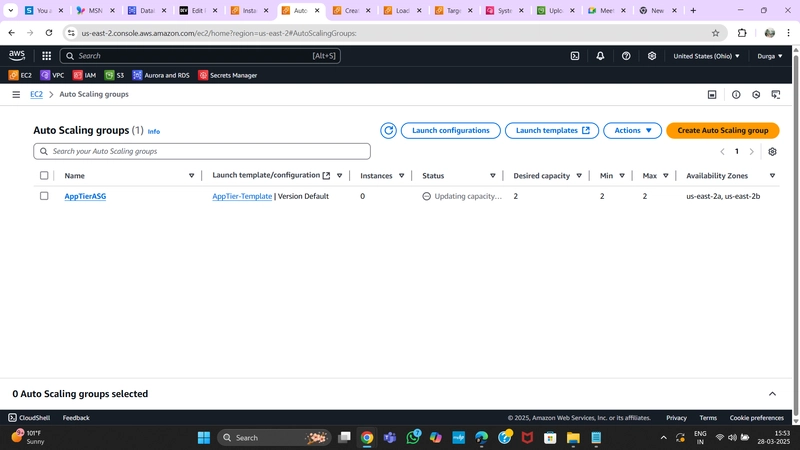
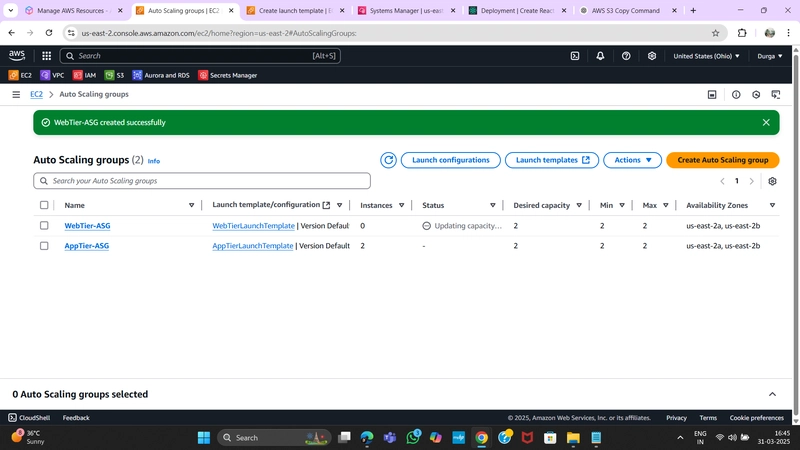
5. Auto Scaling Group
- Navigate to Auto Scaling Groups under Auto Scaling and click Create Auto Scaling Group.
- Provide a name and select the Launch Template created earlier.
- Configure VPC and private subnets for the App Tier.
- Attach this Auto Scaling Group to the Load Balancer by selecting the Target Group.
- Set Desired, Minimum, and Maximum Capacity to 2.
- Click Next > Next > Create Auto Scaling Group.
PART-6
1. Update Config File
Before creating and configuring the web instances, open the application-code/nginx.conf file from the downloaded repository. Scroll down to line 58 and replace [INTERNAL-LOADBALANCER-DNS] with your internal load balancer’s DNS entry. You can find this by navigating to your internal load balancer's details page.
2. Web Instance Deployment
Creating a Web Tier Instance
Uploading Web-Tier and Nginx.conf to S3 Bucket
Copying Files from S3 Bucket
3. Configure Web Instance
We now need to install all necessary components to run our front-end application. Begin by installing NVM and Node.js:
Run the following commands:
curl -o- https://raw.githubusercontent.com/nvm-sh/nvm/v0.38.0/install.sh | bash
source ~/.bashrc
nvm install 16
nvm use 16
Download Web Tier Code from S3 Bucket
cd ~/
aws s3 cp s3://BUCKET_NAME/web-tier/ web-tier --recursive
Build the React App
cd ~/web-tier
npm install
npm run build
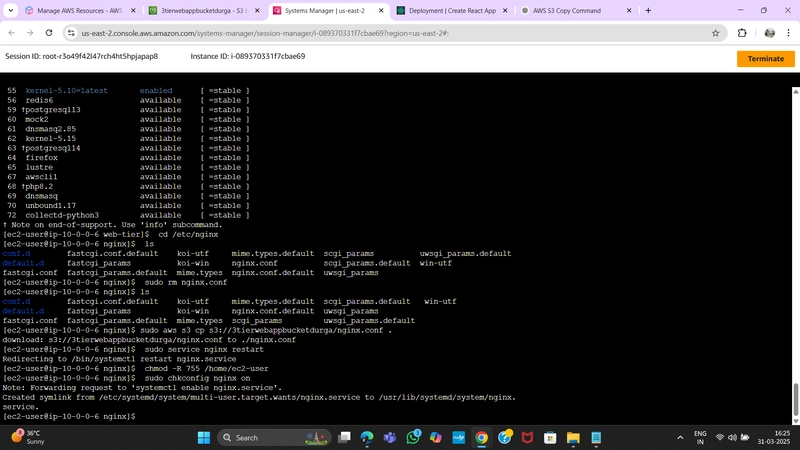
Install and Configure NGINX
sudo amazon-linux-extras install nginx1 -y
Navigate to the Nginx configuration file:
cd /etc/nginx
ls
You should see the nginx.conf file. Delete this file and replace it with the one from the S3 bucket:
sudo rm nginx.conf
sudo aws s3 cp s3://BUCKET_NAME/nginx.conf .
Restart Nginx:
sudo service nginx restart
Ensure Nginx has permission to access our files:
chmod -R 755 /home/ec2-user
Enable Nginx to start on boot:
sudo chkconfig nginx on
PART-7
1.AMI Creation
2.Target Group Configuration
3.Launch Template Creation
4.Internet Facing Load Balancer Setup
5.Auto Scaling Group Configuration
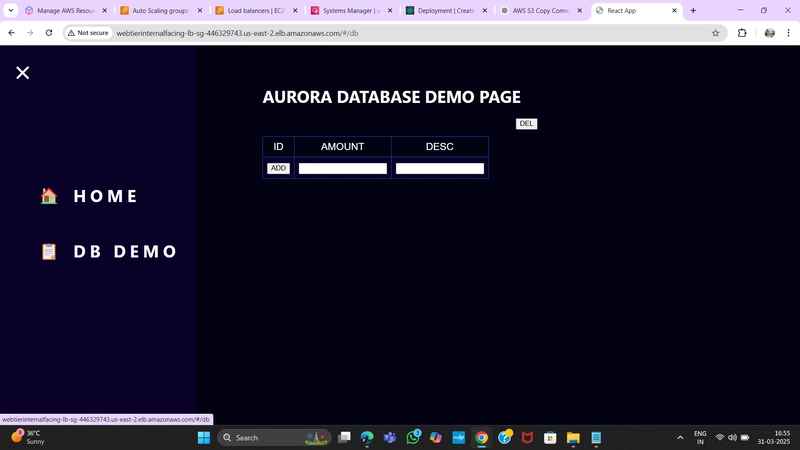
OUTPUT
Final Deployed Web Application
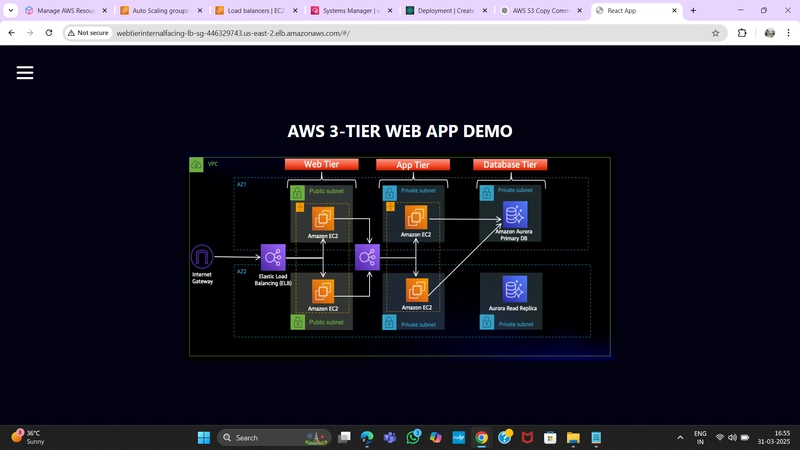

Conclusion
Well done on successfully completing the three-tier architecture project on AWS! This marks a significant accomplishment from setting up instances, load balancers, and auto-scaling to deploying a fully operational web application. Before wrapping up, ensure that all services created for learning purposes are properly cleaned up to avoid unnecessary costs or lingering resources.