


![[The AI Show Episode 144]: ChatGPT’s New Memory, Shopify CEO’s Leaked “AI First” Memo, Google Cloud Next Releases, o3 and o4-mini Coming Soon & Llama 4’s Rocky Launch](https://www.marketingaiinstitute.com/hubfs/ep%20144%20cover.png)


![GrandChase tier list of the best characters available [April 2025]](https://media.pocketgamer.com/artwork/na-33057-1637756796/grandchase-ios-android-3rd-anniversary.jpg?#)


.webp?#)


![New Beats USB-C Charging Cables Now Available on Amazon [Video]](https://www.iclarified.com/images/news/97060/97060/97060-640.jpg)

![Apple M4 13-inch iPad Pro On Sale for $200 Off [Deal]](https://www.iclarified.com/images/news/97056/97056/97056-640.jpg)


Deploy HUGO website to Amazon S3 using Pulumi.
HUGO HUGO is a acclaimed world's fastest static website builder. HUGO is a open source framework. It was launched in 2013 and at present it has more than 79,249 stars on github. Checkout HUGO official library: gohugoio / hugo The world’s fastest framework for building websites. A fast and flexible static site generator built with love by bep, spf13, and friends in Go. Website | Installation | Documentation | Support | Contributing | Mastodon Overview Hugo is a static site generator written in Go, optimized for speed and designed for flexibility. With its advanced templating system and fast asset pipelines, Hugo renders a complete site in seconds, often less. Due to its flexible framework, multilingual support, and powerful taxonomy system, Hugo is widely used to create: Corporate, government, nonprofit, education, news, event, and project sites Documentation sites Image portfolios Landing pages Business, professional, and personal blogs Resumes and CVs Use Hugo's embedded web server during development to instantly see changes to content, structure, behavior, and presentation. Then deploy the site to your host, or push changes to your Git provider for automated builds and deployment. Hugo's fast asset pipelines include: Image processing… View on GitHub We will not go in detail about how to use HUGO but focus more on how to deploy static website generated by HUGO framework using Pulumi. Few words on Pulumi IAC Pulumi IAC (Infrastructure as Code) engine is used to automate the provisioning and management of infrastructure. Too geeky? Let me make it simple. Before Pulumi, If you want to provision or manage any cloud resource then you need to go respective cloud provider dashboard (AWS, Azure) and interact to their UI to perform any action. This method fails in some way with repeatability and consistency issues. Pulumi treats cloud resources (i.e. servers, networks and storage) as code, allowing you to follow modern approaches to embrace and support full software engineering life cycle. You can do version control, automation and auto configure cloud resources easily using Pulumi IAC. Enough talk let's go to code. First things first, We will quickly set up and generate static site using HUGO. For more in depth detail you can follow official website of HUGO. 1.Install HUGO in your local machine. brew install hugo 2.Set up repo in your local. To save I have already pushed website code in github repo. git clone https://github.com/shivamarora1/hugoXPulumi 3.Generate static website. hugo 4.If everything works as expected then you should be able to see your website on http://localhost:1313/ Built site is stored in public folder. Great work. Now our next task is to deploy this website to AWS S3 so that general public can access our cool website. We are gonna use Pulumi for that. S3 is a cloud storage service where you can store and retrieve data online from anywhere and anytime. Setting up AWS security credentials When you interact with AWS, you require your AWS security credentials so that AWS can authenticate and authorize access to cloud resource. Following video gives you process to create AWS security credentials. Once you have AWS_ACCESS_KEY_ID, AWS_SECRET_ACCESS_KEY , go to terminal and export them using below command: export AWS_ACCESS_KEY_ID= export AWS_SECRET_ACCESS_KEY= export AWS_REGION=ap-south-1 Pulumi will use these credentials to interact with AWS dashboard. Setting up Pulumi script Before you get start make sure pulumi is installed on your system. brew install pulumi/tap/pulumi You can refer pulumi documentation for installation in other platforms. We are going to use python runtime , so make sure python is installed in your system. So far: Pulumi is installed Python is installed AWS credentials are configured We are good to write script to provision resources and deploy static website on S3. 1 pulumi new is a command to create a new pulumi project with some basic scaffolding. mkdir hugo-pulumi && cd hugo-pulumi pulumi new aws-python 2 You will be asked for a project name and project description. Hit Enter to accept the default values or change if required. Pulumi code is organized in stack and projects. Project is a folder with all code and stack is instance of that code with different configurations. Single project can have multiple stacks for different environment (dev, test and prod) 3 Lets review the generated files: Pulumi.yaml: This file contains the metadata and runtime that pulumi will use to execute the scripts. In most of cases we are not going to anything in this file. Pulumi.dev.yaml: This file contains stack specific configuration. Instead of hardcoding values of different deployment stack (prod, dev, staging) we can add configuration values in this file. Based upon
HUGO
HUGO is a acclaimed world's fastest static website builder. HUGO is a open source framework. It was launched in 2013 and at present it has more than 79,249 stars on github. Checkout HUGO official library:
![]()
A fast and flexible static site generator built with love by bep, spf13, and friends in Go.
![]()
Website | Installation | Documentation | Support | Contributing | Mastodon
Overview
Hugo is a static site generator written in Go, optimized for speed and designed for flexibility. With its advanced templating system and fast asset pipelines, Hugo renders a complete site in seconds, often less.
Due to its flexible framework, multilingual support, and powerful taxonomy system, Hugo is widely used to create:
- Corporate, government, nonprofit, education, news, event, and project sites
- Documentation sites
- Image portfolios
- Landing pages
- Business, professional, and personal blogs
- Resumes and CVs
Use Hugo's embedded web server during development to instantly see changes to content, structure, behavior, and presentation. Then deploy the site to your host, or push changes to your Git provider for automated builds and deployment.
Hugo's fast asset pipelines include:
- Image processing…
We will not go in detail about how to use HUGO but focus more on how to deploy static website generated by HUGO framework using Pulumi.
Few words on Pulumi IAC
Pulumi IAC (Infrastructure as Code) engine is used to automate the provisioning and management of infrastructure. Too geeky? Let me make it simple. Before Pulumi, If you want to provision or manage any cloud resource then you need to go respective cloud provider dashboard (AWS, Azure) and interact to their UI to perform any action. This method fails in some way with repeatability and consistency issues.
Pulumi treats cloud resources (i.e. servers, networks and storage) as code, allowing you to follow modern approaches to embrace and support full software engineering life cycle. You can do version control, automation and auto configure cloud resources easily using Pulumi IAC.
Enough talk let's go to code.
First things first, We will quickly set up and generate static site using HUGO. For more in depth detail you can follow official website of HUGO.
1.Install HUGO in your local machine.
brew install hugo
2.Set up repo in your local. To save I have already pushed website code in github repo.
git clone https://github.com/shivamarora1/hugoXPulumi
3.Generate static website.
hugo
4.If everything works as expected then you should be able to see your website on
http://localhost:1313/

Built site is stored in public folder.
Great work. Now our next task is to deploy this website to AWS S3 so that general public can access our cool website. We are gonna use Pulumi for that.
S3 is a cloud storage service where you can store and retrieve data online from anywhere and anytime.
Setting up AWS security credentials
When you interact with AWS, you require your AWS security credentials so that AWS can authenticate and authorize access to cloud resource.
Following video gives you process to create AWS security credentials.
Once you have AWS_ACCESS_KEY_ID, AWS_SECRET_ACCESS_KEY , go to terminal and export them using below command:
export AWS_ACCESS_KEY_ID=
export AWS_SECRET_ACCESS_KEY=
export AWS_REGION=ap-south-1
Pulumi will use these credentials to interact with AWS dashboard.
Setting up Pulumi script
Before you get start make sure pulumi is installed on your system.
brew install pulumi/tap/pulumi
You can refer pulumi documentation for installation in other platforms.
We are going to use python runtime , so make sure python is installed in your system.
So far:
- Pulumi is installed
- Python is installed
- AWS credentials are configured
We are good to write script to provision resources and deploy static website on S3.
1 pulumi new is a command to create a new pulumi project with some basic scaffolding.
mkdir hugo-pulumi && cd hugo-pulumi
pulumi new aws-python
2 You will be asked for a project name and project description. Hit Enter to accept the default values or change if required.
Pulumi code is organized in stack and projects. Project is a folder with all code and stack is instance of that code with different configurations. Single project can have multiple stacks for different environment (dev, test and prod)
3 Lets review the generated files:
Pulumi.yaml: This file contains the metadata and runtime that pulumi will use to execute the scripts. In most of cases we are not going to anything in this file.
Pulumi.dev.yaml: This file contains stack specific configuration. Instead of hardcoding values of different deployment stack (prod, dev, staging) we can add configuration values in this file. Based upon the specified stack Pulumi will pick the configurations.This file is automatically named: Pulumi.
__main__.py: This is the file where we will define our stack resources.
4 To deploy our static website in S3 we need to perform below steps:
- Creating a S3 bucket resource on AWS cloud.
- Grant public read access, we want our website public.
- Enable static website hosting in S3 bucket and configuring
index.htmlfile. - Build Hugo website and upload website files.
5 Edit __main__.py file.
Create bucket.
bucket = s3.BucketV2("hugo-pulumi")
Set bucket ownership control, only bucket owner can upload the object.
ownership_controls = s3.BucketOwnershipControls(
    "ownership-controls",
    bucket=bucket.id,
    rule={
        "object_ownership": "ObjectWriter",
    },
)
Block public access to bucket.
public_access_block = s3.BucketPublicAccessBlock(
    "public-access-block", bucket=bucket.id, block_public_acls=False
)
Mark bucket as static and make index.html as default page.
website = s3.BucketWebsiteConfigurationV2(
    "website",
    bucket=bucket.id,
    index_document={
        "suffix": "index.html",
    },
)
Now bucket is provisioned let's add some files:
file_path = os.path.join(root, file)
relative_path = os.path.relpath(file_path, folder_name)
mime_type, _ = mimetypes.guess_type(file_path)
s3.BucketObjectv2(
    relative_path,
    bucket=bucket.id,
    source=pulumi.FileAsset(file_path),
    key=relative_path,
    content_type=mime_type,
    acl="public-read",
    opts=pulumi.ResourceOptions(
        depends_on=[public_access_block, ownership_controls, website]
    ),
)
file is the file object. We will attach the acl policy and ownership controls with file object and use s3.BucketObjectv2 function to upload the file to bucket.
6 Deploy your stack:
pulumi up
This command will evaluate your program and determine resource updates to make. It will first show you the preview and take confirmation from you before executing the changes. If you follow all the steps correctly then you should be able to see the public url of your bucket and access the website.

7 You can use this command to verify the objects uploaded to S3:
aws s3 ls $(pulumi stack output bucket_name)
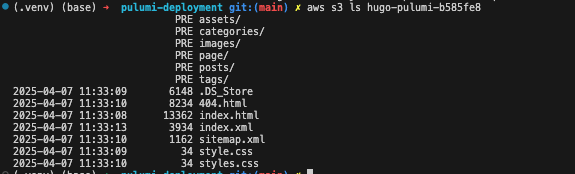
Congrats you have successfully used Pulumi to upload the file to S3. You can refer the complete example in following link:
 shivamarora1
/
hugoXPulumi
shivamarora1
/
hugoXPulumi
Deploy static site generated by Hugo using Pulumi
- Make sure you have setup following environment variables:
export AWS_ACCESS_KEY_ID=
export AWS_SECRET_ACCESS_KEY=
export AWS_REGION=ap-south-1
cd pulumi-deployment
- Make sure pulumi is installed in your system.
brew install pulumi/tap/pulumi
- Apply the provisionings
pulumi up
- Open the url in your browser.
8 Use pulumi destroy to delete the provisions.