![[Webinar] AI Is Already Inside Your SaaS Stack — Learn How to Prevent the Next Silent Breach](https://blogger.googleusercontent.com/img/b/R29vZ2xl/AVvXsEiOWn65wd33dg2uO99NrtKbpYLfcepwOLidQDMls0HXKlA91k6HURluRA4WXgJRAZldEe1VReMQZyyYt1PgnoAn5JPpILsWlXIzmrBSs_TBoyPwO7hZrWouBg2-O3mdeoeSGY-l9_bsZB7vbpKjTSvG93zNytjxgTaMPqo9iq9Z5pGa05CJOs9uXpwHFT4/s1600/ai-cyber.jpg?#)


![[The AI Show Episode 144]: ChatGPT’s New Memory, Shopify CEO’s Leaked “AI First” Memo, Google Cloud Next Releases, o3 and o4-mini Coming Soon & Llama 4’s Rocky Launch](https://www.marketingaiinstitute.com/hubfs/ep%20144%20cover.png)


![Rogue Company Elite tier list of best characters [April 2025]](https://media.pocketgamer.com/artwork/na-33136-1657102075/rogue-company-ios-android-tier-cover.jpg?#)


_Andreas_Prott_Alamy.jpg?width=1280&auto=webp&quality=80&disable=upscale#)


![Apple Watch Series 10 Back On Sale for $299! [Lowest Price Ever]](https://www.iclarified.com/images/news/96657/96657/96657-640.jpg)
![EU Postpones Apple App Store Fines Amid Tariff Negotiations [Report]](https://www.iclarified.com/images/news/97068/97068/97068-640.jpg)
![Apple Slips to Fifth in China's Smartphone Market with 9% Decline [Report]](https://www.iclarified.com/images/news/97065/97065/97065-640.jpg)


Creating Jenkins on AWS
Introduction Jenkins is an open-source automation server that integrates seamlessly with various AWS services such as AWS CodeCommit, AWS CodeDeploy, Amazon EC2 Spot, and Amazon EC2 Fleet. You can deploy Jenkins on AWS using Amazon Elastic Compute Cloud (Amazon EC2) to take advantage of scalable and flexible compute resources. Requirements AWS account An Amazon EC2 key pair. An AWS IAM User with programmatic key access and permissions to launch EC2 instances VS Code Creating a key pair Creating a key pair ensures secure and proper authentication during the Jenkins installation process. Steps Sign into your AWS account. Search for key pair in the search bar and select key pairs (EC2 feature) Select create key pair Choose a name for your key pair, leave key pair type as default and choose a format for your key. Select create key pair after. The private key file is downloaded automatically. Its base name matches the key pair name you specified, and the file extension corresponds to the format you selected. Be sure to store the private key in a secure location. If you're using an SSH client on a macOS or Linux computer to connect to your Linux instance, run the following command to set the permissions on your private key file, ensuring that only you have read access. chmod 400 .pem Creating a security group A security group functions as a virtual firewall that controls inbound and outbound traffic for one or more EC2 instances. When launching an instance, you can assign it one or more security groups. Each group contains rules that define the allowed traffic. You can update these rules at any time, and changes take effect immediately. In this project, you will create a security group and add the following rules: Allow inbound HTTP access from anywhere. Allow inbound SSH traffic from your computer’s public IP address so you can connect to your instance. To create and configure your security group: In the AWS console, search for security group in the search bar and select security groups Select create security group In Security group name, enter WebServerSG or any preferred name of your choice, and provide a description. Select your VPC from the list. You can use the default VPC. On the Inbound tab, add these three rules as follows: 1. Select Add Rule, and then select SSH from the Type list. 2. Under Source, select My IP. 3. Select Add Rule, and then select HTTP from the Type list. 4. Select Add Rule, and then select Custom TCP Rule from the Type list. 5. Under Port Range, enter 8080. NOTE: You can check your ip address by visiting check IP service tool Launching an Amazon EC2 instance With your key pair and security group configured, you're ready to launch an EC2 instance. Back at the AWS Management Console, search and select EC2 instance Select Launch instances. Choose a name for your instance, select Amazon Linux and choose and select the HVM edition of the Amazon Linux AMI under Amazon Machine Image (AMI). Scroll down, select the key pair you created earlier, choose existing security group and select Launch instance. Installing and configuring Jenkins Once your instance is launched, you can connect to it and use it just like your local machine. Before connecting, retrieve the instance's public DNS name from the Amazon EC2 console by ticking the instance and copying the DNS name. I will be using VS Code to connect to my EC2 instance, you can use any other IDE. Using OpenSSH to connect to your instance (Windows) Open a terminal or PowerShell window. Use the ssh command to connect to the instance. You will specify the private key (.pem) file and ec2-user@public_dns_name. ssh -i /path/my-key-pair.pem ec2-user@ec2-198-51-100-1.compute-1.amazonaws.com You will receive a response like the following: The authenticity of host 'ec2-198-51-100-1.compute1.amazonaws.com (10.254.142.33)' can't be established. RSA key fingerprint is 1f:51:ae:28:bf:89:e9:d8:1f:25:5d:37:2d:7d:b8:ca:9f:f5:f1:6f. Are you sure you want to continue connecting (yes/no)? Enter yes. You will receive a response like the following: Warning: Permanently added 'ec2-198-51-100-1.compute1.amazonaws.com' (RSA) to the list of known hosts. Using SSH to connect to your instance (Linux/Mac) For this project, I am making use of Mac and run the following command in my VS Code: ssh -i ~/Downloads/jenkins-key.pem ec2-user@ec2-34-238-126-216.compute-1.amazonaws.com NOTE:You will need to change your key path if it is not located in Downloads folder, same with the name if your name is different. Now you are connected to your EC2 instance. Downloading and installing Jenkins Now that your instance is up and running, install Jenkins on it by running the following command to perform quick software update: sudo yum update –y Add the Jenkins repo using the following command:
Introduction
Jenkins is an open-source automation server that integrates seamlessly with various AWS services such as AWS CodeCommit, AWS CodeDeploy, Amazon EC2 Spot, and Amazon EC2 Fleet. You can deploy Jenkins on AWS using Amazon Elastic Compute Cloud (Amazon EC2) to take advantage of scalable and flexible compute resources.
Requirements
- AWS account
- An Amazon EC2 key pair.
- An AWS IAM User with programmatic key access and permissions to launch EC2 instances
- VS Code
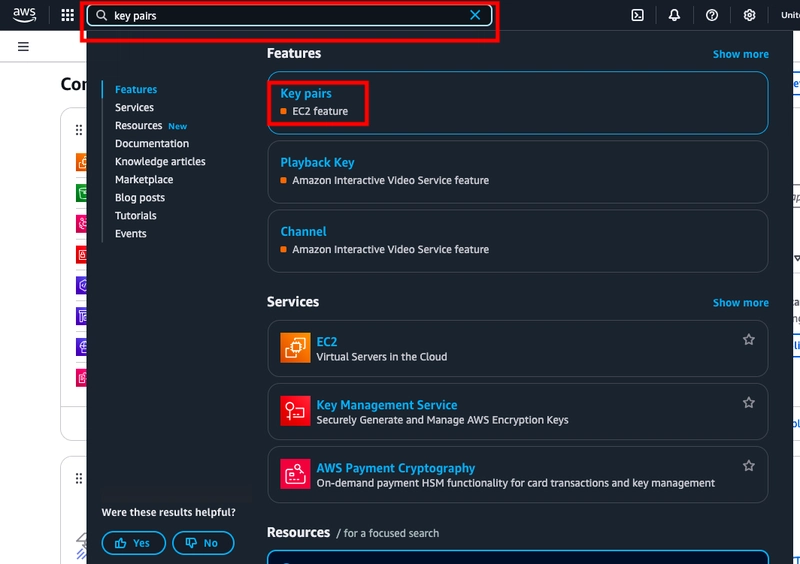
Creating a key pair
Creating a key pair ensures secure and proper authentication during the Jenkins installation process.
Steps
- Sign into your AWS account.
- Search for key pair in the search bar and select key pairs (EC2 feature)
- Select create key pair

- Choose a name for your key pair, leave key pair type as default and choose a format for your key. Select create key pair after.
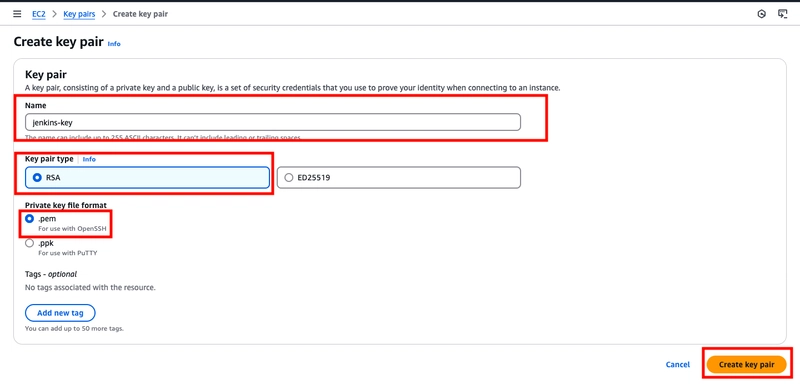
- The private key file is downloaded automatically. Its base name matches the key pair name you specified, and the file extension corresponds to the format you selected. Be sure to store the private key in a secure location.

- If you're using an SSH client on a macOS or Linux computer to connect to your Linux instance, run the following command to set the permissions on your private key file, ensuring that only you have read access.
chmod 400

Creating a security group
A security group functions as a virtual firewall that controls inbound and outbound traffic for one or more EC2 instances. When launching an instance, you can assign it one or more security groups. Each group contains rules that define the allowed traffic. You can update these rules at any time, and changes take effect immediately.
In this project, you will create a security group and add the following rules:
- Allow inbound HTTP access from anywhere.
- Allow inbound SSH traffic from your computer’s public IP address so you can connect to your instance.
To create and configure your security group:
- In the AWS console, search for security group in the search bar and select security groups
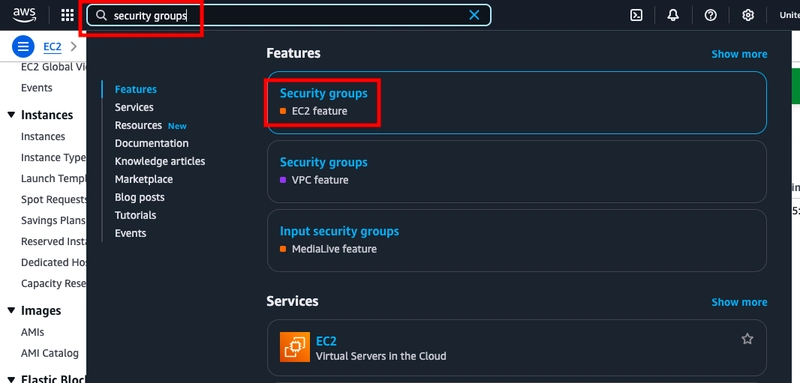
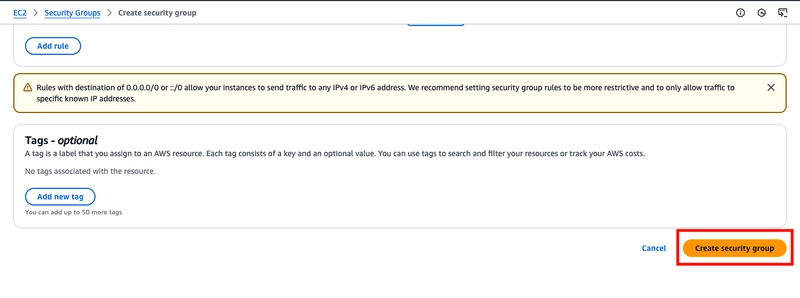
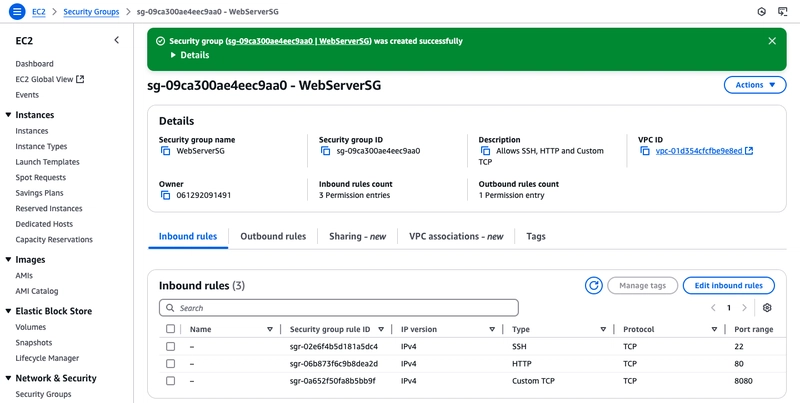
- Select create security group

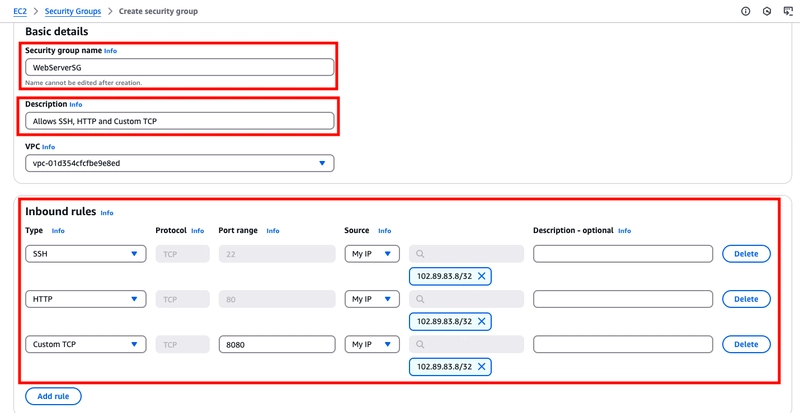
- In Security group name, enter WebServerSG or any preferred name of your choice, and provide a description.
- Select your VPC from the list. You can use the default VPC.
- On the Inbound tab, add these three rules as follows:
1. Select Add Rule, and then select SSH from the Type list.
2. Under Source, select My IP.
3. Select Add Rule, and then select HTTP from the Type list.
4. Select Add Rule, and then select Custom TCP Rule from the Type list.
5. Under Port Range, enter 8080.
NOTE: You can check your ip address by visiting check IP service tool
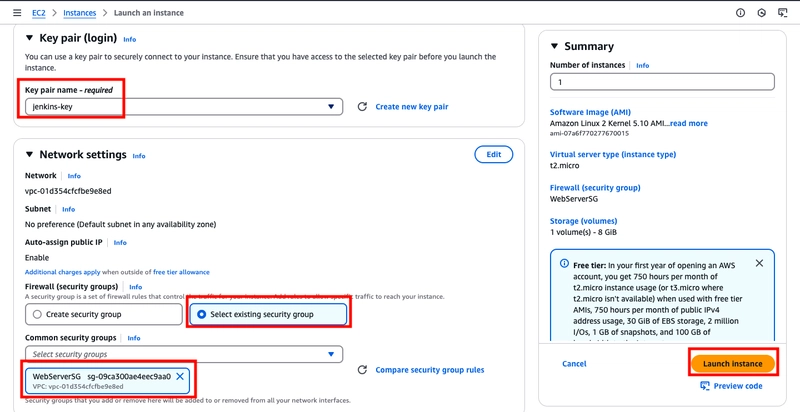
Launching an Amazon EC2 instance
With your key pair and security group configured, you're ready to launch an EC2 instance.
- Back at the AWS Management Console, search and select EC2 instance
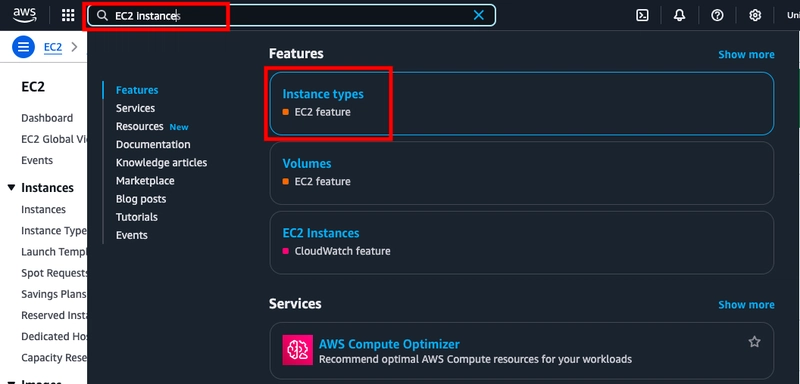
- Select Launch instances.

- Choose a name for your instance, select Amazon Linux and choose and select the HVM edition of the Amazon Linux AMI under Amazon Machine Image (AMI).
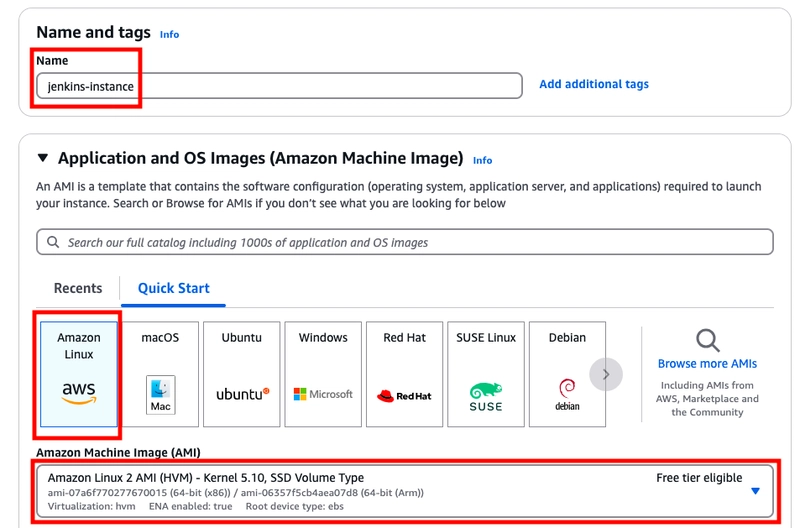
- Scroll down, select the key pair you created earlier, choose existing security group and select Launch instance.


Installing and configuring Jenkins
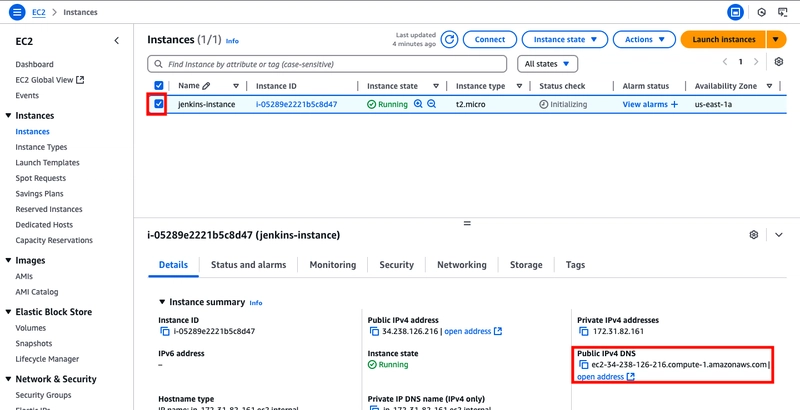
Once your instance is launched, you can connect to it and use it just like your local machine.
Before connecting, retrieve the instance's public DNS name from the Amazon EC2 console by ticking the instance and copying the DNS name.
I will be using VS Code to connect to my EC2 instance, you can use any other IDE.
Using OpenSSH to connect to your instance (Windows)
- Open a terminal or PowerShell window.
- Use the ssh command to connect to the instance. You will specify the private key (.pem) file and ec2-user@public_dns_name.
ssh -i /path/my-key-pair.pem ec2-user@ec2-198-51-100-1.compute-1.amazonaws.com
You will receive a response like the following:
The authenticity of host 'ec2-198-51-100-1.compute1.amazonaws.com (10.254.142.33)' can't be
established.

RSA key fingerprint is 1f:51:ae:28:bf:89:e9:d8:1f:25:5d:37:2d:7d:b8:ca:9f:f5:f1:6f.

Are you sure you want to continue connecting
(yes/no)?
- Enter yes.
You will receive a response like the following:
Warning: Permanently added 'ec2-198-51-100-1.compute1.amazonaws.com' (RSA) to the list of known hosts.
Using SSH to connect to your instance (Linux/Mac)
For this project, I am making use of Mac and run the following command in my VS Code:
ssh -i ~/Downloads/jenkins-key.pem ec2-user@ec2-34-238-126-216.compute-1.amazonaws.com
NOTE:You will need to change your key path if it is not located in Downloads folder, same with the name if your name is different.
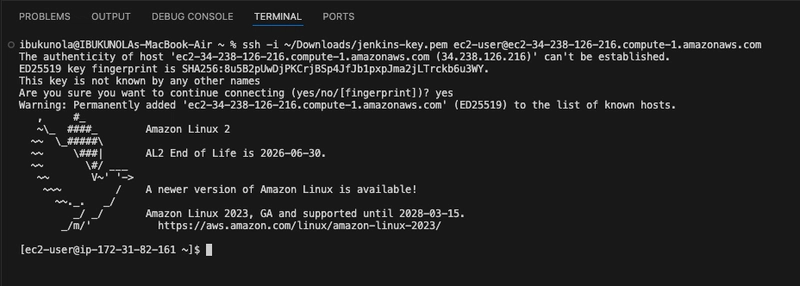
Now you are connected to your EC2 instance.
Downloading and installing Jenkins
Now that your instance is up and running, install Jenkins on it by running the following command to perform quick software update:
sudo yum update –y
- Add the Jenkins repo using the following command:
sudo wget -O /etc/yum.repos.d/jenkins.repo \

    https://pkg.jenkins.io/redhat-stable/jenkins.repo
- Import a key file from Jenkins-CI to enable installation from the package:
sudo rpm --import https://pkg.jenkins.io/redhat-stable/jenkins.io-2023.key

sudo yum upgrade
- Install Java:
sudo yum install java-17-amazon-corretto -y

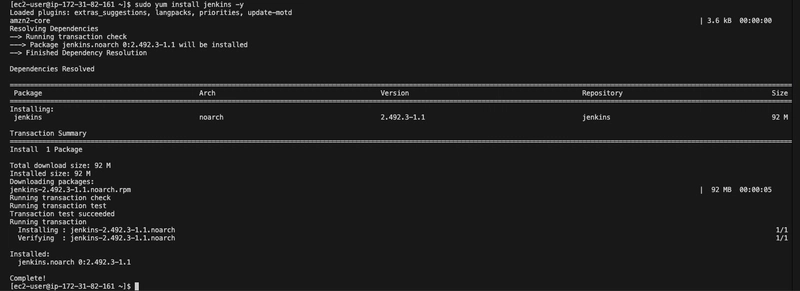
- Install Jenkins:
sudo yum install jenkins -y
- Enable the Jenkins service to start at boot:
sudo systemctl enable jenkins
![]()
- Start Jenkins as a service:
sudo systemctl start jenkins
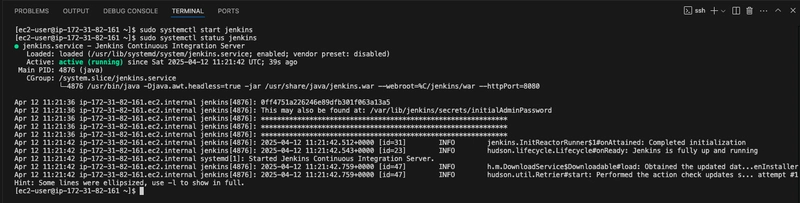
- You can check the status of the Jenkins service using the command:
sudo systemctl status jenkins
Configuring Jenkins
Jenkins is now installed and running on your EC2 instance. To set up Jenkins, follow these steps:
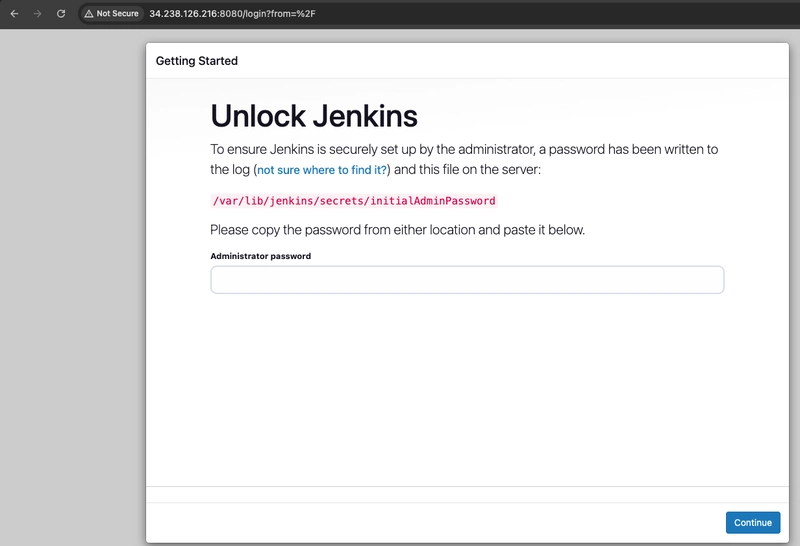
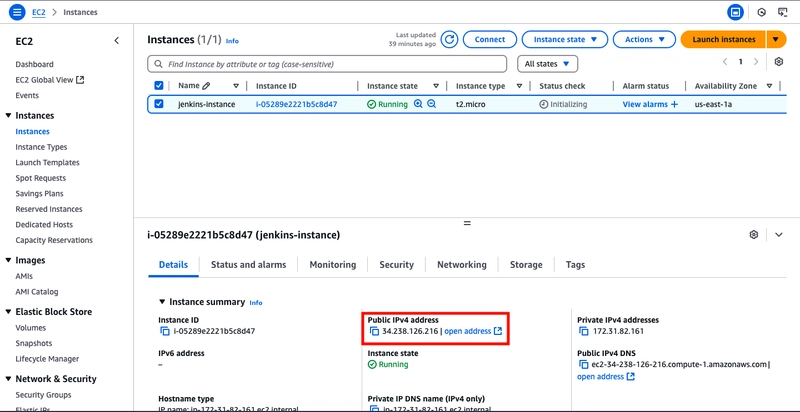
- Connect to http://:8080 from your browser. You will be able to access Jenkins through its management interface:
 NOTE: You can get your Public DNS from your instance
- As prompted, enter the password found in /var/lib/jenkins/secrets/initialAdminPassword. Use the following command to display the password:
sudo cat /var/lib/jenkins/secrets/initialAdminPassword

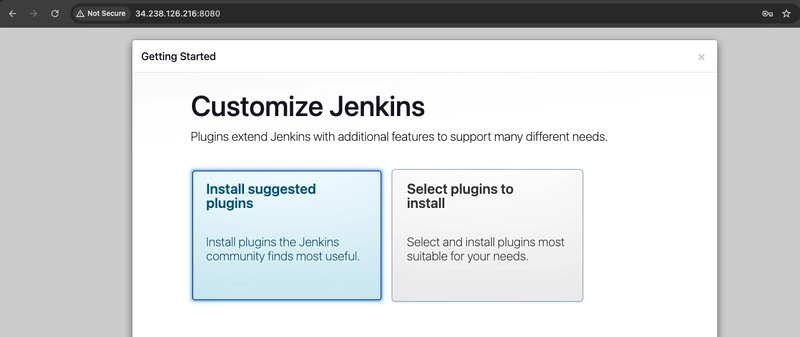
- The Jenkins installation script directs you to the Customize Jenkins page. Click Install suggested plugins.
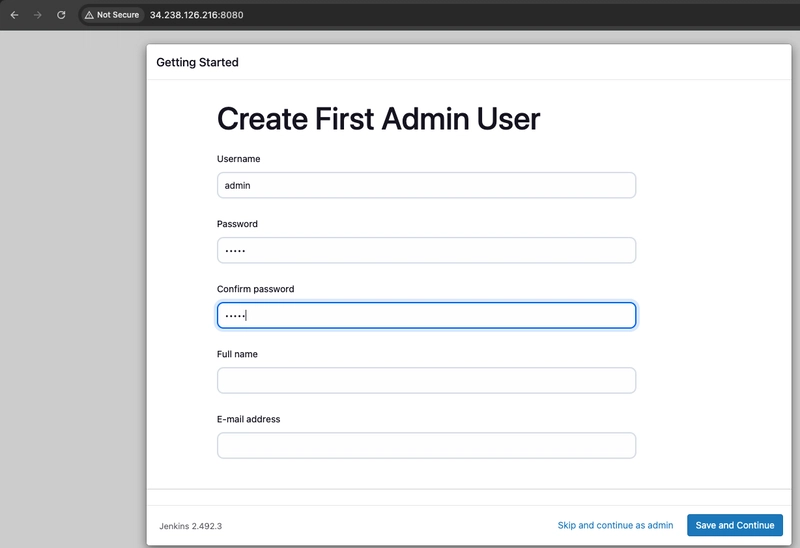
- Once the installation is complete, the Create First Admin User will open. Enter your information, and then select Save and Continue.
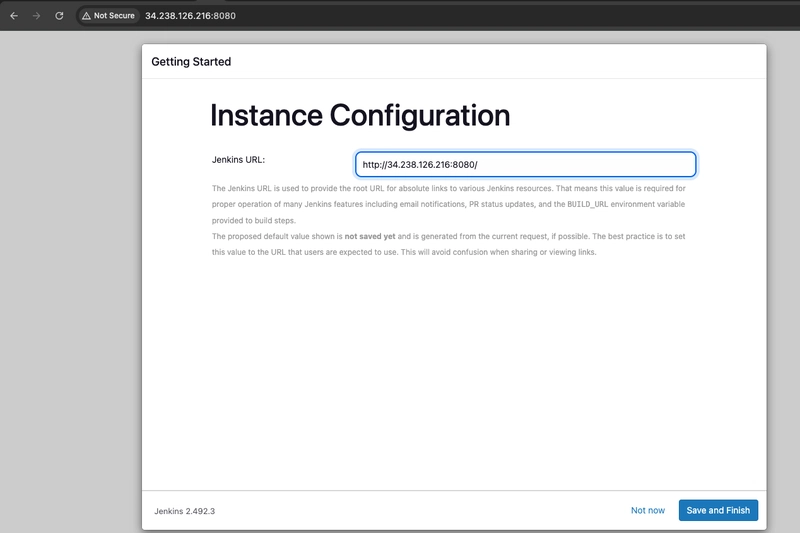
- Click Save and Finish
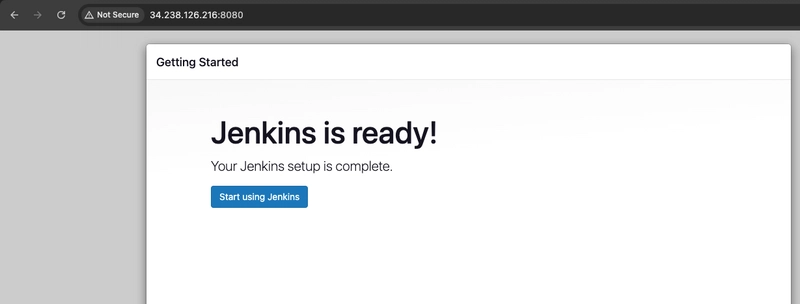
- Select Start using Jenkins
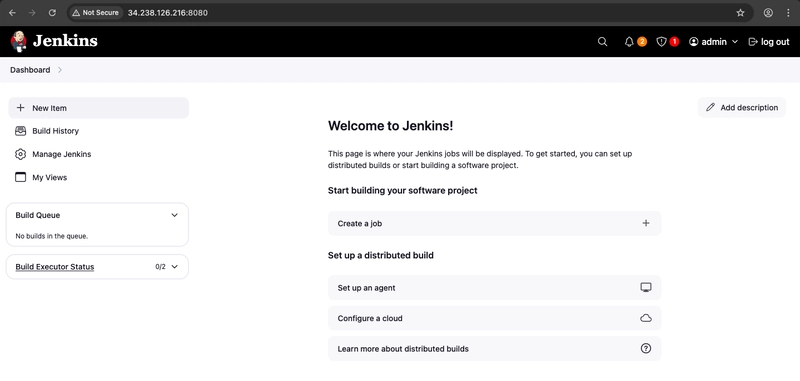
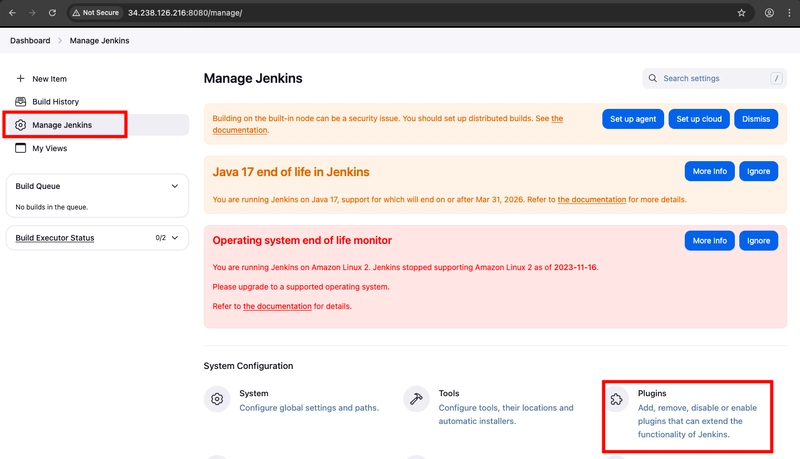
- On the left-hand side, select Manage Jenkins, and then select Plugins.
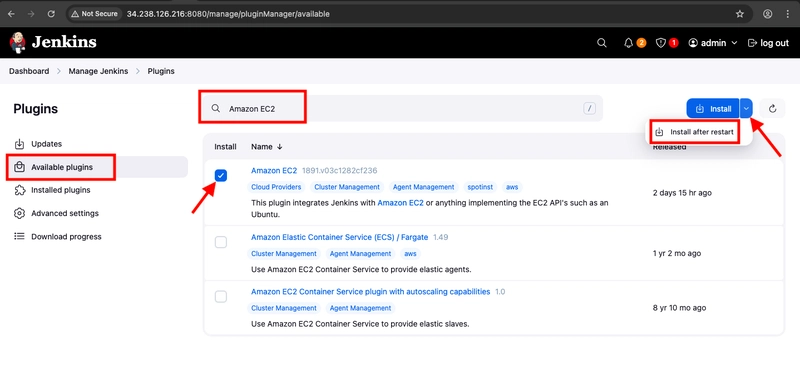
- Select the Available tab, and then enter Amazon EC2 plugin at the top right.
- Select the checkbox next to Amazon EC2 plugin, and then select Install without restart.
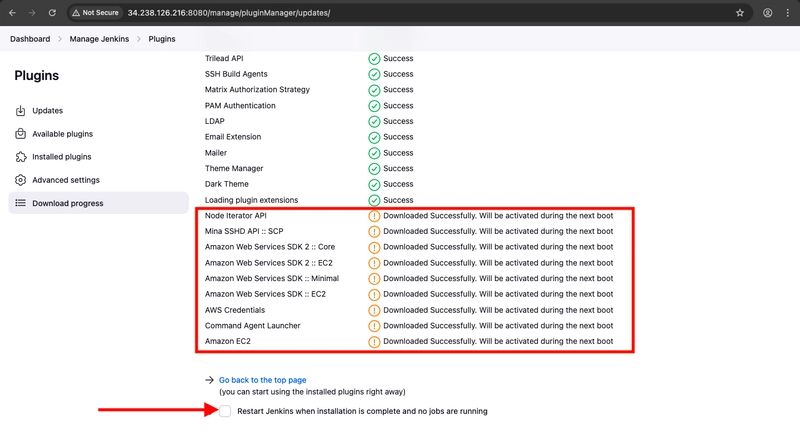
- Since our Plugins will be activated in the next boot, click Restart Jenkins when installation is complete...
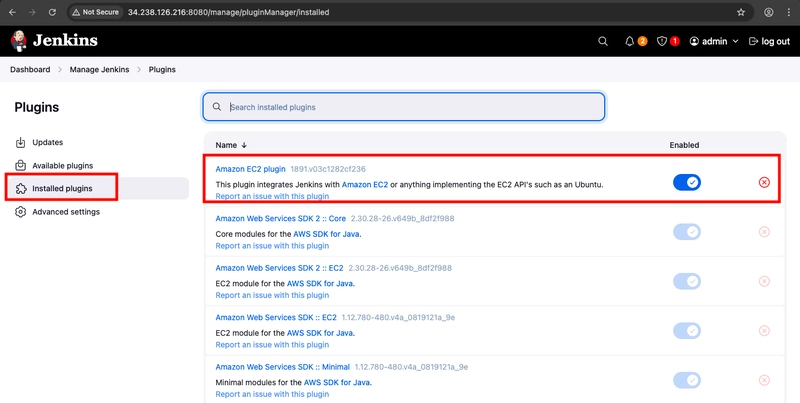
- You will be asked to login, after logging in, check that the plugins has been installed in Installed Plugins.
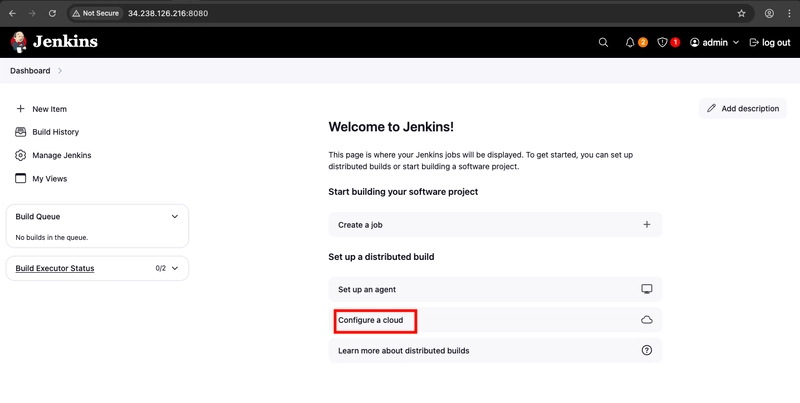
- Once the installation is done, select Back to Dashboard.
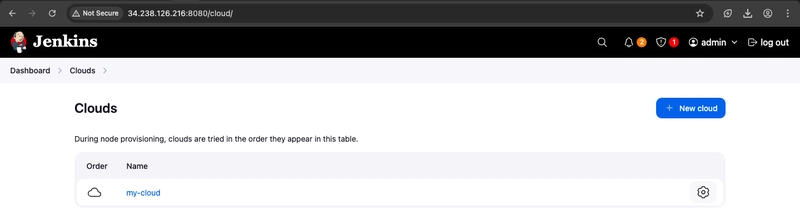
- Select Configure a cloud if there are no existing nodes or clouds.
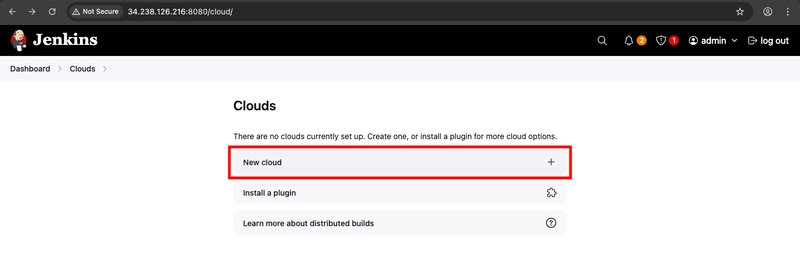
- Click on New cloud.
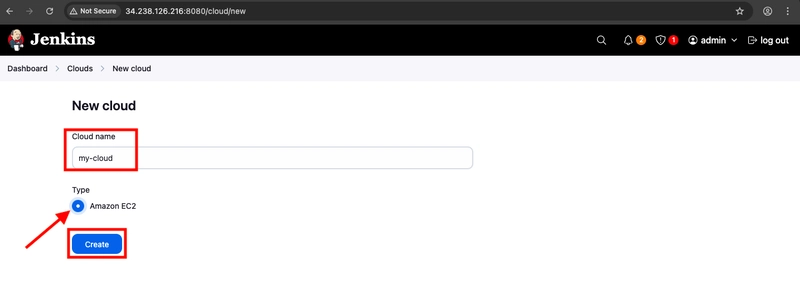
- Give a name for your cloud, select Amazon EC2 under Type and click Create.
- Click Add and select Jenkins.
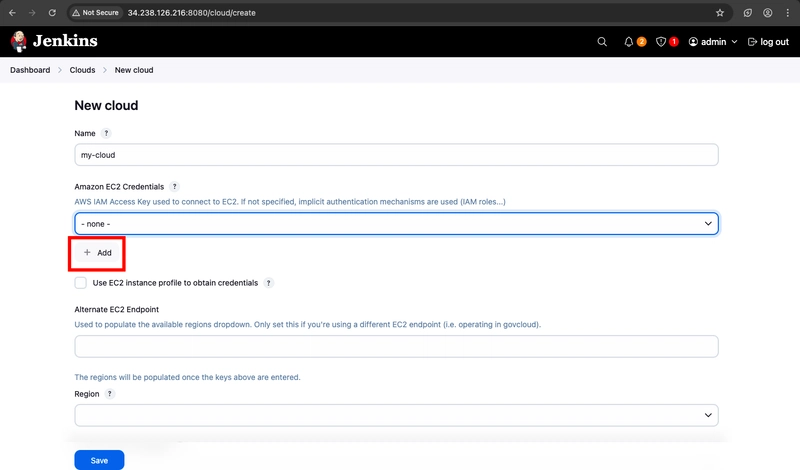
- From the Jenkins Credentials Provider, select AWS Credentials as the Kind.
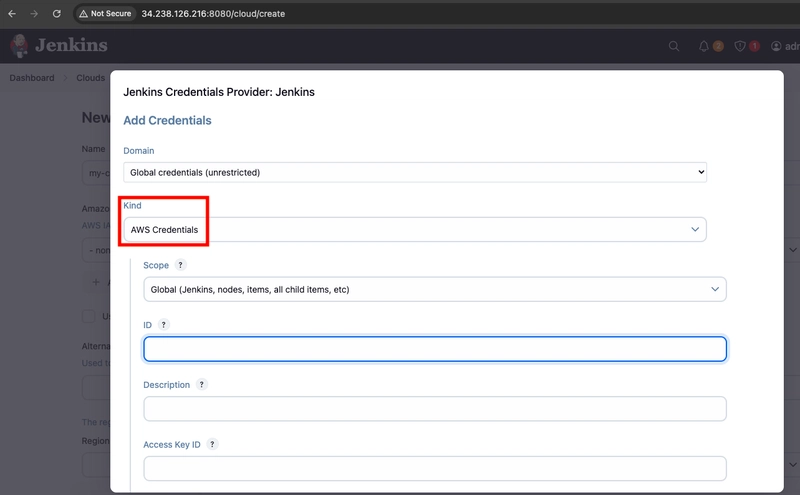
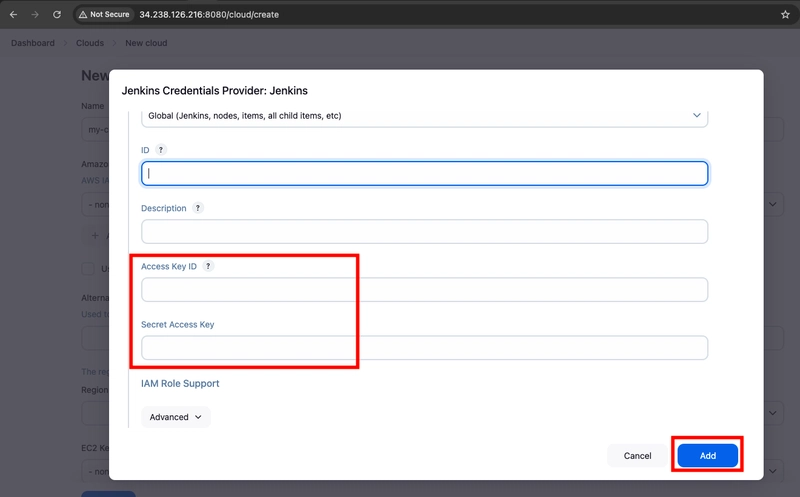
- Scroll down and enter the IAM user's programmatic access keys that have permissions to launch EC2 instances, then click Add.
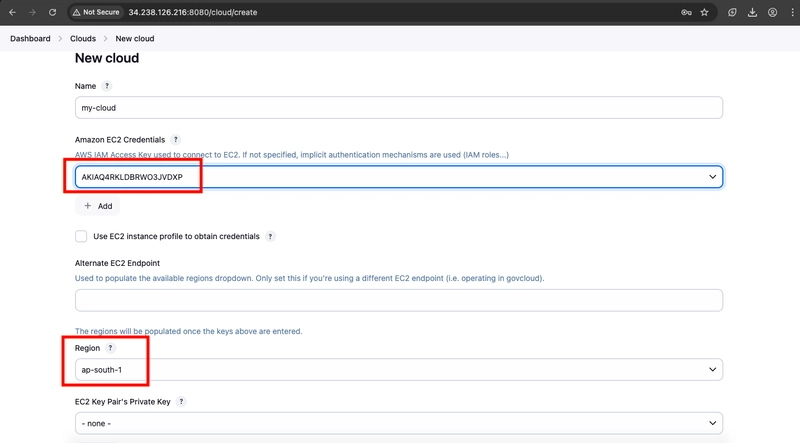
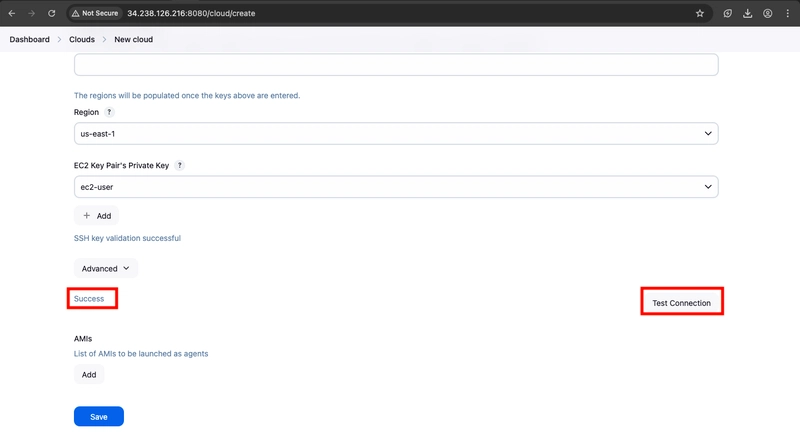
- Select the newly created credentials under Amazon EC2 credentials and choose your Region.
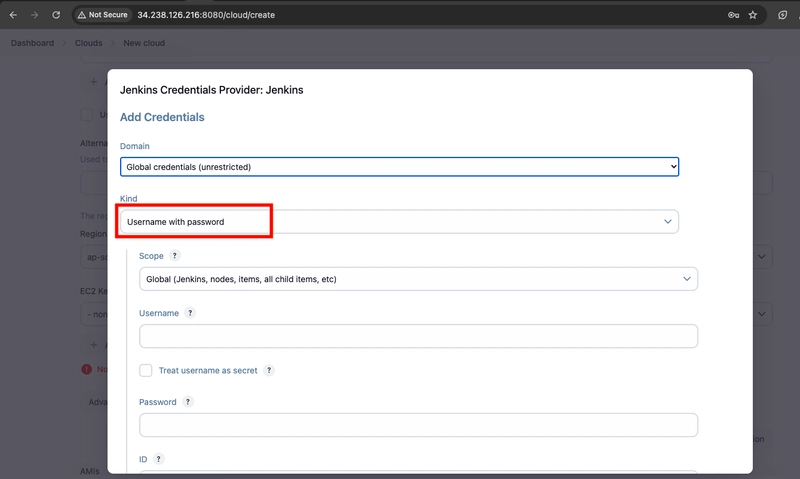
- Select Add for the EC2 Key Pair’s Private Key.
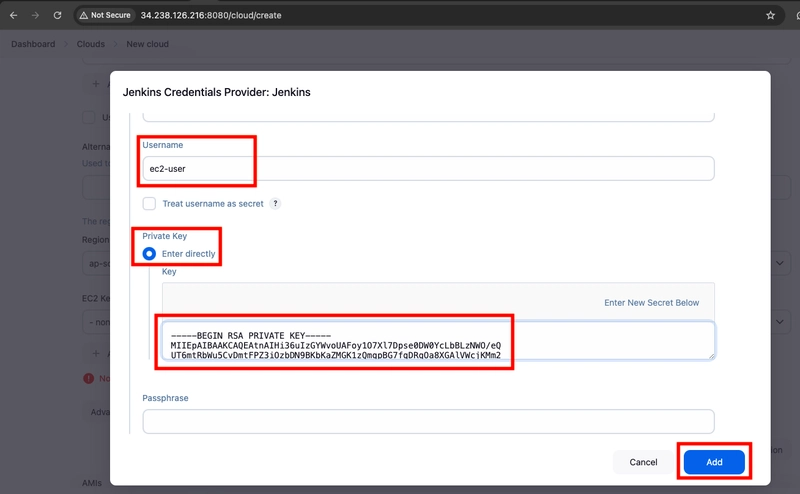
- In the Jenkins Credentials Provider, set the Kind to SSH Username with private key, and enter ec2-user as the Username.
- Scroll down and select Enter Directly under Private Key, then select Add.
- Open the private key pair you created in the creating a key pair step and paste in the contents from "-----BEGIN RSA PRIVATE KEY-----" to "-----END RSA PRIVATE KEY-----". Select Add when completed.
- Scroll down to "Test Connection" and ensure it states "Success". Select Save when done
- You are now ready to use EC2 instances as Jenkins agents.
Thanks for staying till the end