


![[The AI Show Episode 144]: ChatGPT’s New Memory, Shopify CEO’s Leaked “AI First” Memo, Google Cloud Next Releases, o3 and o4-mini Coming Soon & Llama 4’s Rocky Launch](https://www.marketingaiinstitute.com/hubfs/ep%20144%20cover.png)


![BPMN-procesmodellering [closed]](https://i.sstatic.net/l7l8q49F.png)


-All-will-be-revealed-00-35-05.png?width=1920&height=1920&fit=bounds&quality=70&format=jpg&auto=webp#)
-All-will-be-revealed-00-17-36.png?width=1920&height=1920&fit=bounds&quality=70&format=jpg&auto=webp#)


![What iPhone 17 model are you most excited to see? [Poll]](https://9to5mac.com/wp-content/uploads/sites/6/2025/04/iphone-17-pro-sky-blue.jpg?quality=82&strip=all&w=290&h=145&crop=1)


![Hands-On With 'iPhone 17 Air' Dummy Reveals 'Scary Thin' Design [Video]](https://www.iclarified.com/images/news/97100/97100/97100-640.jpg)
![Mike Rockwell is Overhauling Siri's Leadership Team [Report]](https://www.iclarified.com/images/news/97096/97096/97096-640.jpg)
![Instagram Releases 'Edits' Video Creation App [Download]](https://www.iclarified.com/images/news/97097/97097/97097-640.jpg)
![Inside Netflix's Rebuild of the Amsterdam Apple Store for 'iHostage' [Video]](https://www.iclarified.com/images/news/97095/97095/97095-640.jpg)


Connect Objects in 3D Scene with 2D Pages Through HT Line
Original article: Linking 2D view and 3D scene with Hightopo Edge | by hightopo | Apr, 2025 | Medium HT for Web (HT for short) is a flexible front-end component library that allows people to develop rich features and effects if they are imaginative enough. This article will demonstrate the skill of using connecting lines through code and examples. Let’s explore how to dynamically connect 2D and 3D content. Analysis How can we create a line that bridges the 2D view and the 3D scene? While this may seem daunting at first, developers familiar with HT for Web will recognize a simple solution: the line functions as an edge between 2D nodes, with its endpoints’ positions being continuously updated. So, in principle, the main points to be realized are as follows: Get the coordinates of the two points in 2D and 3D respectively; Convert the coordinates in 3D to the 2D view; Draw a 2D edge connecting these two coordinates on 2D; If realized in code, the general steps are as follows: First, let’s create a 2D and 3D view separately, and set some default properties. // Create 3d scene and add it to the DOM dm3d = new ht.DataModel(); g3d = new ht.graph3d.Graph3dView(dm3d); g3d.addToDOM(); // Create 2d view and add it to the DOM dm2d = new ht.DataModel(); g2d = new ht.graph.GraphView(dm2d); g2d.addToDOM(g3d.getView()); g2d.setZoomable(false); Second, encapsulate the 2D/3D coordinate conversion method, which is the key content of this function. function setPosotion(node3d, node2d) { // Convert the position from 3D scene to 2D screen var viewPoint = g3d.toViewPosition(node3d.p3()); // Convert the position from 2D screento HT g2d var position = g2d.getLogicalPoint(viewPoint); // Update the node position node2d.p(position); } Then, create nodes and add them to the corresponding views. // The node in 3D node3d = new ht.Node(); dm3d.add(node3d); // The node in 2D, which will connect with the node in 3D node1 = new ht.Node(); node1.p(100, 100); dm2d.add(node1); // The node in 2D, which is used to represents the node position in 3D. node2 = new ht.Node(); setPosotion(node3d, node2); node2.s('opacity', 0); // Hide the node dm2d.add(node2); // Create edge edge = new ht.Edge(); edge.setSource(node1); edge.setTarget(node2); dm2d.add(edge); At last, monitor and synchronize the 3D node’s position to 2D; there are two main ways: Monitor the eye and center changes event in the 3D scene, for cases where the 3D node position does not change, such as building nodes. g3d.mp(e => { if (e.property === "eye" || e.property === "center") { setPosotion(node3d, node2); } }) Refresh every frame, for cases where the scene node position will change, such as moving vehicles. let func = () => { setPosotion(node3d, node2); requestAnimationFrame(func); } func(); The core of the 2D/3D linking is the precise coordinate transformation. By using this method, we are able to significantly improve the visual appearance of the interface, making the 2D information panels more clearly related to the 3D content. This makes the UI more intuitive, greatly enhancing user experience and understanding of information. Demonstration When the user clicks on a 3D model in the scene, a corresponding information panel will be displayed on the 2D view. This panel displays the attributes and data of the selected model in detail. At the same time, a line connects the 2D information panel to the 3D model so that the user knows exactly which model corresponds to which information panel. This makes it easy for the user to quickly find the corresponding model and information, which enhances the user experience. When the user clicks on a moving vehicle, the system will show a detailed vehicle information panel in the 2D view. In order to ensure that the user can easily associate the information panel with the vehicle even when the vehicle is moving, the 23D linking method is used to generate a visual link to connect the vehicle and the information panel. No matter where the vehicle moves in the scene, this line is updated in real time, always maintaining the consistency between the vehicle and the information panel. In this way, the user can keep track of the vehicle’s information without confusing the source of the information with the vehicle’s movement. This use of connectivity between the 2D view and the 3D scene ensures that information is displayed accurately and optimizes the user experience. To ensure synchronization of data between the 3D node and the 2D information panel, in addition to using lines to connect the two elements, coordinate transformation can also be used to synchronize node positions. We can display the 2D information panel directly at the 3D node’s position through coordinate transformation when clicking the 3D node. Another example is for video surveillance. By embedding a video into a 2D pan
Original article: Linking 2D view and 3D scene with Hightopo Edge | by hightopo | Apr, 2025 | Medium
HT for Web (HT for short) is a flexible front-end component library that allows people to develop rich features and effects if they are imaginative enough.
This article will demonstrate the skill of using connecting lines through code and examples. Let’s explore how to dynamically connect 2D and 3D content.
Analysis
How can we create a line that bridges the 2D view and the 3D scene? While this may seem daunting at first, developers familiar with HT for Web will recognize a simple solution: the line functions as an edge between 2D nodes, with its endpoints’ positions being continuously updated.
So, in principle, the main points to be realized are as follows:
- Get the coordinates of the two points in 2D and 3D respectively;
- Convert the coordinates in 3D to the 2D view;
- Draw a 2D edge connecting these two coordinates on 2D;
If realized in code, the general steps are as follows:
- First, let’s create a 2D and 3D view separately, and set some default properties.
// Create 3d scene and add it to the DOM
dm3d = new ht.DataModel();
g3d = new ht.graph3d.Graph3dView(dm3d);
g3d.addToDOM();

// Create 2d view and add it to the DOM
dm2d = new ht.DataModel();
g2d = new ht.graph.GraphView(dm2d);
g2d.addToDOM(g3d.getView());
g2d.setZoomable(false);
- Second, encapsulate the 2D/3D coordinate conversion method, which is the key content of this function.
function setPosotion(node3d, node2d) {
    // Convert the position from 3D scene to 2D screen
    var viewPoint = g3d.toViewPosition(node3d.p3());
    // Convert the position from 2D screento HT g2d
    var position = g2d.getLogicalPoint(viewPoint);
    // Update the node position
    node2d.p(position);
}
- Then, create nodes and add them to the corresponding views.
// The node in 3D
node3d = new ht.Node();
dm3d.add(node3d);

// The node in 2D, which will connect with the node in 3D
node1 = new ht.Node();
node1.p(100, 100);
dm2d.add(node1);

// The node in 2D, which is used to represents the node position in 3D.
node2 = new ht.Node();
setPosotion(node3d, node2);
node2.s('opacity', 0); // Hide the node
dm2d.add(node2);

// Create edge
edge = new ht.Edge();
edge.setSource(node1);
edge.setTarget(node2);
dm2d.add(edge);
- At last, monitor and synchronize the 3D node’s position to 2D; there are two main ways:
- Monitor the eye and center changes event in the 3D scene, for cases where the 3D node position does not change, such as building nodes.
g3d.mp(e => {
    if (e.property === "eye" || e.property === "center") {
        setPosotion(node3d, node2);
    }
})
- Refresh every frame, for cases where the scene node position will change, such as moving vehicles.
let func = () => {
    setPosotion(node3d, node2);
    requestAnimationFrame(func);
}
func();
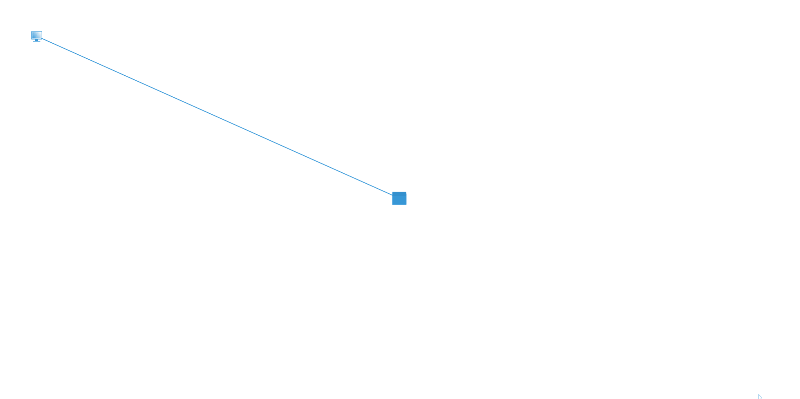
The core of the 2D/3D linking is the precise coordinate transformation. By using this method, we are able to significantly improve the visual appearance of the interface, making the 2D information panels more clearly related to the 3D content. This makes the UI more intuitive, greatly enhancing user experience and understanding of information.
Demonstration
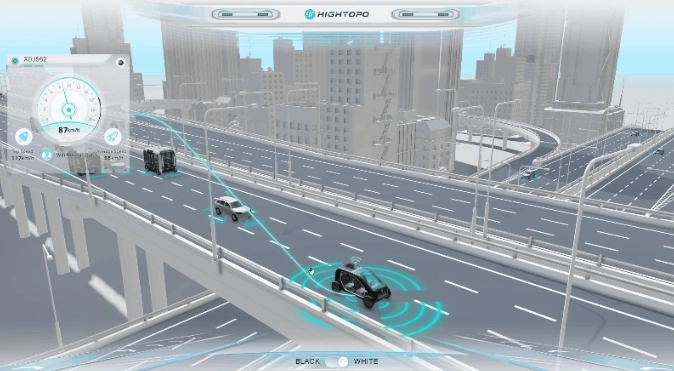
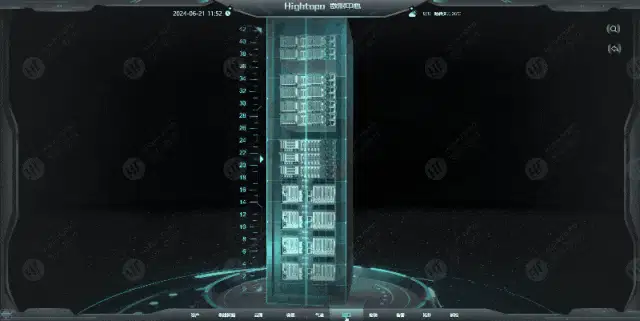
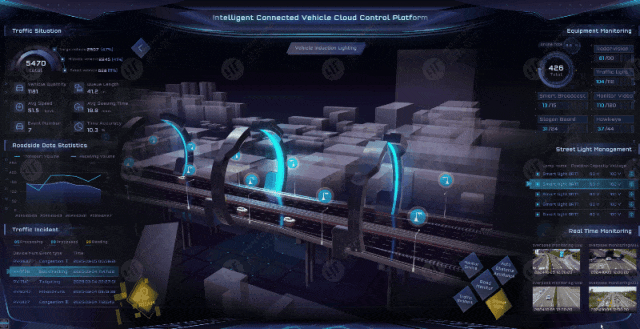
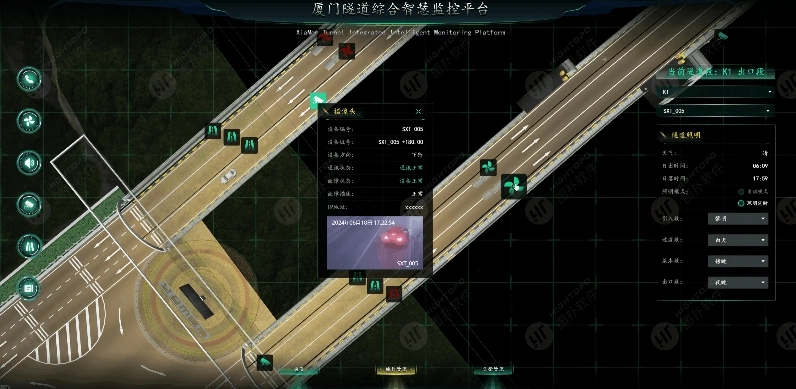
- When the user clicks on a 3D model in the scene, a corresponding information panel will be displayed on the 2D view. This panel displays the attributes and data of the selected model in detail. At the same time, a line connects the 2D information panel to the 3D model so that the user knows exactly which model corresponds to which information panel. This makes it easy for the user to quickly find the corresponding model and information, which enhances the user experience.
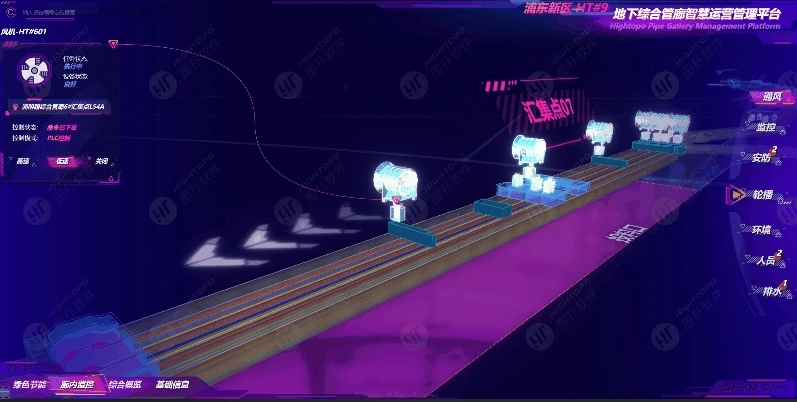
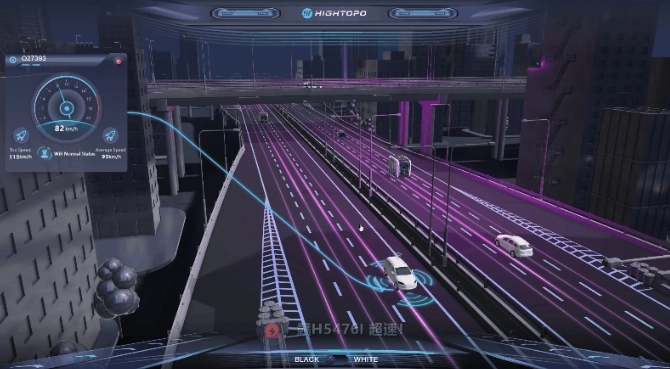
- When the user clicks on a moving vehicle, the system will show a detailed vehicle information panel in the 2D view. In order to ensure that the user can easily associate the information panel with the vehicle even when the vehicle is moving, the 23D linking method is used to generate a visual link to connect the vehicle and the information panel. No matter where the vehicle moves in the scene, this line is updated in real time, always maintaining the consistency between the vehicle and the information panel. In this way, the user can keep track of the vehicle’s information without confusing the source of the information with the vehicle’s movement.
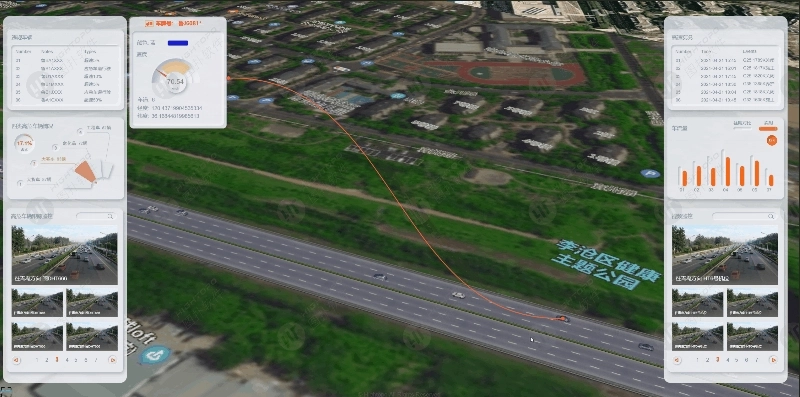
This use of connectivity between the 2D view and the 3D scene ensures that information is displayed accurately and optimizes the user experience.
To ensure synchronization of data between the 3D node and the 2D information panel, in addition to using lines to connect the two elements, coordinate transformation can also be used to synchronize node positions. We can display the 2D information panel directly at the 3D node’s position through coordinate transformation when clicking the 3D node.
Another example is for video surveillance. By embedding a video into a 2D panel and using coordinate transformation, when the camera icon is clicked in 3D, the current video content and other relevant data can be displayed at the exact location of the camera.
Summary
2D/3D connectivity is an efficient, dexterous, and intuitive approach. By drawing a visual line between a 3D object and its corresponding 2D information panel, it can solve the problem of matching the position of information due to the movement or change of the object. It greatly improves the user experience and accuracy of information delivery, especially in complex and dynamic scenes.
We will continue to publish more articles on HT implementation to further explore and optimize the application in different scenarios. Stay tuned!
You can visit our official website to view more cases:
https://www.hightopo.com/demos/index.html
Hightopo YouTube: https://www.youtube.com/hightopo
Hightopo Portfolio: https://www.hightopo.com/demos/en-index.html
Hightopo LinkedIn: https://www.linkedin.com/company/hightopo
Hightopo Medium Blog: https://hightopo.medium.com/
Hightopo Facebook: https://www.facebook.com/hightopo2d3d/
Hightopo Twitter: https://twitter.com/hightopo2d3d
Hightopo Instagram: https://www.instagram.com/hightopo/