


![[The AI Show Episode 144]: ChatGPT’s New Memory, Shopify CEO’s Leaked “AI First” Memo, Google Cloud Next Releases, o3 and o4-mini Coming Soon & Llama 4’s Rocky Launch](https://www.marketingaiinstitute.com/hubfs/ep%20144%20cover.png)


-Classic-Nintendo-GameCube-games-are-coming-to-Nintendo-Switch-2!-00-00-13.png?width=1920&height=1920&fit=bounds&quality=70&format=jpg&auto=webp#)


_Olekcii_Mach_Alamy.jpg?width=1280&auto=webp&quality=80&disable=upscale#)


![M4 MacBook Air Drops to New All-Time Low of $912 [Deal]](https://www.iclarified.com/images/news/97108/97108/97108-640.jpg)
![New iPhone 17 Dummy Models Surface in Black and White [Images]](https://www.iclarified.com/images/news/97106/97106/97106-640.jpg)


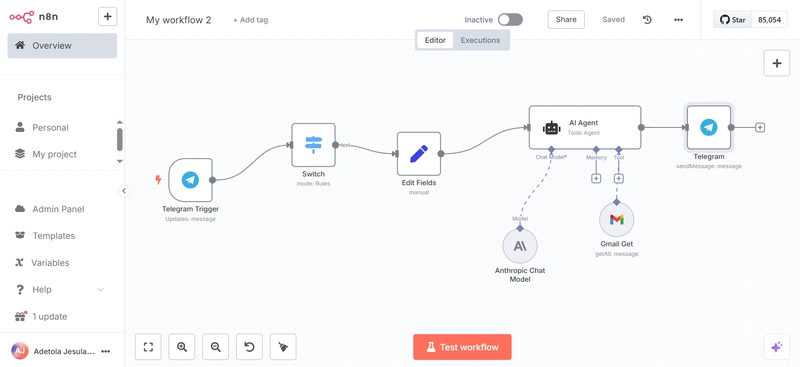
Building a Simple AI Agent with n8n
Introduction I've been playing around with AI Agents for a while now, and in a bit, I'll show you how I built a cool automation agent with n8n that pulls new and recent emails from my Gmail inbox and sends the results to me via Telegram. It's amazing and simple to use, especially since you won't always need to constantly check your inbox every 10 minutes for new emails. If you've never used n8n, it's a workflow automation tool (drag and drop) that is very powerful, flexible and builder-friendly. You can plug in many APIs, tools, apps, and bots to build literally almost anything. Let me show you how I did it. I've also made a quick YouTube video walking through the entire build - Build Gmail-to-Telegram AI Agent with n8n What We're Building: Trigger a flow when a Telegram message is sent. Pull the latest email(s) from your Gmail account Send the email content straight to your Telegram inbox Tools I Used: n8n: a tool for building the AI Agent workflow Gmail account: the inbox I wanted to track Telegram Bot: where I wanted to receive messages Google OAuth2: to connect securely to my Gmail Telegram credentials: to set up Telegram and send messages from my bot To create this workflow, you'd need to create an n8n account, and once you're all set up, on the homepage, create a new workflow. Step 1: Create the Telegram Trigger On your n8n canvas, click "Add step" and select Telegram on the pop-up, click "On Message" Set up the Telegram Trigger node by creating new credentials. Go to Telegram BotFather Create a bot (you’ll get a token - copy that) In the Telegram Trigger node, paste your Bot Token in there Once it's done, select your bot, and it’ll be linked. Test the step by sending a message to the Telegram prompt, and it should appear on the Output page. Step 2: Create Switch Node This is where it's decided what to do based on what you typed. The Switch looks at the message you sent in Telegram and checks if it matches the condition (or rules) you've set. If it matches, it routes to the next action. Otherwise, it presents an error. Click the "+" button on the far right and search for "Switch" Under "Mode", select "Rules" and under "Routing Rules", drag and drop the file ID of your previous test (the test message you sent previously) so it recognizes texts Lastly, rename output as "text" and test again (always best to delete previous workflow and test anew) Step 3: Edit Fields (Set Node) This Set node allows you to format what data goes into the next steps. It can set new data as well as overwrite data that already exists. Here, I created a clean format that includes the message from Telegram and gives the AI a simple prompt. Set "Node" to "Manual Mapping" In "Fields to Set", drag and drop the file ID of your previous test and set it to a "String" Step 4: Setting up AI Agent Node This is where the magic begins. This AI Agent is basically the heart; it's what connects with the actual AI model. I passed in a prompt that’s structured with the message from Telegram and a bit of instruction, telling it what kind of output I expect. You can connect this with Anthropic, OpenAI, or other LLM tools, depending on what you want. Under "Source for Prompt (User Message)", select "Define Below" and under "Prompt(User Message), drag and drop the file ID of a previous test Under "System Message", give it a prompt that can read and get emails from your Gmail account tool Step 5: Set up Anthropic Chat Model This is the actual chat model doing the heavy lifting. I used the Anthropic Claude model here because it’s great at clean responses and structured outputs. It takes the Telegram message (processed earlier) and returns a response, which could be a reply, a summary, an insight, or a decision. This lets the agent reply like a real assistant. You can swap this out for any other LLM — Claude, GPT-4, etc. Connect Anthropic Chat Model to AI Agent Set up necessary credentials using the API key from your Anthropic account, as seen below Step 6: Gmail Get Message (Gmail Node) Now it’s time to fetch the data. This node connects to Gmail using the credentials you set by connecting your account (OAuth-based). It pulls recent unread messages from the inbox. Here, you can control how many it fetches or apply filters (from a specific sender, subject, etc.) Once you set up the credential linking your account, set "Tool Description" to "Set Automatically" "Resource" as "Message" and "Operation" as "Get Many" You can choose to set a limit and add filter(s) based on your preference Step 7: Set up Telegram (Send Message) as output This is the final step, the response delivery. This node sends a Telegram message back to the bot. It feels like chatting with a real assistant on Telegram, and it's instantly responsive. Select existing credentials linking your Telegram account, choose "Messa
Introduction
I've been playing around with AI Agents for a while now, and in a bit, I'll show you how I built a cool automation agent with n8n that pulls new and recent emails from my Gmail inbox and sends the results to me via Telegram.
It's amazing and simple to use, especially since you won't always need to constantly check your inbox every 10 minutes for new emails. If you've never used n8n, it's a workflow automation tool (drag and drop) that is very powerful, flexible and builder-friendly. You can plug in many APIs, tools, apps, and bots to build literally almost anything.
Let me show you how I did it. I've also made a quick YouTube video walking through the entire build - Build Gmail-to-Telegram AI Agent with n8n
What We're Building:
Trigger a flow when a Telegram message is sent.
Pull the latest email(s) from your Gmail account
Send the email content straight to your Telegram inbox
Tools I Used:
n8n: a tool for building the AI Agent workflow
Gmail account: the inbox I wanted to track
Telegram Bot: where I wanted to receive messages
Google OAuth2: to connect securely to my Gmail
Telegram credentials: to set up Telegram and send messages from my bot
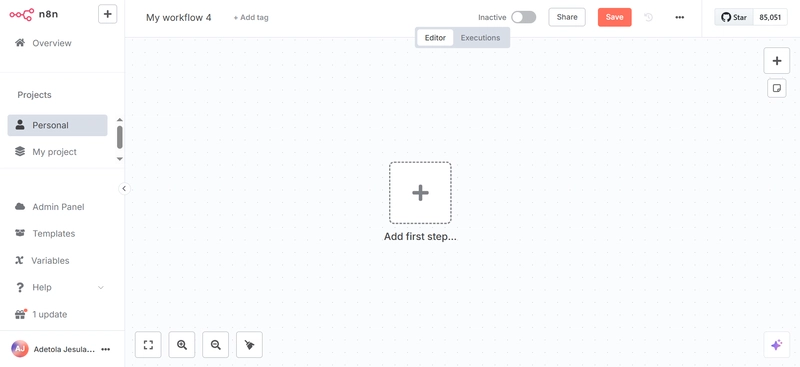
To create this workflow, you'd need to create an n8n account, and once you're all set up, on the homepage, create a new workflow.
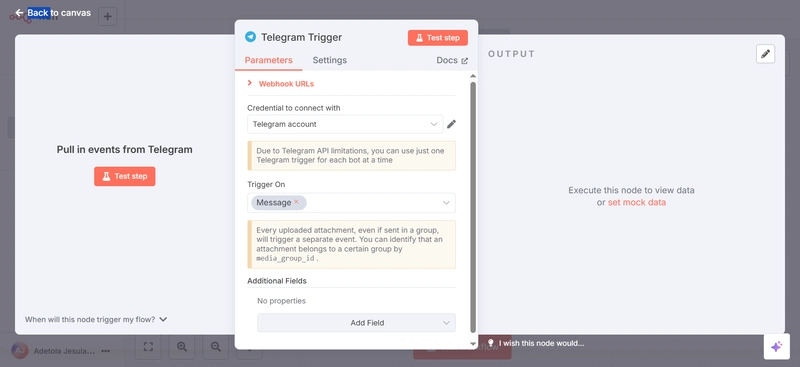
Step 1: Create the Telegram Trigger
On your n8n canvas, click "Add step" and select Telegram on the pop-up, click "On Message"
Set up the Telegram Trigger node by creating new credentials. Go to Telegram BotFather
Create a bot (you’ll get a token - copy that)
In the Telegram Trigger node, paste your Bot Token in there
Once it's done, select your bot, and it’ll be linked. Test the step by sending a message to the Telegram prompt, and it should appear on the Output page.
Step 2: Create Switch Node
This is where it's decided what to do based on what you typed. The Switch looks at the message you sent in Telegram and checks if it matches the condition (or rules) you've set. If it matches, it routes to the next action. Otherwise, it presents an error.
Click the "+" button on the far right and search for "Switch"
Under "Mode", select "Rules" and under "Routing Rules", drag and drop the file ID of your previous test (the test message you sent previously) so it recognizes texts
Lastly, rename output as "text" and test again (always best to delete previous workflow and test anew)

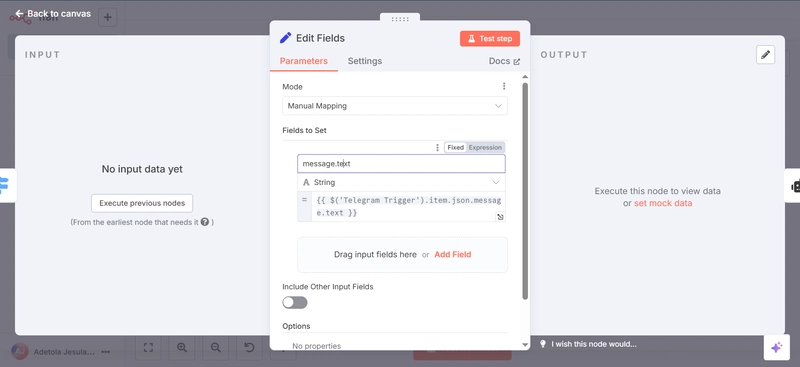
Step 3: Edit Fields (Set Node)
This Set node allows you to format what data goes into the next steps. It can set new data as well as overwrite data that already exists. Here, I created a clean format that includes the message from Telegram and gives the AI a simple prompt.
Set "Node" to "Manual Mapping"
In "Fields to Set", drag and drop the file ID of your previous test and set it to a "String"
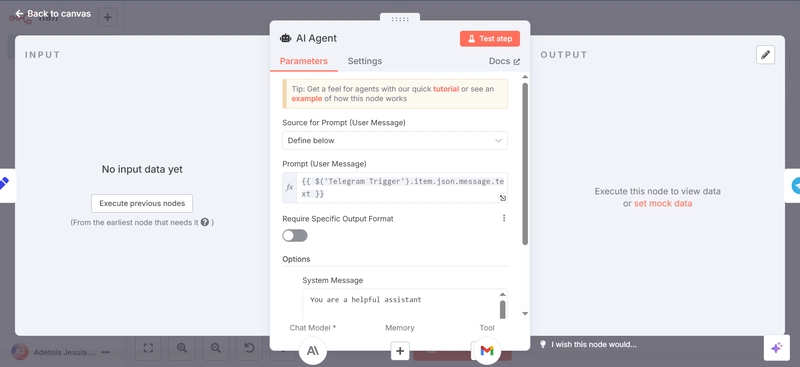
Step 4: Setting up AI Agent Node
This is where the magic begins. This AI Agent is basically the heart; it's what connects with the actual AI model. I passed in a prompt that’s structured with the message from Telegram and a bit of instruction, telling it what kind of output I expect.
You can connect this with Anthropic, OpenAI, or other LLM tools, depending on what you want.
Under "Source for Prompt (User Message)", select "Define Below" and under "Prompt(User Message), drag and drop the file ID of a previous test
Under "System Message", give it a prompt that can read and get emails from your Gmail account tool
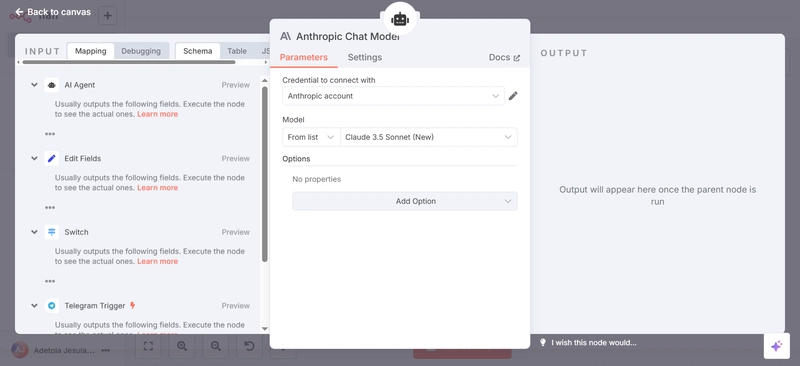
Step 5: Set up Anthropic Chat Model
This is the actual chat model doing the heavy lifting. I used the Anthropic Claude model here because it’s great at clean responses and structured outputs.
It takes the Telegram message (processed earlier) and returns a response, which could be a reply, a summary, an insight, or a decision. This lets the agent reply like a real assistant.
You can swap this out for any other LLM — Claude, GPT-4, etc.
Connect Anthropic Chat Model to AI Agent
Set up necessary credentials using the API key from your Anthropic account, as seen below
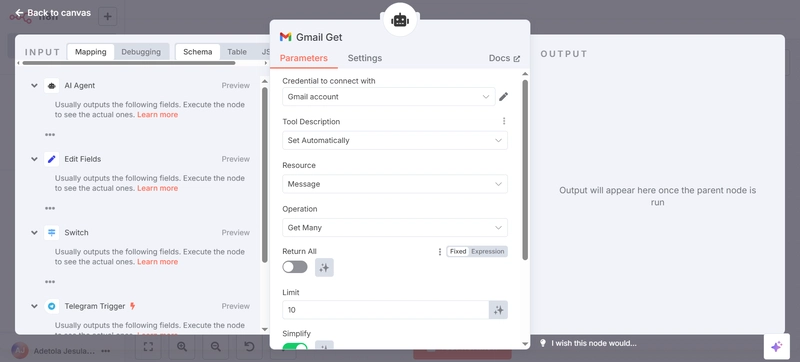
Step 6: Gmail Get Message (Gmail Node)
Now it’s time to fetch the data. This node connects to Gmail using the credentials you set by connecting your account (OAuth-based).
It pulls recent unread messages from the inbox. Here, you can control how many it fetches or apply filters (from a specific sender, subject, etc.)
Once you set up the credential linking your account, set "Tool Description" to "Set Automatically"
"Resource" as "Message" and "Operation" as "Get Many"
You can choose to set a limit and add filter(s) based on your preference
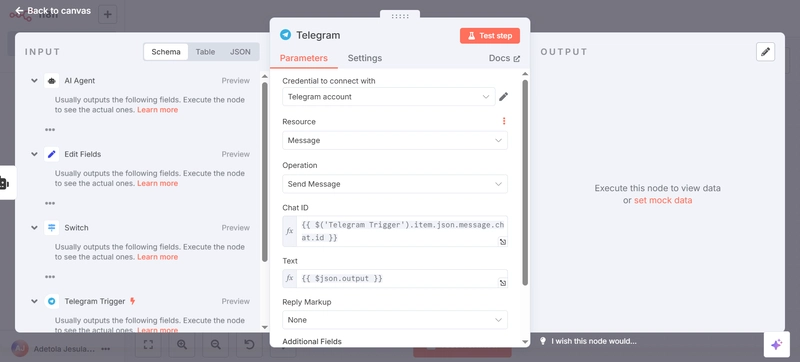
Step 7: Set up Telegram (Send Message) as output
This is the final step, the response delivery. This node sends a Telegram message back to the bot. It feels like chatting with a real assistant on Telegram, and it's instantly responsive.
Select existing credentials linking your Telegram account, choose "Message" for "Resource", and “Send Message” as the operation
Drag the previous chat ID and Text
- Test the workflow, go to your Telegram, and type a prompt. And just like that, you’ve built your own AI email-checking Telegram agent.
This might seem like a simple automation, but it’s actually one of those use cases that proves how powerful AI agents and tools like n8n can be. Plus, you didn’t need to write a single line of code to do it. Imagine combining this with OpenAI or adding voice triggers next...
I made a quick YouTube video walking through the entire build - Build Gmail-to-Telegram AI Agent with n8n. If you try this, tag me on X or LinkedIn — I want to see what you’re building too.
Happy building