


![[The AI Show Episode 144]: ChatGPT’s New Memory, Shopify CEO’s Leaked “AI First” Memo, Google Cloud Next Releases, o3 and o4-mini Coming Soon & Llama 4’s Rocky Launch](https://www.marketingaiinstitute.com/hubfs/ep%20144%20cover.png)


![Is there a windows-based CIDR list sorter / condenser - aggregator? [closed]](https://cdn.sstatic.net/Sites/softwareengineering/Img/apple-touch-icon@2.png?v=1ef7363febba)


_Andreas_Prott_Alamy.jpg?width=1280&auto=webp&quality=80&disable=upscale#)


![What features do you get with Gemini Advanced? [April 2025]](https://i0.wp.com/9to5google.com/wp-content/uploads/sites/4/2024/02/gemini-advanced-cover.jpg?resize=1200%2C628&quality=82&strip=all&ssl=1)


![Apple Shares Official Trailer for 'Long Way Home' Starring Ewan McGregor and Charley Boorman [Video]](https://www.iclarified.com/images/news/97069/97069/97069-640.jpg)
![Apple Watch Series 10 Back On Sale for $299! [Lowest Price Ever]](https://www.iclarified.com/images/news/96657/96657/96657-640.jpg)
![EU Postpones Apple App Store Fines Amid Tariff Negotiations [Report]](https://www.iclarified.com/images/news/97068/97068/97068-640.jpg)


![Mobile Legends: Bang Bang [MLBB] Free Redeem Codes April 2025](https://www.talkandroid.com/wp-content/uploads/2024/07/Screenshot_20240704-093036_Mobile-Legends-Bang-Bang.jpg)


AWS Lightsail in Action: Launching and Scaling Your Web Server Efficiently.
Description Deploy a Java web app to AWS Lightsail using Jenkins for CI/CD. Learn how to launch, automate, and scale your app with this hands-on tutorial. Are you looking for a fast, affordable, and beginner-friendly way to deploy your Java app to the cloud? In this guide, you'll learn how to: Launch an AWS Lightsail instance Use Jenkins to build and deploy a containerized Java web application Scale your application smartly Introduction AWS Lightsail AWS Lightsail is a lightweight Virtual Private Server (VPS) service by Amazon Web Services, perfect for developers and small teams looking to deploy applications without diving into complex AWS configurations. Key Features of AWS Lightsail Straightforward Pricing with Predictable Costs One of Lightsail’s biggest advantages is its flat-rate pricing model. Unlike EC2’s pay-as-you-go model, Lightsail bundles compute resources, SSD storage, and data transfer into fixed monthly plans, starting as low as $5/month. This makes budgeting easier, especially for developers working on side projects or small teams managing costs without sacrificing performance. Quick Instance Setup and Pre-configured Applications Starting with AWS Lightsail is incredibly easy. Users can launch a virtual machine (instance) in just a few clicks. You can choose your preferred operating system (Linux or Windows) or select from a range of pre-configured application stacks such as WordPress, Node.js, LAMP, and more. This allows developers to skip lengthy server setup processes and get their applications online faster. Built-in Networking and Management Tools Lightsail includes several built-in tools to simplify server management. Users can easily assign static IPs, configure DNS settings, manage firewalls, and even integrate load balancers for high availability setups. These features are accessible via a user-friendly web interface, which removes the need for complex networking configurations typically associated with EC2 or other AWS infrastructure. Snapshots, Backups, and High Availability Data protection and recovery are made simple through Lightsail’s snapshot feature. You can create snapshots of your instances and storage volumes either manually or automatically. These snapshots can be used to restore data quickly or clone environments for testing or scaling. Lightsail also supports high availability by allowing load balancer integration and deploying across different availability zones. Seamless Migration to EC2 When your project outgrows Lightsail’s capabilities, migrating to EC2 is straightforward. Lightsail offers a built-in export tool that converts your instance into an EC2-compatible AMI. This makes it easy to transition to a more flexible and powerful AWS environment while maintaining your application setup and configurations. Ideal Use Cases AWS Lightsail is best suited for lightweight workloads and projects that require quick deployment and minimal maintenance. It is ideal for: Hosting blogs, portfolios, and e-commerce websites Running small-scale web applications and APIs Creating development or staging environments Deploying MVPs (Minimum Viable Products) Students or beginners learning server deployment Prerequisites Please ensure you have the following before we begin: An AWS account Jenkins installed (locally or remotely) Apache Maven installed (locally or remotely) A Java project (using Maven or Gradle) Docker installed (locally or remotely) Basic familiarity with terminal commands Step 1: Create a Lightsail Instance Visit AWS Lightsail Click Create instance Select your instance location. For this project, I chose Virginia us-east-1 region. Choose your instance image; this is the operating system. Platform: Linux/Unix Blueprint: OS-only (Ubuntu) For this demo, I chose Ubuntu distribution of Linux operating system without any Apps added. Pick an instance plan from (as low as $5/month). This is one of the major benefits of the AWS Lightsail it removes the unpredictability of cloud costs and allows small businesses to operate within a tight budget. Give your instance a unique name; this will enable you to identify it, and then click on the Create Instance button to launch it. The instance starting Click on the Instance icon to see the details Download the .pem private SSH key. You need this to connect to the instance from an SSH agent or terminal. For this project, we connected directly from the Lightsail management console. Click on the Networking tab and scroll down to IPv4 Firewall under it click on Add rule. This will open a pane to configure inbound rule. Under Application, select Custom, for Protocol select TCP and Port or range enter 8080. Step 2: Connect to Your Instance Use the command below if you are connecting from a command line. ssh -i ~/Downl
Description
Deploy a Java web app to AWS Lightsail using Jenkins for CI/CD. Learn how to launch, automate, and scale your app with this hands-on tutorial.
Are you looking for a fast, affordable, and beginner-friendly way to deploy your Java app to the cloud?
In this guide, you'll learn how to:
- Launch an AWS Lightsail instance
- Use Jenkins to build and deploy a containerized Java web application
- Scale your application smartly
Introduction
AWS Lightsail
AWS Lightsail is a lightweight Virtual Private Server (VPS) service by Amazon Web Services, perfect for developers and small teams looking to deploy applications without diving into complex AWS configurations.
Key Features of AWS Lightsail
Straightforward Pricing with Predictable Costs
One of Lightsail’s biggest advantages is its flat-rate pricing model. Unlike EC2’s pay-as-you-go model, Lightsail bundles compute resources, SSD storage, and data transfer into fixed monthly plans, starting as low as $5/month. This makes budgeting easier, especially for developers working on side projects or small teams managing costs without sacrificing performance.
Quick Instance Setup and Pre-configured Applications
Starting with AWS Lightsail is incredibly easy. Users can launch a virtual machine (instance) in just a few clicks. You can choose your preferred operating system (Linux or Windows) or select from a range of pre-configured application stacks such as WordPress, Node.js, LAMP, and more. This allows developers to skip lengthy server setup processes and get their applications online faster.
Built-in Networking and Management Tools
Lightsail includes several built-in tools to simplify server management. Users can easily assign static IPs, configure DNS settings, manage firewalls, and even integrate load balancers for high availability setups. These features are accessible via a user-friendly web interface, which removes the need for complex networking configurations typically associated with EC2 or other AWS infrastructure.
Snapshots, Backups, and High Availability
Data protection and recovery are made simple through Lightsail’s snapshot feature. You can create snapshots of your instances and storage volumes either manually or automatically. These snapshots can be used to restore data quickly or clone environments for testing or scaling. Lightsail also supports high availability by allowing load balancer integration and deploying across different availability zones.
Seamless Migration to EC2
When your project outgrows Lightsail’s capabilities, migrating to EC2 is straightforward. Lightsail offers a built-in export tool that converts your instance into an EC2-compatible AMI. This makes it easy to transition to a more flexible and powerful AWS environment while maintaining your application setup and configurations.
Ideal Use Cases
AWS Lightsail is best suited for lightweight workloads and projects that require quick deployment and minimal maintenance. It is ideal for:
Hosting blogs, portfolios, and e-commerce websites
Running small-scale web applications and APIs
Creating development or staging environments
Deploying MVPs (Minimum Viable Products)
Students or beginners learning server deployment
Prerequisites
Please ensure you have the following before we begin:
- An AWS account
- Jenkins installed (locally or remotely)
- Apache Maven installed (locally or remotely)
- A Java project (using Maven or Gradle)
- Docker installed (locally or remotely)
- Basic familiarity with terminal commands
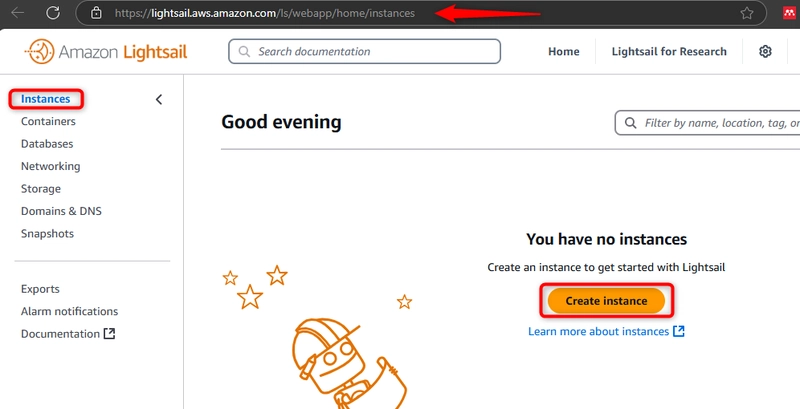
Step 1: Create a Lightsail Instance
- Visit AWS Lightsail
Click Create instance
Select your instance location. For this project, I chose Virginia
us-east-1region.

-
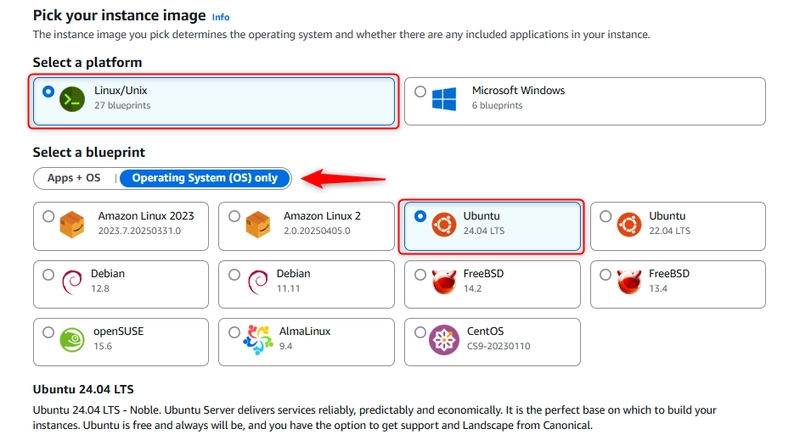
Choose your instance image; this is the operating system.
- Platform: Linux/Unix
- Blueprint: OS-only (Ubuntu) For this demo, I chose Ubuntu distribution of Linux operating system without any Apps added.
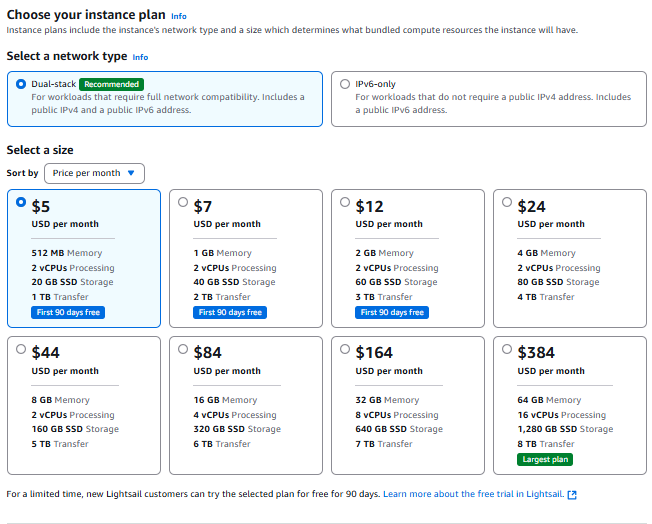
- Pick an instance plan from (as low as $5/month). This is one of the major benefits of the AWS Lightsail it removes the unpredictability of cloud costs and allows small businesses to operate within a tight budget.
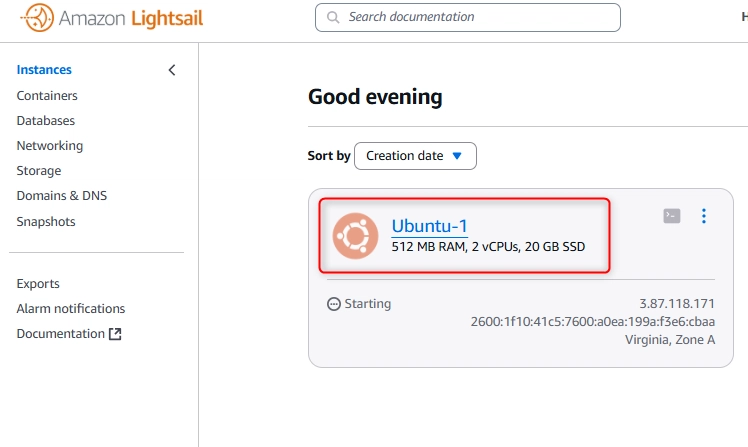
- Give your instance a unique name; this will enable you to identify it, and then click on the Create Instance button to launch it.
The instance starting
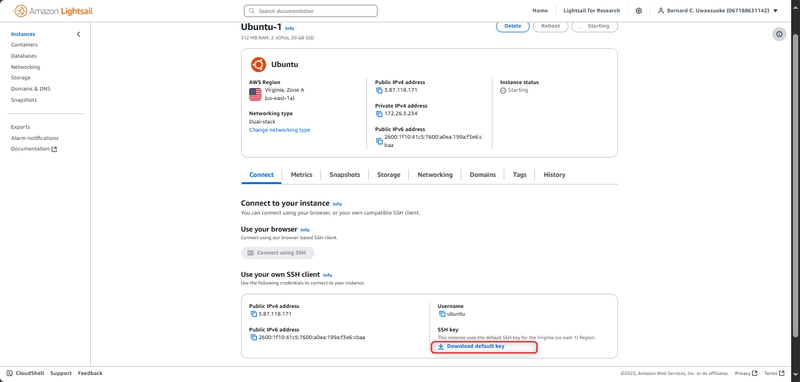
- Click on the Instance icon to see the details
-
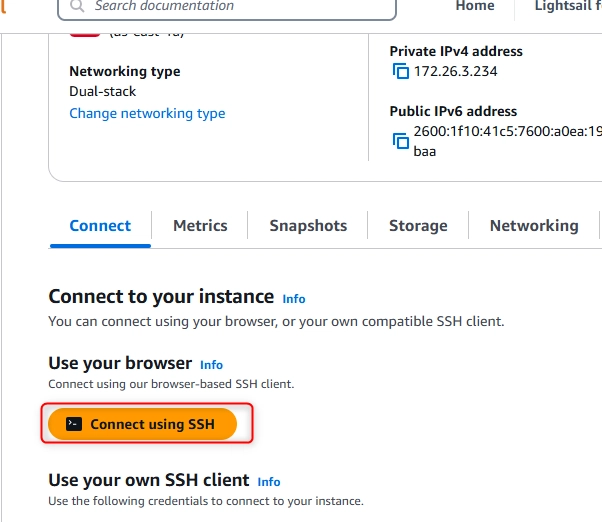
Download the
.pemprivate SSH key. You need this to connect to the instance from an SSH agent or terminal. For this project, we connected directly from the Lightsail management console.
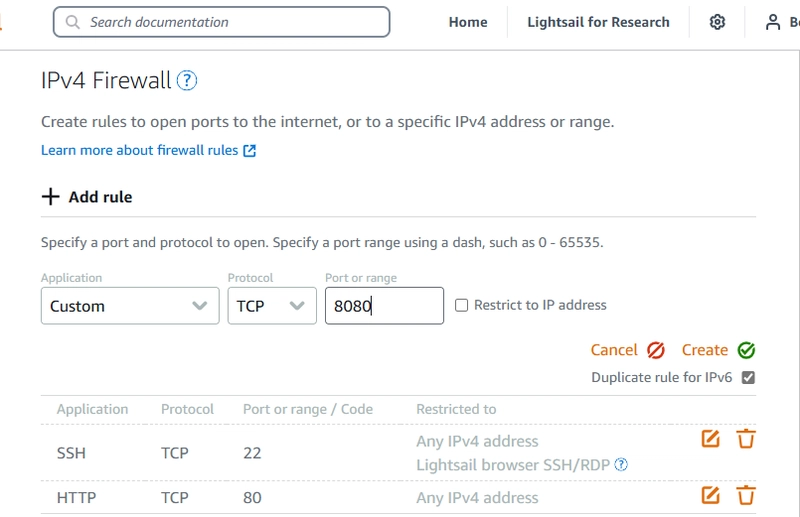
- Click on the Networking tab and scroll down to IPv4 Firewall under it click on Add rule. This will open a pane to configure inbound rule. Under Application, select Custom, for Protocol select TCP and Port or range enter 8080.
Step 2: Connect to Your Instance
Use the command below if you are connecting from a command line.
ssh -i ~/Downloads/lightsail.pem ubuntu@your-lightsail-ip
For this project, I will be connecting from the Lightsail console.
The Ubuntu Lightsail Instance Terminal

Once connected, run the following commands to update the server and install Java and Docker:
sudo apt update && sudo apt upgrade -y

sudo apt install -y default-jdk

java -version

sudo apt install -y apt-transport-https ca-certificates curl software-properties-common gnupg lsb-release

curl -fsSL https://download.docker.com/linux/ubuntu/gpg | sudo gpg --dearmor -o /usr/share/keyrings/docker-archive-keyring.gpg

echo \
  "deb [arch=$(dpkg --print-architecture) signed-by=/usr/share/keyrings/docker-archive-keyring.gpg] \
  https://download.docker.com/linux/ubuntu \
  $(lsb_release -cs) stable" | \
  sudo tee /etc/apt/sources.list.d/docker.list > /dev/null

sudo apt update

sudo apt install -y docker-ce docker-ce-cli containerd.io

docker --version
sudo systemctl status docker

sudo usermod -aG docker $USER
newgrp docker
Checking Java Version

Step 3: Deploy the Application
- Clone the Project Repository: Clone the sample Java application repository from GitHub.
git clone https://github.com/Donhadley22/practice-java-app.git
This repository contains a basic Java project, Dockerfile and Jenkinsfile. These will be used to build a Docker image, test, and deploy the application to AWS Lightsail.
Here is the Jenkinsfile:
pipeline {
  agent any
     tools {
    maven 'maven-3.9.9'
  }

  environment {
    DOCKER_IMAGE          = 'donhadley/peabsmartapp'
    DOCKERFILE            = 'Dockerfile'
    DOCKER_REGISTRY       = 'index.docker.io/v1'
    DOCKER_CREDENTIALS_ID = 'dockerhub-creds'
    DOCKER_TAG            = "${env.BUILD_NUMBER}"
    LS_INSTANCE_ID       = 'i-05d37916155efbc80'
    LS_REGION            = 'us-east-1'
    SSH_CREDENTIALS_ID    = 'ec2-ssh-key'
    LS_USER              = 'ubuntu'
    LS_HOST              = '52.87.109.141'
    CONTAINER_NAME        = 'peabsmart-app'
    HOST_PORT             = 80
    CONTAINER_PORT        = 8080
  }

  stages {

    stage('Checkout') {
      steps {
        echo 'Checking out code...'
        checkout scm
      }
    }

    stage('Package') {
      steps {
        echo 'Building the Java project and packaging WAR...'
          sh 'mvn clean package'
  }
}

stage('Test') {
      steps {
        echo 'Running tests...'
         sh 'mvn test'
      }
    }
    stage('Build') {
      steps {
        echo 'Building Docker image...'
        script {
          docker.build("${DOCKER_IMAGE}:${DOCKER_TAG}", "-f ${DOCKERFILE} .")
        }
      }
    }

    stage('Push') {
      steps {
        echo 'Pushing Docker image to Docker Hub...'
        script {
          docker.withRegistry('https://index.docker.io/v1/', "${DOCKER_CREDENTIALS_ID}") {
          docker.image("${DOCKER_IMAGE}:${DOCKER_TAG}").push()
      }
    }
  }
}


    stage('Deploy') {
      steps {
        echo 'Deploying to AWS EC2...'
        script {
          sshagent([SSH_CREDENTIALS_ID]) {
            sh """
              ssh -o StrictHostKeyChecking=no ${EC2_USER}@${EC2_HOST} \\
              'docker pull ${DOCKER_IMAGE}:${DOCKER_TAG} && \
              docker stop ${CONTAINER_NAME} || true && \
              docker rm ${CONTAINER_NAME} || true && \
              docker run -d --name ${CONTAINER_NAME} -p ${HOST_PORT}:${CONTAINER_PORT} ${DOCKER_IMAGE}:${DOCKER_TAG}'
             """

          }
        }
      }
    }
  }

  post {
    success {
      echo "✅ Deployed successfully to EC2