![[The AI Show Episode 142]: ChatGPT’s New Image Generator, Studio Ghibli Craze and Backlash, Gemini 2.5, OpenAI Academy, 4o Updates, Vibe Marketing & xAI Acquires X](https://www.marketingaiinstitute.com/hubfs/ep%20142%20cover.png)


![From drop-out to software architect with Jason Lengstorf [Podcast #167]](https://cdn.hashnode.com/res/hashnode/image/upload/v1743796461357/f3d19cd7-e6f5-4d7c-8bfc-eb974bc8da68.png?#)


.png?#)


_Christophe_Coat_Alamy.jpg?#)
 (1).webp?#)


![Apple Considers Delaying Smart Home Hub Until 2026 [Gurman]](https://www.iclarified.com/images/news/96946/96946/96946-640.jpg)
![iPhone 17 Pro Won't Feature Two-Toned Back [Gurman]](https://www.iclarified.com/images/news/96944/96944/96944-640.jpg)
![Tariffs Threaten Apple's $999 iPhone Price Point in the U.S. [Gurman]](https://www.iclarified.com/images/news/96943/96943/96943-640.jpg)


Authentication System with Next.js and Nest.js
Building a Secure Authentication System with Next.js and Nest.js Security is a top priority in modern web applications, and a well-architected authentication system is key to protecting user data. In this guide, we’ll build a secure authentication system using Next.js and Nest.js, implementing Crypto.js, bcrypt, JWT, and role-based authentication. Additionally, we'll cover how to integrate NodeMailer for password reset functionality with OTP-based sessions. Why This Architecture? Our system follows a modular and layered security approach: ✅ Crypto.js (Frontend Encryption) – Encrypts credentials before transmission. ✅ bcrypt (Backend Encryption) – Hashes passwords before storing them in the database. ✅ JWT Authentication – Issues secure access tokens for API requests. ✅ Role-Based Access Control (RBAC) – Restricts users based on roles. ✅ OTP and NodeMailer for Password Reset – Provides secure session-based password recovery. Step 1: Setting Up the Backend with Nest.js 1.1 Install Dependencies In your Nest.js backend, install the required packages: npm install @nestjs/jwt @nestjs/passport bcryptjs passport passport-jwt crypto-js nodemailer 1.2 User Entity & Authentication Service Define the user schema in TypeORM: import { Entity, Column, PrimaryGeneratedColumn } from 'typeorm'; @Entity() export class User { @PrimaryGeneratedColumn() id: number; @Column({ unique: true }) email: string; @Column() password: string; @Column({ default: 'user' }) // Default role is 'user' role: string; } Now, create the authentication service: import * as bcrypt from 'bcrypt'; import { JwtService } from '@nestjs/jwt'; @Injectable() export class AuthService { constructor(private jwtService: JwtService) {} async hashPassword(password: string): Promise { return bcrypt.hash(password, 10); } async comparePasswords(password: string, hash: string): Promise { return bcrypt.compare(password, hash); } async generateJWT(email: string, role: string) { return this.jwtService.sign({ email, role }); } } Step 2: Implementing Crypto.js in the Frontend (Next.js) To enhance security, we encrypt credentials before sending them to the backend. 2.1 Install Crypto.js npm install crypto-js 2.2 Encrypt User Credentials in Next.js Modify the login page (pages/login.js): import CryptoJS from 'crypto-js'; async function login(email, password) { const encryptedPassword = CryptoJS.AES.encrypt(password, process.env.NEXT_PUBLIC_SECRET).toString(); const response = await fetch('/api/auth/login', { method: 'POST', body: JSON.stringify({ email, password: encryptedPassword }), }); const data = await response.json(); console.log(data); } Step 3: JWT-Based Authentication & Role-Based Access 3.1 Protect Routes Using JWT Middleware for JWT authentication (jwt.strategy.ts): import { Injectable } from '@nestjs/common'; import { PassportStrategy } from '@nestjs/passport'; import { ExtractJwt, Strategy } from 'passport-jwt'; @Injectable() export class JwtStrategy extends PassportStrategy(Strategy) { constructor() { super({ jwtFromRequest: ExtractJwt.fromAuthHeaderAsBearerToken(), secretOrKey: process.env.JWT_SECRET, }); } async validate(payload) { return { email: payload.email, role: payload.role }; } } 3.2 Role-Based Authorization Middleware To allow access based on user roles, create a decorator: import { CanActivate, ExecutionContext, Injectable } from '@nestjs/common'; @Injectable() export class RolesGuard implements CanActivate { canActivate(context: ExecutionContext): boolean { const request = context.switchToHttp().getRequest(); return request.user.role === 'admin'; // Only admins can access } } Apply the RolesGuard to protected routes: @UseGuards(JwtAuthGuard, RolesGuard) @Get('admin') adminAccess() { return "You have admin privileges!"; } Step 4: Implementing Forgot Password with OTP & NodeMailer 4.1 Generate OTP and Send Email Install NodeMailer: npm install nodemailer Create the email service: import * as nodemailer from 'nodemailer'; @Injectable() export class MailService { private transporter = nodemailer.createTransport({ service: 'Gmail', auth: { user: process.env.EMAIL_USER, pass: process.env.EMAIL_PASS, }, }); async sendOTP(email: string, otp: string) { await this.transporter.sendMail({ from: '"Security Team" ', to: email, subject: 'Password Reset OTP', text: `Your OTP is ${otp}`, }); } } 4.2 Store OTP in Database and Verify Modify the AuthService: import { v4 as uuidv4 } from 'uuid'; async requestPasswordReset(email: string) { const otp = uuidv4().substring(0, 6); // Generate a 6-digit OTP await this.userReposi
Building a Secure Authentication System with Next.js and Nest.js
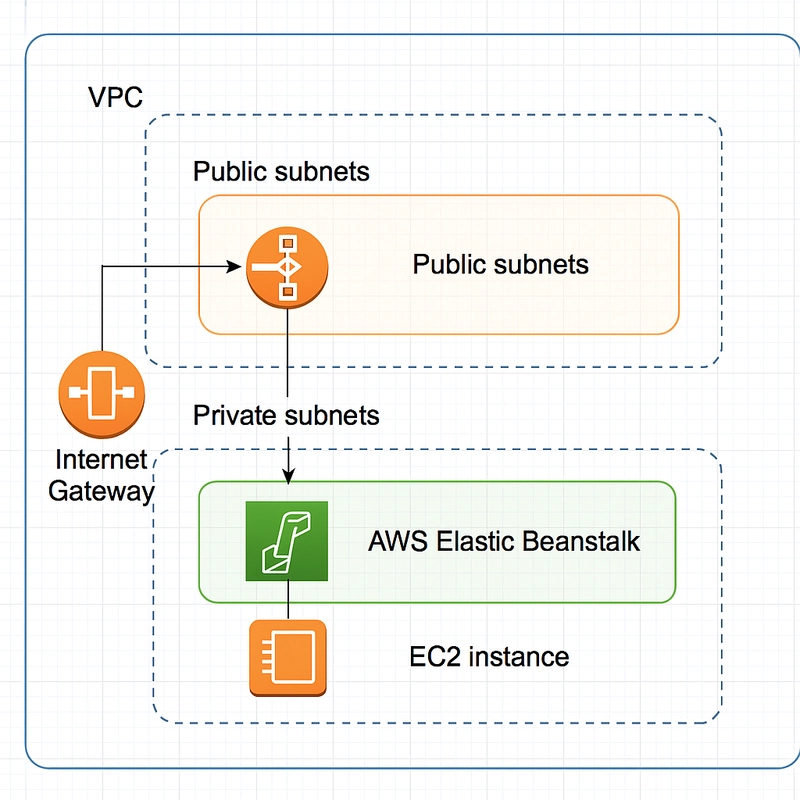
Security is a top priority in modern web applications, and a well-architected authentication system is key to protecting user data. In this guide, we’ll build a secure authentication system using Next.js and Nest.js, implementing Crypto.js, bcrypt, JWT, and role-based authentication. Additionally, we'll cover how to integrate NodeMailer for password reset functionality with OTP-based sessions.
Why This Architecture?
Our system follows a modular and layered security approach:
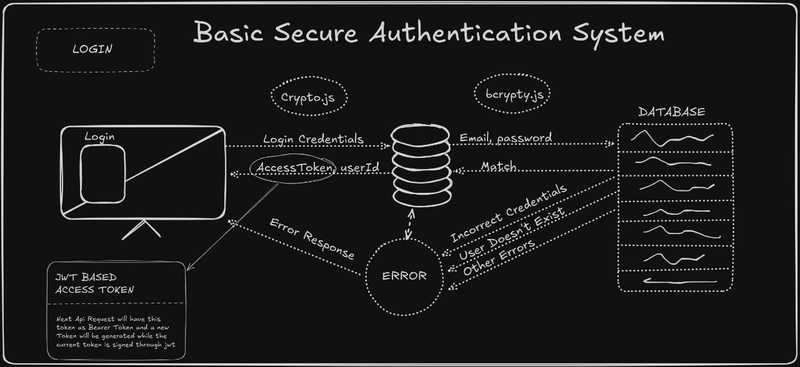
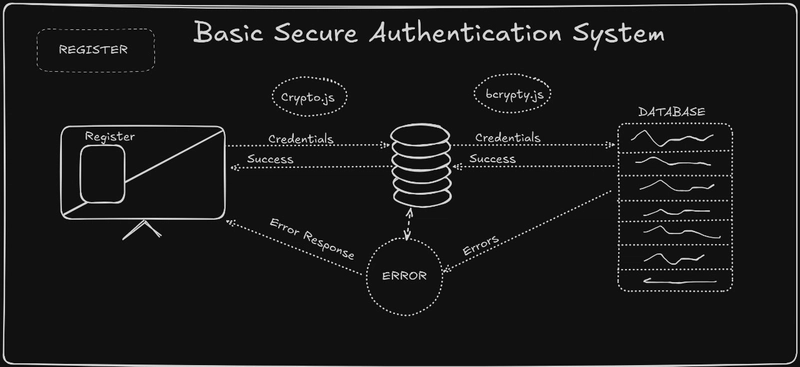
✅ Crypto.js (Frontend Encryption) – Encrypts credentials before transmission.
✅ bcrypt (Backend Encryption) – Hashes passwords before storing them in the database.
✅ JWT Authentication – Issues secure access tokens for API requests.
✅ Role-Based Access Control (RBAC) – Restricts users based on roles.
✅ OTP and NodeMailer for Password Reset – Provides secure session-based password recovery.
Step 1: Setting Up the Backend with Nest.js
1.1 Install Dependencies
In your Nest.js backend, install the required packages:
npm install @nestjs/jwt @nestjs/passport bcryptjs passport passport-jwt crypto-js nodemailer
1.2 User Entity & Authentication Service
Define the user schema in TypeORM:
import { Entity, Column, PrimaryGeneratedColumn } from 'typeorm';

@Entity()
export class User {
  @PrimaryGeneratedColumn()
  id: number;

  @Column({ unique: true })
  email: string;

  @Column()
  password: string;

  @Column({ default: 'user' }) // Default role is 'user'
  role: string;
}
Now, create the authentication service:
import * as bcrypt from 'bcrypt';
import { JwtService } from '@nestjs/jwt';

@Injectable()
export class AuthService {
  constructor(private jwtService: JwtService) {}

  async hashPassword(password: string): Promise<string> {
    return bcrypt.hash(password, 10);
  }

  async comparePasswords(password: string, hash: string): Promise<boolean> {
    return bcrypt.compare(password, hash);
  }

  async generateJWT(email: string, role: string) {
    return this.jwtService.sign({ email, role });
  }
}
Step 2: Implementing Crypto.js in the Frontend (Next.js)
To enhance security, we encrypt credentials before sending them to the backend.
2.1 Install Crypto.js
npm install crypto-js
2.2 Encrypt User Credentials in Next.js
Modify the login page (pages/login.js):
import CryptoJS from 'crypto-js';

async function login(email, password) {
  const encryptedPassword = CryptoJS.AES.encrypt(password, process.env.NEXT_PUBLIC_SECRET).toString();

  const response = await fetch('/api/auth/login', {
    method: 'POST',
    body: JSON.stringify({ email, password: encryptedPassword }),
  });

  const data = await response.json();
  console.log(data);
}
Step 3: JWT-Based Authentication & Role-Based Access
3.1 Protect Routes Using JWT
Middleware for JWT authentication (jwt.strategy.ts):
import { Injectable } from '@nestjs/common';
import { PassportStrategy } from '@nestjs/passport';
import { ExtractJwt, Strategy } from 'passport-jwt';

@Injectable()
export class JwtStrategy extends PassportStrategy(Strategy) {
  constructor() {
    super({
      jwtFromRequest: ExtractJwt.fromAuthHeaderAsBearerToken(),
      secretOrKey: process.env.JWT_SECRET,
    });
  }

  async validate(payload) {
    return { email: payload.email, role: payload.role };
  }
}
3.2 Role-Based Authorization Middleware
To allow access based on user roles, create a decorator:
import { CanActivate, ExecutionContext, Injectable } from '@nestjs/common';

@Injectable()
export class RolesGuard implements CanActivate {
  canActivate(context: ExecutionContext): boolean {
    const request = context.switchToHttp().getRequest();
    return request.user.role === 'admin'; // Only admins can access
  }
}
Apply the RolesGuard to protected routes:
@UseGuards(JwtAuthGuard, RolesGuard)
@Get('admin')
adminAccess() {
  return "You have admin privileges!";
}
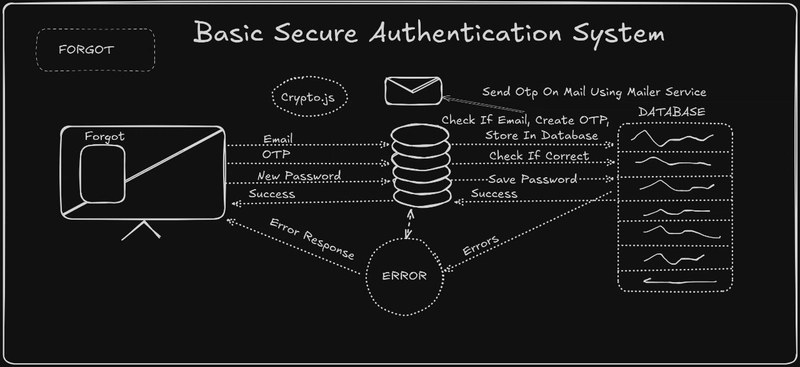
Step 4: Implementing Forgot Password with OTP & NodeMailer
4.1 Generate OTP and Send Email
Install NodeMailer:
npm install nodemailer
Create the email service:
import * as nodemailer from 'nodemailer';
@Injectable()
export class MailService {
private transporter = nodemailer.createTransport({
service: 'Gmail',
auth: {
user: process.env.EMAIL_USER,
pass: process.env.EMAIL_PASS,
},
});
async sendOTP(email: string, otp: string) {
await this.transporter.sendMail({
from: '"Security Team" 4.2 Store OTP in Database and Verify
Modify the AuthService:
import { v4 as uuidv4 } from 'uuid';

async requestPasswordReset(email: string) {
  const otp = uuidv4().substring(0, 6); // Generate a 6-digit OTP
  await this.userRepository.update({ email }, { otp });
  await this.mailService.sendOTP(email, otp);
}

async verifyOTP(email: string, otp: string, newPassword: string) {
  const user = await this.userRepository.findOne({ email });

  if (user.otp === otp) {
    user.password = await this.hashPassword(newPassword);
    user.otp = null;
    await this.userRepository.save(user);
    return 'Password reset successfully';
  } else {
    throw new Error('Invalid OTP');
  }
}
Final Thoughts
This authentication system ensures security at every layer: