


![[Webinar] AI Is Already Inside Your SaaS Stack — Learn How to Prevent the Next Silent Breach](https://blogger.googleusercontent.com/img/b/R29vZ2xl/AVvXsEiOWn65wd33dg2uO99NrtKbpYLfcepwOLidQDMls0HXKlA91k6HURluRA4WXgJRAZldEe1VReMQZyyYt1PgnoAn5JPpILsWlXIzmrBSs_TBoyPwO7hZrWouBg2-O3mdeoeSGY-l9_bsZB7vbpKjTSvG93zNytjxgTaMPqo9iq9Z5pGa05CJOs9uXpwHFT4/s1600/ai-cyber.jpg?#)


![[The AI Show Episode 144]: ChatGPT’s New Memory, Shopify CEO’s Leaked “AI First” Memo, Google Cloud Next Releases, o3 and o4-mini Coming Soon & Llama 4’s Rocky Launch](https://www.marketingaiinstitute.com/hubfs/ep%20144%20cover.png)


![Rogue Company Elite tier list of best characters [April 2025]](https://media.pocketgamer.com/artwork/na-33136-1657102075/rogue-company-ios-android-tier-cover.jpg?#)


_roibu_Alamy.jpg?width=1280&auto=webp&quality=80&disable=upscale#)


.webp?#)


![Beats showcases Android in ad for ‘universally compatible’ cables that Apple was forced to support [Video]](https://i0.wp.com/9to5google.com/wp-content/uploads/sites/4/2025/04/beats-cables-4.jpg?resize=1200%2C628&quality=82&strip=all&ssl=1)


![Apple Slips to Fifth in China's Smartphone Market with 9% Decline [Report]](https://www.iclarified.com/images/news/97065/97065/97065-640.jpg)

![New Beats USB-C Charging Cables Now Available on Amazon [Video]](https://www.iclarified.com/images/news/97060/97060/97060-640.jpg)


A Step-by-Step Guide to Implementing a GAN with PyTorch
Generative Adversarial Networks (GANs) are an incredible way to explore the creative side of artificial intelligence. They can generate realistic data like handwritten digits from the MNIST dataset by pitting two neural networks against each other. If you’re new to GANs or PyTorch, this step-by-step guide will walk you through building a simple GAN from scratch. We’ll use beginner-friendly explanations, sprinkle in some PyTorch code snippets, and help you learn how to create your digit generator. What Are GANs? GANs consist of two neural networks that both collaborate and compete with each other for data generation. GANs function as two separate neural networks that compete in creative gameplay. The generator operates as an artificial creator that generates fake data through random seed generation. The discriminator functions as the critical system that determines between genuine data from the actual dataset and artificial data generated by the Generator. The networks operate at the same time within a setting that promotes competition between them. During training, the Generator tries to create better fake data which tricks the Discriminator, yet the Discriminator strives to detect genuine from fake information better. As the two networks compete with each other, the Generator develops the ability to produce extremely realistic outputs. In an MNIST example, the Generator develops capabilities to generate handwritten digits resembling human letters while the Discriminator enhances its ability to differentiate between real and fake digits from the dataset. How Do GANs Work? Let’s break it down step-by-step with a simple analogy and some technical insight. The Generator The Generator takes a random input called a “latent vector,” which is just a bunch of random numbers (e.g., 100 values drawn from a normal distribution). Think of this as a blank canvas with no meaning. Its job is to transform this noise into something meaningful, like a 28x28 pixel image of a digit. It does this using a neural network with layers that gradually shape the noise into a structured output. The Discriminator The Discriminator takes an image, either real (from the dataset) or fake (from the Generator), and decides if it’s authentic. It’s a classifier, outputting a probability between 0 (fake) and 1 (real). Imagine it as an art critic inspecting a painting to see if it’s a genuine masterpiece or a forgery. The Adversarial Training Process The Discriminator is trained first: it looks at real images and learns to label them as “real” (1), then looks at fake images from the Generator and labels them as “fake” (0). It adjusts its weights to improve its judgment. The Generator is trained next: it generates fake images and passes them to the Discriminator. If the Discriminator says “fake,” the Generator tweaks its weights to make its next attempt more convincing. Its goal is to trick the Discriminator into saying “real.” Step by step implementation: First, you’ll need PyTorch and a few helper libraries. Install them if you haven’t already (pip install torch torchvision matplotlib). Here’s the basic setup: Step 1: Set Up import torch import torch.nn as nn import torchvision import torchvision.transforms as transforms import matplotlib.pyplot as plt # Use GPU if available device = torch.device('cuda' if torch.cuda.is_available() else 'cpu') Step 2: Set Up the MNIST Dataset The first step is loading the MNIST dataset, which contains 28x28 grayscale images of digits. We’ll preprocess it to normalize pixel values between -1 and 1, making it compatible with our GAN’s output. transform = transforms.Compose([ transforms.ToTensor(), transforms.Normalize(mean=(0.5,), std=(0.5,)) ]) train_dataset = datasets.MNIST(root='./data', train=True, download=True, transform=transform) train_loader = DataLoader(train_dataset, batch_size=64, shuffle=True) transforms.Normalize scales the data to [-1, 1]. DataLoader batches the data (e.g., 64 images) for efficient training. Step 3: Build the Generator The Generator takes random noise (a latent vector) and turns it into a fake digit image. We’ll use a simple neural network with layers that upscale the noise into a 28x28 image. class Generator(nn.Module): def __init__(self, z_dim=100): super(Generator, self).__init__() self.model = nn.Sequential( nn.Linear(z_dim, 256), nn.LeakyReLU(0.2, inplace=True), # ... more layers ... nn.Linear(1024, 28 * 28), nn.Tanh() ) def forward(self, z): return self.model(z).view(z.size(0), 1, 28, 28) z_dim is the noise size (e.g., 100). LeakyReLU helps with training stability; Tanh ensures outputs match the [-1, 1] range. The output is reshaped into a 28x28 image. Step 4: Build the Discriminator The Discriminator evaluates whether an image is real or fake, outputting a probability (0 to 1). It’s a classifier that downsamples th
Generative Adversarial Networks (GANs) are an incredible way to explore the creative side of artificial intelligence. They can generate realistic data like handwritten digits from the MNIST dataset by pitting two neural networks against each other. If you’re new to GANs or PyTorch, this step-by-step guide will walk you through building a simple GAN from scratch. We’ll use beginner-friendly explanations, sprinkle in some PyTorch code snippets, and help you learn how to create your digit generator.
What Are GANs?
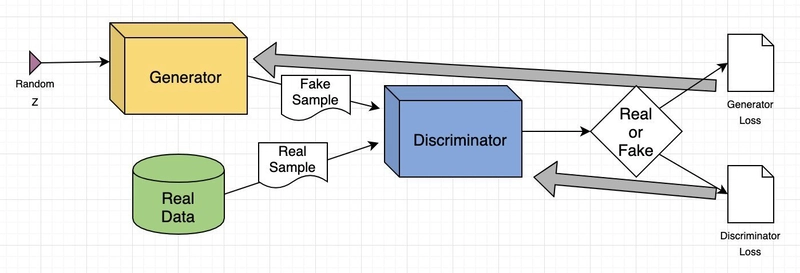
GANs consist of two neural networks that both collaborate and compete with each other for data generation. GANs function as two separate neural networks that compete in creative gameplay.
- The generator operates as an artificial creator that generates fake data through random seed generation.
- The discriminator functions as the critical system that determines between genuine data from the actual dataset and artificial data generated by the Generator.
The networks operate at the same time within a setting that promotes competition between them. During training, the Generator tries to create better fake data which tricks the Discriminator, yet the Discriminator strives to detect genuine from fake information better. As the two networks compete with each other, the Generator develops the ability to produce extremely realistic outputs.
In an MNIST example, the Generator develops capabilities to generate handwritten digits resembling human letters while the Discriminator enhances its ability to differentiate between real and fake digits from the dataset.
How Do GANs Work?
Let’s break it down step-by-step with a simple analogy and some technical insight.
The Generator
The Generator takes a random input called a “latent vector,” which is just a bunch of random numbers (e.g., 100 values drawn from a normal distribution). Think of this as a blank canvas with no meaning. Its job is to transform this noise into something meaningful, like a 28x28 pixel image of a digit. It does this using a neural network with layers that gradually shape the noise into a structured output.
The Discriminator
The Discriminator takes an image, either real (from the dataset) or fake (from the Generator), and decides if it’s authentic. It’s a classifier, outputting a probability between 0 (fake) and 1 (real). Imagine it as an art critic inspecting a painting to see if it’s a genuine masterpiece or a forgery.
The Adversarial Training Process
The Discriminator is trained first: it looks at real images and learns to label them as “real” (1), then looks at fake images from the Generator and labels them as “fake” (0). It adjusts its weights to improve its judgment.
The Generator is trained next: it generates fake images and passes them to the Discriminator. If the Discriminator says “fake,” the Generator tweaks its weights to make its next attempt more convincing. Its goal is to trick the Discriminator into saying “real.”
Step by step implementation:
First, you’ll need PyTorch and a few helper libraries. Install them if you haven’t already (pip install torch torchvision matplotlib). Here’s the basic setup:
Step 1: Set Up
import torch
import torch.nn as nn
import torchvision
import torchvision.transforms as transforms
import matplotlib.pyplot as plt

# Use GPU if available
device = torch.device('cuda' if torch.cuda.is_available() else 'cpu')
Step 2: Set Up the MNIST Dataset
The first step is loading the MNIST dataset, which contains 28x28 grayscale images of digits. We’ll preprocess it to normalize pixel values between -1 and 1, making it compatible with our GAN’s output.
transform = transforms.Compose([
    transforms.ToTensor(),
    transforms.Normalize(mean=(0.5,), std=(0.5,))
])
train_dataset = datasets.MNIST(root='./data', train=True, download=True, transform=transform)
train_loader = DataLoader(train_dataset, batch_size=64, shuffle=True)
transforms.Normalize scales the data to [-1, 1].
DataLoader batches the data (e.g., 64 images) for efficient training.
Step 3: Build the Generator
The Generator takes random noise (a latent vector) and turns it into a fake digit image. We’ll use a simple neural network with layers that upscale the noise into a 28x28 image.
class Generator(nn.Module):
    def __init__(self, z_dim=100):
        super(Generator, self).__init__()
        self.model = nn.Sequential(
            nn.Linear(z_dim, 256),
            nn.LeakyReLU(0.2, inplace=True),
           # ... more layers ...

            nn.Linear(1024, 28 * 28),
            nn.Tanh()
        )

    def forward(self, z):
        return self.model(z).view(z.size(0), 1, 28, 28)
- z_dim is the noise size (e.g., 100).
- LeakyReLU helps with training stability; Tanh ensures outputs match the [-1, 1] range.
- The output is reshaped into a 28x28 image.
Step 4: Build the Discriminator
The Discriminator evaluates whether an image is real or fake, outputting a probability (0 to 1). It’s a classifier that downsamples the image to a single value.
class Discriminator(nn.Module):
    def __init__(self):
        super(Discriminator, self).__init__()
        self.model = nn.Sequential(
            nn.Flatten(),
            nn.Linear(28 * 28, 1024),
            nn.LeakyReLU(0.2, inplace=True),
            # ... more layers ...
            nn.Linear(256, 1),
            nn.Sigmoid()
        )

    def forward(self, img):
        return self.model(img)
- Flatten converts the 28x28 image into a 784-value vector.
- Sigmoid gives a probability score.
Step 5: Train the GAN
Training involves alternating between the Discriminator and Generator:
- Discriminator: Learns to spot real MNIST images (label 1) vs. fake ones (label 0).
- Generator: Adjusts to make fakes that the Discriminator labels as real. You’d set up optimizers (e.g., Adam) and a loss function (e.g., Binary Cross-Entropy), then loop through epochs, updating each network in turn.
Step 6: Evaluate the Results
To check how good your GAN is, you can generate fake images and compare them to real ones. One advanced metric is the Fréchet Inception Distance (FID), which measures similarity between real and fake image features using a pre-trained model like InceptionV3.
def calculate_fid(real_images, fake_images, model=None):
    real_features = extract_features(real_images, model)
    fake_features = extract_features(fake_images, model)
    # Compute FID score...
- Lower FID = better similarity.
- The example code includes a feature extraction function to preprocess images for this metric.
Conclusion
Building a GAN with PyTorch is a rewarding way to dip your toes into generative AI. You’ve learned how to set up MNIST, create a Generator and Discriminator, train them in an adversarial dance, and evaluate the results. While this is a simple setup, it’s a solid foundation. Your generated digits might start blurry, but with practice and tweaks (like adding layers or tuning hyperparameters), they’ll sharpen up. GANs open a world of creativity, and this is just the beginning of what you can achieve!