![[The AI Show Episode 142]: ChatGPT’s New Image Generator, Studio Ghibli Craze and Backlash, Gemini 2.5, OpenAI Academy, 4o Updates, Vibe Marketing & xAI Acquires X](https://www.marketingaiinstitute.com/hubfs/ep%20142%20cover.png)


![From drop-out to software architect with Jason Lengstorf [Podcast #167]](https://cdn.hashnode.com/res/hashnode/image/upload/v1743796461357/f3d19cd7-e6f5-4d7c-8bfc-eb974bc8da68.png?#)


.png?#)


_Christophe_Coat_Alamy.jpg?#)
 (1).webp?#)


![iPhone 17 Pro Won't Feature Two-Toned Back [Gurman]](https://www.iclarified.com/images/news/96944/96944/96944-640.jpg)
![Tariffs Threaten Apple's $999 iPhone Price Point in the U.S. [Gurman]](https://www.iclarified.com/images/news/96943/96943/96943-640.jpg)


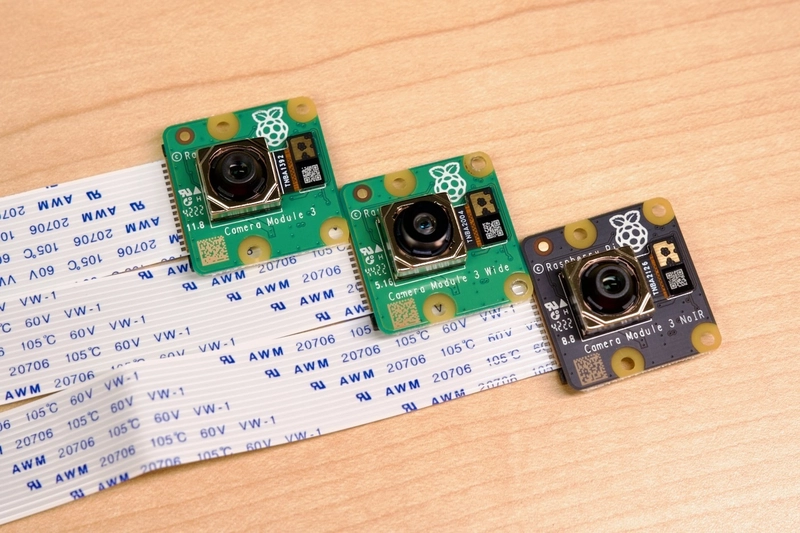
What cameras can i use with Raspberry Pi?
The Raspberry Pi is compatible with a wide range of cameras, both official and third-party. These cameras can be used for various applications, such as photography, video recording, computer vision, and machine learning. Below is a comprehensive guide to the cameras you can use with a Raspberry Pi: 1. Official Raspberry Pi Cameras These cameras are designed specifically for the Raspberry Pi and offer excellent compatibility and performance. Raspberry Pi Camera Module 3 Features: Sensor: 12MP Sony IMX708. Autofocus: Yes. Lens Options: Standard and wide-angle. Interface: CSI (Camera Serial Interface). Use Cases: Photography, video recording, and computer vision. Raspberry Pi Camera Module 2 Features: Sensor: 8MP Sony IMX219. Autofocus: No (fixed focus). Interface: CSI. Use Cases: General-purpose photography and video. Raspberry Pi High Quality Camera Features: Sensor: 12.3MP Sony IMX477. Lens Mount: C-mount and CS-mount (interchangeable lenses). Interface: CSI. Use Cases: Professional photography, microscopy, and telescopy. Raspberry Pi Global Shutter Camera Features: Sensor: 1.6MP Sony IMX296 (global shutter). Interface: CSI. Use Cases: High-speed imaging and machine vision. 2. Third-Party Cameras These cameras are not officially produced by Raspberry Pi but are compatible with the platform. Arducam Options: Arducam 16MP Autofocus Camera: High-resolution camera with autofocus. Arducam Mini Modules: Compact cameras with various resolutions (2MP to 16MP). Arducam Multi-Camera Adapter: Allows connecting multiple cameras to a single Raspberry Pi. Use Cases: Photography, surveillance, and multi-camera setups. Waveshare Cameras Options: Waveshare IMX219 Camera: 8MP camera similar to the Raspberry Pi Camera Module 2. Waveshare Night Vision Camera: Equipped with IR LEDs for low-light imaging. Use Cases: General-purpose and night vision applications. Leopard Imaging Cameras Options: LI-IMX219-MIPI-FF: 8MP camera with a flexible cable. LI-IMX477R: 12.3MP camera with interchangeable lenses. Use Cases: Industrial and professional imaging. 3. USB Cameras USB cameras are easy to use and do not require the CSI interface. They are ideal for beginners and applications where flexibility is needed. Logitech Webcams Popular Models: Logitech C920: 1080p HD webcam. Logitech C270: 720p HD webcam. Use Cases: Video conferencing, streaming, and basic computer vision. Raspberry Pi USB Camera Modules Options: Raspberry Pi Camera Module 3 USB: USB version of the Camera Module 3. Third-party USB cameras: Many USB cameras are compatible with the Raspberry Pi. Use Cases: Plug-and-play applications. 4. Specialized Cameras These cameras are designed for specific applications, such as thermal imaging or high-speed capture. FLIR Lepton Thermal Camera Features: Sensor: Thermal imaging sensor. Interface: SPI or I2C (requires breakout board). Use Cases: Thermal imaging and temperature measurement. Pi NoIR Camera Features: Sensor: 8MP Sony IMX219 (no IR filter). Interface: CSI. Use Cases: Night vision, plant health monitoring, and scientific imaging. High-Speed Cameras Options: Flea3 USB Camera: High-speed USB camera. Chameleon3 USB Camera: Compact high-speed camera. Use Cases: High-speed imaging and motion analysis. 5. Camera Setup and Software Connecting the Camera CSI Cameras: Disconnect the Raspberry Pi from power. Open the CSI connector on the Raspberry Pi. Insert the camera ribbon cable (blue side facing the Ethernet port). Secure the connector. USB Cameras: Simply plug the USB camera into a USB port on the Raspberry Pi. Enabling the Camera Open the Raspberry Pi configuration tool: bash sudo raspi-config Navigate to Interface Options > Camera and enable it. Reboot the Raspberry Pi. Using the Camera Command Line Tools: Use raspistill and raspivid for capturing images and videos: bash raspistill -o image.jpg raspivid -o video.h264 Python Libraries: Use the picamera library for controlling the camera in Python: python from picamera import PiCamera camera = PiCamera() camera.capture('image.jpg') OpenCV: Use OpenCV for advanced computer vision applications: python import cv2 cap = cv2.VideoCapture(0) ret, frame = cap.read() cv2.imwrite('image.jpg', frame) 6. Choosing the Right Camera For Beginners: Raspberry Pi Camera Module 3 or a USB webcam. For Photography: Raspberry Pi High Quality Camera with interchangeable lenses. For Computer Vision: Raspberry Pi Camera Module 3 or Arducam. For Thermal Imaging: FLIR Lepton Thermal Camera. By selecting the right camera and following the setup instructions, you can unlock the full potential of your Raspberry Pi for imaging and vision applications. Let me know if you need further assistance!
The Raspberry Pi is compatible with a wide range of cameras, both official and third-party. These cameras can be used for various applications, such as photography, video recording, computer vision, and machine learning. Below is a comprehensive guide to the cameras you can use with a Raspberry Pi:
1. Official Raspberry Pi Cameras
These cameras are designed specifically for the Raspberry Pi and offer excellent compatibility and performance.
Raspberry Pi Camera Module 3
Features:
- Sensor: 12MP Sony IMX708.
- Autofocus: Yes.
- Lens Options: Standard and wide-angle.
- Interface: CSI (Camera Serial Interface).
Use Cases: Photography, video recording, and computer vision.
Raspberry Pi Camera Module 2
Features:
- Sensor: 8MP Sony IMX219.
- Autofocus: No (fixed focus).
- Interface: CSI.
Use Cases: General-purpose photography and video.
Raspberry Pi High Quality Camera
Features:
- Sensor: 12.3MP Sony IMX477.
- Lens Mount: C-mount and CS-mount (interchangeable lenses).
- Interface: CSI.
Use Cases: Professional photography, microscopy, and telescopy.
Raspberry Pi Global Shutter Camera
Features:
- Sensor: 1.6MP Sony IMX296 (global shutter).
- Interface: CSI.
Use Cases: High-speed imaging and machine vision.
2. Third-Party Cameras
These cameras are not officially produced by Raspberry Pi but are compatible with the platform.
Arducam
Options:
- Arducam 16MP Autofocus Camera: High-resolution camera with autofocus.
- Arducam Mini Modules: Compact cameras with various resolutions (2MP to 16MP).
- Arducam Multi-Camera Adapter: Allows connecting multiple cameras to a single Raspberry Pi.
Use Cases: Photography, surveillance, and multi-camera setups.
Waveshare Cameras
Options:
- Waveshare IMX219 Camera: 8MP camera similar to the Raspberry Pi Camera Module 2.
- Waveshare Night Vision Camera: Equipped with IR LEDs for low-light imaging.
Use Cases: General-purpose and night vision applications.
Leopard Imaging Cameras
Options:
- LI-IMX219-MIPI-FF: 8MP camera with a flexible cable.
- LI-IMX477R: 12.3MP camera with interchangeable lenses.
Use Cases: Industrial and professional imaging.
3. USB Cameras
USB cameras are easy to use and do not require the CSI interface. They are ideal for beginners and applications where flexibility is needed.
Logitech Webcams
Popular Models:
- Logitech C920: 1080p HD webcam.
- Logitech C270: 720p HD webcam.
Use Cases: Video conferencing, streaming, and basic computer vision.
Raspberry Pi USB Camera Modules
Options:
- Raspberry Pi Camera Module 3 USB: USB version of the Camera Module 3.
- Third-party USB cameras: Many USB cameras are compatible with the Raspberry Pi.
Use Cases: Plug-and-play applications.
4. Specialized Cameras
These cameras are designed for specific applications, such as thermal imaging or high-speed capture.
FLIR Lepton Thermal Camera
Features:
- Sensor: Thermal imaging sensor.
- Interface: SPI or I2C (requires breakout board).
Use Cases: Thermal imaging and temperature measurement.
Pi NoIR Camera
Features:
- Sensor: 8MP Sony IMX219 (no IR filter).
- Interface: CSI.
Use Cases: Night vision, plant health monitoring, and scientific imaging.
High-Speed Cameras
Options:
- Flea3 USB Camera: High-speed USB camera.
- Chameleon3 USB Camera: Compact high-speed camera.
Use Cases: High-speed imaging and motion analysis.
5. Camera Setup and Software
Connecting the Camera
CSI Cameras:
- Disconnect the Raspberry Pi from power.
- Open the CSI connector on the Raspberry Pi.
- Insert the camera ribbon cable (blue side facing the Ethernet port).
- Secure the connector.
USB Cameras:
Simply plug the USB camera into a USB port on the Raspberry Pi.
Enabling the Camera
- Open the Raspberry Pi configuration tool:
bash

sudo raspi-config
Navigate to Interface Options > Camera and enable it.
Reboot the Raspberry Pi.
Using the Camera
Command Line Tools:
Use raspistill and raspivid for capturing images and videos:
bash

raspistill -o image.jpg
raspivid -o video.h264
Python Libraries:
Use the picamera library for controlling the camera in Python:
python

from picamera import PiCamera
camera = PiCamera()
camera.capture('image.jpg')
OpenCV:
Use OpenCV for advanced computer vision applications:
python

import cv2
cap = cv2.VideoCapture(0)
ret, frame = cap.read()
cv2.imwrite('image.jpg', frame)
6. Choosing the Right Camera
- For Beginners: Raspberry Pi Camera Module 3 or a USB webcam.
- For Photography: Raspberry Pi High Quality Camera with interchangeable lenses.
- For Computer Vision: Raspberry Pi Camera Module 3 or Arducam.
- For Thermal Imaging: FLIR Lepton Thermal Camera.
By selecting the right camera and following the setup instructions, you can unlock the full potential of your Raspberry Pi for imaging and vision applications. Let me know if you need further assistance!