![[The AI Show Episode 142]: ChatGPT’s New Image Generator, Studio Ghibli Craze and Backlash, Gemini 2.5, OpenAI Academy, 4o Updates, Vibe Marketing & xAI Acquires X](https://www.marketingaiinstitute.com/hubfs/ep%20142%20cover.png)


![From drop-out to software architect with Jason Lengstorf [Podcast #167]](https://cdn.hashnode.com/res/hashnode/image/upload/v1743796461357/f3d19cd7-e6f5-4d7c-8bfc-eb974bc8da68.png?#)


.png?#)


_Christophe_Coat_Alamy.jpg?#)


.webp?#)


![Apple Considers Delaying Smart Home Hub Until 2026 [Gurman]](https://www.iclarified.com/images/news/96946/96946/96946-640.jpg)
![iPhone 17 Pro Won't Feature Two-Toned Back [Gurman]](https://www.iclarified.com/images/news/96944/96944/96944-640.jpg)
![Tariffs Threaten Apple's $999 iPhone Price Point in the U.S. [Gurman]](https://www.iclarified.com/images/news/96943/96943/96943-640.jpg)


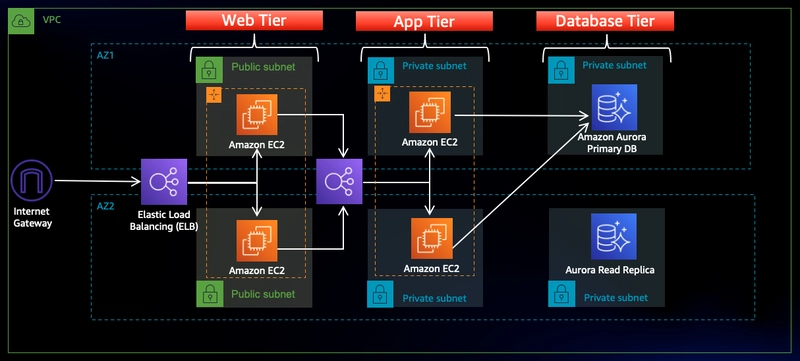
Three-Tier Architecture Application Deployment
1. Download Code From Git Repo Download the code Repo file from Git-hub and unzip it Sample :-(https://github.com/aws-samples/aws-three-tier-web-architecture-workshop.git) git clone https://github.com/Naveen3251/AWS_3Tier.git 2. S3 Bucket Creation Create a S3 bucket Block public access for now 3. Create IAM Role IAM > Roles > create role Use case -> EC2 Apply these 2 permissions: 1.AmazonSSMManagedInstanceCore 2.AmazonS3ReadOnlyAccess Give your role a name, and then click Create Role. 4. VPC Creation VPC > Your VPCs > create VPC VPC created successfully... 5. Subnet Creation Create 6 subnets Note: Remember, your CIDR range for the subnets will be subsets of your VPC CIDR range. AZ-1 Availability zone-1 => (1-public, 2-private) AZ-2 Create subnets as created in AZ-1 with different CIDR range. Availability zone-2 => (1-public, 2-private) 6. Internet Gateway Creation To give internet access to the public subnets in our VPC, we will have to create and attach an Internet Gateway. VPC > Internet gateways > Create internet gateway After internet gateway creation, attach it to your VPC. Select IGW > Actions > Attach to VPC Select the correct VPC and click on Attach internet gateway 7. NAT gateway Creation For our instances in the app layer private subnet to access the internet, they will have to go through a NAT Gateway. Create two NAT gateway for 2 public subnets on the 2 availability zones VPC > NAT gateways > Create NAT gateway Select the correct public subnet in AZ-1 Allocate elastic IP Click Create NAT gateway. Follow the same steps for the creation of the second NAT gateway Two NAT gateways in two AZs has been created successfully... 8. Routing Configuration create one route table for the web layer public subnets. VPC > Route table > Create route table Click Create route table. Scroll down and click on Routes and click on Edit routes Click on Add route Select the destination 0.0.0.0/0 In Target section, select Internet Gateway Then select the created IGW Then click Save changes Select Subnet Associations and click Edit subnet associations. Select the web layer public subnets which has been created Then click Save associations Create 2 more route tables, one for each app layer private subnet in each availability zone 1.Private route table 1 Scroll down and click on Routes and click on Edit routes Click on Add route Select the destination 0.0.0.0/0 In Target section, select Internet Gateway Then select the created NAT gateway in AZ-1 Then click Save changes Select Subnet Associations and click Edit subnet associations. Select the app layer private subnet on AZ-1 Then click Save associations 2. Private route table 2 For creating the Private route table 2, follow the steps performed in the creation of above private subnet route table with their availability zone accordingly. These route tables will route app layer traffic destined for outside the VPC to the NAT gateway in the respective availability zone, so add the appropriate routes for that. 9. Security groups 1 for database 2 for load balancer 1 for public EC2 1 for private EC2 While creating sg, don't change anything in outbound rules. 1. Security group for internet facing load balancer(internet facing) The first security group you’ll create is for the public, internet facing load balancer. After typing a name and description, add an inbound rule to allow HTTP type traffic for your IP. 2.Security group for allowing ELB access to EC2 instances(web tier) In creation of this security group, in inbound rules allow HTTP type traffic for your IP Add rule - Allow 'HTTP' type and select the 'internet facing security group' 3.Security group for Internal load balancer(Internal facing) The third security group will be for our internal load balancer. Create this new security group and add an inbound rule that allows HTTP type traffic from your public instance security group 4.Security group for app tier The fourth security group we’ll configure is for our private instances. Add an inbound rule that will allow TCP type traffic on port 4000 from the internal load balancer security group you created in the previous step 5.Database security group Add an inbound rule that will allow traffic from the private instance security group to the MYSQL/Aurora port (3306) 10. DB subnet group creation Aurora and RDS > Subnet groups > Create DB subnet group choose the VPC we created. While adding subnets, make sure to add the subnets we created in each availability zone for our database layer. Navigate back to the VPC dashboard and check to make sure to select the correct subnet IDs. 11. Database Creation Start with a Standard create for this MySQL-Compatible Amazon Aurora database. Leave the rest of the defaults in the Engine options as default. Under the Templates section choose Dev/Test sin
1. Download Code From Git Repo
Download the code Repo file from Git-hub and unzip it
Sample :-(https://github.com/aws-samples/aws-three-tier-web-architecture-workshop.git)
git clone https://github.com/Naveen3251/AWS_3Tier.git
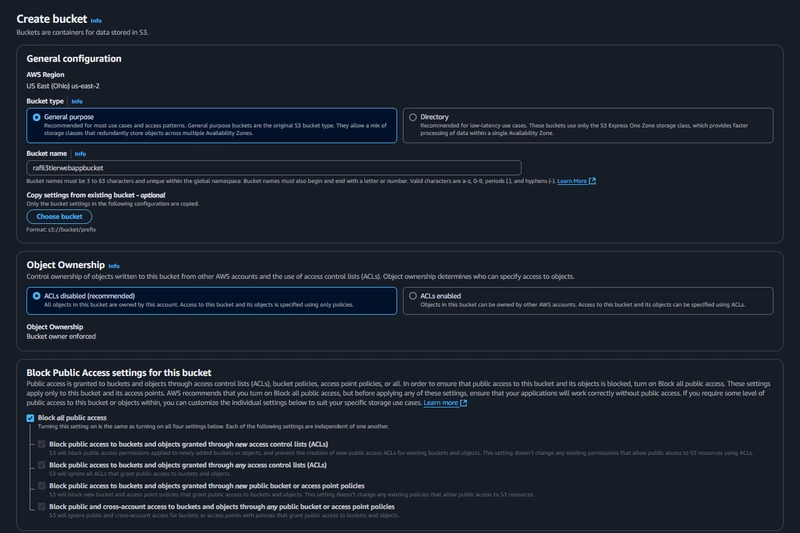
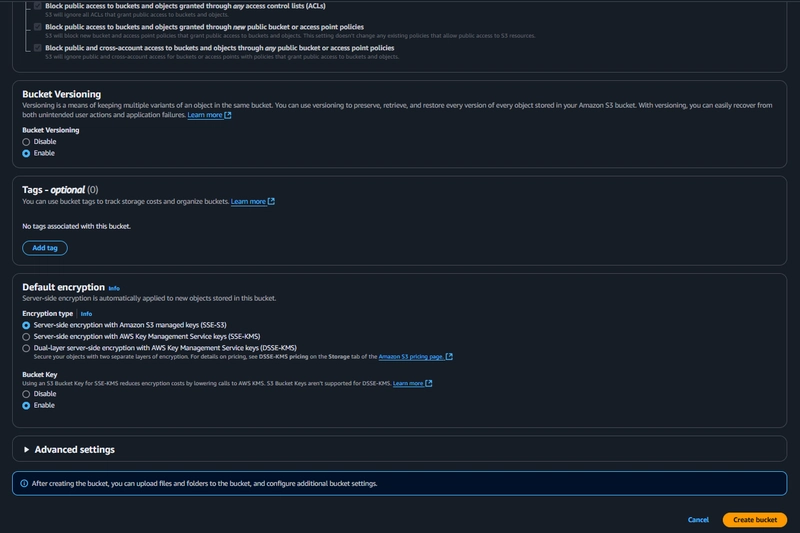
2. S3 Bucket Creation
Create a S3 bucket
Block public access for now
3. Create IAM Role
IAM > Roles > create role
Use case -> EC2
Apply these 2 permissions:
1.AmazonSSMManagedInstanceCore
2.AmazonS3ReadOnlyAccess
Give your role a name, and then click Create Role.

4. VPC Creation
VPC > Your VPCs > create VPC
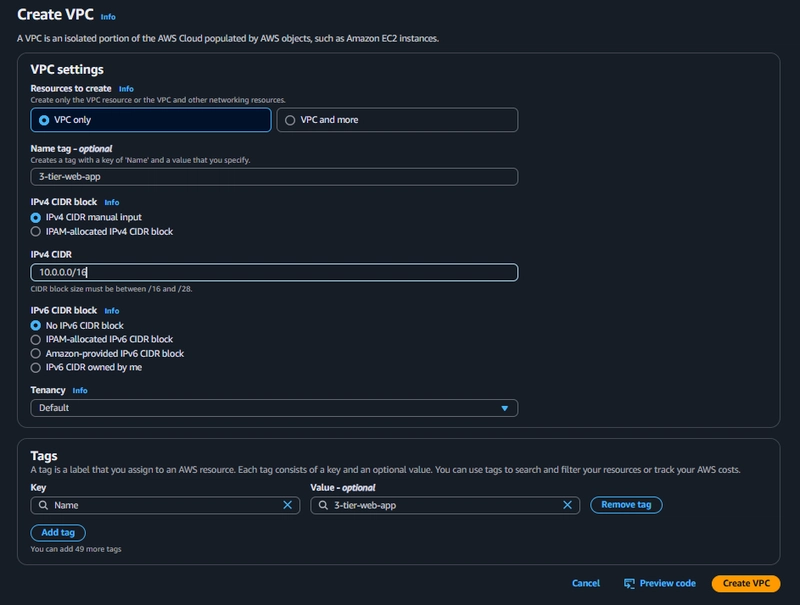 VPC created successfully...
5. Subnet Creation
Create 6 subnets
Note: Remember, your CIDR range for the subnets will be subsets of your VPC CIDR range.
AZ-1
Availability zone-1 => (1-public, 2-private)


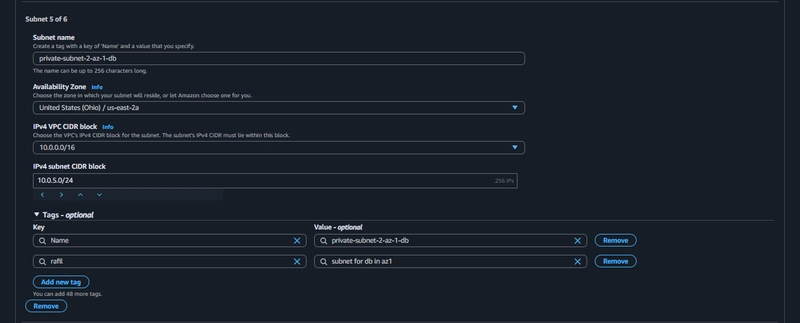 AZ-2
AZ-2
Create subnets as created in AZ-1 with different CIDR range.
Availability zone-2 => (1-public, 2-private)
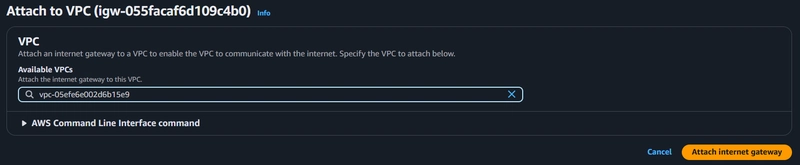
6. Internet Gateway Creation
To give internet access to the public subnets in our VPC, we will have to create and attach an Internet Gateway.
VPC > Internet gateways > Create internet gateway
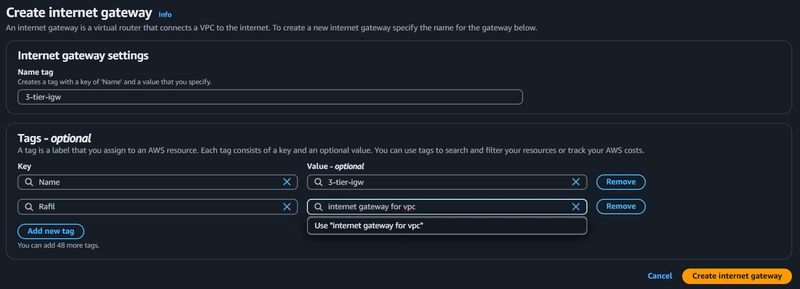 After internet gateway creation, attach it to your VPC.
- Select IGW > Actions > Attach to VPC
- Select the correct VPC and click on Attach internet gateway
7. NAT gateway Creation
For our instances in the app layer private subnet to access the internet, they will have to go through a NAT Gateway.
Create two NAT gateway for 2 public subnets on the 2 availability zones
VPC > NAT gateways > Create NAT gateway
- Select the correct public subnet in AZ-1
- Allocate elastic IP
- Click Create NAT gateway.
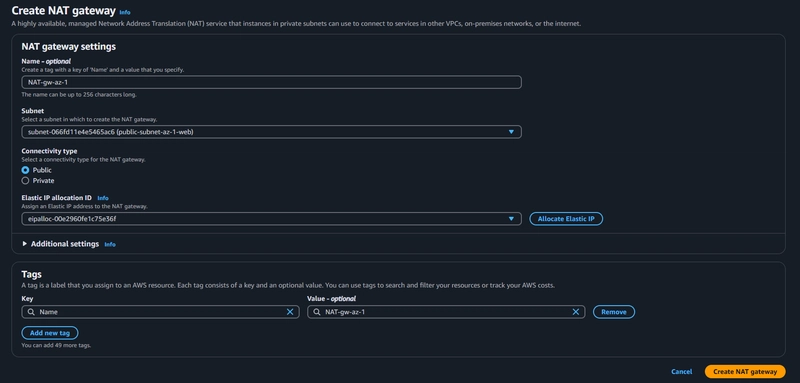
- Follow the same steps for the creation of the second NAT gateway
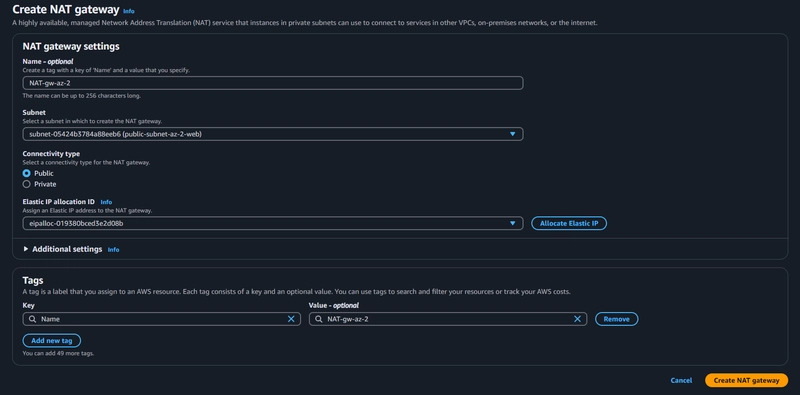
 Two NAT gateways in two AZs has been created successfully...
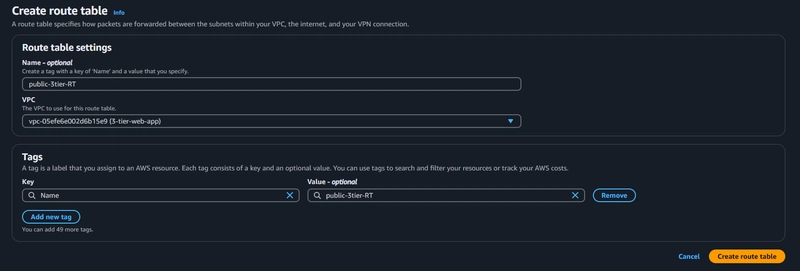
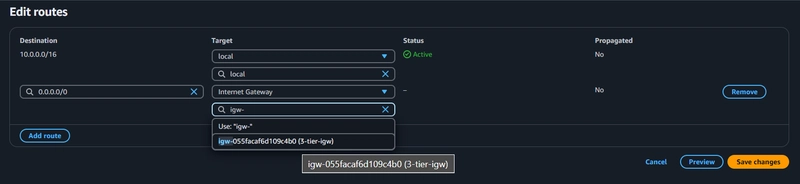
8. Routing Configuration
create one route table for the web layer public subnets.
VPC > Route table > Create route table
Click Create route table.
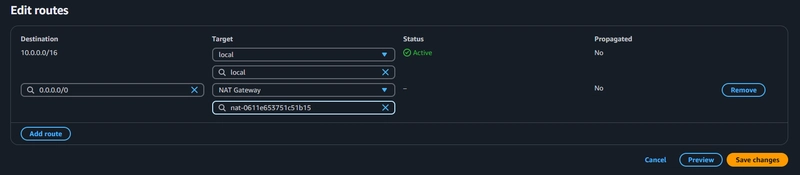
- Scroll down and click on Routes and click on Edit routes
- Click on Add route
- Select the destination 0.0.0.0/0
- In Target section, select Internet Gateway
- Then select the created IGW
- Then click Save changes
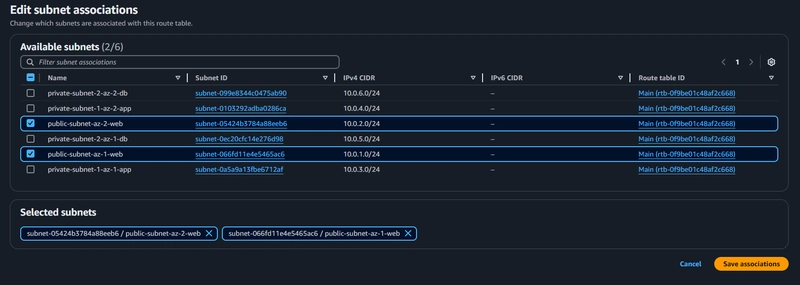
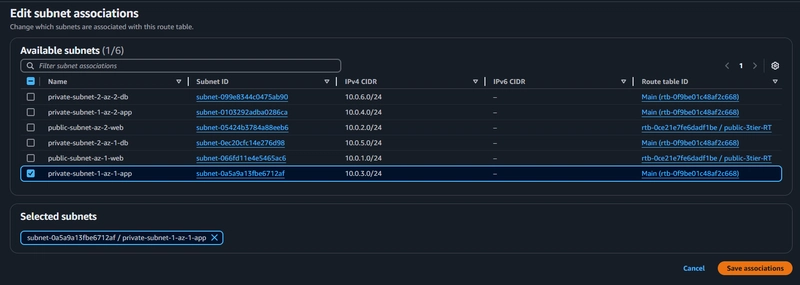
- Select Subnet Associations and click Edit subnet associations.
- Select the web layer public subnets which has been created
- Then click Save associations
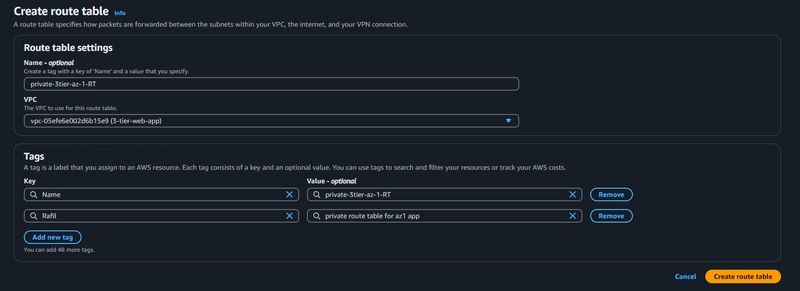
 Create 2 more route tables, one for each app layer private subnet in each availability zone
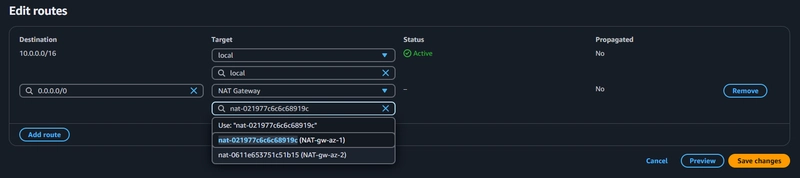
1.Private route table 1
- Scroll down and click on Routes and click on Edit routes
- Click on Add route
- Select the destination 0.0.0.0/0
- In Target section, select Internet Gateway
- Then select the created NAT gateway in AZ-1
- Then click Save changes
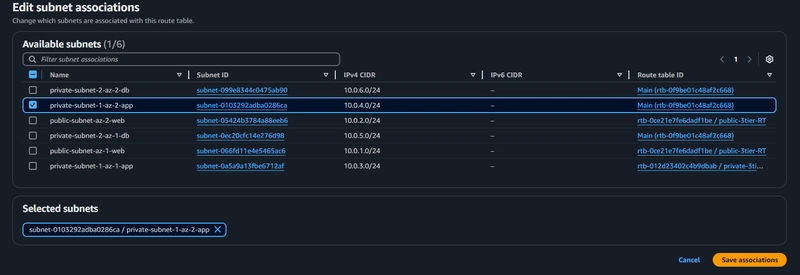
- Select Subnet Associations and click Edit subnet associations.
- Select the app layer private subnet on AZ-1
- Then click Save associations
2. Private route table 2
For creating the Private route table 2, follow the steps performed in the creation of above private subnet route table with their availability zone accordingly.

 These route tables will route app layer traffic destined for outside the VPC to the NAT gateway in the respective availability zone, so add the appropriate routes for that.
9. Security groups
1 for database
2 for load balancer
1 for public EC2
1 for private EC2
While creating sg, don't change anything in outbound rules.
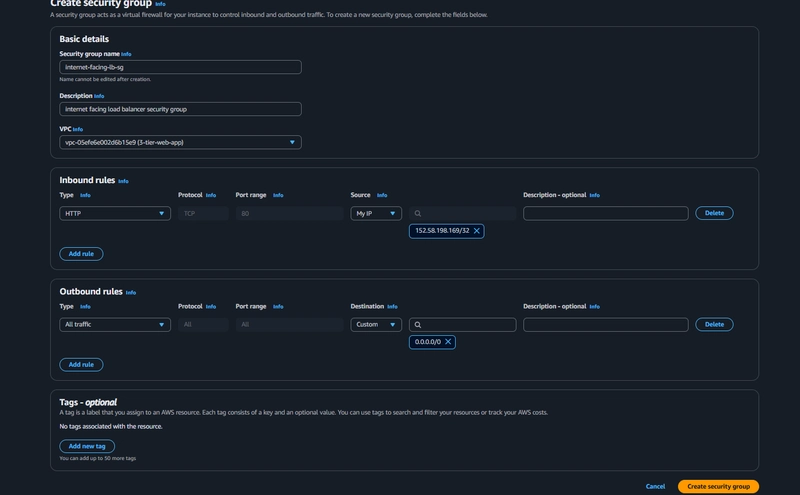
1. Security group for internet facing load balancer(internet facing)
- The first security group you’ll create is for the public, internet facing load balancer.
- After typing a name and description, add an inbound rule to allow HTTP type traffic for your IP.
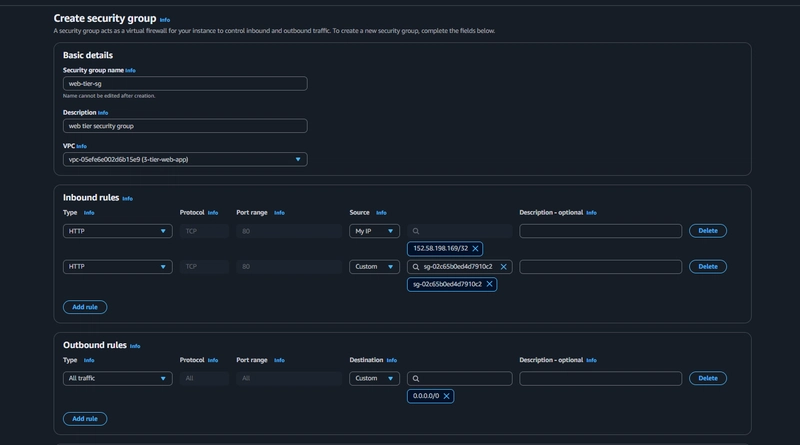
 2.Security group for allowing ELB access to EC2 instances(web tier)
In creation of this security group, in inbound rules allow HTTP type traffic for your IP
Add rule - Allow 'HTTP' type and select the 'internet facing security group'
2.Security group for allowing ELB access to EC2 instances(web tier)
In creation of this security group, in inbound rules allow HTTP type traffic for your IP
Add rule - Allow 'HTTP' type and select the 'internet facing security group'
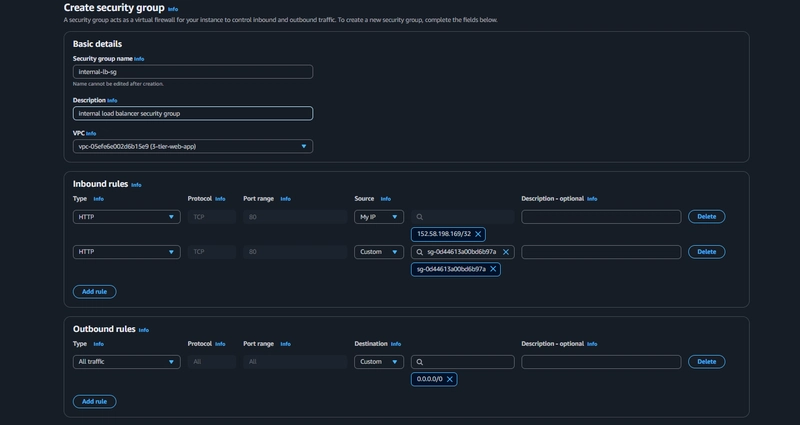
 3.Security group for Internal load balancer(Internal facing)
The third security group will be for our internal load balancer. Create this new security group and add an inbound rule that allows HTTP type traffic from your public instance security group
3.Security group for Internal load balancer(Internal facing)
The third security group will be for our internal load balancer. Create this new security group and add an inbound rule that allows HTTP type traffic from your public instance security group
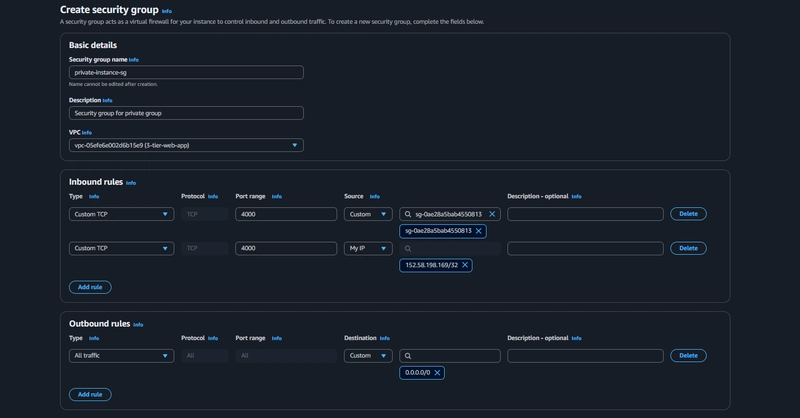
 4.Security group for app tier
The fourth security group we’ll configure is for our private instances.
Add an inbound rule that will allow TCP type traffic on port 4000 from the internal load balancer security group you created in the previous step
4.Security group for app tier
The fourth security group we’ll configure is for our private instances.
Add an inbound rule that will allow TCP type traffic on port 4000 from the internal load balancer security group you created in the previous step
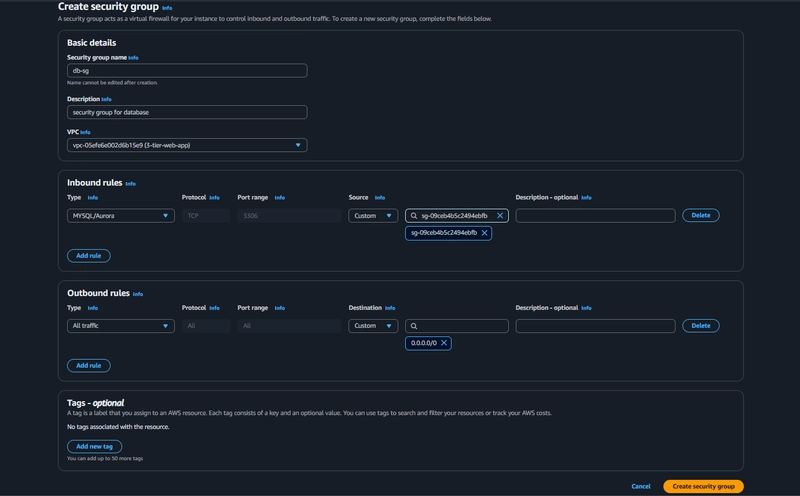
 5.Database security group
Add an inbound rule that will allow traffic from the private instance security group to the MYSQL/Aurora port (3306)
5.Database security group
Add an inbound rule that will allow traffic from the private instance security group to the MYSQL/Aurora port (3306)
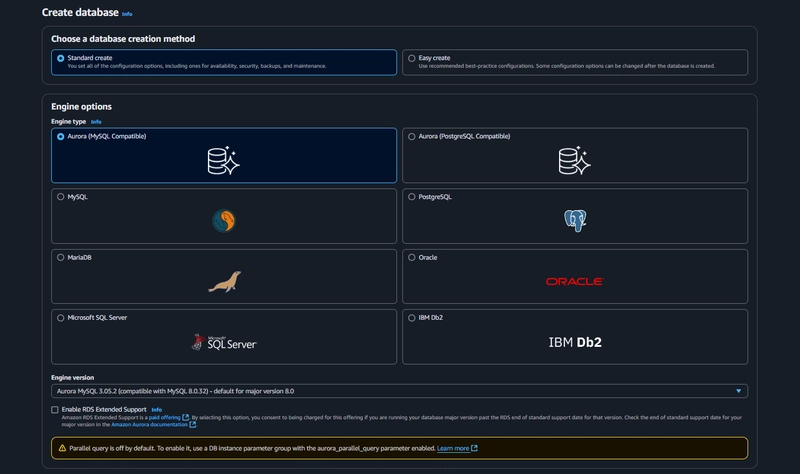
10. DB subnet group creation
Aurora and RDS > Subnet groups > Create DB subnet group
choose the VPC we created.
While adding subnets, make sure to add the subnets we created in each availability zone for our database layer. Navigate back to the VPC dashboard and check to make sure to select the correct subnet IDs.
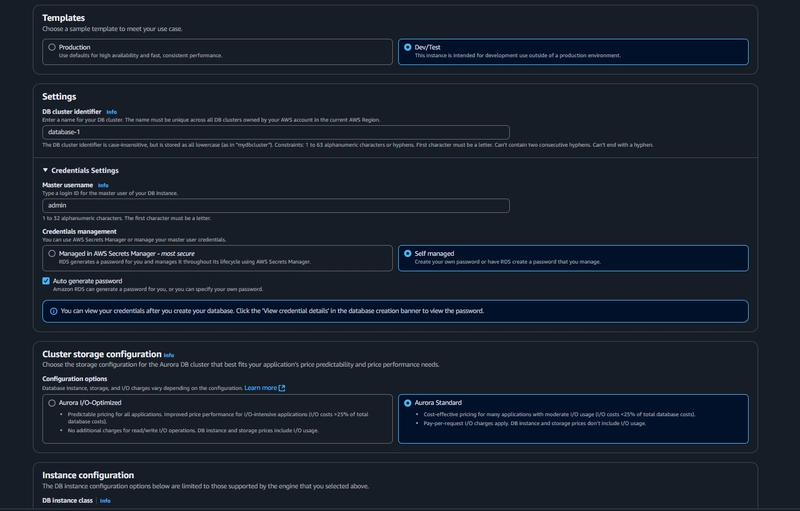
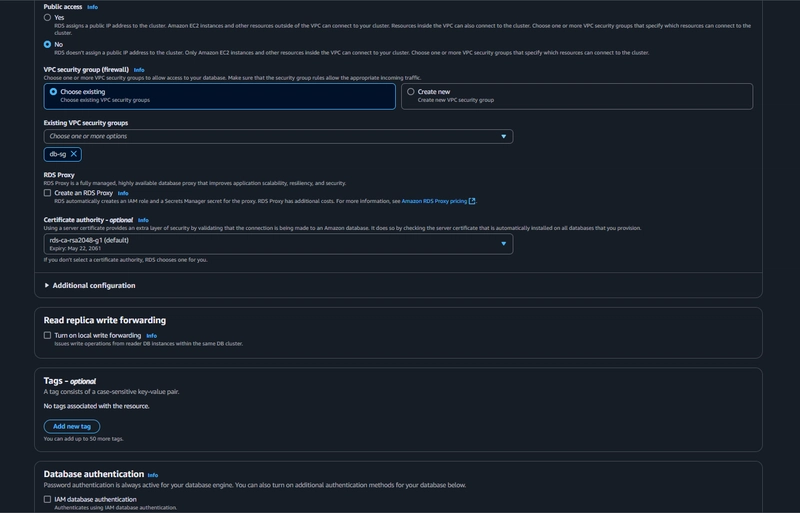
11. Database Creation
Start with a Standard create for this MySQL-Compatible Amazon Aurora database. Leave the rest of the defaults in the Engine options as default.
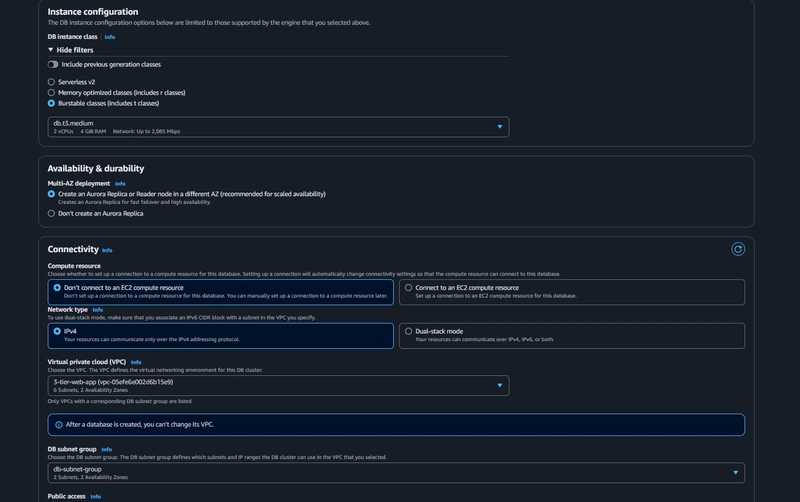
Under the Templates section choose Dev/Test since this isn't being used for production at the moment. Under Settings set a username and password of your choice and note them down since we'll be using password authentication to access our database.
- under Availability and durability change the option to create an Aurora Replica or reader node in a different availability zone.
- Under Connectivity, select the VPC, choose the subnet group we created earlier, and select no for public access.
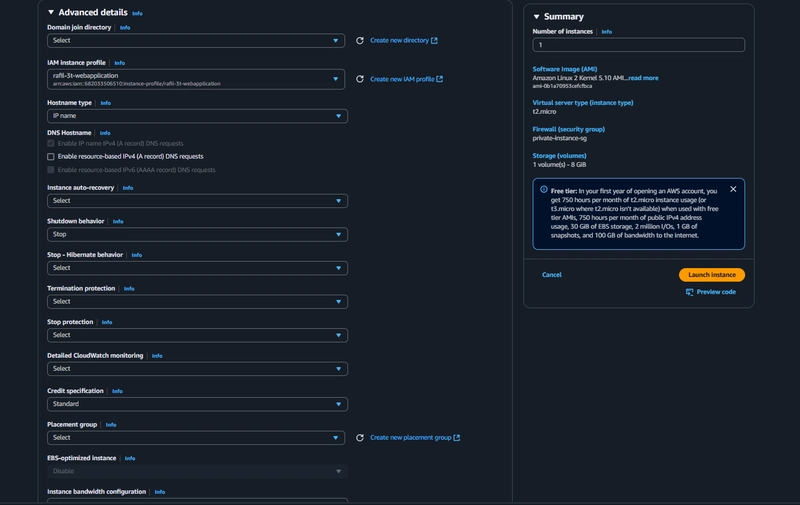
12. App Instance Creation
EC2 > Instances > Launch an instance
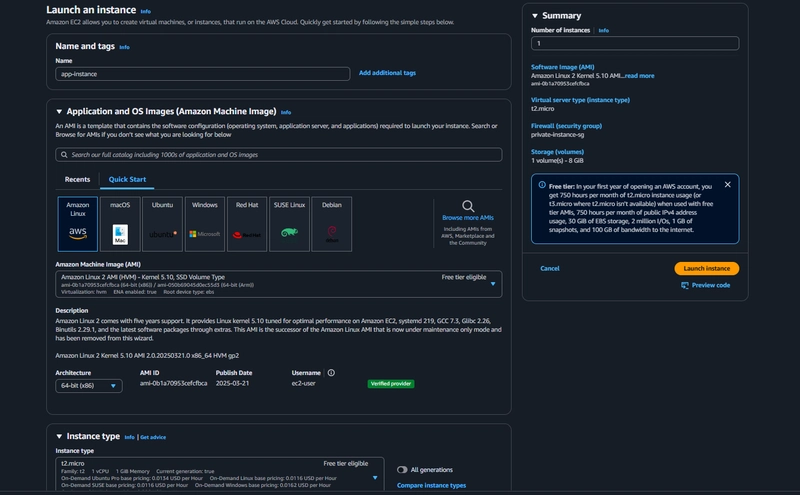
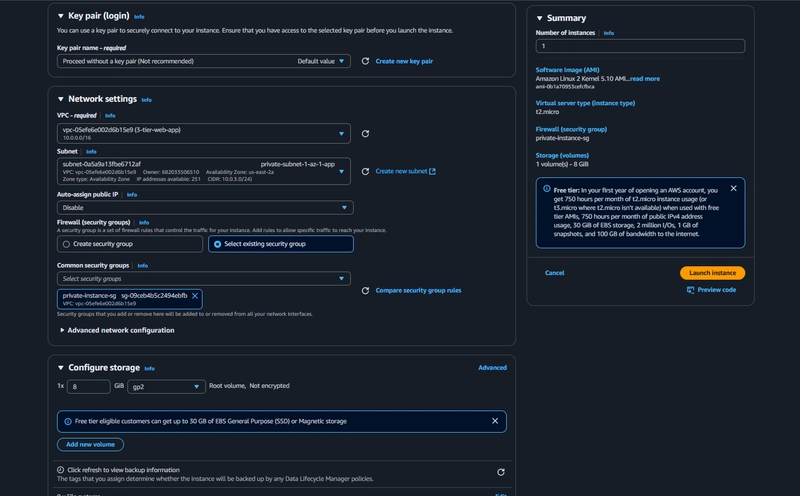
 Finally click "Launch Instance"
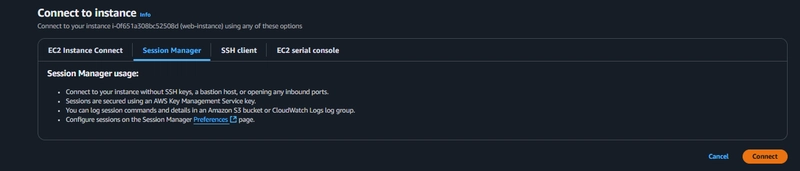
Connect Instance
click the connect button on the top right corner of the dashboard. Select the Session Manager tab and click connect.
- Switch to ec2-user by executing the following command in the browser terminal:
sudo -su ec2-user
2.If your network is configured correctly up till this point, you should be able to ping the google DNS servers:
ping 8.8.8.8
Configure Database
- Start by downloading the MySQL CLI:
sudo yum install mysql -y
- Initiate your DB connection with your Aurora RDS writer endpoint. Execute the following command in the browser after changing to your RDS end point and to your user name:
mysql -h CHANGE-TO-YOUR-RDS-ENDPOINT -u CHANGE-TO-USER-NAME -p
- Create a database called webappdb in MYSQL CLI:
CREATE DATABASE webappdb;
4.Create a data table by first navigating to the database we created:
USE webappdb;
5.create the following transactions table by executing this create table command:
 CREATE TABLE IF NOT EXISTS transactions(id INT NOT NULL
 AUTO_INCREMENT, amount DECIMAL(10,2), description
 VARCHAR(100), PRIMARY KEY(id));
6.Insert data into table:
INSERT INTO transactions (amount, description) VALUES ('400','groceries');
7.View the data inserted in table:
SELECT * FROM transactions;
8.When finished, just type exit and hit enter to exit the MySQL client.
Configure App Instance
1.The first thing we will do is update our database credentials for the app tier. To do this, open the application-code/app-tier/DbConfig.js file
2.Fill this in with the credentials you configured for your database, the writer endpoint of your database as the hostname, and webappdb for the database. Save the file.
- Upload the app-tier folder to the S3 bucket
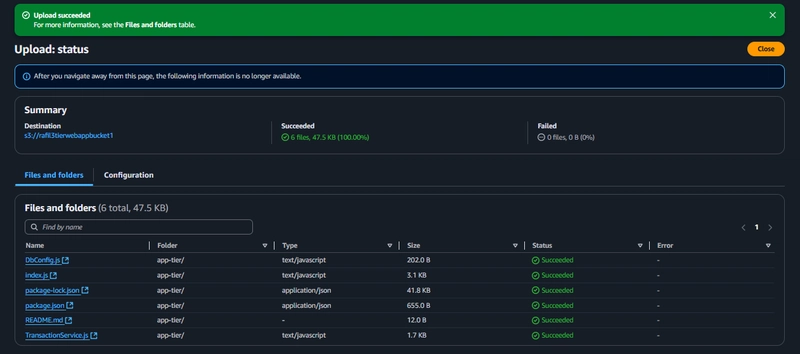 4.Go to your SSM session. Start by installing NVM (node version manager)
 curl -o- https://raw.githubusercontent.com/nvm-sh/nvm/v0.38.0/install.sh | bash
 source ~/.bashrc
- install Node.js and make sure it's being used.
 nvm install 16
 nvm use 16
6.Install PM2. PM2 is a daemon process manager that will keep our node.js app running when we exit the instance.
npm install -g pm2
7.Now we need to download our code from our s3 buckets onto our instance. Perform the following command with proper changes in bucket name.
 cd ~/
 aws s3 cp s3://BUCKET_NAME/app-tier/ app-tier --recursive
8.Navigate to the app directory, install dependencies, and start the app with pm2.
 cd ~/app-tier
 npm install
 pm2 start index.js
Run the following to make sure the app is running correctly
pm2 list
To look at the latest errors, use this command:
pm2 logs
9.Right now, pm2 is just making sure our app stays running when we leave the SSM session. This is also important for the AMI we will create:
pm2 startup
After you run it, save the current list of node processes with the following command:
pm2 save
Test App Tier
1.To hit out health check endpoint, run this command into your SSM terminal.
curl http://localhost:4000/health
2.Next, test your database connection. You can do that by hitting the following endpoint locally:
curl http://localhost:4000/transaction
Your app layer is fully configured and ready to go.
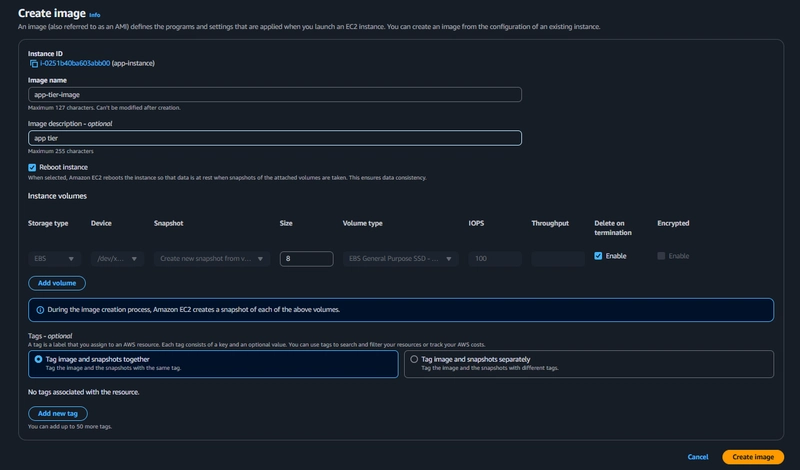
App Tier AMI
Select the app tier instance and click Actions, select Image and templates. Click Create Image.

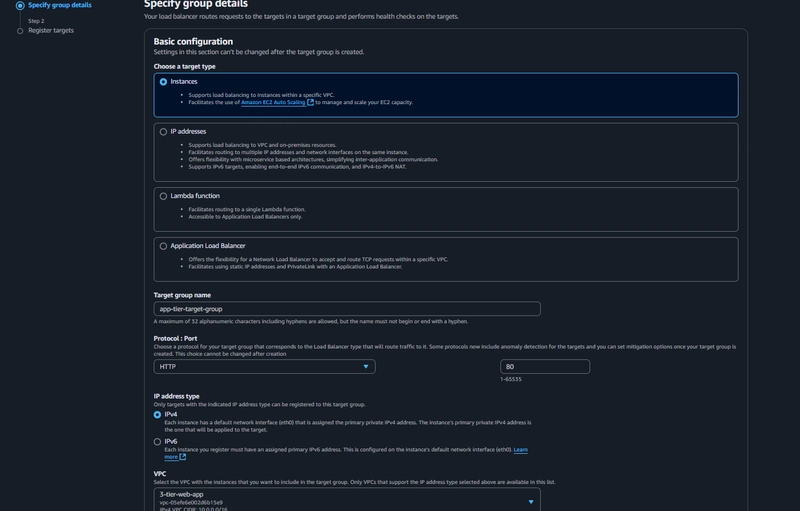
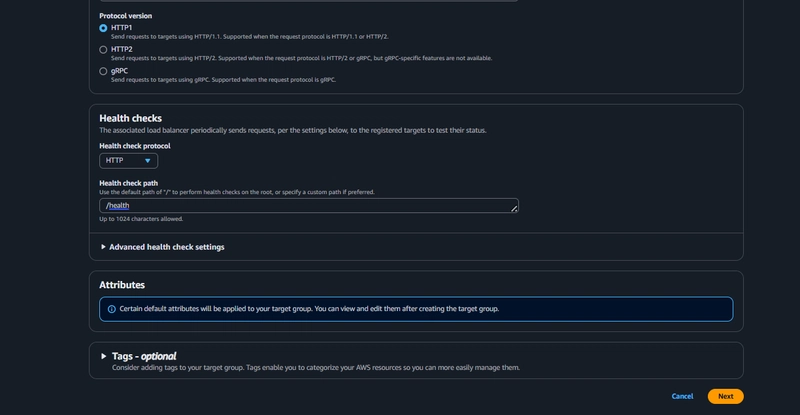
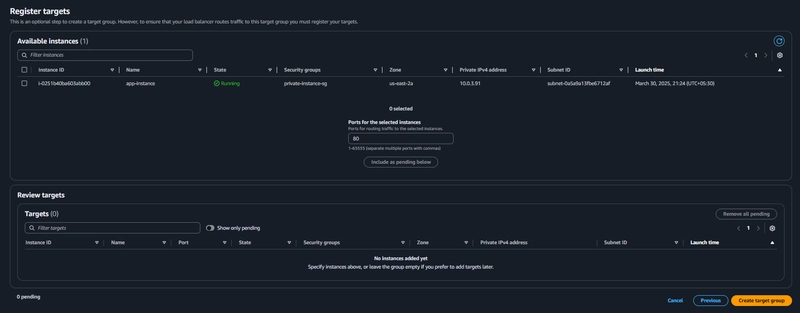
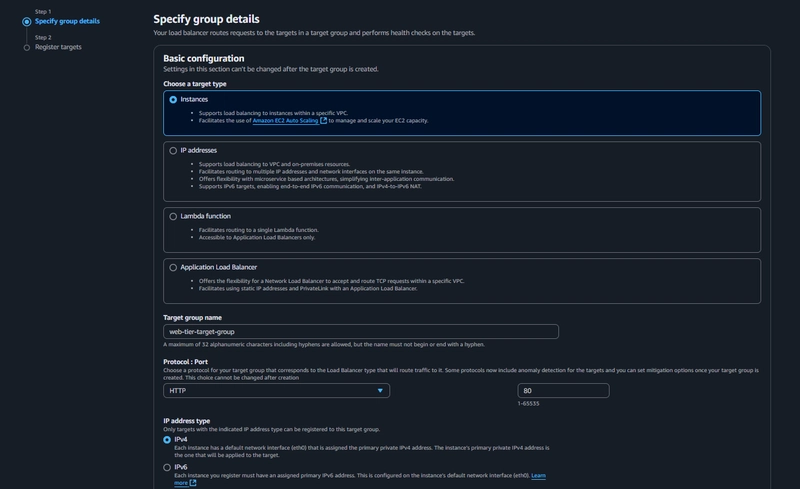
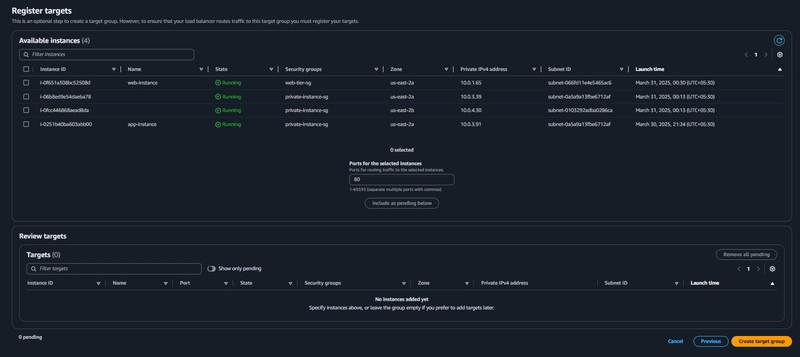
Target Group
EC2 > Load Balancing > Target Groups > Create Target Group
Navigate to Target Groups. Click on Create Target Group.
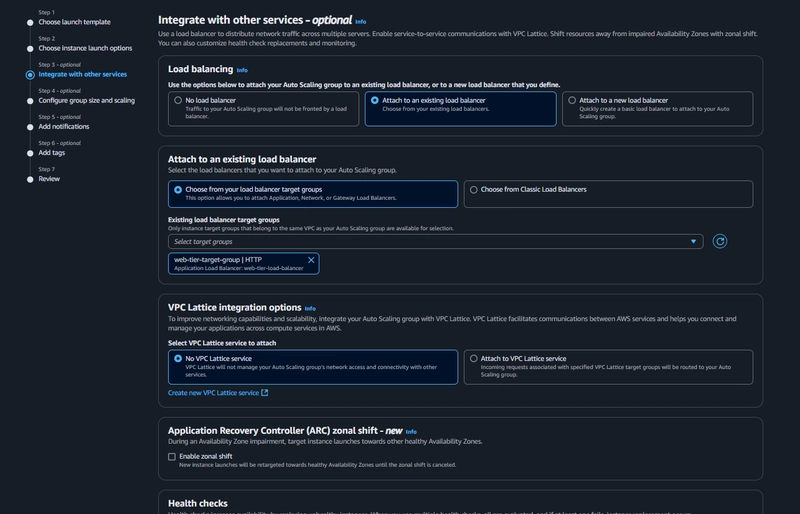
Internal Load Balancer
EC2 > Load Balancing > Load Balancers > Create load balancer
- click Create Load Balancer
- We'll be using an Application Load Balancer for our HTTP traffic so click the create button for that option.
- After giving the load balancer a name, be sure to select internal
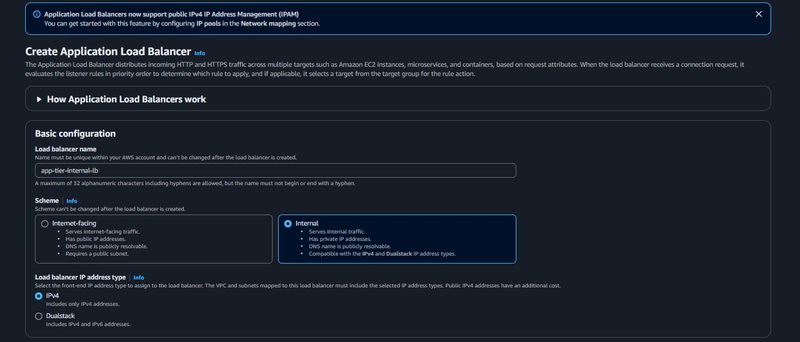 -Select the correct network configuration for VPC and private subnets.
 - Select the security group we created for this internal ALB. Now, this ALB will be listening for HTTP traffic on port 80.
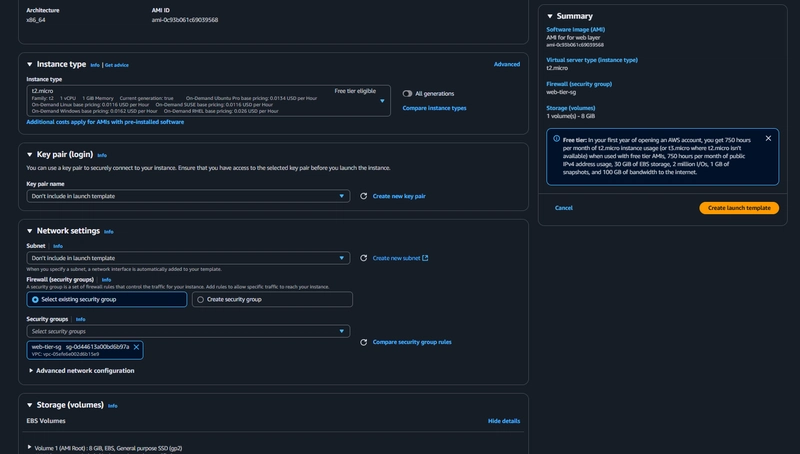
 ##Launch Template
EC2 > Instances > Launch Template > Create Launch Template
##Launch Template
EC2 > Instances > Launch Template > Create Launch Template - Click Create Launch Template.
- Under Application and OS Images include the app tier AMI you created.

- Under Instance Type select t2.micro. For Key pair and Network Settings don't include it in the template.
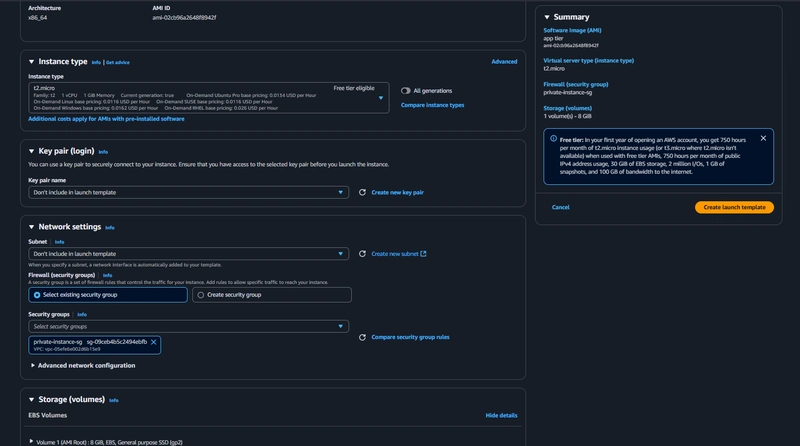
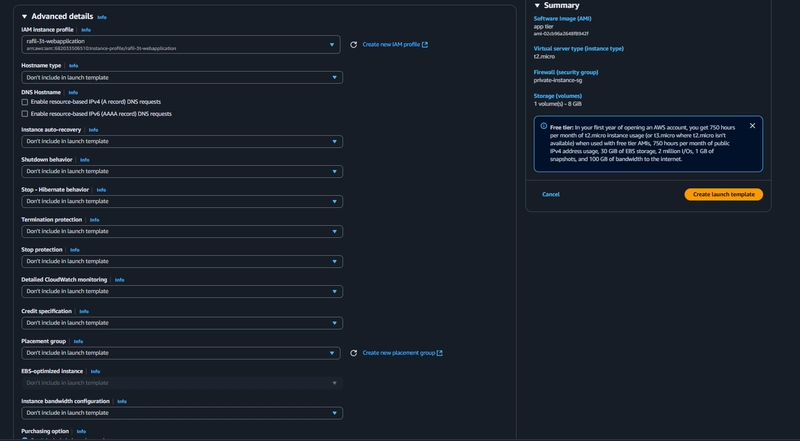
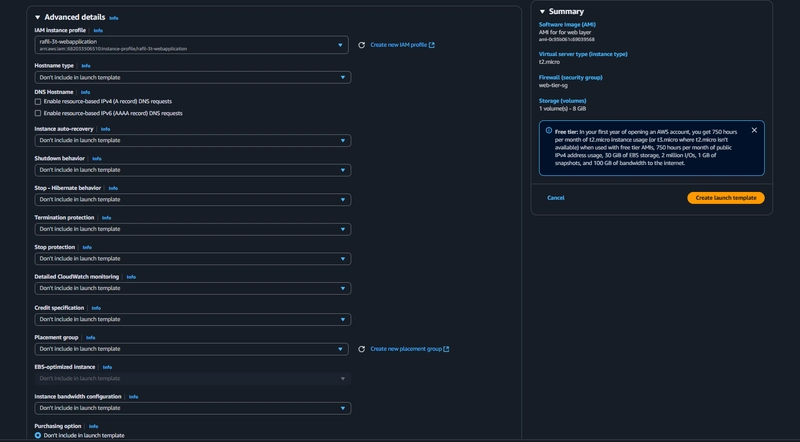
- under Advanced details use the same IAM instance profile we have been using for our EC2 instances.
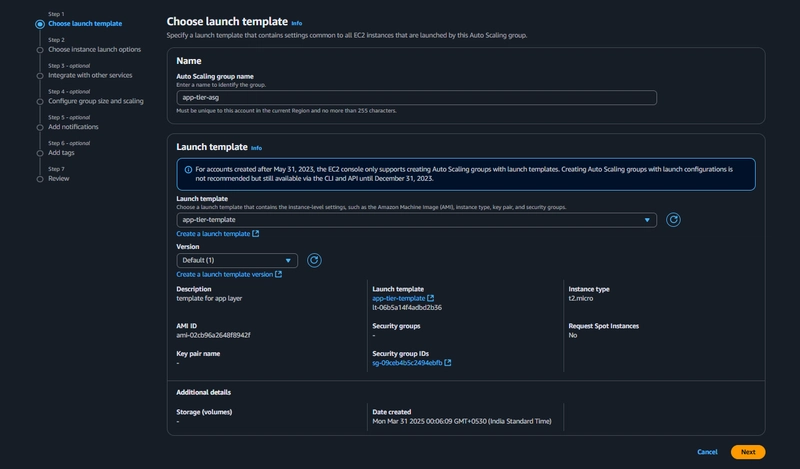
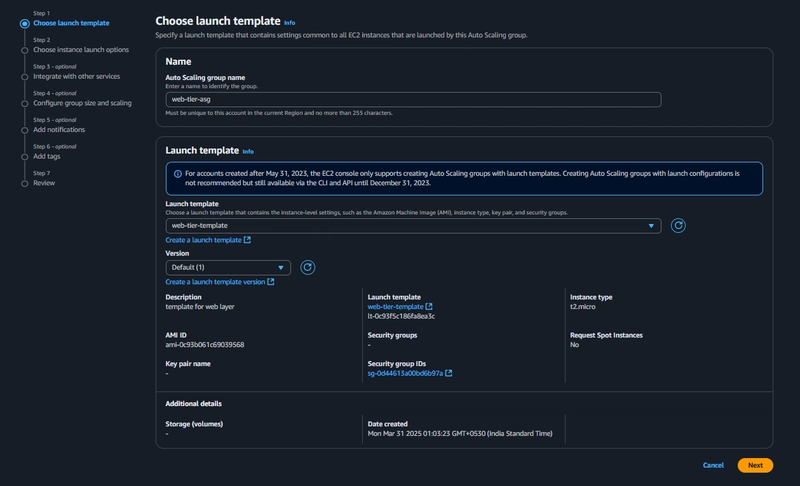
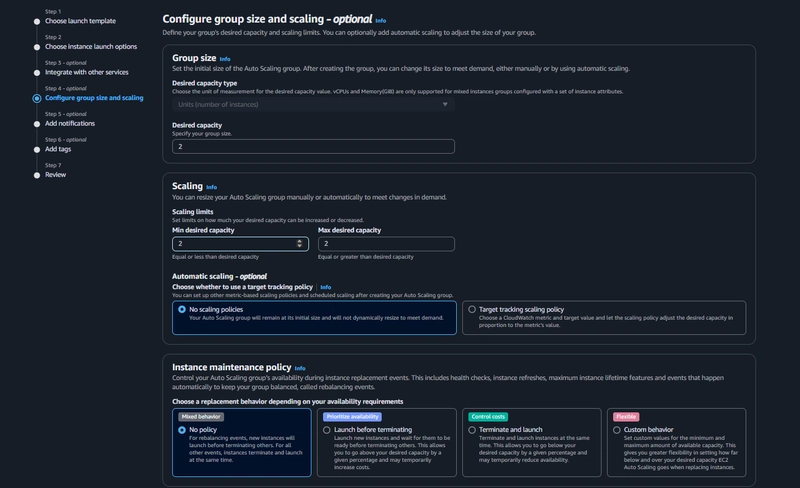
Auto Scaling
EC2 > Auto Scaling > Auto Scaling Groups > Create Auto Scaling Group
- select the Launch Template we just created and click next.
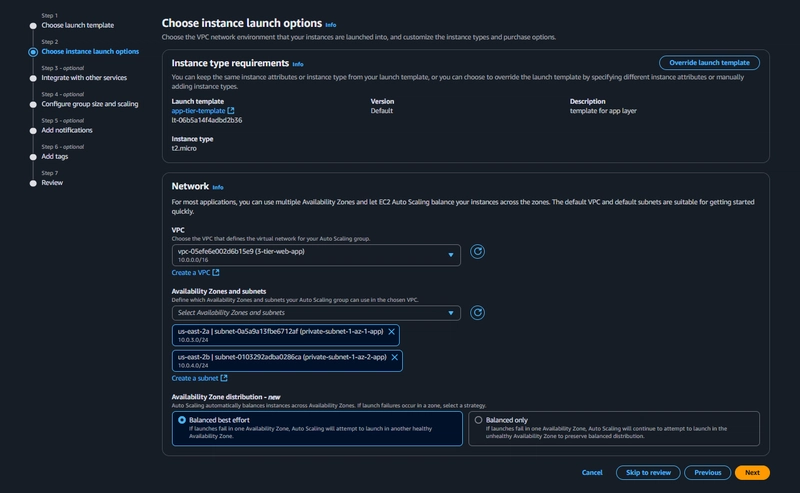
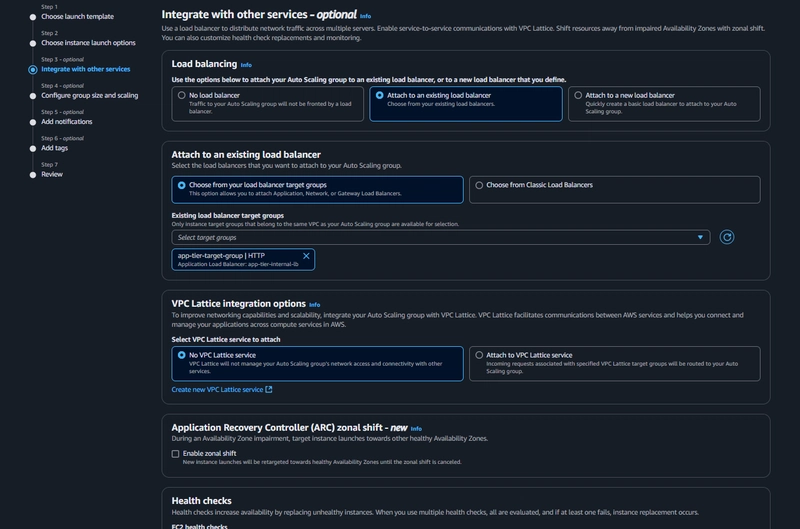
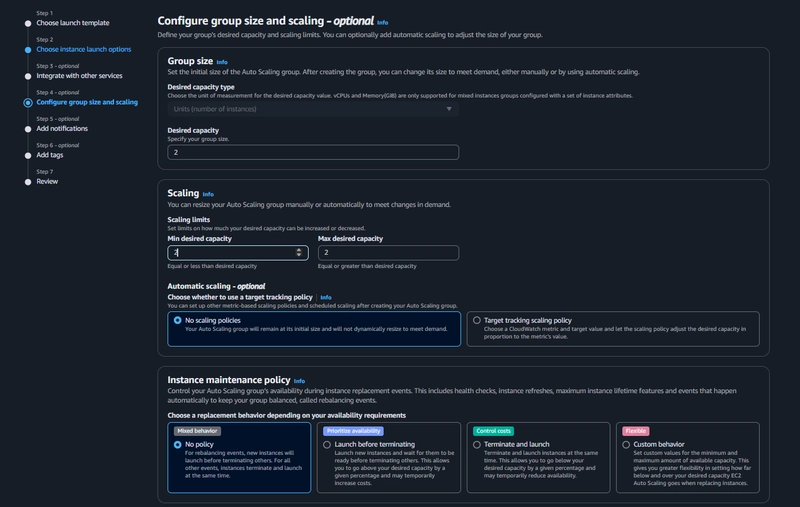
After the above step Click next, next finally click Create Auto Scaling group
Updation of Config File
- Open up the application-code/nginx.conf file.
- Scroll down to line 58 and replace [INTERNAL-LOADBALANCER-DNS] with your internal load balancer’s DNS entry.
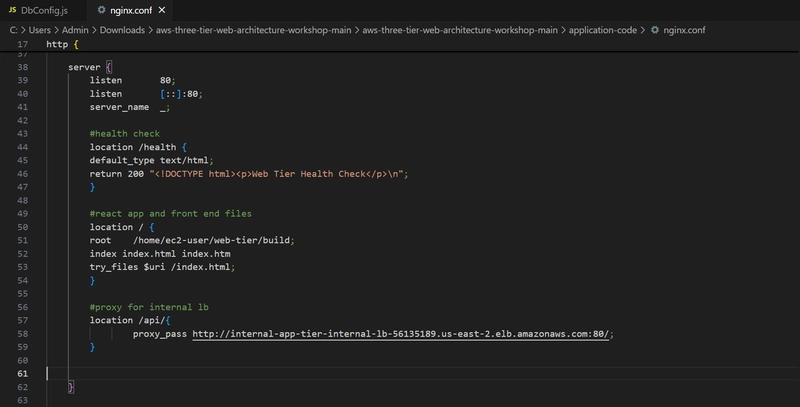
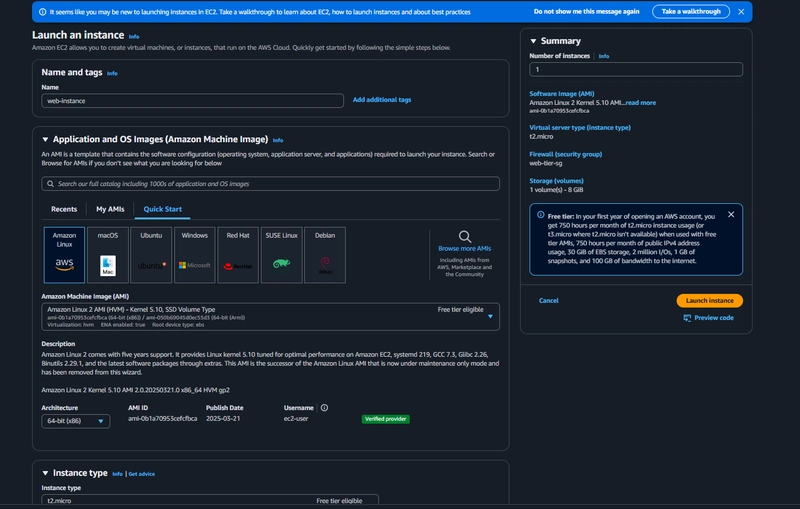
- Then, upload this file and the application-code/web-tier folder to the s3 bucket you created for this lab. ##Web Instance Deployment EC2 > Instances > Launch an Instance
- Select the first Amazon Linux 2 AMI.
- We'll be using the free tier eligible t2.micro instance type.
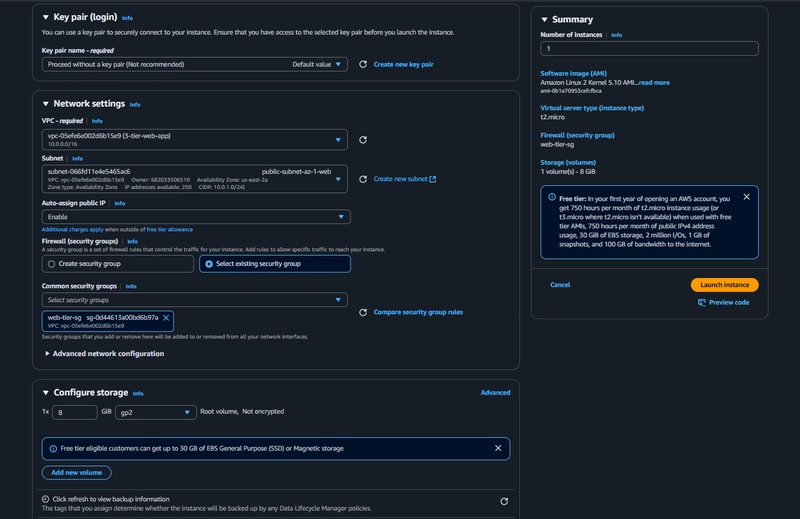
- When configuring the instance details, make sure to select to correct Network, subnet, and IAM role we created.
- We are using already created VPC and Public Subnet AZ-1 and Enable auto assign Public IP
- We are using already created web tier security group
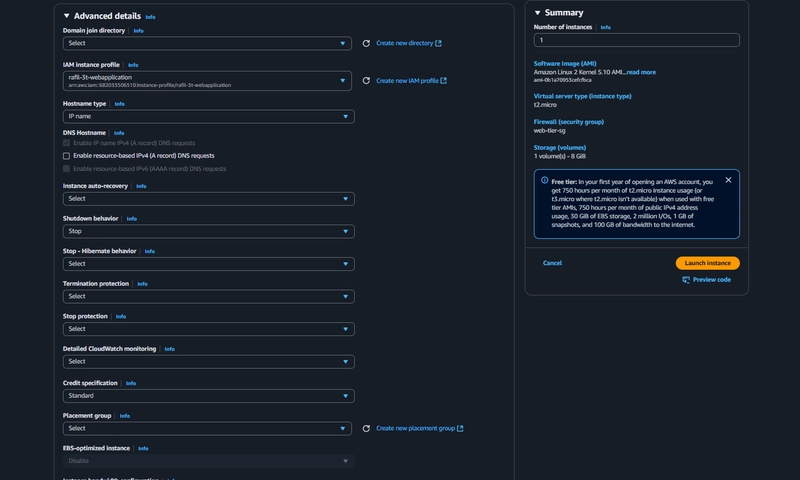
- We are using already created IAM role
- Finally click "Launch Instance"
 ##Connect to Instance
click the connect button on the top right corner of the EC2 dashboard. Select the Session Manager tab and click connect.
##Connect to Instance
click the connect button on the top right corner of the EC2 dashboard. Select the Session Manager tab and click connect.
- Switch to ec2-user by executing the following command in the browser terminal:
sudo -su ec2-user
2.If your network is configured correctly up till this point, you should be able to ping the google DNS servers:
ping 8.8.8.8
Configure Web Instance
1.We now need to install all of the necessary components needed to run our front-end application. Again, start by installing NVM and node
 curl -o- https://raw.githubusercontent.com/nvm-sh/nvm/v0.38.0/install.sh | bash
 source ~/.bashrc
 nvm install 16
 nvm use 16
2.Now we need to download our web tier code from our s3 bucket:
 cd ~/
 aws s3 cp s3://rafil3tierwebappbucket1/web-tier/ web-tier --recursive
3.Navigate to the web-layer folder and create the build folder for the react app so we can serve our code:
 cd ~/web-tier
 npm install
 npm run build
4.NGINX can be used for different use cases like load balancing, content caching. But we will be using it as a web server that we will configure to serve our application on port 80, as well as help direct our API calls to the internal load balancer.
sudo amazon-linux-extras install nginx1 -y
5.We will now have to configure NGINX. Navigate to the Nginx configuration file with the following commands and list the files in the directory
 cd /etc/nginx
 ls
6.You should see an nginx.conf file. We’re going to delete this file and use the one we uploaded to s3.
 sudo rm nginx.conf
 sudo aws s3 cp s3://BUCKET_NAME/nginx.conf .
7.Restart Nginx with the following command:
sudo service nginx restart
8.To make sure Nginx has permission to access our files execute this command:
chmod -R 755 /home/ec2-user
9.Then to make sure the service starts on boot, run this command:
sudo chkconfig nginx on
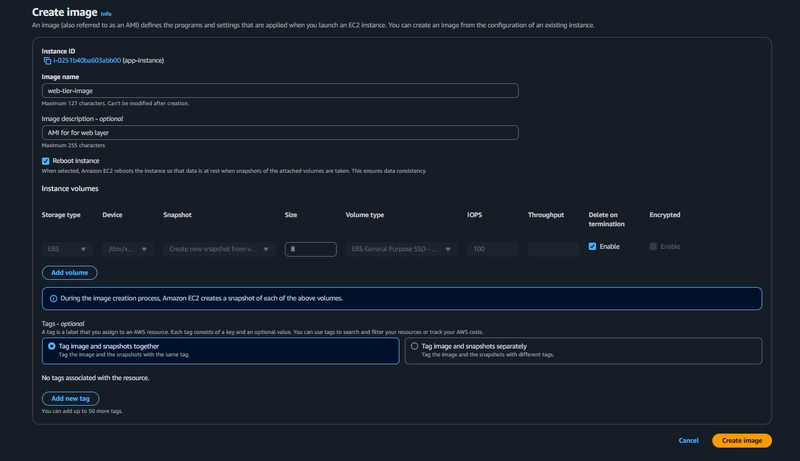
Web Tier AMI
Select the web tier instance and click Actions, select Image and templates. Click Create Image.
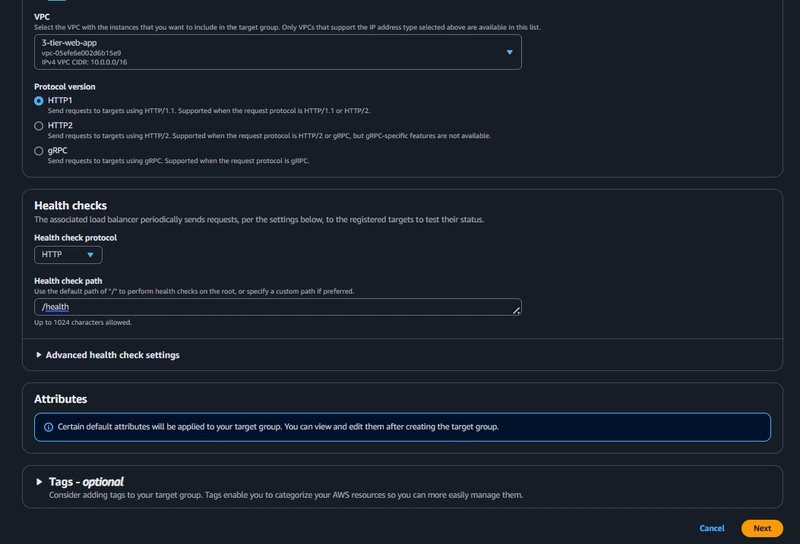
Target Group
EC2 > Load Balancing > Target Groups > Create Target Group
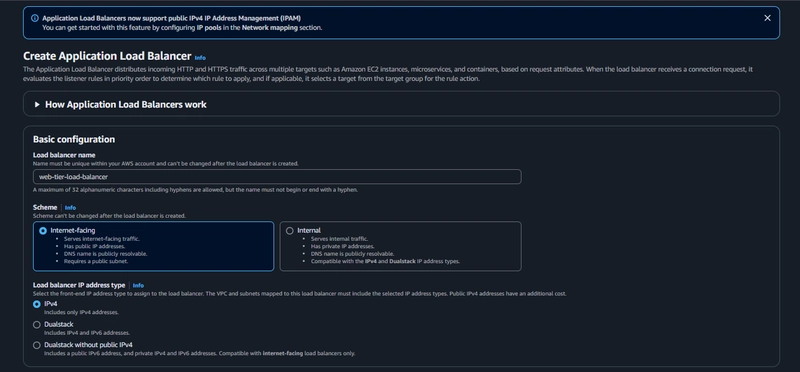
Internet Facing Load Balancer
EC2 > Load Balancing > Load Balancers > Create load balancer
- click Create Load Balancer
- We'll be using an Application Load Balancer for our HTTP traffic so click the create button for that option.
- After giving the load balancer a name, be sure to select Internet facing
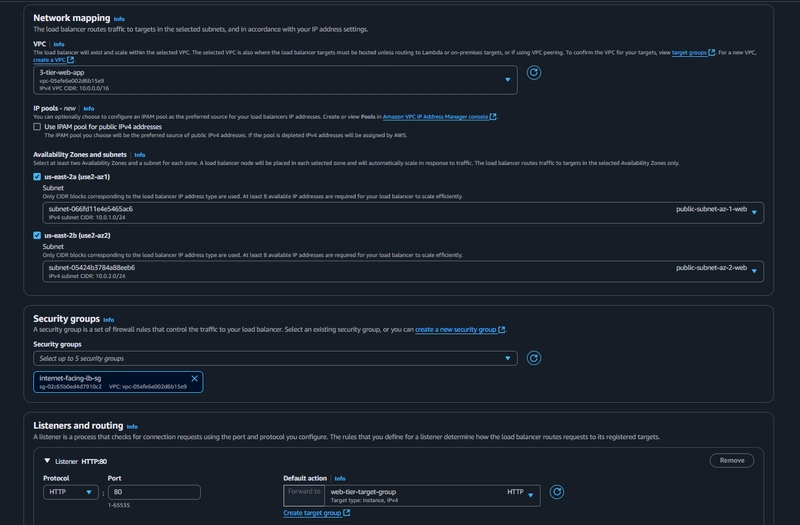
 -Select the correct network configuration for VPC and private subnets.
 - Select the security group we created for this internet facing ALB. Now, this ALB will be listening for HTTP traffic on port 80.
 ##Launch Template
 - Click Create Launch Template.
- Under Application and OS Images include the web tier AMI you created.
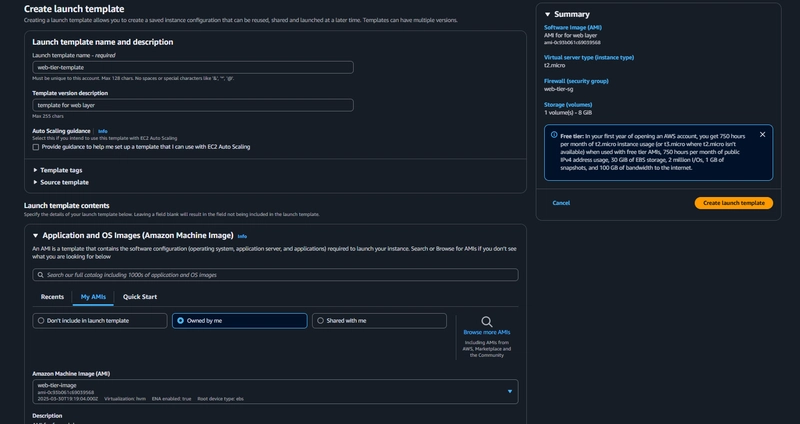
- Under Instance Type select t2.micro. For Key pair and Network Settings don't include it in the template.
- under Advanced details use the same IAM instance profile we have been using for our EC2 instances.
 ##Auto Scaling
EC2 > Auto Scaling > Auto Scaling Groups > Create Auto Scaling Group
##Auto Scaling
EC2 > Auto Scaling > Auto Scaling Groups > Create Auto Scaling Group - select the Launch Template we just created and click next.

 After the above step Click next, next finally click Create Auto Scaling group
Finally we get our "webapp"