


![[Webinar] AI Is Already Inside Your SaaS Stack — Learn How to Prevent the Next Silent Breach](https://blogger.googleusercontent.com/img/b/R29vZ2xl/AVvXsEiOWn65wd33dg2uO99NrtKbpYLfcepwOLidQDMls0HXKlA91k6HURluRA4WXgJRAZldEe1VReMQZyyYt1PgnoAn5JPpILsWlXIzmrBSs_TBoyPwO7hZrWouBg2-O3mdeoeSGY-l9_bsZB7vbpKjTSvG93zNytjxgTaMPqo9iq9Z5pGa05CJOs9uXpwHFT4/s1600/ai-cyber.jpg?#)


![[The AI Show Episode 144]: ChatGPT’s New Memory, Shopify CEO’s Leaked “AI First” Memo, Google Cloud Next Releases, o3 and o4-mini Coming Soon & Llama 4’s Rocky Launch](https://www.marketingaiinstitute.com/hubfs/ep%20144%20cover.png)


![Rogue Company Elite tier list of best characters [April 2025]](https://media.pocketgamer.com/artwork/na-33136-1657102075/rogue-company-ios-android-tier-cover.jpg?#)


![Here’s the first live demo of Android XR on Google’s prototype smart glasses [Video]](https://i0.wp.com/9to5google.com/wp-content/uploads/sites/4/2025/04/google-android-xr-ted-glasses-demo-3.png?resize=1200%2C628&quality=82&strip=all&ssl=1)


![New Beats USB-C Charging Cables Now Available on Amazon [Video]](https://www.iclarified.com/images/news/97060/97060/97060-640.jpg)

![Apple M4 13-inch iPad Pro On Sale for $200 Off [Deal]](https://www.iclarified.com/images/news/97056/97056/97056-640.jpg)


Taking Payments with AI Agents and Rig using Stripe's MCP server
Introduction Hello world! In today's post we're going to take a look at how you can build AI agent systems that can take payments with Rig, a Rust-based AI agent framework, and the official Stripe MCP server. By the end of this you'll have a CLI chatbot that can read products and prices that belong to your Stripe account, as well as creating payment links (using Stripe's MCP server). The chatbot will be modelled on a shop assistant. Below is an example of a possible chat log with this chatbot: And of course, here is the respective payment link output: Interested in just jumping ahead to trying it out? Check out the repo. Getting started Pre-requisites Before we get started, you'll need the latest version of Node as well as a Stripe API key. Note that if you don't actually own a company to use Stripe officially (or you want to ensure everything works), you can still use a test account with Stripe. The Stripe MCP server itself requires Node to run but does not need an additional web server as it communicates through stdio (standard input/output). The program we'll be building will be instantiating the MCP server by itself, so outside of Node you shouldn't need anything else. You'll also need an OpenAI API key. Using Stripe To start using Stripe, sign into their dashboard then create a few products and attach some prices to them - you can find out more about this on their documentation pages. Once done, we'll be creating payment links programatically through the MCP server so you won't need to manually handle this yourself. Project setup To get started with creating our project, you'll need to run the following to initialise your Rust application: cargo init stripe-mcp-rig Next, you'll want to install the project dependencies - which you can do with the one liner below: cargo add anyhow mcp-core rig-core tokio -F rig-core/mcp,tokio/macros,\ tokio/rt-multi-thread What did we just add? mcp-core: A crate for working with MCP. rig-core: The Rig core crate. Uses the mcp feature for integration with mcp-core. tokio: An async Rust runtime. Uses the mcaros and rt-multi-thread features for convenient async runtime setup. ## Building our project Now for the fun part: building our project! ### Talking to our MCP server Before we do anything else, we need to get our Stripe API key as an environment variable as well as our OpenAI API key. You can do this with export command as below: export STRIPE_API_KEY=my-key-here export OPENAI_API_KEY=my-key-here As mentioned before, currently the official Stripe MCP server supports stdio only - and we can start it up with the following one-line command (although later on, the program itself will instantiate the MCP server): npx -y @stripe/mcp --tools=all --api-key=$STRIPE_API_KEY The mcp_core crate allows us to run this in much the same way that you'd run something using the std::command::Command struct - providing the program name, then the arguments. Next, a (relatively!) simple function that will attempt to get the Stripe API key from environment variables and automatically panics if it doesn't exist (as it's required to allow the program to run). We then feed the command into the ClientStdioTransport::new function to start the program up, then initiate a connection and return the client itself. async fn connect_to_stripe_mcp() -> Result { println!("Loading Stripe MCP server..."); let stripe_api_key = std::env::var("STRIPE_API_KEY").expect("STRIPE_API_KEY to exist as env var"); let stripe_api_key = format!("--api-key={stripe_api_key}"); // Create the MCP client let client_transport = ClientStdioTransport::new( "npx", &[ "-y", "@stripe/mcp", "--tools=products.read,prices.read,paymentLinks.create", &stripe_api_key, ], ) .unwrap(); let mcp_client = ClientBuilder::new(client_transport).build(); // Start the MCP client mcp_client.open().await?; Ok(mcp_client) } Note that in the command above, we have only allowed the following tools to be spawned with the MCP server: Reading products Reading prices Creating payment links Although the MCP server contains many, many more tools, in the wild this this would be a user-facing application. In this case, we should ensure that we grant the least power possible to the user that is still required for the application to work. Otherwise, they might try to create new products for example, or add fake customers to our Stripe account! Next, we need to fetch our list of tools from the MCP server and create a ToolSet as well as a Vec - both of which will be used to invoke functions as well as help the LLM select which tool to use. To break this function down: We use the fold() function, which takes an accumulator (ToolSet and Vec which are both contained in a tuple) Within the closure, the tuple (of a
Introduction
Hello world! In today's post we're going to take a look at how you can build AI agent systems that can take payments with Rig, a Rust-based AI agent framework, and the official Stripe MCP server.
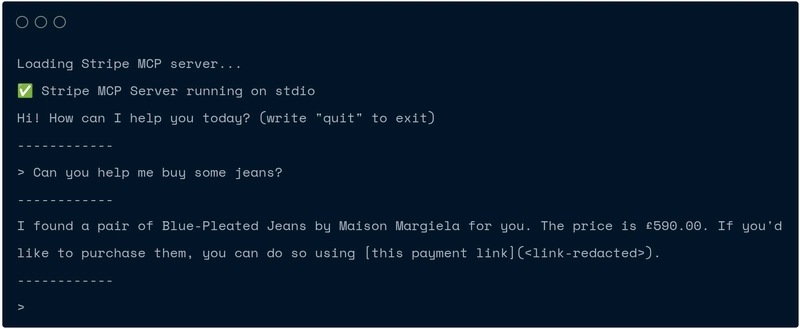
By the end of this you'll have a CLI chatbot that can read products and prices that belong to your Stripe account, as well as creating payment links (using Stripe's MCP server). The chatbot will be modelled on a shop assistant.
Below is an example of a possible chat log with this chatbot:
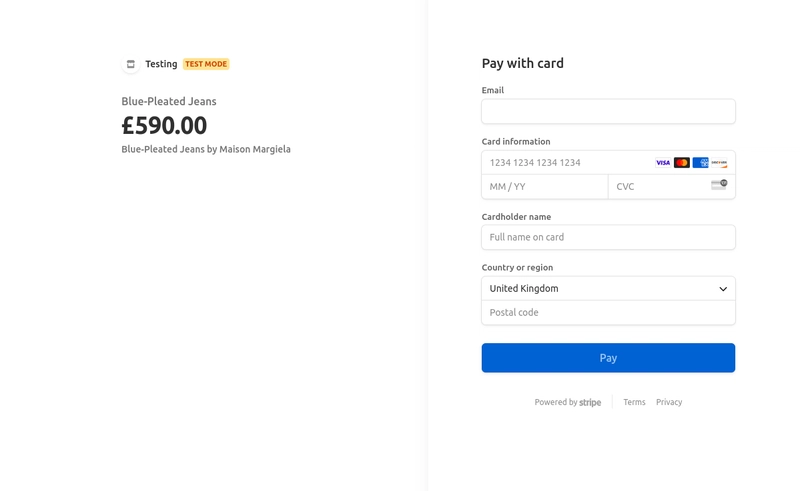
And of course, here is the respective payment link output:
Interested in just jumping ahead to trying it out? Check out the repo.
Getting started
Pre-requisites
Before we get started, you'll need the latest version of Node as well as a Stripe API key. Note that if you don't actually own a company to use Stripe officially (or you want to ensure everything works), you can still use a test account with Stripe.
The Stripe MCP server itself requires Node to run but does not need an additional web server as it communicates through stdio (standard input/output). The program we'll be building will be instantiating the MCP server by itself, so outside of Node you shouldn't need anything else.
You'll also need an OpenAI API key.
Using Stripe
To start using Stripe, sign into their dashboard then create a few products and attach some prices to them - you can find out more about this on their documentation pages. Once done, we'll be creating payment links programatically through the MCP server so you won't need to manually handle this yourself.
Project setup
To get started with creating our project, you'll need to run the following to initialise your Rust application:
cargo init stripe-mcp-rig
Next, you'll want to install the project dependencies - which you can do with the one liner below:
cargo add anyhow mcp-core rig-core tokio -F rig-core/mcp,tokio/macros,\
tokio/rt-multi-thread
What did we just add?
-
mcp-core: A crate for working with MCP. -
rig-core: The Rig core crate. Uses themcpfeature for integration withmcp-core. -
tokio: An async Rust runtime. Uses themcarosandrt-multi-threadfeatures for convenient async runtime setup. ## Building our project Now for the fun part: building our project! ### Talking to our MCP server Before we do anything else, we need to get our Stripe API key as an environment variable as well as our OpenAI API key. You can do this withexportcommand as below:
export STRIPE_API_KEY=my-key-here
export OPENAI_API_KEY=my-key-here
As mentioned before, currently the official Stripe MCP server supports stdio only - and we can start it up with the following one-line command (although later on, the program itself will instantiate the MCP server):
npx -y @stripe/mcp --tools=all --api-key=$STRIPE_API_KEY
The mcp_core crate allows us to run this in much the same way that you'd run something using the std::command::Command struct - providing the program name, then the arguments.
Next, a (relatively!) simple function that will attempt to get the Stripe API key from environment variables and automatically panics if it doesn't exist (as it's required to allow the program to run). We then feed the command into the ClientStdioTransport::new function to start the program up, then initiate a connection and return the client itself.
async fn connect_to_stripe_mcp()
-> Result<mcp_core::client::Client<ClientStdioTransport>, Box<dyn std::error::Error>> {
    println!("Loading Stripe MCP server...");

    let stripe_api_key =
        std::env::var("STRIPE_API_KEY").expect("STRIPE_API_KEY to exist as env var");
    let stripe_api_key = format!("--api-key={stripe_api_key}");
    // Create the MCP client

    let client_transport = ClientStdioTransport::new(
        "npx",
        &[
            "-y",
            "@stripe/mcp",
            "--tools=products.read,prices.read,paymentLinks.create",
            &stripe_api_key,
        ],
    )
    .unwrap();

    let mcp_client = ClientBuilder::new(client_transport).build();

    // Start the MCP client
    mcp_client.open().await?;

    Ok(mcp_client)
}
Note that in the command above, we have only allowed the following tools to be spawned with the MCP server:
- Reading products
- Reading prices
- Creating payment links
Although the MCP server contains many, many more tools, in the wild this this would be a user-facing application. In this case, we should ensure that we grant the least power possible to the user that is still required for the application to work. Otherwise, they might try to create new products for example, or add fake customers to our Stripe account!
Next, we need to fetch our list of tools from the MCP server and create a ToolSet as well as a Vec - both of which will be used to invoke functions as well as help the LLM select which tool to use. To break this function down:
- We use the
fold()function, which takes an accumulator (ToolSetandVecwhich are both contained in a tuple) - Within the closure, the tuple (of accumulators) is on the left hand side with the iterator return value being on the right hand side
- We then create a
rig::tools::McpTooland and it to theToolSetwhile also creating aToolDefinitionand pushing it to theVec
fn get_tools_from_mcp_tool_response(
    tools_list_res: ToolsListResponse,
    mcp_client: mcp_core::client::Client<ClientStdioTransport>,
) -> (ToolSet, Vec<ToolDefinition>) {
    let (tools, tooldefs) = tools_list_res.tools.into_iter().fold(
        (ToolSet::builder().build(), Vec::new()),
        |(mut tools, mut tooldefs), tool| {
            let mcp_tool = McpTool::from_mcp_server(tool.clone(), mcp_client.clone());
            tools.add_tool(mcp_tool);

            let tooldef = ToolDefinition {
                description: tool.description.unwrap_or(String::new()),
                name: tool.name,
                parameters: tool.input_schema.clone(),
            };
            tooldefs.push(tooldef);

            (tools, tooldefs)
        },
    );

    (tools, tooldefs)
}
Creating our reasoning loop
Now that we've fetched our tools from the MCP server, let's add them to our completion request.
We also want to make our application competent: it should be fully capable of incorporating tool responses, as well as returning an answer from the LLM without the user needing to do anything.
Before we start, let's create a couple of helper methods. The first one will simply be a message that converts an ID and a content field into a UserContent::tool_result.
fn tool_result_from_text_response(id: impl Into<String>, content: String) -> UserContent {
    let content = OneOrMany::one(ToolResultContent::Text(content.into()));
    UserContent::tool_result(id, content)
}
Now we can implement our response loop! This is a relatively long function, so buckle up. Here's what the function will do:
- Create a
CompletioRequestBuilderand fill it out with all required items including tool definitions, prompts and chat history. - Send the completion request.
- Match the latest message:
- If it's a text message, add prompt and assistant message to chat history then just return the text
- If it's a tool call, attempt to call the function (using the toolset we initialised)
- If the tool call results in an error, set the tool call error as the the prompt (explained below)
- If it was successful, push both the original prompt and assistant message to the chat history, then set the prompt as the tool call result (explained below)
When we're sending a completion request to the model, the tool prompt resolves to a message with the tool role. This allows us to continue the conversation without us explicitly having to send a prompt ourselves.
Now for the code! Let's begin by initialising our toolset and filling out the completion request, then sending it. Note that although the function does use generics, we don't need to specify what these are when we're actually calling this function as there is only one model we're using (the OpenAI one):
async fn call_until_response<M: CompletionModel>(
    mut prompt: Message,
    model: &M,
    preamble: &str,
    chat_history: &mut Vec<Message>,
    toolset: &ToolSet,
    tooldefs: Vec<ToolDefinition>,
) -> Result<String, anyhow::Error> {

    loop {
        let request = CompletionRequestBuilder::new(model.clone(), prompt.to_owned())
            .preamble(preamble.to_owned())
            .messages(chat_history.clone())
            .temperature(0.0)
            .max_tokens(1024)
            .tools(tooldefs.clone())
            .build();
        // call model
        let resp = model
            .completion(request)
            .await
            .map_err(|x| anyhow::anyhow!("Error when prompting: {x}"))?;

        // rest of code goes down here!
    }
}
Next, we need to match the response and see what type the response is. If it's text, return it; otherwise, try to execute the function. If the function fails, set the prompt to be the tool call result and recursively call the function again to get a string response and return the string. Otherwise, the variable assignment works as normal and we can continue.
// keep calling tools until we get human readable answer from the model
match resp.choice.first() {
    AssistantContent::Text(text) => {
        let text = text.text;
        chat_history.push(prompt.clone().into());
        chat_history.push(Message::assistant(&text));
        return Ok(text);
    }
    AssistantContent::ToolCall(tool_call) => {
        // Call the tool
        let tool_response = toolset
            .call(
                &tool_call.function.name,
                tool_call.function.arguments.to_string(),
            )
            .await;

        let tool_response = match tool_response {
            Ok(res) => res,
            Err(e) => {
                prompt = Message::User {
                    content: OneOrMany::one(UserContent::ToolResult(ToolResult {
                        id: tool_call.id.to_string(),
                        content: OneOrMany::one(ToolResultContent::Text(rig::message::Text {
                            text: e.to_string(),
                        })),
                    })),
                };
                continue;
                }
            };
        }
    }
}
Finally, we convert the text returned from the tool to a tool response message, then push the original prompt & assistant message to the chat history. We then (optionally) print the tool response message, as well as setting the "user" prompt to be the tool response message and then call the call_until_response function recursively to get our String result (and then return the String).
let tool_response_message =                tool_result_from_text_response(tool_call.id.clone(), tool_response);

let tool_call = OneOrMany::one(AssistantContent::ToolCall(tool_call));

// add tool call and response into chat history and continue the loop
chat_history.push(prompt.clone().into());
chat_history.push(Message::Assistant { content: tool_call });

println!("{tool_response_message:?}");

let tool_result_message = Message::User {
    content: OneOrMany::one(tool_response_message),
};

prompt = tool_result_message;
After this, the function will loop back around.
Hooking everything back up
Now that we've actually wrote all the difficult parts of the code, now is the easy part: taking the input and writing our main function!
To take input from the terminal, we simply use stdio().read_line in a function that returns a String:
fn take_input() -> String {
    let mut str = String::new();
    print!("> ");
    stdout()
        .flush()
        .expect("Failed to flush stdout - this should normally never happen");

    stdin().read_line(&mut str).expect("to read line");

    str
}
Next is the main function. We need to create our preamble (system message), then we initialise everything and make a loop, taking input from the user and using our LLM reasoning loop to get a response (then printing the response). We will also add a quit command to be able to break the loop.
const PREAMBLE: &str = r###"You are a shop assistant.
Your job is to help customers find the product they are looking for using Stripe.
If they want to buy it, send a payment link where they can buy it.
If they are rude to you in any way, don't respond to them."###;

#[tokio::main]
async fn main() -> Result<(), Box<dyn std::error::Error>> {
    let mcp_client = connect_to_stripe_mcp().await?;

    let tools_list_res = mcp_client.list_tools(None, None).await?;

    let (tools, tooldefs) = get_tools_from_mcp_tool_response(tools_list_res, mcp_client);

    let openai_client = providers::openai::Client::from_env();
    let model = openai_client.completion_model("gpt-4o");

    println!("Hi! How can I help you today? (write \"quit\" to exit)");
    println!("------------");

    loop {
        let prompt = take_input();
        println!("------------");

        if prompt == *"quit" {
            println!("Thanks for using me! I am quitting now.");
            break;
        }

        let mut chat_history = Vec::new();

        let res = call_until_response(
            prompt.into(),
            &model,
            PREAMBLE,
            &mut chat_history,
            &tools,
            tooldefs.clone(),
        )
        .await
        .unwrap();

        println!("{res}");
        println!("------------");
    }

    Ok(())
}
Extending this demo
So, now that we're done: how can we extend this demo? Below are a couple of ideas:
- Switch to a webpage interface: While this example does work, if you plan on mass adoption you may instead want to try hosting this as a webpage.
- Add some personality to your chatbot: Depending on your target audience or customer base, adapting the chatbot's personality by prompt engineering the preamble (system message) can make it much easier for your audience to approach using an AI-assisted interface. Don't forget that you can use guardrails, semantic routing and other techniques to improve the effectiveness of your chatbot as well as preventing any potential disasters! ## Finishing up Thanks for reading! Hopefully this has helped you learn a little bit more about how you can use MCP servers in production, as well as how Rig can help you achieve that goal.
For additional Rig resources and community engagement:
Check out more examples in our gallery.
Contribute or report issues on our GitHub.
Join discussions in our Discord community!