![[The AI Show Episode 142]: ChatGPT’s New Image Generator, Studio Ghibli Craze and Backlash, Gemini 2.5, OpenAI Academy, 4o Updates, Vibe Marketing & xAI Acquires X](https://www.marketingaiinstitute.com/hubfs/ep%20142%20cover.png)


![From drop-out to software architect with Jason Lengstorf [Podcast #167]](https://cdn.hashnode.com/res/hashnode/image/upload/v1743796461357/f3d19cd7-e6f5-4d7c-8bfc-eb974bc8da68.png?#)


.png?#)


_Christophe_Coat_Alamy.jpg?#)
 (1).webp?#)


![Apple Considers Delaying Smart Home Hub Until 2026 [Gurman]](https://www.iclarified.com/images/news/96946/96946/96946-640.jpg)
![iPhone 17 Pro Won't Feature Two-Toned Back [Gurman]](https://www.iclarified.com/images/news/96944/96944/96944-640.jpg)
![Tariffs Threaten Apple's $999 iPhone Price Point in the U.S. [Gurman]](https://www.iclarified.com/images/news/96943/96943/96943-640.jpg)


Step-by-step guide on how to provide storage for the public website on the Azure portal.
Table of contents Introduction. Create a storage account with high availability. Create a blob storage container with anonymous read access. Practice uploading files and testing access. Configure soft delete Configure blob versioning. Introduction Providing storage for a public website on the Azure portal is a straightforward and efficient way to manage and deliver content to a broad audience. This guide will walk you through setting up and configuring Azure storage to ensure your website is scalable, secure, and optimized for performance. Whether you're hosting static files or dynamic content, this step-by-step guide simplifies the process and equips you with the tools to make your website accessible and reliable. First, go to your browser and paste the link https://learn.microsoft.com/en-us/training/modules/guided-project-azure-files-azure-blobs/ Click on the marked project 2.0. Create a **storage account with high availability. 2.1. In the Azure portal, search for and select storage accounts 2.2. Fill up the project details. 2.3. Fill in the instance details set the storage account name to publicwebsite10245 and take the defaults for other settings 2.4. Select Review and then Create. Wait for the storage account to deploy, and then select Go to the resource. In the storage account, in the Data management section, select the Redundancy blade. Ensure Read-access Geo-redundant storage is selected and review the primary and secondary location information. In the storage account, in the Settings section, select the Configuration Blade. Ensure the Allow blob anonymous access setting is Enabled. Be sure to Save your changes. 3.0. Create a blob storage container with anonymous read access. 3.1. In your storage account, in the Data storage section, select the Containers blade. Select +Container and ensure the name of the container is public then select Create. 3.2. Select your public container. On the Overview blade, select Change Access Level. Ensure the Public access level is Blob (anonymous read access for blobs only). Select OK. 4.0. Practice uploading files and testing access. 4.1. Ensure you are viewing your container. Select Upload. Browse to files and select a file. Browse to a file of your choice. Select Upload. Close the upload window, Refresh the page, and ensure your file was uploaded. 4.2. Select your uploaded file. On the Overview tab, copy the URL. Paste the URL into a new browser tab. If you have uploaded an image file it will display in the browser. 5.0. Configure soft delete 5.1. Go to the Overview blade of the storage account. On the Properties page, locate the Blob service section. Select the Blob soft delete setting. Ensure the Enable soft delete for blobs is checked Change the Keep deleted blobs for (in days setting is 21. Notice you can also Enable soft delete for containers. Don’t forget to Save your changes. 5.2. If something gets deleted, you need to practice using soft delete to restore the files. Navigate to the container where you uploaded a file. Select the file you uploaded and then select Delete. Select OK to confirm deleting the file. On the container Overview page, toggle the slider to show deleted blobs. This toggle is to the right of the search box. Select your deleted file, and use the ellipses on the far right, to Undelete the file. Refresh the container and confirm the file has been restored. 6.0. Configure blob versioning 6.1. Go to the Overview blade of the storage account. In the Properties section, locate the Blob service section. Select the Versioning setting. Ensure the Enable versioning for the blobs checkbox is checked. Notice your options to keep all versions or delete versions after. Don’t forget to Save your changes. 6.2. As you have time experiment with restoring previous blob versions. Upload another version of your container file. This overwrites your existing file. Your previous file version is listed on the Show Deleted Blobs page. Conclusion By completing this guide, you've successfully set up storage on the Azure portal to support your public website's needs. This ensures your content is accessible, secure, and optimized for performance, allowing your audience to enjoy a seamless experience. Regularly monitor and maintain your storage to keep your website running efficiently and adapt to growing demands.
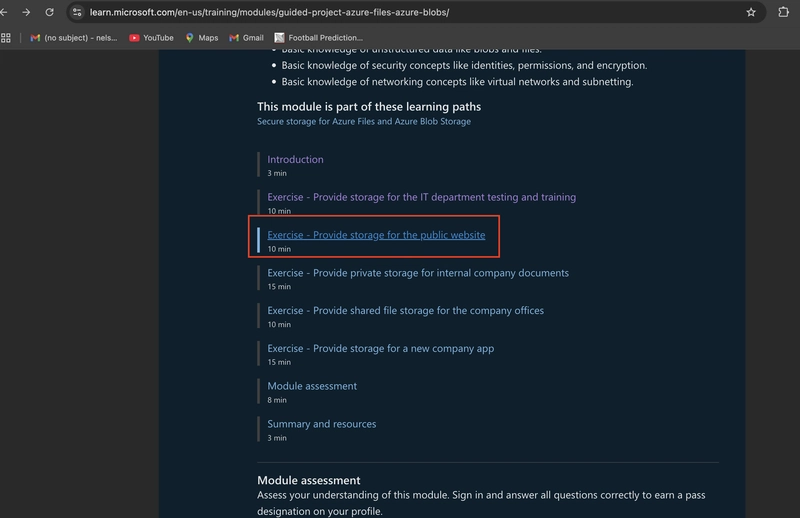
Table of contents
- Introduction.
- Create a storage account with high availability.
- Create a blob storage container with anonymous read access.
- Practice uploading files and testing access.
- Configure soft delete
- Configure blob versioning.
Introduction
Providing storage for a public website on the Azure portal is a straightforward and efficient way to manage and deliver content to a broad audience. This guide will walk you through setting up and configuring Azure storage to ensure your website is scalable, secure, and optimized for performance. Whether you're hosting static files or dynamic content, this step-by-step guide simplifies the process and equips you with the tools to make your website accessible and reliable.
First, go to your browser and paste the link https://learn.microsoft.com/en-us/training/modules/guided-project-azure-files-azure-blobs/
Click on the marked project
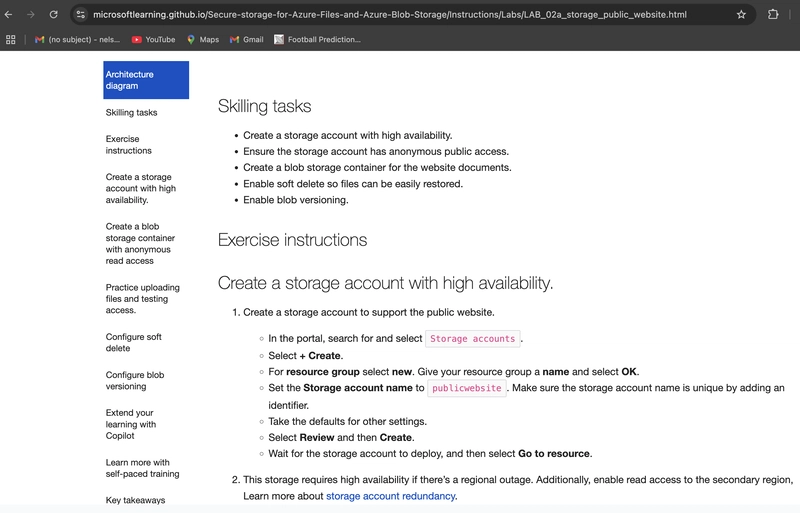
2.0. Create a **storage account with high availability.
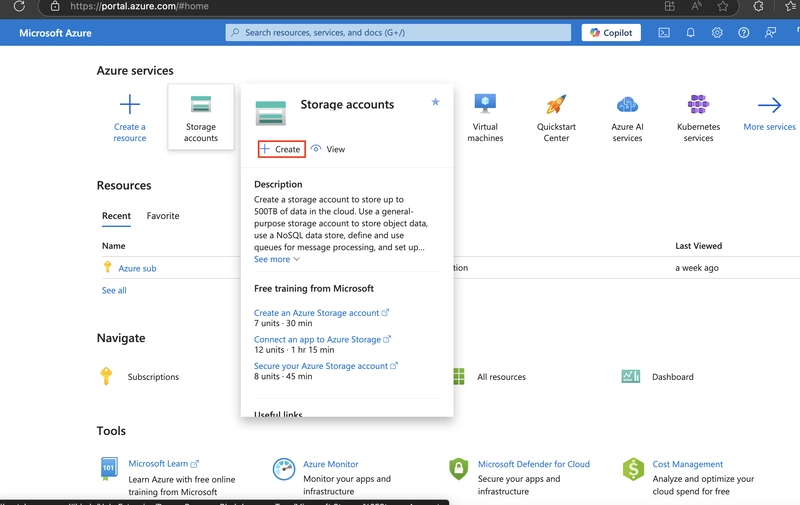
2.1. In the Azure portal, search for and select storage accounts
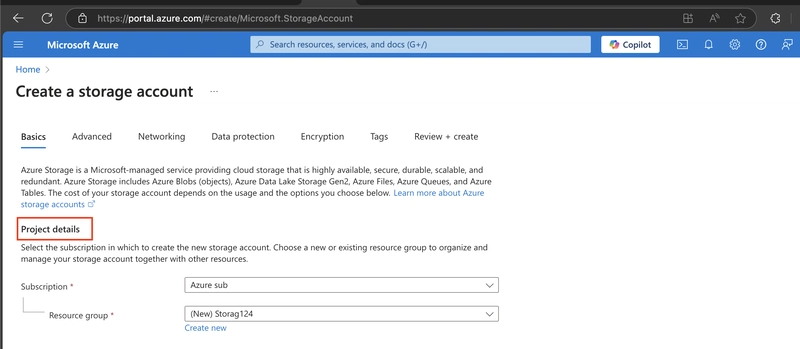
2.2. Fill up the project details.
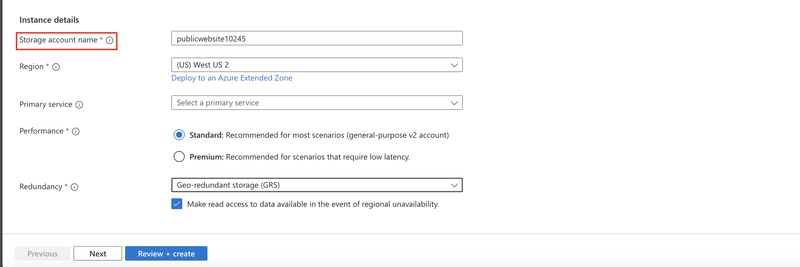
2.3. Fill in the instance details set the storage account name to publicwebsite10245 and take the defaults for other settings
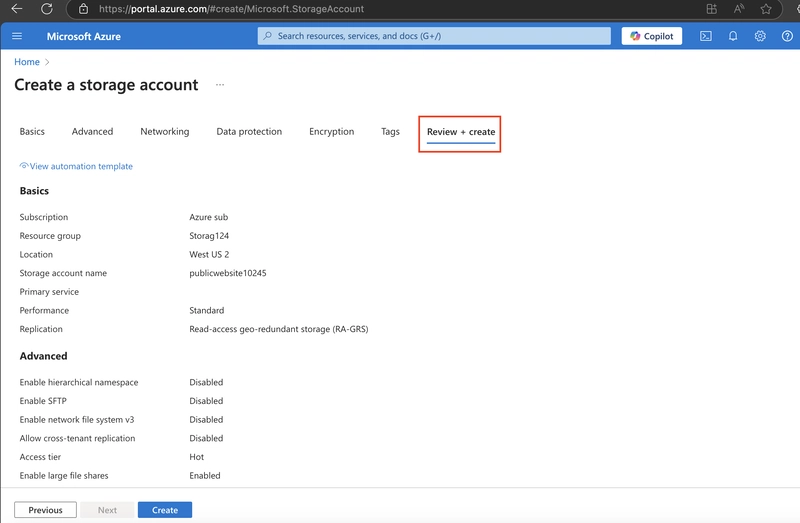
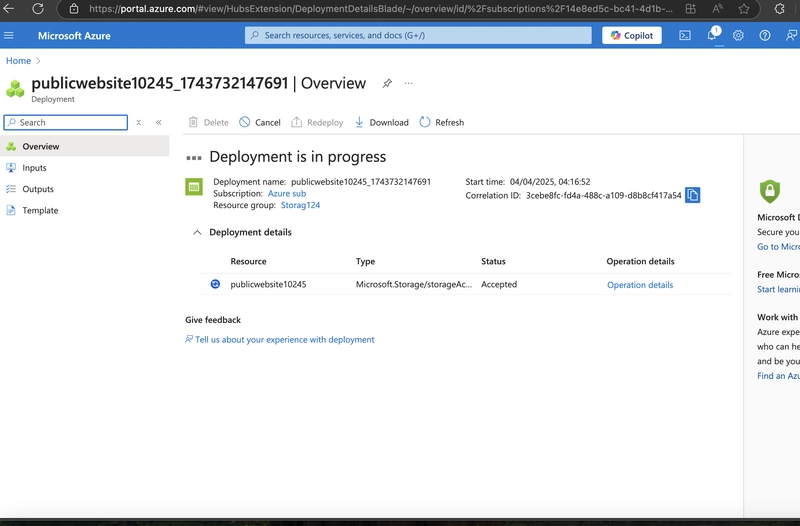
2.4. Select Review and then Create.
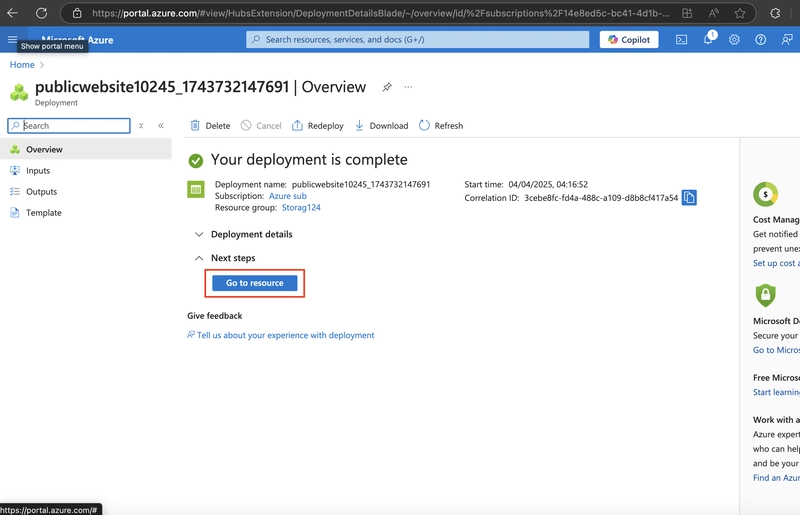
Wait for the storage account to deploy, and then select Go to the resource.

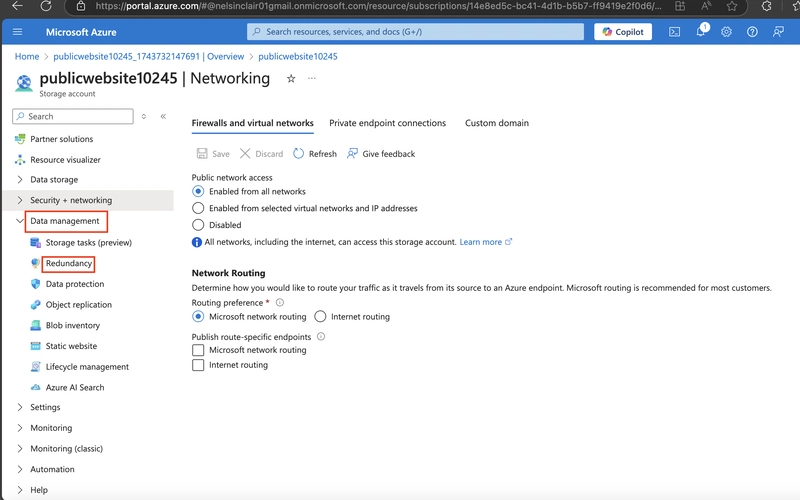
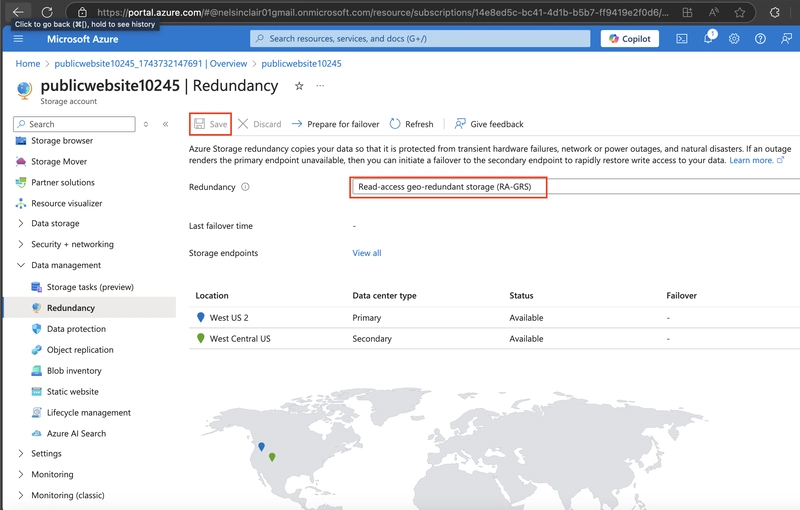
In the storage account, in the Data management section, select the Redundancy blade.
Ensure Read-access Geo-redundant storage is selected and review the primary and secondary location information.
In the storage account, in the Settings section, select the Configuration Blade.
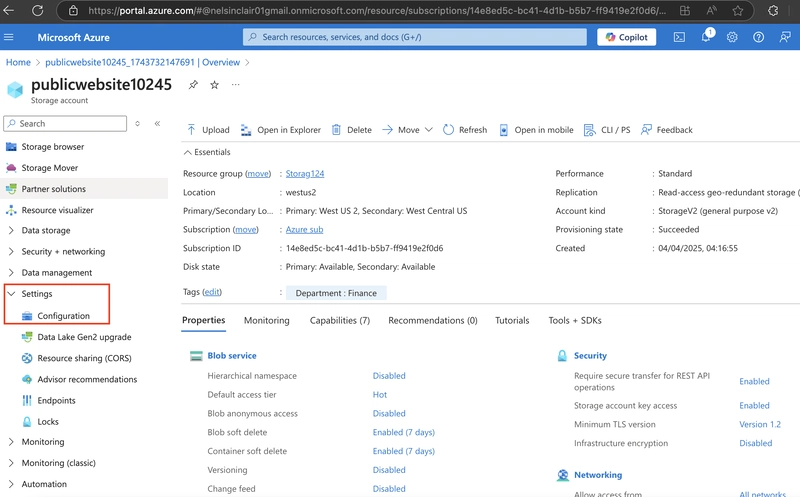
Ensure the Allow blob anonymous access setting is Enabled.
Be sure to Save your changes.

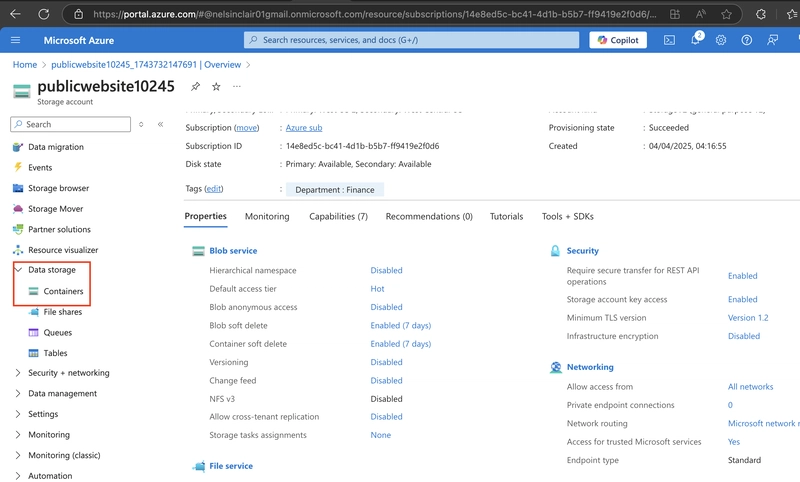
3.0. Create a blob storage container with anonymous read access.
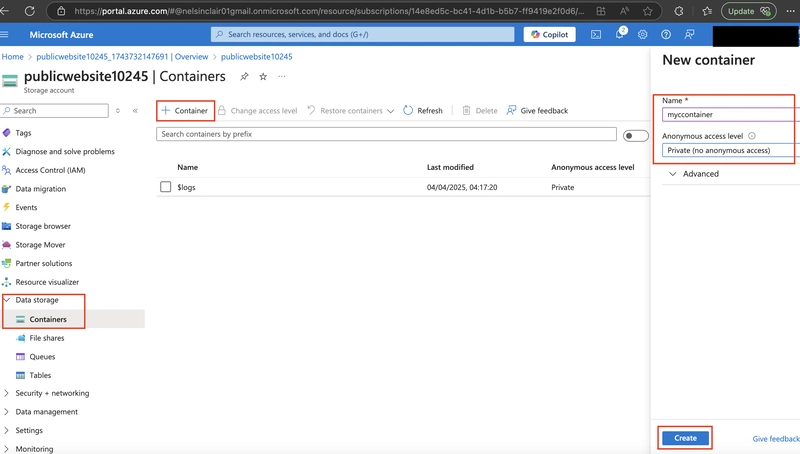
3.1. In your storage account, in the Data storage section, select the Containers blade.
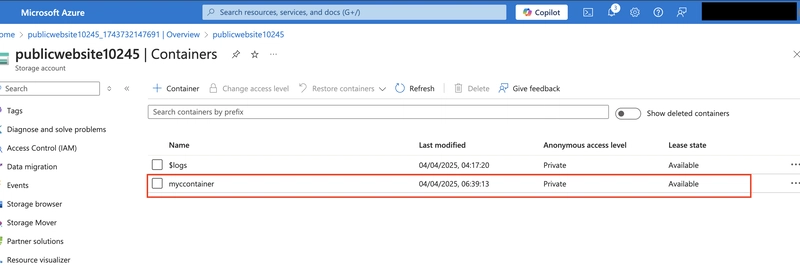
Select +Container and ensure the name of the container is public then select Create.
3.2. Select your public container.
On the Overview blade, select Change Access Level.
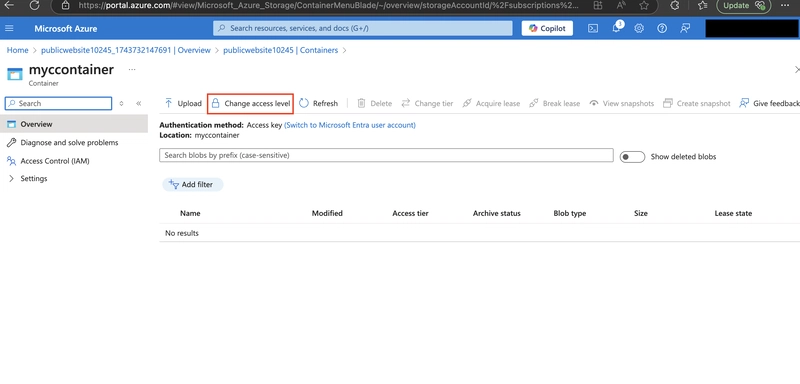
Ensure the Public access level is Blob (anonymous read access for blobs only).
Select OK.

4.0. Practice uploading files and testing access.
4.1. Ensure you are viewing your container.
Select Upload.
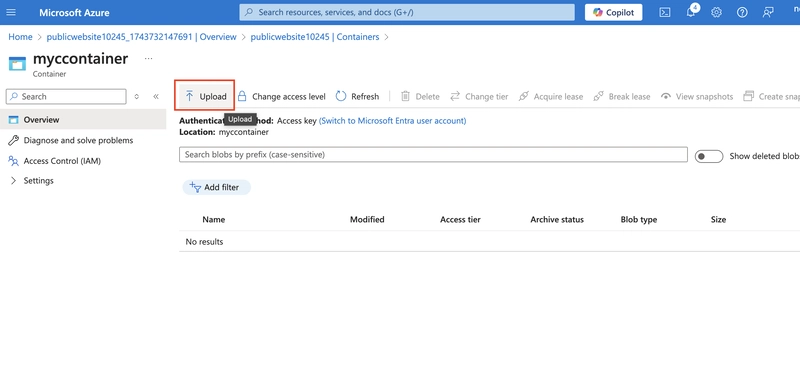
Browse to files and select a file. Browse to a file of your choice.
Select Upload.
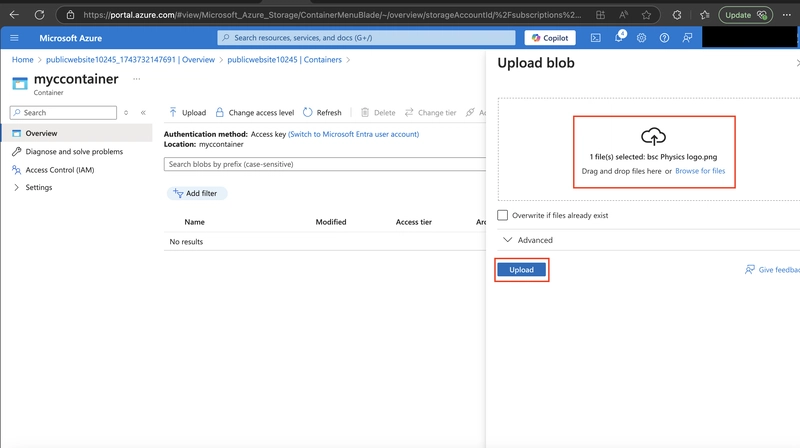
Close the upload window, Refresh the page, and ensure your file was uploaded.
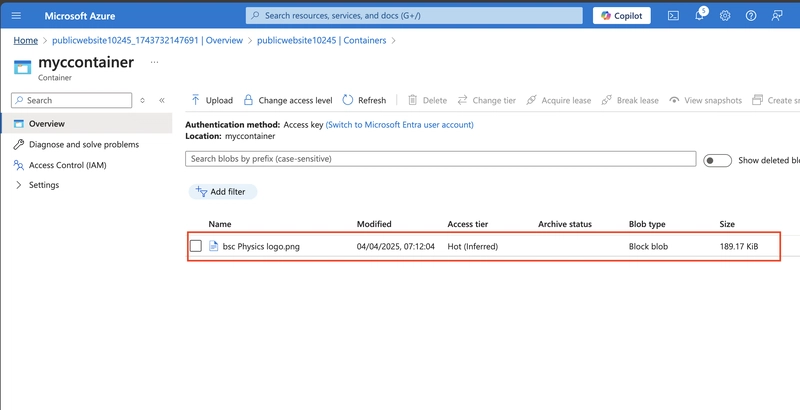
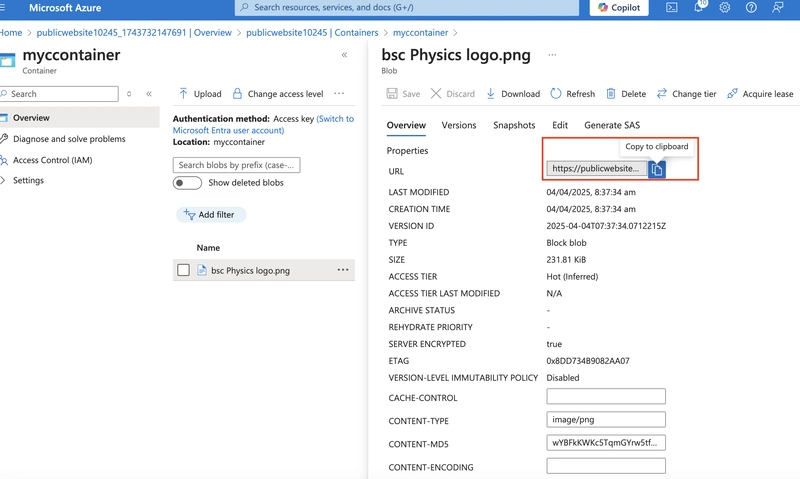
4.2. Select your uploaded file.
On the Overview tab, copy the URL.
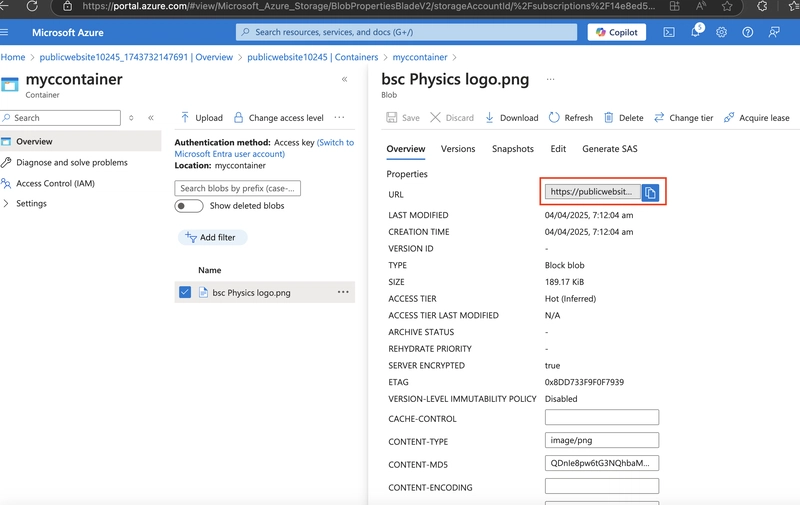
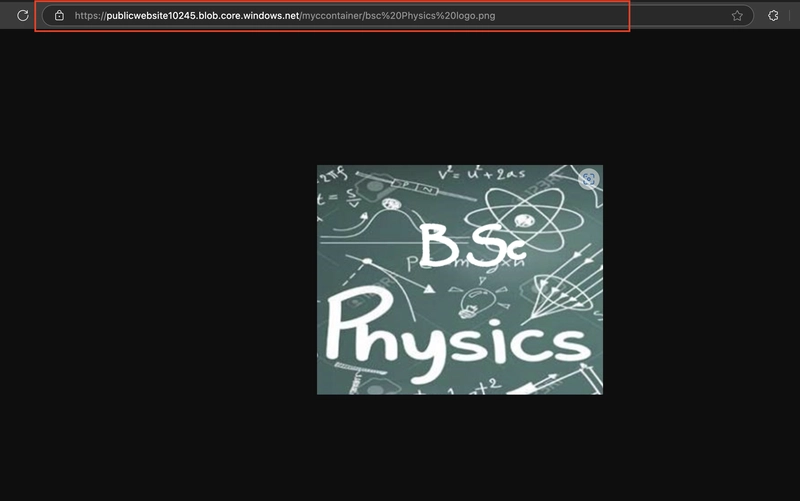
Paste the URL into a new browser tab.
If you have uploaded an image file it will display in the browser.
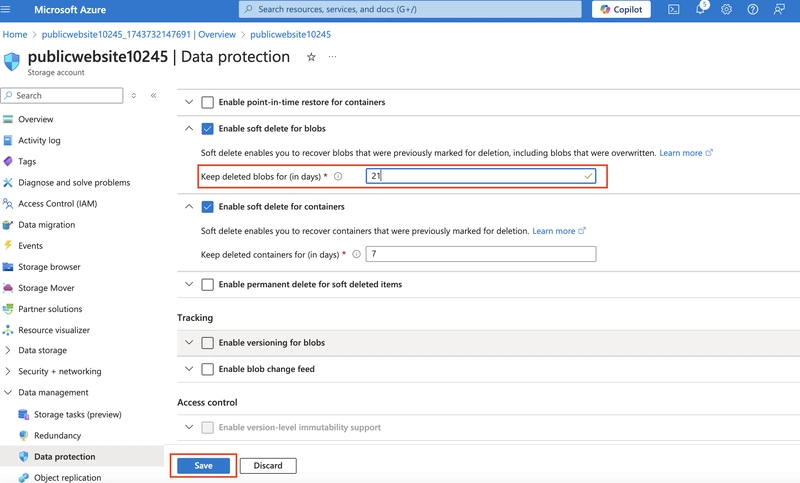
5.0. Configure soft delete
5.1. Go to the Overview blade of the storage account.
On the Properties page, locate the Blob service section.
Select the Blob soft delete setting.
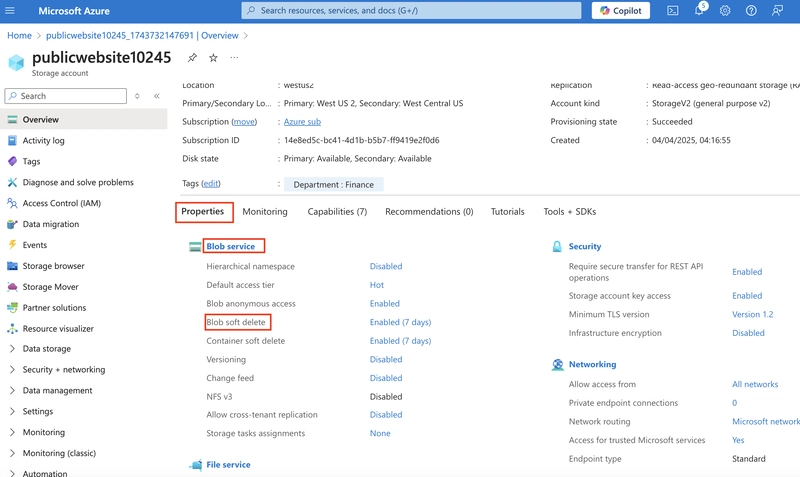
Ensure the Enable soft delete for blobs is checked
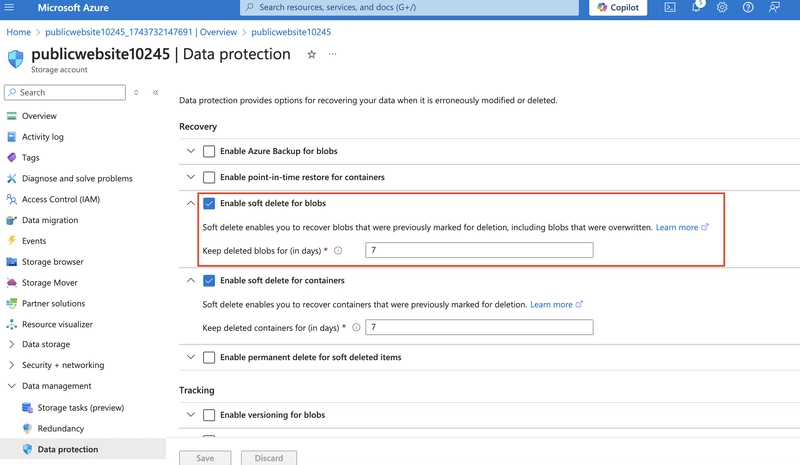
Change the Keep deleted blobs for (in days setting is 21.
Notice you can also Enable soft delete for containers.
Don’t forget to Save your changes.
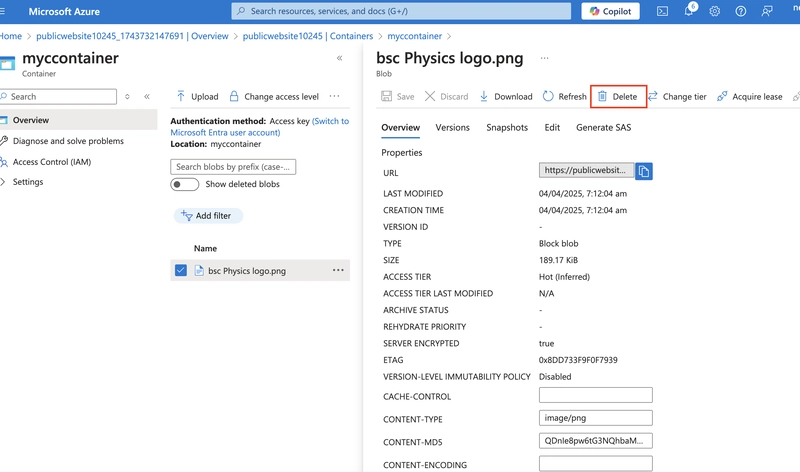
5.2. If something gets deleted, you need to practice using soft delete to restore the files.
Navigate to the container where you uploaded a file.
Select the file you uploaded and then select Delete.
Select OK to confirm deleting the file.
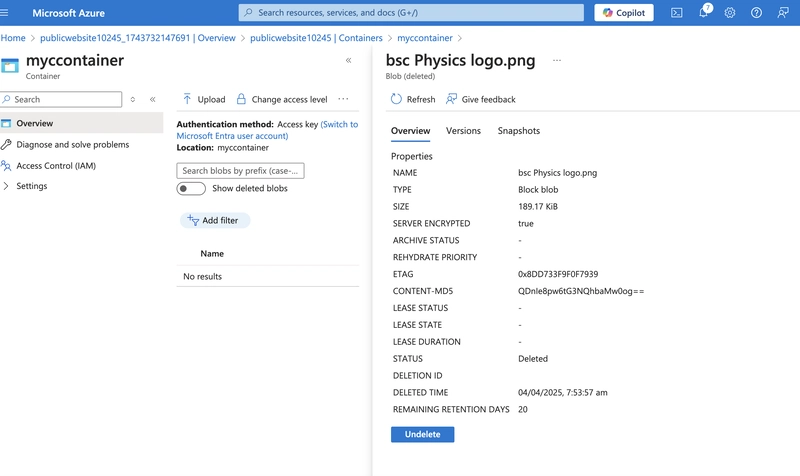
On the container Overview page, toggle the slider to show deleted blobs. This toggle is to the right of the search box.
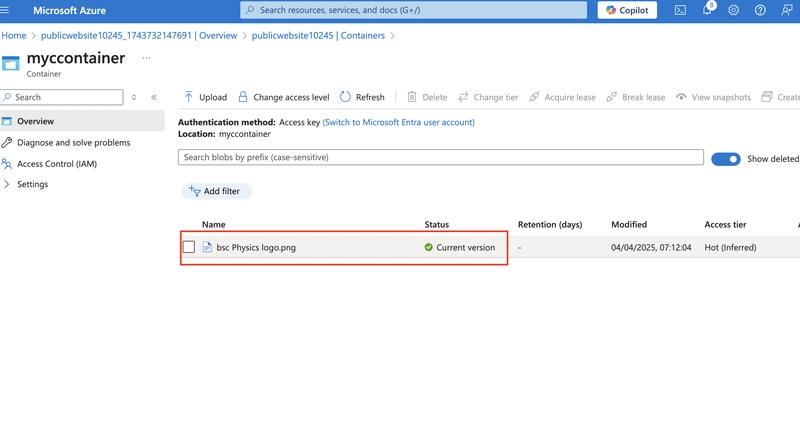
Select your deleted file, and use the ellipses on the far right, to Undelete the file.
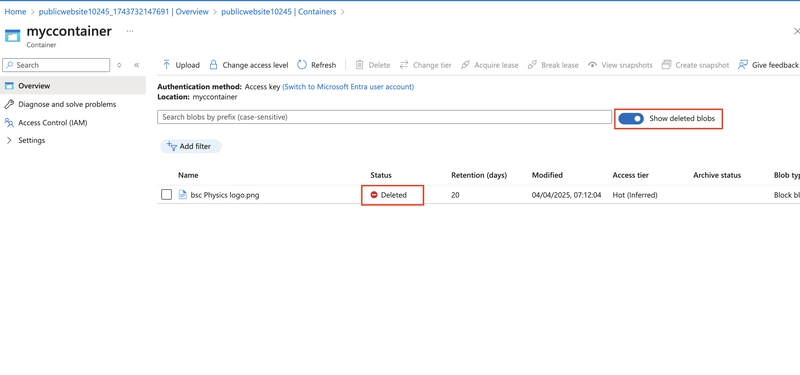
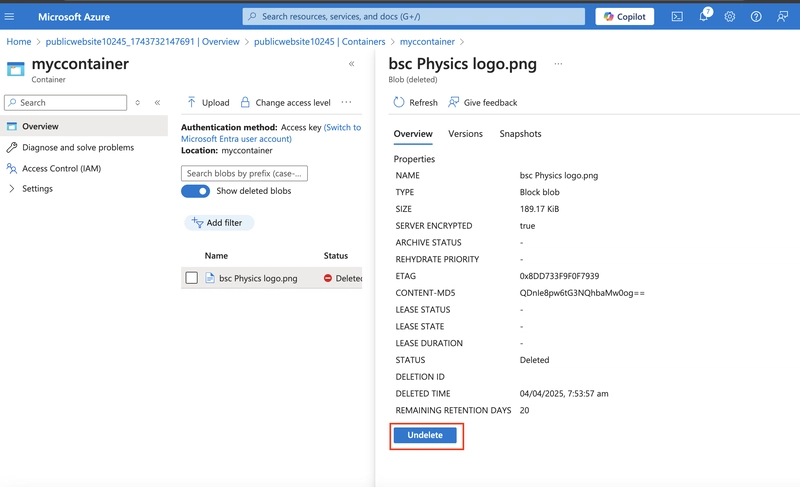
Refresh the container and confirm the file has been restored.
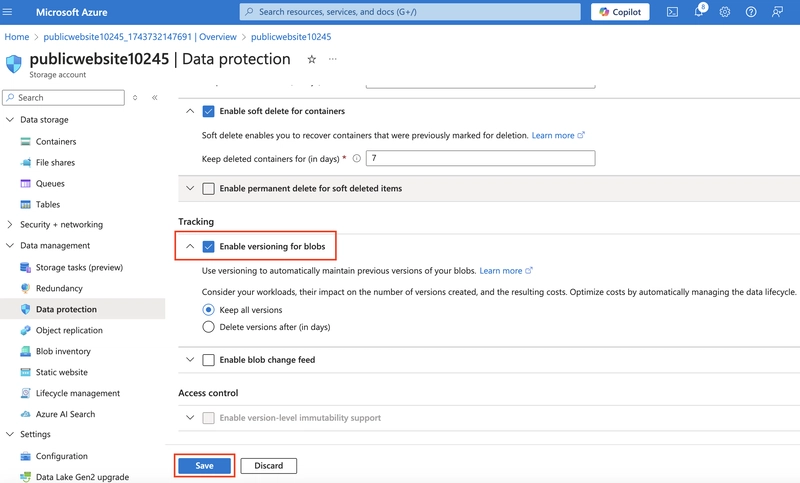
6.0. Configure blob versioning
6.1. Go to the Overview blade of the storage account.
In the Properties section, locate the Blob service section.
Select the Versioning setting.

Ensure the Enable versioning for the blobs checkbox is checked.
Notice your options to keep all versions or delete versions after.
Don’t forget to Save your changes.
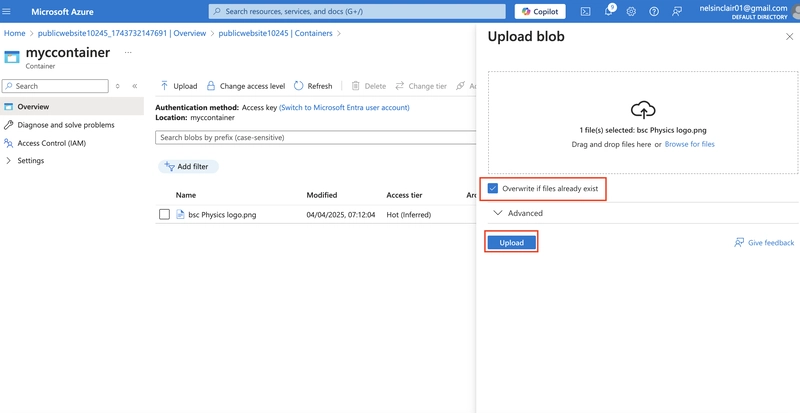
6.2. As you have time experiment with restoring previous blob versions.
Upload another version of your container file. This overwrites your existing file.
Your previous file version is listed on the Show Deleted Blobs page.

Conclusion
By completing this guide, you've successfully set up storage on the Azure portal to support your public website's needs. This ensures your content is accessible, secure, and optimized for performance, allowing your audience to enjoy a seamless experience. Regularly monitor and maintain your storage to keep your website running efficiently and adapt to growing demands.