![[The AI Show Episode 142]: ChatGPT’s New Image Generator, Studio Ghibli Craze and Backlash, Gemini 2.5, OpenAI Academy, 4o Updates, Vibe Marketing & xAI Acquires X](https://www.marketingaiinstitute.com/hubfs/ep%20142%20cover.png)


![From drop-out to software architect with Jason Lengstorf [Podcast #167]](https://cdn.hashnode.com/res/hashnode/image/upload/v1743796461357/f3d19cd7-e6f5-4d7c-8bfc-eb974bc8da68.png?#)


.png?#)


_Christophe_Coat_Alamy.jpg?#)
 (1).webp?#)


![Apple Considers Delaying Smart Home Hub Until 2026 [Gurman]](https://www.iclarified.com/images/news/96946/96946/96946-640.jpg)
![iPhone 17 Pro Won't Feature Two-Toned Back [Gurman]](https://www.iclarified.com/images/news/96944/96944/96944-640.jpg)
![Tariffs Threaten Apple's $999 iPhone Price Point in the U.S. [Gurman]](https://www.iclarified.com/images/news/96943/96943/96943-640.jpg)


Secure Your S3 Bucket for Image Hosting: A Step-by-Step Guide
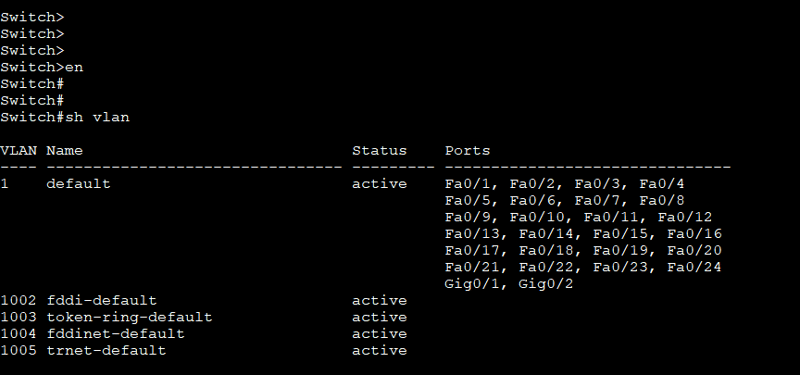
In today’s cloud-driven world, safeguarding your data while delivering content fast is essential. This guide will walk you through the process of creating a secure S3 bucket for storing and serving images. You'll learn how to configure bucket policies, CORS settings, and additional security features—all designed to keep your assets protected and accessible only to trusted sources. 1. Create the S3 Bucket Log in to the AWS Management Console: Navigate to the S3 service. Create a New Bucket: Click Create bucket. Enter a unique bucket name (e.g., best-practices-s3) and choose your AWS Region. In the Block Public Access settings, enable Block all public access to prevent accidental exposure. Important Note: If you plan to add a bucket policy that grants limited public access using conditions like the aws:Referer, you must disable the setting that blocks public bucket policies. Otherwise, you will encounter an error such as: "User is not authorized to perform: s3:PutBucketPolicy ... because public policies are blocked by the BlockPublicPolicy block public access setting." To use your custom bucket policy, disable Block public bucket policies while keeping the other block settings enabled. (Be sure to manage your policy carefully to avoid unintentional exposure.) Finalize Creation: Complete the steps and click Create bucket. 2. Configure Object Ownership Go to your bucket’s Permissions tab. Under Object Ownership, choose Bucket owner enforced. This setting disables Access Control Lists (ACLs) so that only your bucket policy manages access. 3. Set Up a Bucket Policy Bucket policies control who can access your bucket’s objects. In this guide, image access is restricted to trusted domains. Open the Bucket Policy Editor: In the Permissions tab, click Bucket Policy. Paste the Following Policy: Replace best-practices-s3 with your bucket name if needed. { "Version": "2012-10-17", "Id": "PolicyForTrustedAccess", "Statement": [ { "Sid": "AllowTrustedAccess", "Effect": "Allow", "Principal": "*", "Action": "s3:GetObject", "Resource": "arn:aws:s3:::best-practices-s3/*", "Condition": { "StringLike": { "aws:Referer": [ "https://*.example.com/*" ] }, "Bool": { "aws:SecureTransport": "true" } } }, { "Sid": "DenyNonTrustedAccess", "Effect": "Deny", "Principal": "*", "Action": "s3:GetObject", "Resource": "arn:aws:s3:::best-practices-s3/*", "Condition": { "StringNotLike": { "aws:Referer": [ "https://*.example.com/*" ] } } } ] } Save the Policy. 4. Configure CORS (Cross-Origin Resource Sharing) CORS settings allow your images to be requested by web pages from specific domains. They also enable uploads via signed URLs if needed. Open the CORS Configuration Editor: In the Permissions tab, click CORS configuration. Enter the Following Configuration for GET requests: [ { "AllowedHeaders": ["*"], "AllowedMethods": ["GET"], "AllowedOrigins": [ "https://*.example.com" ], "ExposeHeaders": [] } ] ###

In today’s cloud-driven world, safeguarding your data while delivering content fast is essential. This guide will walk you through the process of creating a secure S3 bucket for storing and serving images. You'll learn how to configure bucket policies, CORS settings, and additional security features—all designed to keep your assets protected and accessible only to trusted sources.
1. Create the S3 Bucket
Log in to the AWS Management Console:
Navigate to the S3 service.
Create a New Bucket:
- Click Create bucket.
- Enter a unique bucket name (e.g.,
best-practices-s3) and choose your AWS Region. - In the Block Public Access settings, enable Block all public access to prevent accidental exposure.
Important Note:
If you plan to add a bucket policy that grants limited public access using conditions like the aws:Referer, you must disable the setting that blocks public bucket policies. Otherwise, you will encounter an error such as:
"User is not authorized to perform: s3:PutBucketPolicy ... because public policies are blocked by the BlockPublicPolicy block public access setting."
To use your custom bucket policy, disable Block public bucket policies while keeping the other block settings enabled. (Be sure to manage your policy carefully to avoid unintentional exposure.)
Finalize Creation:
Complete the steps and click Create bucket.
2. Configure Object Ownership
- Go to your bucket’s Permissions tab.
- Under Object Ownership, choose Bucket owner enforced. This setting disables Access Control Lists (ACLs) so that only your bucket policy manages access.

3. Set Up a Bucket Policy
Bucket policies control who can access your bucket’s objects. In this guide, image access is restricted to trusted domains.
Open the Bucket Policy Editor:
In the Permissions tab, click Bucket Policy.Paste the Following Policy:
Replacebest-practices-s3with your bucket name if needed.
   {
       "Version": "2012-10-17",
       "Id": "PolicyForTrustedAccess",
       "Statement": [
           {
               "Sid": "AllowTrustedAccess",
               "Effect": "Allow",
               "Principal": "*",
               "Action": "s3:GetObject",
               "Resource": "arn:aws:s3:::best-practices-s3/*",
               "Condition": {
                   "StringLike": {
                       "aws:Referer": [
                           "https://*.example.com/*"
                       ]
                   },
                   "Bool": {
                       "aws:SecureTransport": "true"
                   }
               }
           },
           {
               "Sid": "DenyNonTrustedAccess",
               "Effect": "Deny",
               "Principal": "*",
               "Action": "s3:GetObject",
               "Resource": "arn:aws:s3:::best-practices-s3/*",
               "Condition": {
                   "StringNotLike": {
                       "aws:Referer": [
                           "https://*.example.com/*"
                       ]
                   }
               }
           }
       ]
   }

- Save the Policy.
4. Configure CORS (Cross-Origin Resource Sharing)
CORS settings allow your images to be requested by web pages from specific domains. They also enable uploads via signed URLs if needed.
Open the CORS Configuration Editor:
In the Permissions tab, click CORS configuration.Enter the Following Configuration for GET requests:
   [
       {
           "AllowedHeaders": ["*"],
           "AllowedMethods": ["GET"],
           "AllowedOrigins": [
               "https://*.example.com"
           ],
           "ExposeHeaders": []
       }
   ]
###