![[The AI Show Episode 142]: ChatGPT’s New Image Generator, Studio Ghibli Craze and Backlash, Gemini 2.5, OpenAI Academy, 4o Updates, Vibe Marketing & xAI Acquires X](https://www.marketingaiinstitute.com/hubfs/ep%20142%20cover.png)


![From drop-out to software architect with Jason Lengstorf [Podcast #167]](https://cdn.hashnode.com/res/hashnode/image/upload/v1743796461357/f3d19cd7-e6f5-4d7c-8bfc-eb974bc8da68.png?#)


.png?#)


_Christophe_Coat_Alamy.jpg?#)


.webp?#)


![Apple Considers Delaying Smart Home Hub Until 2026 [Gurman]](https://www.iclarified.com/images/news/96946/96946/96946-640.jpg)
![iPhone 17 Pro Won't Feature Two-Toned Back [Gurman]](https://www.iclarified.com/images/news/96944/96944/96944-640.jpg)
![Tariffs Threaten Apple's $999 iPhone Price Point in the U.S. [Gurman]](https://www.iclarified.com/images/news/96943/96943/96943-640.jpg)


Secure Image Processing with Pulumi ESC, Clarifai, and pCloud
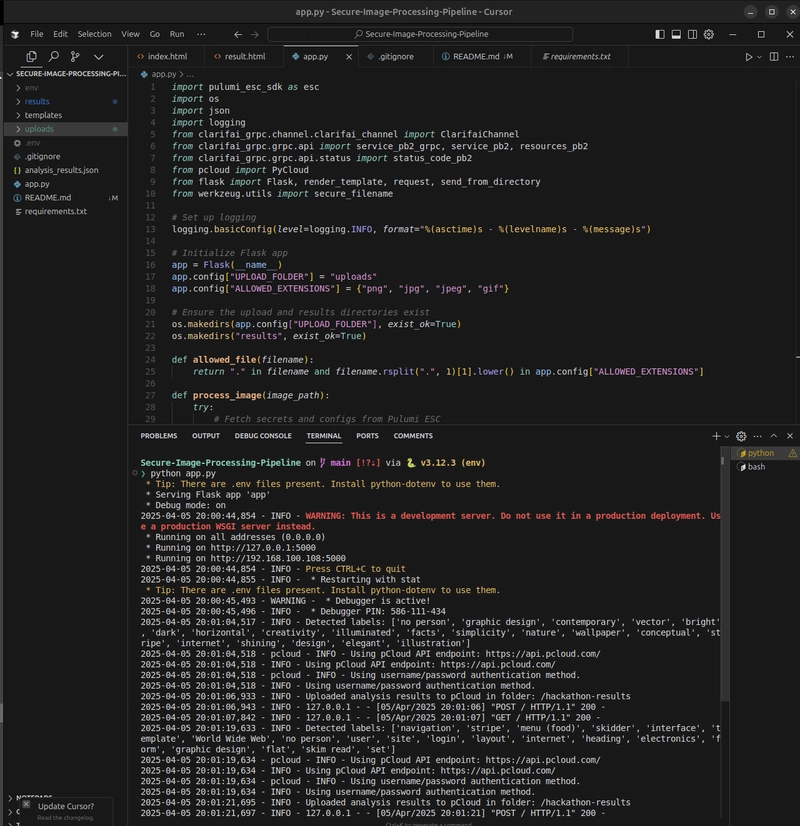
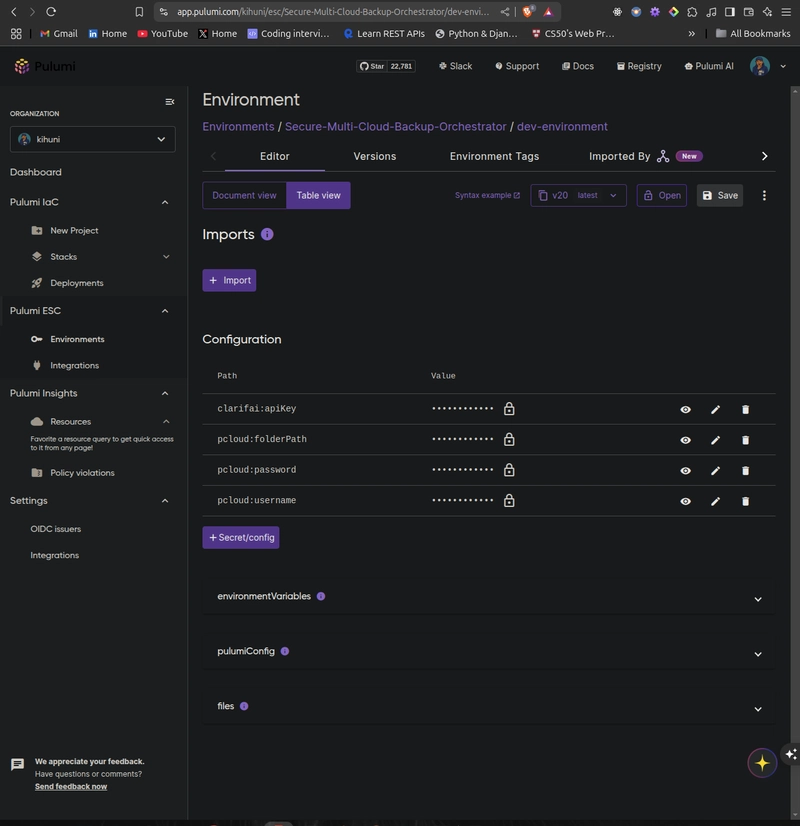
This is a submission for the Pulumi Deploy and Document Challenge: Shhh, It's a Secret! What I Built I built a Secure Image Processing Pipeline that processes images to detect labels and securely stores the results in the cloud. The pipeline uses Clarifai for image processing, pCloud for storage, and Pulumi ESC to manage secrets and configurations securely. To make the project more interactive, I added a simple web UI using Flask, allowing users to upload an image, view the detected labels, and access the results file. Here’s how the pipeline works: A user uploads an image through the web UI. The script fetches the Clarifai API key and pCloud credentials from Pulumi ESC. Clarifai processes the image to detect labels (e.g., dog, pet, animal). The results are saved locally as a JSON file (e.g., analysis_results_1743817982.json) with a unique timestamp to prevent overwrites. The UI displays the uploaded image, detected labels, and a result file link. This project demonstrates secure configuration management using Pulumi ESC to handle sensitive data (API keys and credentials) without hardcoding them in the source code. It also showcases a practical use case for image processing and cloud storage. Web UI Home Page: Results Page: Results File Content pCloud Storage: Live Demo Link Due to connectivity restrictions on PythonAnywhere’s free tier, which blocked outbound HTTPS connections to api.pulumi.com for fetching secrets at runtime, I was unable to deploy the app live within the hackathon timeline. Instead, I’ve tested the app locally and provided detailed screenshots and setup instructions to demonstrate its functionality. You can replicate the app on your local machine by following the setup instructions below. Setup Instructions To run the Secure Image Processing Pipeline locally, follow these steps: Prerequisites Python 3.8+ Pulumi CLI (for managing ESC environments) A Clarifai account with an API key A pCloud account with a username and password A folder named /hackathon-results in your pCloud account Steps Clone the Repository: git clone https://github.com/kihuni/Secure-Image-Processing-Pipeline.git cd Secure-Image-Processing-Pipeline Set Up a Virtual Environment: python -m venv venv source venv/bin/activate # On Windows: venv\Scripts\activate Install Dependencies: pip install -r requirements.txt The requirements.txt includes: flask clarifai-grpc pcloud pulumi-esc-sdk Set Up Pulumi ESC: Install the Pulumi CLI: Pulumi Installation Guide Set your Pulumi access token: export PULUMI_ACCESS_TOKEN="your-access-token" Create a new ESC environment (or use the existing one): bash esc env init kihuni/Secure-Multi-Cloud-Backup-Orchestrator/dev-environment Set the secrets and configurations: esc env set --secret kihuni/Secure-Multi-Cloud-Backup-Orchestrator/dev-environment clarifai:apiKey "your-clarifai-api-key" esc env set --secret kihuni/Secure-Multi-Cloud-Backup-Orchestrator/dev-environment pcloud:username "your-pcloud-email" esc env set --secret kihuni/Secure-Multi-Cloud-Backup-Orchestrator/dev-environment pcloud:password "your-pcloud-password" esc env set kihuni/Secure-Multi-Cloud-Backup-Orchestrator/dev-environment pcloud:folderPath "/hackathon-results" Run the App Locally: python app.py Open http://localhost:5000 in your browser. Project Repo The source code for the Secure Image Processing Pipeline is available on GitHub: Secure-Image-Processing-Pipeline My Journey Building the Secure Image Processing Pipeline was a rewarding experience that taught me a lot about secure configuration management, image processing, and web development. Here’s a summary of my journey: Initial Setup: I started by setting up a Flask app with a simple UI for uploading images. I chose Clarifai for image processing and pCloud for storage due to their free tiers and ease of use. Integrating Pulumi ESC: I used Pulumi ESC to manage my Clarifai API key and pCloud credentials securely. I initially encountered a 401 Unauthorized error due to an incorrect import of the pulumi_esc_sdk and a malformed environment path. I resolved this by using the correct Client class and fixing the path to kihuni/Secure-Multi-Cloud-Backup-Orchestrator/dev-environment. Challenges with Deployment: I planned to deploy the app on PythonAnywhere, but connectivity restrictions blocked outbound HTTPS connections to api.pulumi.com. I pivoted to a local setup, providing screenshots and detailed setup instructions to demonstrate the app’s functionality. Adding Unique Filenames: I noticed that multiple requests would overwrite the analysis_results.json file, so I added a timestamp to the filename (e.g., analysis_results_1743817982.json), ensuring each request generates a unique file. Lessons Learned: This project taught me the importance of secure configuration management and the challenges of deploying on restricted pla
This is a submission for the Pulumi Deploy and Document Challenge: Shhh, It's a Secret!
What I Built
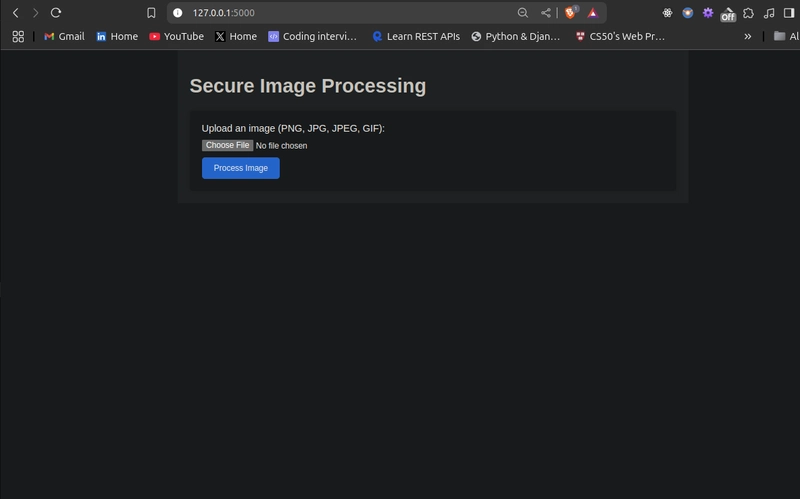
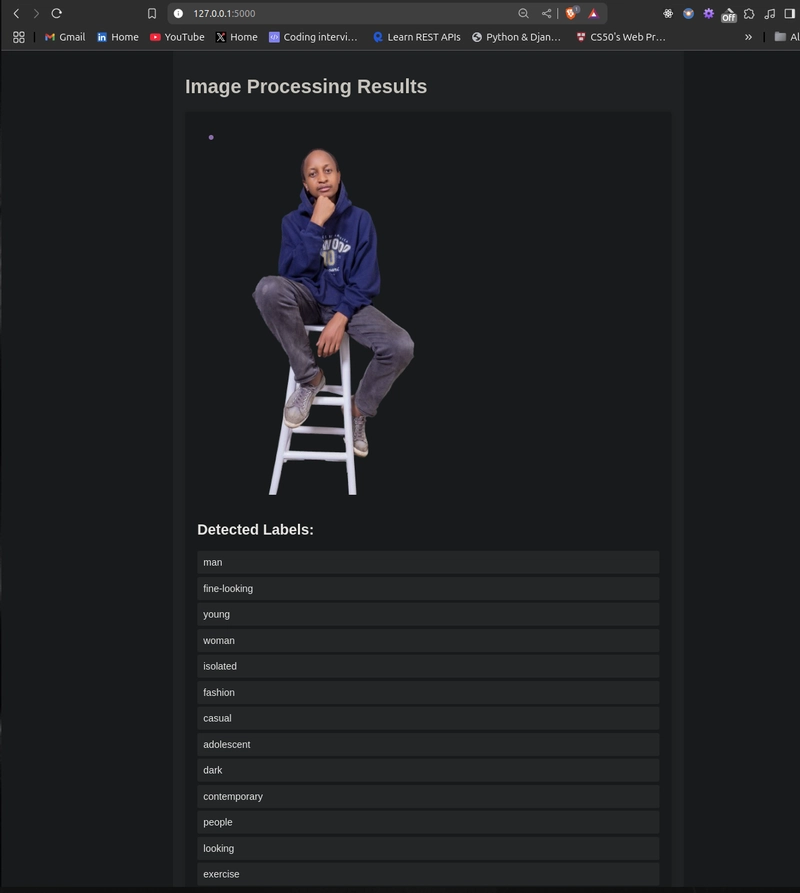
I built a Secure Image Processing Pipeline that processes images to detect labels and securely stores the results in the cloud. The pipeline uses Clarifai for image processing, pCloud for storage, and Pulumi ESC to manage secrets and configurations securely. To make the project more interactive, I added a simple web UI using Flask, allowing users to upload an image, view the detected labels, and access the results file.
Here’s how the pipeline works:
- A user uploads an image through the web UI.
- The script fetches the Clarifai API key and pCloud credentials from Pulumi ESC.
- Clarifai processes the image to detect labels (e.g., dog, pet, animal).
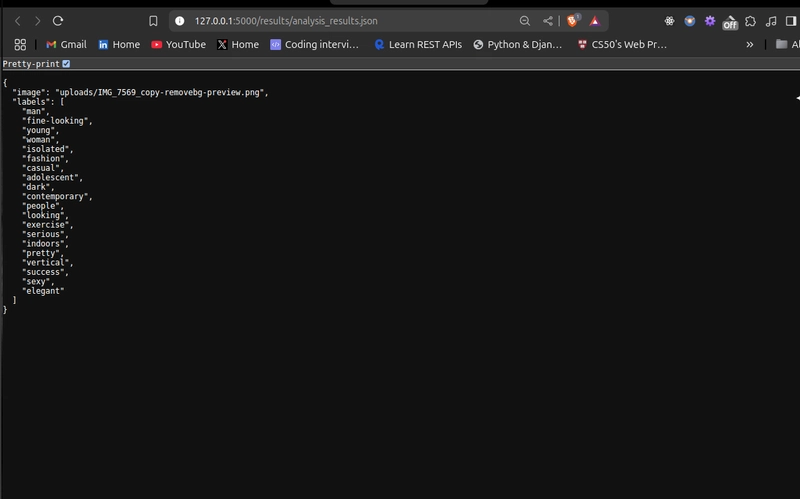
- The results are saved locally as a JSON file (e.g., analysis_results_1743817982.json) with a unique timestamp to prevent overwrites.
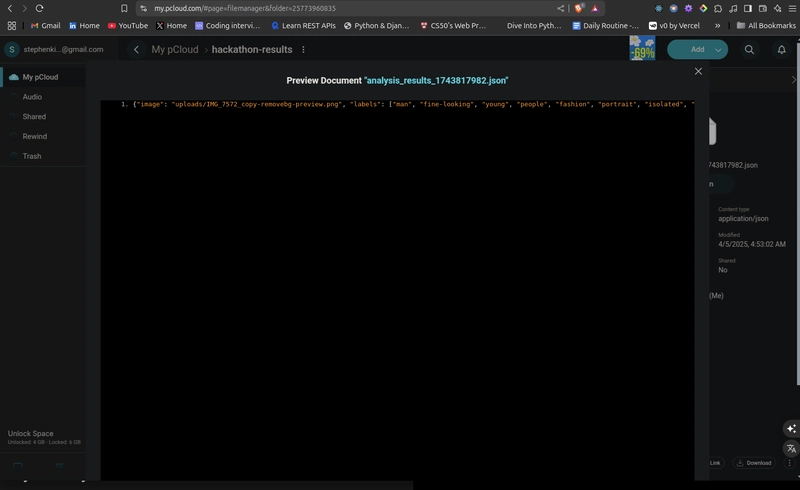
- The UI displays the uploaded image, detected labels, and a result file link.
This project demonstrates secure configuration management using Pulumi ESC to handle sensitive data (API keys and credentials) without hardcoding them in the source code. It also showcases a practical use case for image processing and cloud storage.
Web UI Home Page:
Results Page:
Results File Content
pCloud Storage:
Live Demo Link
Due to connectivity restrictions on PythonAnywhere’s free tier, which blocked outbound HTTPS connections to api.pulumi.com for fetching secrets at runtime, I was unable to deploy the app live within the hackathon timeline. Instead, I’ve tested the app locally and provided detailed screenshots and setup instructions to demonstrate its functionality. You can replicate the app on your local machine by following the setup instructions below.
Setup Instructions
To run the Secure Image Processing Pipeline locally, follow these steps:
Prerequisites
- Python 3.8+
- Pulumi CLI (for managing ESC environments)
- A Clarifai account with an API key
- A pCloud account with a username and password
- A folder named /hackathon-results in your pCloud account
Steps
Clone the Repository:
git clone https://github.com/kihuni/Secure-Image-Processing-Pipeline.git
cd Secure-Image-Processing-Pipeline
Set Up a Virtual Environment:
python -m venv venv
source venv/bin/activate  # On Windows: venv\Scripts\activate
Install Dependencies:
pip install -r requirements.txt
The requirements.txt includes:
flask
clarifai-grpc
pcloud
pulumi-esc-sdk
Set Up Pulumi ESC:
Install the Pulumi CLI: Pulumi Installation Guide
Set your Pulumi access token:
export PULUMI_ACCESS_TOKEN="your-access-token"
Create a new ESC environment (or use the existing one):
bash
esc env init kihuni/Secure-Multi-Cloud-Backup-Orchestrator/dev-environment
Set the secrets and configurations:
esc env set --secret kihuni/Secure-Multi-Cloud-Backup-Orchestrator/dev-environment clarifai:apiKey "your-clarifai-api-key"
esc env set --secret kihuni/Secure-Multi-Cloud-Backup-Orchestrator/dev-environment pcloud:username "your-pcloud-email"
esc env set --secret kihuni/Secure-Multi-Cloud-Backup-Orchestrator/dev-environment pcloud:password "your-pcloud-password"
esc env set kihuni/Secure-Multi-Cloud-Backup-Orchestrator/dev-environment pcloud:folderPath "/hackathon-results"
Run the App Locally:
python app.py
Open http://localhost:5000 in your browser.
Project Repo
The source code for the Secure Image Processing Pipeline is available on GitHub:
Secure-Image-Processing-Pipeline
My Journey
Building the Secure Image Processing Pipeline was a rewarding experience that taught me a lot about secure configuration management, image processing, and web development. Here’s a summary of my journey:
- Initial Setup: I started by setting up a Flask app with a simple UI for uploading images. I chose Clarifai for image processing and pCloud for storage due to their free tiers and ease of use.
- Integrating Pulumi ESC: I used Pulumi ESC to manage my Clarifai API key and pCloud credentials securely. I initially encountered a 401 Unauthorized error due to an incorrect import of the pulumi_esc_sdk and a malformed environment path. I resolved this by using the correct Client class and fixing the path to kihuni/Secure-Multi-Cloud-Backup-Orchestrator/dev-environment.
- Challenges with Deployment: I planned to deploy the app on PythonAnywhere, but connectivity restrictions blocked outbound HTTPS connections to api.pulumi.com. I pivoted to a local setup, providing screenshots and detailed setup instructions to demonstrate the app’s functionality.
- Adding Unique Filenames: I noticed that multiple requests would overwrite the analysis_results.json file, so I added a timestamp to the filename (e.g., analysis_results_1743817982.json), ensuring each request generates a unique file.
- Lessons Learned: This project taught me the importance of secure configuration management and the challenges of deploying on restricted platforms. I also gained experience with Flask, Clarifai, pCloud, and Pulumi ESC, and I’m excited to apply these skills to future projects.
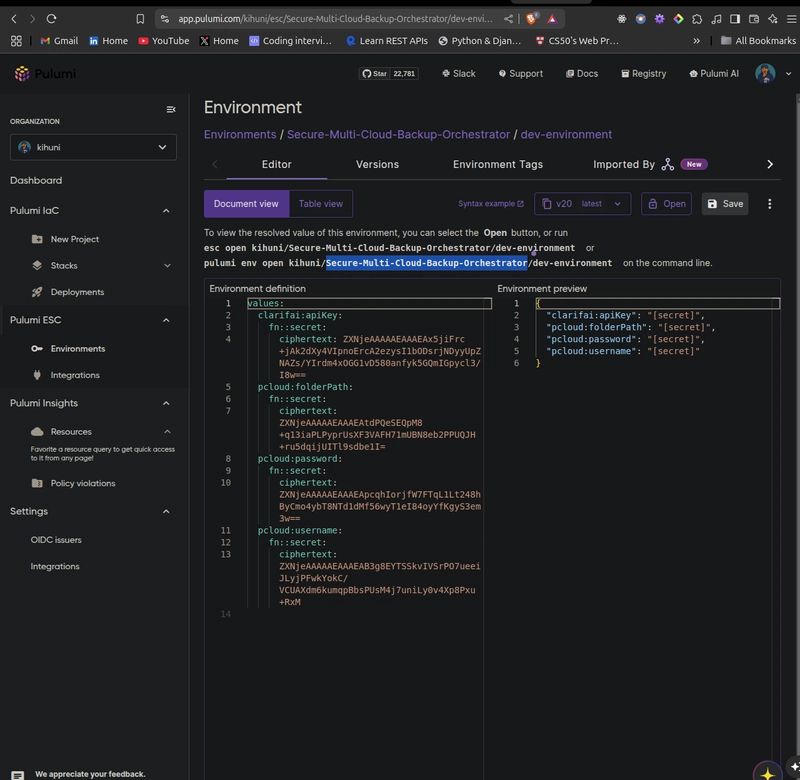
Using Pulumi ESC
Pulumi ESC played a crucial role in ensuring the security of my Secure Image Processing Pipeline. Here’s how I used it:
- Environment Setup: I created an ESC environment named kihuni/Secure-Multi-Cloud-Backup-Orchestrator/dev-environment to store my secrets and configurations.
- Storing Secrets: I stored the Clarifai API key and pCloud credentials as secrets in the ESC environment, ensuring they were encrypted and not exposed in the source code.
esc env set --secret kihuni/Secure-Multi-Cloud-Backup-Orchestrator/dev-environment clarifai:apiKey "your-clarifai-api-key"
esc env set --secret kihuni/Secure-Multi-Cloud-Backup-Orchestrator/dev-environment pcloud:username "your-pcloud-email"
esc env set --secret kihuni/Secure-Multi-Cloud-Backup-Orchestrator/dev-environment pcloud:password "your-pcloud-password"
esc env set kihuni/Secure-Multi-Cloud-Backup-Orchestrator/dev-environment pcloud:folderPath "/hackathon-results"
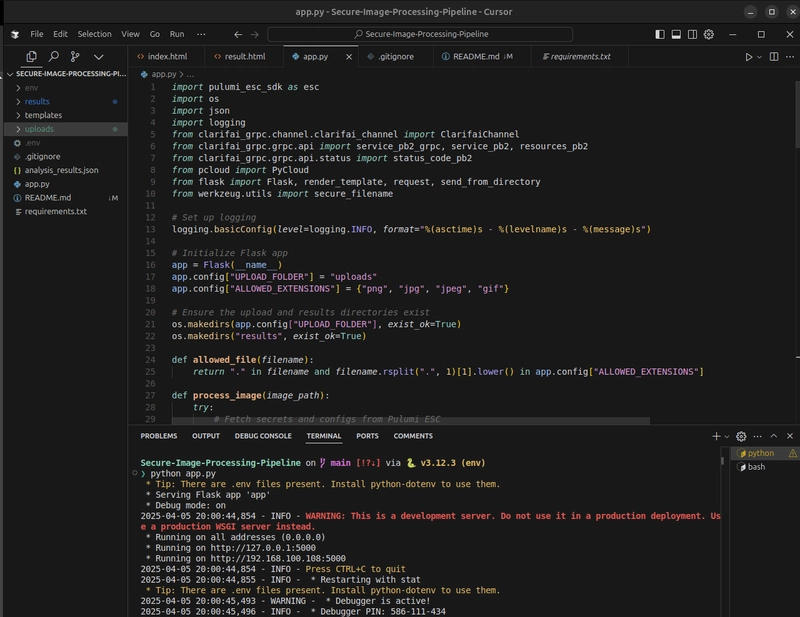
- Fetching Secrets: In the app, I used the
pulumi-esc-sdkto fetch the secrets at runtime:
from pulumi_esc_sdk import Client
client = Client()
environment = client.open_and_read_environment("kihuni/Secure-Multi-Cloud-Backup-Orchestrator/dev-environment")
clarifai_api_key = environment["clarifai"]["apiKey"]
pcloud_username = environment["pcloud"]["username"]
pcloud_password = environment["pcloud"]["password"]
pcloud_folder_path = environment["pcloud"]["folderPath"]
- Security Benefits: Using Pulumi ESC allowed me to keep sensitive data out of my source code and environment variables, reducing the risk of accidental leaks. It also provided a centralized way to manage configurations, making it easy to update secrets without modifying the code.
Conclusion
The Secure Image Processing Pipeline demonstrates how to build a secure, user-friendly application with Pulumi ESC, Clarifai, and pCloud. Although I couldn’t deploy the app live due to platform restrictions, the local setup and detailed documentation showcase its functionality and the benefits of using Pulumi ESC for secure configuration management.