


![[The AI Show Episode 144]: ChatGPT’s New Memory, Shopify CEO’s Leaked “AI First” Memo, Google Cloud Next Releases, o3 and o4-mini Coming Soon & Llama 4’s Rocky Launch](https://www.marketingaiinstitute.com/hubfs/ep%20144%20cover.png)


_Andreas_Prott_Alamy.jpg?width=1280&auto=webp&quality=80&disable=upscale#)


![What features do you get with Gemini Advanced? [April 2025]](https://i0.wp.com/9to5google.com/wp-content/uploads/sites/4/2024/02/gemini-advanced-cover.jpg?resize=1200%2C628&quality=82&strip=all&ssl=1)


![Apple Shares Official Trailer for 'Long Way Home' Starring Ewan McGregor and Charley Boorman [Video]](https://www.iclarified.com/images/news/97069/97069/97069-640.jpg)
![Apple Watch Series 10 Back On Sale for $299! [Lowest Price Ever]](https://www.iclarified.com/images/news/96657/96657/96657-640.jpg)
![EU Postpones Apple App Store Fines Amid Tariff Negotiations [Report]](https://www.iclarified.com/images/news/97068/97068/97068-640.jpg)


![Mobile Legends: Bang Bang [MLBB] Free Redeem Codes April 2025](https://www.talkandroid.com/wp-content/uploads/2024/07/Screenshot_20240704-093036_Mobile-Legends-Bang-Bang.jpg)


Multi Stage Docker Build - smaller is better
40 days of K8s - CKA challenge (03/40) Multi Stage Docker Build - smaller is better @piyushsachdeva Day 3/40 - Multi Stage Docker Build - Docker Tutorial For Beginners - CKA Full Course 2024 in the preview lesson - I created a docker image that is 1.2 GB this lesson discussed how to make an image smaller. the chapter focus on main methodology. let me here count some methods considered best approch (BEST PRACTICES) to create as small image as can be created. but 1ST : lets count main reasons : why LARGE images are not recommended: there are several reasons why we want to make images smaller : (1) Faster Deployment * Smaller images pull and push faster * Reduced network bandwidth usage * Quicker container startup times (2) Security Benefits * Smaller attack surface * Fewer potentially vulnerable packages * Less code to scan and maintain (3) Resource Efficiency * Less disk space usage in registries * Reduced memory footprint * Better cache utilization (4) Cost Savings * Lower storage costs in container registries * Reduced data transfer costs * More efficient use of cloud resources (5) Better CI/CD Performance * Faster build pipelines * Quicker rollbacks if needed * Improved deployment reliability there are several methods to make the docker image smaller, and the most recommended is using MULTISTAGE BUILD lets count and explain the methods : Key techniques for slimming Docker images: (1) Start from a Minimal Base Image ('-alpine' or '-slim' ) when choosing the base image of a known application - usualy alpine is available. when you create an image from scratch - use alpine as base image. alpine is a slim linux operation system, s owhen an image is created out of alpine, it is usualy considering installing only what necesarry for the application to use. there is also scratch image, which is an image that uses the HOST operating system as base, but it is not recommended- since we can never know where our image will be executed. there is whole different approach when using scratch , and I will not write about it here **sometimes official versions dont use '-alpine' , but '-slim' in the tagname of the image** (2) Remove Unnecessary Packages/Files after executing image logic - if files are not nesesarry - we can remove the files that used in execution **it is importent to remove the files in the same layer *RUN*, since once a layer is executed - storage that is clearde will not be reduced** RUN apt-get update && apt-get install -y \ some-package && rm -rf /var/lib/apt/lists/* after installing package we can remove the files that are not neaded manually the && add a command after previous comman was executed all is done in the same RUN layer (3) remove cache on layers when adding a an argument to Dockerfile , we can then execute the build with dynamic value to this argument it prevent caching of layers , which makes build longer , but also clears cached data from image FROM .... ARG CACHEBUST=1 # default value RUN ... and then when executing build : (4) remove cache on build when building with --no-cache , we omit cache , just lije in the build ARGUMENTS (5) Multi-Stage Builds when we use multy stage - we actually use the files in one build , but not saving it to the next build. we use the result of the execution as source in a new clean build without all of the installations, needed to create this files. it is similar to removing files after executing (2) however - using this method - we are creating hirarchical flow of the build. in this example I use the first node image (installer) to install and all react packeges. then I add the files used in the build of the site. the command : ``` RUN yarn && yarn build ``` install all packages , and then execute build then, in the 2ND image (deployer) I install NGINX HTTP server - a slim server, much slimmer then node, since I dont need all of the code compilation capabilities of node. then I copy the build files from the node server - which are the only files I need to use in the site from : /app/dist ==> to ==> /usr/share/nginx/html in deployer image. and I config expose its port (80) for outer connection (docker access to the image on port 80 of this image) results : the original image (one stage) - 1.2 GB the multi-staged image - 280MB docker run -d --name 4inarow-multi -p 8080:80 multi-stage-4_in_a_row:1.1 docker ps CONTAINER ID IMAGE COMMAND CREATED STATUS PORTS NAMES 2396e23aa874 multi-stage-4_in_a_row:1.1 "/docker-entrypoint.…" 21 seconds ago Up 21 seconds 0.0.0.0:8080->80/tcp 4inarow-multi
40 days of K8s - CKA challenge (03/40)
Multi Stage Docker Build - smaller is better
Day 3/40 - Multi Stage Docker Build - Docker Tutorial For Beginners - CKA Full Course 2024
in the preview lesson - I created a docker image that is 1.2 GB
this lesson discussed how to make an image smaller.
the chapter focus on main methodology.
let me here count some methods considered best approch
(BEST PRACTICES) to create as small image as can be created.
but 1ST : lets count main reasons : why LARGE images are
not recommended:
there are several reasons why we want to make images smaller :
(1) Faster Deployment
* Smaller images pull and push faster * Reduced network bandwidth usage * Quicker container startup times
(2) Security Benefits
* Smaller attack surface * Fewer potentially vulnerable packages * Less code to scan and maintain
(3) Resource Efficiency
* Less disk space usage in registries * Reduced memory footprint * Better cache utilization
(4) Cost Savings
* Lower storage costs in container registries * Reduced data transfer costs * More efficient use of cloud resources
(5) Better CI/CD Performance
* Faster build pipelines * Quicker rollbacks if needed * Improved deployment reliability
there are several methods to make the docker image smaller, and the most recommended is using MULTISTAGE BUILD
lets count and explain the methods :
Key techniques for slimming Docker images:
(1) Start from a Minimal Base Image ('-alpine' or '-slim' )
when choosing the base image of a known application - usualy alpine is available. when you create an image from scratch - use alpine as base image. alpine is a slim linux operation system, s owhen an image is created out of alpine, it is usualy considering installing only what necesarry for the application to use.
there is also scratch image, which is an image that uses the HOST operating system as base, but it is not recommended- since we can never know where our image will be executed. there is whole different approach when using scratch , and I will not write about it here
**sometimes official versions dont use '-alpine' , but '-slim' in the tagname of the image** (2) Remove Unnecessary Packages/Files
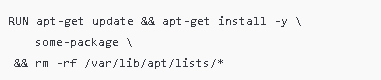
after executing image logic - if files are not nesesarry - we can remove the files that used in execution **it is importent to remove the files in the same layer *RUN*, since once a layer is executed - storage that is clearde will not be reduced**
RUN apt-get update && apt-get install -y \ some-package && rm -rf /var/lib/apt/lists/*
after installing package we can remove the files that are
not neaded manually
the && add a command after previous comman was executed
all is done in the same RUN layer
(3) remove cache on layers
when adding a an argument to Dockerfile , we can then execute the build with dynamic value to this argument it prevent caching of layers , which makes build longer , but also clears cached data from image FROM .... ARG CACHEBUST=1 # default value RUN ...

and then when executing build :
![]()
(4) remove cache on build
when building with --no-cache , we omit cache , just lije in the build ARGUMENTS

(5) Multi-Stage Builds
when we use multy stage - we actually use the files in one build , but not saving it to the next build. we use the result of the execution as source in a new clean build without all of the installations, needed to create this files. it is similar to removing files after executing (2) however - using this method - we are creating hirarchical flow of the build.
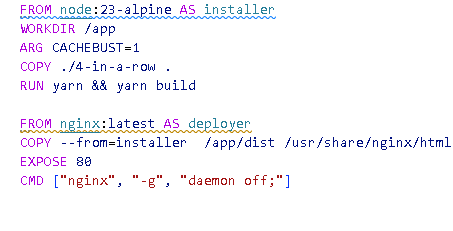
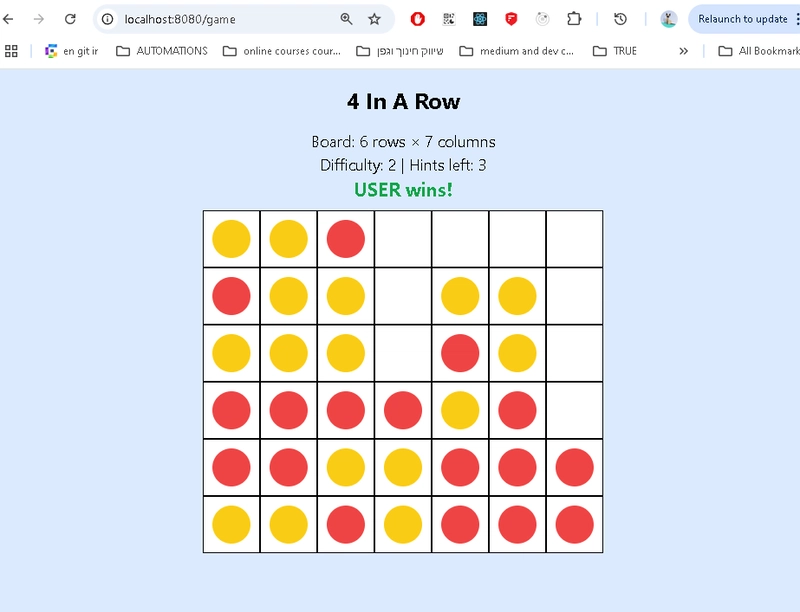
in this example I use the first node image (installer) to install and all react packeges. then I add the files used in the build of the site. the command :
``` RUN yarn && yarn build ```
install all packages , and then execute build
then, in the 2ND image (deployer) I install NGINX HTTP server - a slim server, much slimmer then node, since I dont need all of the code compilation capabilities of node. then I copy the build files from the node server - which are the only files I need to use in the site from : /app/dist ==> to ==> /usr/share/nginx/html in deployer image. and I config expose its port (80) for outer connection (docker access to the image on port 80 of this image)
results :
the original image (one stage) - 1.2 GB
the multi-staged image - 280MB

docker run -d --name 4inarow-multi -p 8080:80 multi-stage-4_in_a_row:1.1


docker ps
CONTAINER ID   IMAGE                        COMMAND                  CREATED          STATUS          PORTS                  NAMES
2396e23aa874   multi-stage-4_in_a_row:1.1   "/docker-entrypoint.…"   21 seconds ago   Up 21 seconds   0.0.0.0:8080->80/tcp   4inarow-multi