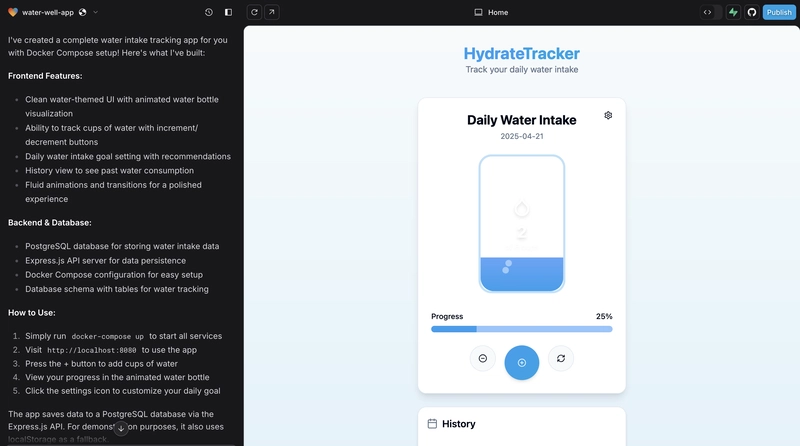


![[The AI Show Episode 143]: ChatGPT Revenue Surge, New AGI Timelines, Amazon’s AI Agent, Claude for Education, Model Context Protocol & LLMs Pass the Turing Test](https://www.marketingaiinstitute.com/hubfs/ep%20143%20cover.png)


![Is this too much for a modular monolith system? [closed]](https://i.sstatic.net/pYL1nsfg.png)


_roibu_Alamy.jpg?width=1280&auto=webp&quality=80&disable=upscale#)


 CISO’s Core Focus.webp?#)


![M4 MacBook Air Drops to Just $849 - Act Fast! [Lowest Price Ever]](https://www.iclarified.com/images/news/97140/97140/97140-640.jpg)
![Apple Smart Glasses Not Close to Being Ready as Meta Targets 2025 [Gurman]](https://www.iclarified.com/images/news/97139/97139/97139-640.jpg)
![iPadOS 19 May Introduce Menu Bar, iOS 19 to Support External Displays [Rumor]](https://www.iclarified.com/images/news/97137/97137/97137-640.jpg)


In today's rapidly evolving tech landscape, monolithic architectures are increasingly becoming bottlenecks for innovation and scalability. This post explores the practical steps of migrating from a monolithic architecture to microservices using Google Kubernetes Engine (GKE), offering a hands-on approach based on Google Cloud's Study Jam program. Why Make the Switch? Before diving into the how, let's briefly address the why. Monolithic applications become increasingly difficult to maintain as they grow. Updates require complete redeployment, scaling is inefficient, and failures can bring down the entire system. Microservices address these issues by breaking applications into independent, specialized components that can be developed, deployed, and scaled independently. Project Overview Our journey uses the monolith-to-microservices project, which provides a sample e-commerce application called "FancyStore." The repository is structured with both the original monolith and the already-refactored microservices: monolith-to-microservices/ ├── monolith/ # Monolithic version └── microservices/ └── src/ ├── orders/ # Orders microservice ├── products/ # Products microservice └── frontend/ # Frontend microservice Our goal is to decompose the monolith into these three services, focusing on a gradual, safe transition. Setting Up the Environment We begin by cloning the repository and setting up our environment: # Set project ID gcloud config set project qwiklabs-gcp-00-09f9d6988b61 # Clone repository git clone https://github.com/googlecodelabs/monolith-to-microservices.git cd monolith-to-microservices # Install latest Node.js LTS version nvm install --lts # Enable Cloud Build API gcloud services enable cloudbuild.googleapis.com The Strangler Pattern Approach Rather than making a risky all-at-once transition, we'll use the Strangler Pattern—gradually replacing the monolith's functionality with microservices while keeping the system operational throughout the process. Step 1: Containerize the Monolith The first step is containerizing the existing monolith without code changes: # Navigate to the monolith directory cd monolith # Build and push container image gcloud builds submit \ --tag gcr.io/${GOOGLE_CLOUD_PROJECT}/fancy-monolith-203:1.0.0 Step 2: Create a Kubernetes Cluster Next, we set up a GKE cluster to host our application: # Enable Containers API gcloud services enable container.googleapis.com # Create GKE cluster with 3 nodes gcloud container clusters create fancy-cluster-685 \ --zone=europe-west1-b \ --num-nodes=3 \ --machine-type=e2-medium # Get authentication credentials gcloud container clusters get-credentials fancy-cluster-685 --zone=europe-west1-b Step 3: Deploy the Monolith to Kubernetes We deploy our containerized monolith to the GKE cluster: # Create Kubernetes deployment kubectl create deployment fancy-monolith-203 \ --image=gcr.io/${GOOGLE_CLOUD_PROJECT}/fancy-monolith-203:1.0.0 # Expose deployment as LoadBalancer service kubectl expose deployment fancy-monolith-203 \ --type=LoadBalancer \ --port=80 \ --target-port=8080 # Check service status to get external IP kubectl get service fancy-monolith-203 Once the external IP is available, we verify that our monolith is running correctly in the containerized environment. This is a crucial validation step before proceeding with the migration. Breaking Down into Microservices Now comes the exciting part—gradually extracting functionality from the monolith into separate microservices. Step 4: Deploy the Orders Microservice First, we containerize and deploy the Orders service: # Navigate to Orders service directory cd ~/monolith-to-microservices/microservices/src/orders # Build and push container gcloud builds submit \ --tag gcr.io/${GOOGLE_CLOUD_PROJECT}/fancy-orders-447:1.0.0 . # Deploy to Kubernetes kubectl create deployment fancy-orders-447 \ --image=gcr.io/${GOOGLE_CLOUD_PROJECT}/fancy-orders-447:1.0.0 # Expose service kubectl expose deployment fancy-orders-447 \ --type=LoadBalancer \ --port=80 \ --target-port=8081 # Get external IP kubectl get service fancy-orders-447 Note that the Orders microservice runs on port 8081. When splitting a monolith, each service typically operates on its own port. Step 5: Reconfigure the Monolith to Use the Orders Microservice Now comes a key step—updating the monolith to use our new microservice: # Edit configuration file cd ~/monolith-to-microservices/react-app nano .env.monolith # Change: # REACT_APP_ORDERS_URL=/service/orders # To: # REACT_APP_ORDERS_URL=http:///api/orders # Rebuild monolith frontend npm run build:monolith # Rebuild and redeploy container cd ~/monolith-to-microservices/monolith gcloud builds submit --tag gcr.io/${GOOGLE_CLOUD_PROJECT}/fancy-monolith-203
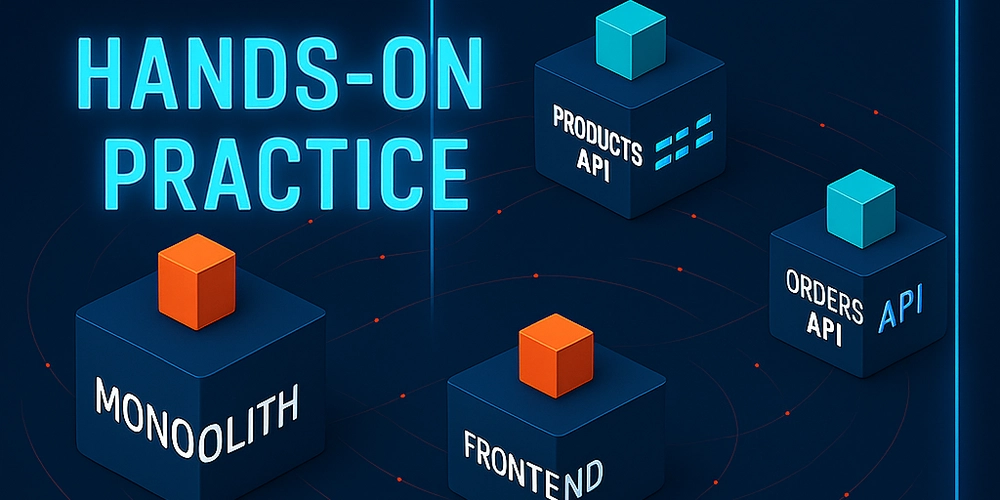
In today's rapidly evolving tech landscape, monolithic architectures are increasingly becoming bottlenecks for innovation and scalability. This post explores the practical steps of migrating from a monolithic architecture to microservices using Google Kubernetes Engine (GKE), offering a hands-on approach based on Google Cloud's Study Jam program.
Why Make the Switch?
Before diving into the how, let's briefly address the why. Monolithic applications become increasingly difficult to maintain as they grow. Updates require complete redeployment, scaling is inefficient, and failures can bring down the entire system. Microservices address these issues by breaking applications into independent, specialized components that can be developed, deployed, and scaled independently.
Project Overview
Our journey uses the monolith-to-microservices project, which provides a sample e-commerce application called "FancyStore." The repository is structured with both the original monolith and the already-refactored microservices:
monolith-to-microservices/
├── monolith/          # Monolithic version
└── microservices/
    └── src/
        ├── orders/    # Orders microservice
        ├── products/  # Products microservice
        └── frontend/  # Frontend microservice
Our goal is to decompose the monolith into these three services, focusing on a gradual, safe transition.
Setting Up the Environment
We begin by cloning the repository and setting up our environment:
# Set project ID
gcloud config set project qwiklabs-gcp-00-09f9d6988b61

# Clone repository
git clone https://github.com/googlecodelabs/monolith-to-microservices.git
cd monolith-to-microservices

# Install latest Node.js LTS version
nvm install --lts

# Enable Cloud Build API
gcloud services enable cloudbuild.googleapis.com
The Strangler Pattern Approach
Rather than making a risky all-at-once transition, we'll use the Strangler Pattern—gradually replacing the monolith's functionality with microservices while keeping the system operational throughout the process.
Step 1: Containerize the Monolith
The first step is containerizing the existing monolith without code changes:
# Navigate to the monolith directory
cd monolith

# Build and push container image
gcloud builds submit \
  --tag gcr.io/${GOOGLE_CLOUD_PROJECT}/fancy-monolith-203:1.0.0
Step 2: Create a Kubernetes Cluster
Next, we set up a GKE cluster to host our application:
# Enable Containers API
gcloud services enable container.googleapis.com

# Create GKE cluster with 3 nodes
gcloud container clusters create fancy-cluster-685 \
  --zone=europe-west1-b \
  --num-nodes=3 \
  --machine-type=e2-medium

# Get authentication credentials
gcloud container clusters get-credentials fancy-cluster-685 --zone=europe-west1-b
Step 3: Deploy the Monolith to Kubernetes
We deploy our containerized monolith to the GKE cluster:
# Create Kubernetes deployment
kubectl create deployment fancy-monolith-203 \
  --image=gcr.io/${GOOGLE_CLOUD_PROJECT}/fancy-monolith-203:1.0.0

# Expose deployment as LoadBalancer service
kubectl expose deployment fancy-monolith-203 \
  --type=LoadBalancer \
  --port=80 \
  --target-port=8080

# Check service status to get external IP
kubectl get service fancy-monolith-203
Once the external IP is available, we verify that our monolith is running correctly in the containerized environment. This is a crucial validation step before proceeding with the migration.
Breaking Down into Microservices
Now comes the exciting part—gradually extracting functionality from the monolith into separate microservices.
Step 4: Deploy the Orders Microservice
First, we containerize and deploy the Orders service:
# Navigate to Orders service directory
cd ~/monolith-to-microservices/microservices/src/orders

# Build and push container
gcloud builds submit \
  --tag gcr.io/${GOOGLE_CLOUD_PROJECT}/fancy-orders-447:1.0.0 .

# Deploy to Kubernetes
kubectl create deployment fancy-orders-447 \
  --image=gcr.io/${GOOGLE_CLOUD_PROJECT}/fancy-orders-447:1.0.0

# Expose service
kubectl expose deployment fancy-orders-447 \
  --type=LoadBalancer \
  --port=80 \
  --target-port=8081

# Get external IP
kubectl get service fancy-orders-447
Note that the Orders microservice runs on port 8081. When splitting a monolith, each service typically operates on its own port.
Step 5: Reconfigure the Monolith to Use the Orders Microservice
Now comes a key step—updating the monolith to use our new microservice:
# Edit configuration file
cd ~/monolith-to-microservices/react-app
nano .env.monolith

# Change:
# REACT_APP_ORDERS_URL=/service/orders
# To:
# REACT_APP_ORDERS_URL=http:///api/orders

# Rebuild monolith frontend
npm run build:monolith

# Rebuild and redeploy container
cd ~/monolith-to-microservices/monolith
gcloud builds submit --tag gcr.io/${GOOGLE_CLOUD_PROJECT}/fancy-monolith-203:2.0.0 .
kubectl set image deployment/fancy-monolith-203 fancy-monolith-203=gcr.io/${GOOGLE_CLOUD_PROJECT}/fancy-monolith-203:2.0.0
This transformation is the essence of the microservices migration—instead of internal function calls, the application now makes HTTP requests to a separate service.
Step 6: Deploy the Products Microservice
Following the same pattern, we deploy the Products microservice:
# Navigate to Products service directory
cd ~/monolith-to-microservices/microservices/src/products

# Build and push container
gcloud builds submit \
  --tag gcr.io/${GOOGLE_CLOUD_PROJECT}/fancy-products-894:1.0.0 .

# Deploy to Kubernetes
kubectl create deployment fancy-products-894 \
  --image=gcr.io/${GOOGLE_CLOUD_PROJECT}/fancy-products-894:1.0.0

# Expose service
kubectl expose deployment fancy-products-894 \
  --type=LoadBalancer \
  --port=80 \
  --target-port=8082

# Get external IP
kubectl get service fancy-products-894
The Products microservice runs on port 8082, maintaining the pattern of distinct ports for different services.
Want to Learn More?
We've successfully extracted the Orders and Products services from our monolith, implementing a gradual, safe transition to microservices. But our journey doesn't end here! In the complete guide on my blog, I cover:
- How to update the monolith to integrate with multiple microservices
- The Frontend microservice deployment
- Safe decommissioning of the original monolith
- Critical considerations for real-world migrations
- The substantial benefits gained from the microservices architecture
For the complete walkthrough, including real deployment insights and best practices for production environments, https://medium.com/@kansm/migrating-from-monolith-to-microservices-with-gke-hands-on-practice-83f32d5aba24.
Are you ready to break free from your monolithic constraints and embrace the flexibility of microservices? The step-by-step approach makes this transition manageable and risk-minimized for organizations of any size.