![[The AI Show Episode 142]: ChatGPT’s New Image Generator, Studio Ghibli Craze and Backlash, Gemini 2.5, OpenAI Academy, 4o Updates, Vibe Marketing & xAI Acquires X](https://www.marketingaiinstitute.com/hubfs/ep%20142%20cover.png)


![From drop-out to software architect with Jason Lengstorf [Podcast #167]](https://cdn.hashnode.com/res/hashnode/image/upload/v1743796461357/f3d19cd7-e6f5-4d7c-8bfc-eb974bc8da68.png?#)


.png?#)


_Christophe_Coat_Alamy.jpg?#)
 (1).webp?#)


![iPhone 17 Pro Won't Feature Two-Toned Back [Gurman]](https://www.iclarified.com/images/news/96944/96944/96944-640.jpg)
![Tariffs Threaten Apple's $999 iPhone Price Point in the U.S. [Gurman]](https://www.iclarified.com/images/news/96943/96943/96943-640.jpg)


Integration Tests Using Cypress Next and Prisma
In this article, I’ll walk you through setting up a Next + Prisma + Cypress testing environment. My goal is to keep things as simple as possible, so we’ll use SQLite as the database and React with inline styles for the frontend. Create a New Next.js Project Run the following command to create a Next.js app: npx create-next-app@latest Press Enter on all prompts to accept the default settings. We’ll be using JavaScript (not TypeScript) and won’t include Tailwind CSS. Once the setup is complete, open the project in your IDE (e.g., VS Code). Install Prisma Next, install Prisma as a development dependency: npm install prisma --save-dev Then, initialize Prisma with SQLite as the database provider: npx prisma init --datasource-provider sqlite Configure the Database After running the command, a .env file will be created in your project. Open it and you’ll see the database connection string: DATABASE_URL="file:./dev.db" This tells Prisma to use a local SQLite database file (dev.db). Define the Database Schema Open the prisma/schema.prisma file and replace its contents with the following: generator client { provider = "prisma-client-js" } datasource db { provider = "sqlite" url = env("DATABASE_URL") } model Book { id Int @id @default(autoincrement()) title String @unique author String? } This defines a simple Book model with: An id that auto-increments. A title field that must be unique. An optional author field. Run Initial Migration To apply the schema to your database, run: npx prisma migrate dev --name init This will create the database file (dev.db) and apply the initial schema. Create Server Actions for Books First, create a new file to handle database interactions: /lib/actions.js 'use server'; import { PrismaClient } from '@prisma/client'; const prisma = new PrismaClient(); export const createBook = async (data) => { return await prisma.book.create({ data }); }; export const getBooks = async () => { return await prisma.book.findMany({}); }; export const deleteBook = async (id) => { return await prisma.book.delete({ where: { id } }); }; Clean Up Next.js Default Files To simplify the project, delete all files inside the /app/ directory except page.js and layout.js. Create a Simple Books Interface /app/books.jsx 'use client'; import { createBook, deleteBook } from '@/lib/actions'; import { useRouter } from 'next/navigation'; import { useState } from 'react'; const Book = ({ book, destroy }) => ( X Title: {book.title}, Author: {book.author} ); const Books = ({ books }) => { const [title, setTitle] = useState(''); const [author, setAuthor] = useState(''); const [error, setError] = useState(false); const { refresh } = useRouter(); const create = async () => { try { await createBook({ title, author }); setError(false); refresh(); } catch (e) { setError(true); } }; const destroy = async (id) => { await deleteBook(id); refresh(); }; return ( setTitle(e.target.value)} name="title" /> Title setAuthor(e.target.value)} name="author" /> Author {error && Invalid data provided} Add new book {books.map((book) => ( destroy(book.id)} key={book.id} /> ))} ); }; export default Books; Connect UI to the Server /app/page.js import { getBooks } from '@/lib/actions'; import Books from './books'; const Home = async () => { const books = await getBooks(); return ( Books ); }; export default Home; Update the Root Layout /app/layout.js export default function Layout({ children }) { return ( {children} ); } Running the Application To start your app, run the following command: npm run dev This will launch your Next.js application at http://localhost:3000. In this simple form, you can easily add and remove books. The model makes sure the title is unique and isn’t left blank. If anything goes wrong, you’ll see an error message. Installing and Setting Up Cypress To add Cypress to your project, run the following command: npm install cypress --save-dev Next, initialize Cypress and generate the default files and folders by running: npx cypress open When the Cypress window appears: Select E2E Testing as your default configuration. Click Continue to confirm the setup. Once the setup is complete, close both the Next.js development server and the Cypress window for now. Setting Up the Test Environment To ensure our tests run safely and efficiently, setting up a dedicated test environment is essential. Using a separate test database helps protect your development data from accidental changes, as tests often c
In this article, I’ll walk you through setting up a Next + Prisma + Cypress testing environment. My goal is to keep things as simple as possible, so we’ll use SQLite as the database and React with inline styles for the frontend.
Create a New Next.js Project
Run the following command to create a Next.js app:
npx create-next-app@latest
Press Enter on all prompts to accept the default settings. We’ll be using JavaScript (not TypeScript) and won’t include Tailwind CSS.
Once the setup is complete, open the project in your IDE (e.g., VS Code).
Install Prisma
Next, install Prisma as a development dependency:
npm install prisma --save-dev
Then, initialize Prisma with SQLite as the database provider:
npx prisma init --datasource-provider sqlite
Configure the Database
After running the command, a .env file will be created in your project. Open it and you’ll see the database connection string:
DATABASE_URL="file:./dev.db"
This tells Prisma to use a local SQLite database file (dev.db).
Define the Database Schema
Open the prisma/schema.prisma file and replace its contents with the following:
generator client {
  provider = "prisma-client-js"
}

datasource db {
  provider = "sqlite"
  url      = env("DATABASE_URL")
}

model Book {
  id     Int     @id @default(autoincrement())
  title  String  @unique
  author String?
}
This defines a simple Book model with:
- An id that auto-increments.
- A title field that must be unique.
- An optional author field.
Run Initial Migration
To apply the schema to your database, run:
npx prisma migrate dev --name init
This will create the database file (dev.db) and apply the initial schema.
Create Server Actions for Books
First, create a new file to handle database interactions:
/lib/actions.js
'use server';

import { PrismaClient } from '@prisma/client';

const prisma = new PrismaClient();

export const createBook = async (data) => {
  return await prisma.book.create({ data });
};

export const getBooks = async () => {
  return await prisma.book.findMany({});
};

export const deleteBook = async (id) => {
  return await prisma.book.delete({ where: { id } });
};
Clean Up Next.js Default Files
To simplify the project, delete all files inside the /app/ directory except page.js and layout.js.
Create a Simple Books Interface
/app/books.jsx
'use client';
import { createBook, deleteBook } from '@/lib/actions';
import { useRouter } from 'next/navigation';
import { useState } from 'react';
const Book = ({ book, destroy }) => (
Title: {book.title}, Author: {book.author}
);
const Books = ({ books }) => {
const [title, setTitle] = useState('');
const [author, setAuthor] = useState('');
const [error, setError] = useState(false);
const { refresh } = useRouter();
const create = async () => {
try {
await createBook({ title, author });
setError(false);
refresh();
} catch (e) {
setError(true);
}
};
const destroy = async (id) => {
await deleteBook(id);
refresh();
};
return (
setTitle(e.target.value)} name="title" />
setAuthor(e.target.value)} name="author" />
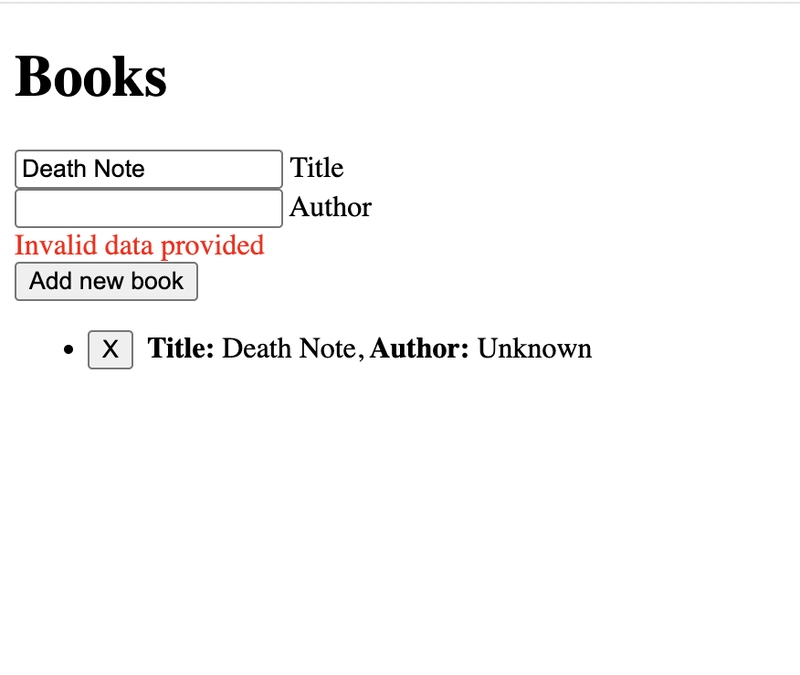
{error && Invalid data provided}
{books.map((book) => (
destroy(book.id)} key={book.id} />
))}
);
};
export default Books;
Connect UI to the Server
/app/page.js
import { getBooks } from '@/lib/actions';
import Books from './books';
const Home = async () => {
const books = await getBooks();
return (
<>
Books
Update the Root Layout
/app/layout.js
export default function Layout({ children }) {
  return (

      {children}

  );
}
Running the Application
To start your app, run the following command:
npm run dev
This will launch your Next.js application at http://localhost:3000.
In this simple form, you can easily add and remove books. The model makes sure the title is unique and isn’t left blank. If anything goes wrong, you’ll see an error message.
Installing and Setting Up Cypress
To add Cypress to your project, run the following command:
npm install cypress --save-dev
Next, initialize Cypress and generate the default files and folders by running:
npx cypress open
When the Cypress window appears:
Select E2E Testing as your default configuration.
Click Continue to confirm the setup.
Once the setup is complete, close both the Next.js development server and the Cypress window for now.
Setting Up the Test Environment
To ensure our tests run safely and efficiently, setting up a dedicated test environment is essential. Using a separate test database helps protect your development data from accidental changes, as tests often create, update, or delete records. This isolation also ensures tests start with a clean state, making them more consistent and reliable.
Step 1: Install dotenv-cli
We'll use dotenv-cli to manage environment variables for our test setup.
Run the following command:
npm install dotenv-cli --save-dev
Step 2: Create a .env.test File
Next, create a new file called .env.test in your project's root directory.
Add the following content to define your test database URL:
DATABASE_URL="file:./test.db"
Since we're using SQLite, this configuration points to a separate database file called test.db — keeping your development data safe.
Creating a Database Cleaner
Since we currently have only one model (Book), we’ll clean just that for now. As more models are added, this cleaner can be expanded.
Create the file /cypress/tasks/clean.js:
const { PrismaClient } = require('@prisma/client');

const prisma = new PrismaClient();

const clean = async () => {
  return await prisma.book.deleteMany({});
};

module.exports = clean;
Since we don’t use TypeScript, we must follow the CommonJS module system (e.g., module.exports) instead of ES module syntax (e.g., export default).
Creating a Test Data Factory
We'll create a simple task for adding test data. In our tests, we'll pass an object to this task to generate the necessary database entities.
Create the file /cypress/tasks/createTestBook.js:
const { PrismaClient } = require('@prisma/client');

const prisma = new PrismaClient();

const createTestBook = async ({
  title = 'Death Note',
  author = 'unknown',
} = {}) => {
  return await prisma.book.create({
    data: { title, author },
  });
};

module.exports = createTestBook;
Adding Tasks to Cypress Configuration
Now, let’s register these tasks in the Cypress config file.
/cypress.config.js:
const { defineConfig } = require("cypress");
const clean = require('./cypress/tasks/clean');
const createTestBook = require('./cypress/tasks/createTestBook');

module.exports = defineConfig({
  e2e: {
    baseUrl: 'http://localhost:3001',
    setupNodeEvents(on, config) {
      on('task', {
        clean,
        createTestBook,
      });
    },
  },
});
Adding Scripts to package.json
We need some helpful scripts to simplify the process of:
- Running the server on a separate port with the test environment.
- Running Cypress tests.
- Applying migrations on the test database.
In your package.json, add the following scripts:
"test:cypress": "dotenv -e .env.test -- cypress open",
"test:server": "dotenv -e .env.test -- next dev -p 3001",
"test:migrate": "dotenv -e .env.test -- npx prisma migrate deploy"
Creating the Test Database
Finally, run the following command to apply your migrations to the test database:
npm run test:migrate
This will create the test.db file, ensuring your test environment is properly configured.
Running the Test Server and Cypress
We need to run the test server and Cypress simultaneously. To do this, open two separate terminals and run the following commands:
npm run test:server
npm run test:cypress
Creating the First Test
Now let's write our first Cypress test.
Create the file /cypress/e2e/books.cy.js and add the following code:
describe('Book', () => {
  beforeEach(() => {
    cy.task('clean')
    cy.task('createTestBook')
    cy.task('createTestBook', { title: 'Memoirs of a Geisha' })
    cy.visit('/')
  })

  it('can be created', () => {
    cy.get('[name="title"]').type('Necronomicon')
    cy.get('[name="author"]').type('Abdul Alhazred')
    cy.contains('Add new book').click()
    cy.contains('Title: Necronomicon').should('exist')
  })
})
What Happens in This Test?
- The test database is cleaned before each test run.
- Two books are created — one with the default name and one titled Memoirs of a Geisha.
- The test visits the homepage.
- It types a new book's title and author.
- The new book is added to the database, and the test checks that it’s displayed on the page.
Running the Test
With both the test server and Cypress running, you should see something like this:
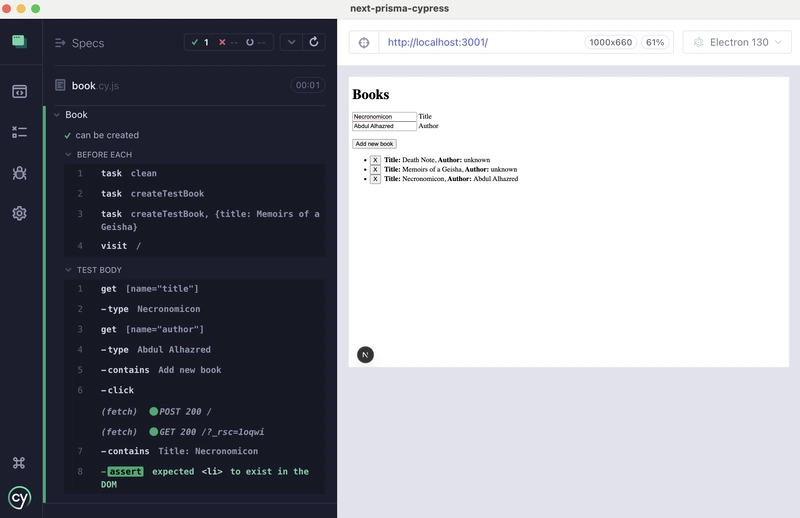
That’s it — it works!
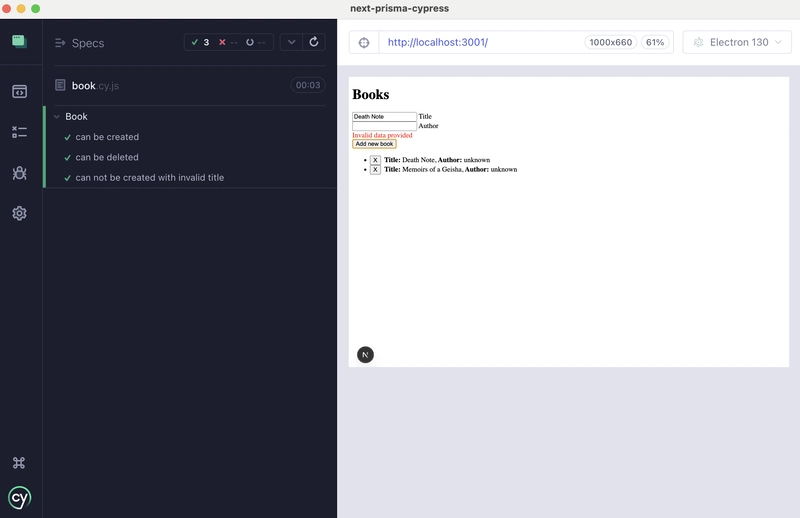
Adding More Tests
Now let's expand our test suite by adding two more specs — one to test invalid input and another to test book deletion.
Here’s the updated /cypress/e2e/books.cy.js file:
describe('Book', () => {
  beforeEach(() => {
    cy.task('clean')
    cy.task('createTestBook')
    cy.task('createTestBook', { title: 'Memoirs of a Geisha' })
    cy.visit('/')
  })

  it('can be created', () => {
    cy.get('[name="title"]').type('Necronomicon')
    cy.get('[name="author"]').type('Abdul Alhazred')
    cy.contains('Add new book').click()
    cy.contains('Title: Necronomicon').should('exist')
  })

  it('can be deleted', () => {
    cy.contains('X').click()
    cy.contains('Title: Death Note').should('not.exist')
    cy.contains('X').click()
    cy.contains('Title: Memoirs of a Geisha').should('not.exist')
  })

  it('cannot be created with an invalid title', () => {
    cy.get('[name="title"]').type('Death Note')
    cy.contains('Add new book').click()
    cy.contains('Invalid data provided').should('exist')
  })
})
So our tests check the following things:
- Book Creation: Verifies that a new book can be added successfully.
- Book Deletion: Ensures books can be removed from the database.
- Invalid Input Handling: Confirms that attempting to create a book with an existing title shows an error message.
Running the Tests
With both the test server and Cypress running, check the Cypress UI to confirm that all tests pass successfully.
Wrapping Up
In this article, we’ve built a simple yet effective testing setup using Next, Prisma, and Cypress. While this is a basic configuration, it provides a solid foundation that can be expanded to meet your project's specific needs.
Feel free to reach out if you have any questions or suggestions. I'd love to hear your thoughts!