How to Add Live Deploy Status Badges to Your Render Projects
Let me introduce you to render-status-badge - a lightweight Node.js tool that generates dynamic status badges for Render deployments using Shields.io and Render's API. Why You Need This Instant Visibility: Know if your last deploy succeeded or failed at a glance. Professional Polish: Make your READMEs look pro with Shields.io badges. Zero Maintenance: Automatically updates using GitHub Actions. Multi-Project Ready: Use it across all your Render services. How It Works in 3 Steps 1. Install the Package npm install render-status-badge or run it once without installing npx render-status-badge Configure Your Render Credentials 2. Create a .env file with your Render API key and service ID: RENDER_API_KEY="your_api_key_here" RENDER_SERVICE_ID="srv-your-service-id" Never commit .env to Git! Use GitHub Secrets for CI/CD._ 3. Add the Badge to Your README Run the tool to get your badge URL: npx render-status-badge Output is something like https://img.shields.io/badge/Render-Live-brightgreen?logo=render&style=for-the-badge Then paste the URL into your README.md:  Automate It with GitHub Action (Optional) For **real-time updates, add this workflow to your repo** .github/workflows/update-badge.yml: name: Update Render Status Badge on: schedule: - cron: '*/5 * * * *' # Update every 5 minutes workflow_dispatch: jobs: update-badge: runs-on: ubuntu-latest steps: - uses: actions/checkout@v4 - name: Generate Badge env: RENDER_API_KEY: ${{ secrets.RENDER_API_KEY }} RENDER_SERVICE_ID: ${{ secrets.RENDER_SERVICE_ID }} run: npx render-status-badge >> badge-url.txt - name: Update README run: | sed -i "s|
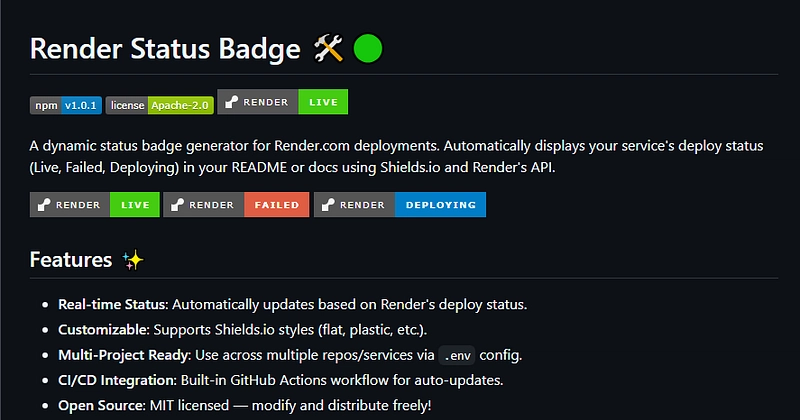
Let me introduce you to render-status-badge - a lightweight Node.js tool that generates dynamic status badges for Render deployments using Shields.io and Render's API.
Why You Need This
- Instant Visibility: Know if your last deploy succeeded or failed at a glance.
- Professional Polish: Make your READMEs look pro with Shields.io badges.
- Zero Maintenance: Automatically updates using GitHub Actions.
- Multi-Project Ready: Use it across all your Render services.
How It Works in 3 Steps
1. Install the Package
npm install render-status-badge
or run it once without installing
npx render-status-badge
Configure Your Render Credentials
2. Create a .env file with your Render API key and service ID:
RENDER_API_KEY="your_api_key_here"
RENDER_SERVICE_ID="srv-your-service-id"
Never commit .env to Git! Use GitHub Secrets for CI/CD._
3. Add the Badge to Your README
Run the tool to get your badge URL:
npx render-status-badge
Output is something like
https://img.shields.io/badge/Render-Live-brightgreen?logo=render&style=for-the-badge
Then paste the URL into your README.md:

Automate It with GitHub Action (Optional)
For **real-time updates, add this workflow to your repo**
.github/workflows/update-badge.yml:
name: Update Render Status Badge
on:
 schedule:
 - cron: '*/5 * * * *' # Update every 5 minutes
 workflow_dispatch:
jobs:
 update-badge:
 runs-on: ubuntu-latest
 steps:
 - uses: actions/checkout@v4
 - name: Generate Badge
 env:
 RENDER_API_KEY: ${{ secrets.RENDER_API_KEY }}
 RENDER_SERVICE_ID: ${{ secrets.RENDER_SERVICE_ID }}
 run: npx render-status-badge >> badge-url.txt
 - name: Update README
 run: |
 sed -i "s|
Customize Your Badge
Use Shields.io's parameters to tweak the style:
Options
-
style:for-the-badge(default),flat-square,plastic -
label: Custom text like "Deploy Status" -
color: Override based on your theme
If you like the project please feel free to Contribute or Star the Project, it lives on GitHub: https://github.com/nia-cloud-official/render-status
I'd love your help!
- ⭐ Star the repo to show support.


![[The AI Show Episode 142]: ChatGPT’s New Image Generator, Studio Ghibli Craze and Backlash, Gemini 2.5, OpenAI Academy, 4o Updates, Vibe Marketing & xAI Acquires X](https://www.marketingaiinstitute.com/hubfs/ep%20142%20cover.png)





![[DEALS] The Premium Learn to Code Certification Bundle (97% off) & Other Deals Up To 98% Off – Offers End Soon!](https://www.javacodegeeks.com/wp-content/uploads/2012/12/jcg-logo.jpg)


![From drop-out to software architect with Jason Lengstorf [Podcast #167]](https://cdn.hashnode.com/res/hashnode/image/upload/v1743796461357/f3d19cd7-e6f5-4d7c-8bfc-eb974bc8da68.png?#)


.png?#)


_Christophe_Coat_Alamy.jpg?#)
 (1).webp?#)








![iPhone 17 Pro Won't Feature Two-Toned Back [Gurman]](https://www.iclarified.com/images/news/96944/96944/96944-640.jpg)
![Tariffs Threaten Apple's $999 iPhone Price Point in the U.S. [Gurman]](https://www.iclarified.com/images/news/96943/96943/96943-640.jpg)


