![[The AI Show Episode 142]: ChatGPT’s New Image Generator, Studio Ghibli Craze and Backlash, Gemini 2.5, OpenAI Academy, 4o Updates, Vibe Marketing & xAI Acquires X](https://www.marketingaiinstitute.com/hubfs/ep%20142%20cover.png)


![From drop-out to software architect with Jason Lengstorf [Podcast #167]](https://cdn.hashnode.com/res/hashnode/image/upload/v1743796461357/f3d19cd7-e6f5-4d7c-8bfc-eb974bc8da68.png?#)


.png?#)


_Christophe_Coat_Alamy.jpg?#)
 (1).webp?#)


![iPhone 17 Pro Won't Feature Two-Toned Back [Gurman]](https://www.iclarified.com/images/news/96944/96944/96944-640.jpg)
![Tariffs Threaten Apple's $999 iPhone Price Point in the U.S. [Gurman]](https://www.iclarified.com/images/news/96943/96943/96943-640.jpg)


Flask Application Deployment using AWS ECS and AWS DynamoDB with Terraform
Deploying a Flask application can seem daunting, but using AWS makes the process streamlined and scalable. In this blog post, we’ll walk through deploying a simple "Hello World" Flask application using AWS ECS (Elastic Container Service) and AWS DynamoDB. This is a simple "Hello World" application that exposes two HTTP-based APIs: PUT /hello/: Saves or updates the given user's name and date of birth in the database. GET /hello/: Returns a hello message for the given user, including their birthday message if it's today or in the next N days. Architecture Requirements Docker(local) Terraform Python 3.8+ Flask 2.0+ SQLite3(local) AWS account for deployment AWS DynamoDB Deployment Architecture Cloud Platform: AWS (Amazon Web Services) Github Action: CI/CD Deployment. AWS ECS: To run the application as a containers in EC2. AWS DynamoDB: Amazon DynamoDB is a fully managed proprietary NoSQL database. AWS S3: For storing terraform state file. AWS CloudWatch: For logging and monitoring. 1. Contents ./applocal.py contains a Python Flask application, which is integrated with SQLite3 ./app.py contains a Python Flask application, which is integrated with DynamoDB the same applicaion can be used to run locally except you need to have aws dynamodb database deployed already. terraform/ contains the terraform code necessary to deploy the application into AWS ECS 2. How to run and test locally Install dependencies: pip install flask sqlite3 boto3 Run the application: python applocal.py Run test: python3 -m unittest tests/test_app.py Test the APIs using curl or a tool like Postman 3. How-to Deploy into AWS ECS using github action CI/CD and Terraform for IAC General workflow: For the very 1st time, Run the sh setup.sh command which will create ECR repository and build, tag and push the image into it. As soon as the changes are pushed into git repository branches like main and develop it will trigger the GHA CI/CD to build and deploy into ECS using Terraform Terraform will output the alb url at the end of the GHA run. 4. File Descriptions 1. provider.tf This file defines the AWS provider and region where the resources will be created, as well as the backend "s3" configures a remote backend using Amazon S3. provider "aws" { region = "us-east-1" } terraform { backend "s3" { bucket = "" key = "terraform.tfstate" region = "us-east-1" encrypt = true } } 2. variables.tf This file contains variable definitions used throughout your Terraform configuration. For example: variable "ecs_cluster_name" { description = "Name of the ECS Cluster" default = "hello-world-cluster" } variable "dynamodb_table_name" { description = "Name of the DynamoDB table" default = "Messages" } variable "image_repository" { description = "ECR repository for the Docker image" default = "hello-world-flask" } 3. main.tf This file includes the configurations for the ECS cluster, service, task definitions and dynamo DB configurations. resource "aws_ecs_cluster" "hello_world_cluster" { name = var.ecs_cluster_name } resource "aws_ecs_task_definition" "hello_world_task" { family = "hello-world-task" network_mode = "awsvpc" requires_compatibilities = ["FARGATE"] container_definitions = jsonencode([{ name = "hello-world-container" image = "${aws_ecr_repository.hello_world_repo.repository_url}:latest" cpu = 256 memory = 512 essential = true portMappings = [{ containerPort = 5000 hostPort = 5000 protocol = "tcp" }] }]) } resource "aws_ecs_service" "hello_world_service" { name = "hello-world-service" cluster = aws_ecs_cluster.hello_world_cluster.id task_definition = aws_ecs_task_definition.hello_world_task.arn desired_count = 1 launch_type = "FARGATE" network_configuration { subnets = var.subnet_ids security_groups = [aws_security_group.ecs_sg.id] assign_public_ip = true } } 4. outputs.tf Outputs provide useful information after the Terraform apply, like resource ARNs or URLs. output "alb_dns_name" { description = "The Application Load Balancer DNS name" value = aws_lb.main.*.dns_name[0] } 5. Deployment Steps Initialize Terraform: Before applying the configuration, make sure to initialize the Terraform environment. sh setup.sh # This command which will create ECR repository and build, tag and push the image into it. cd terraform terraform init Plan the Deployment: Generate and show an execution plan. terraform plan Apply the Configuration: Deploy the infrastructure by applying the plan. terraform apply Verify Deployment: After the deployment completes, verify that all resources were created success
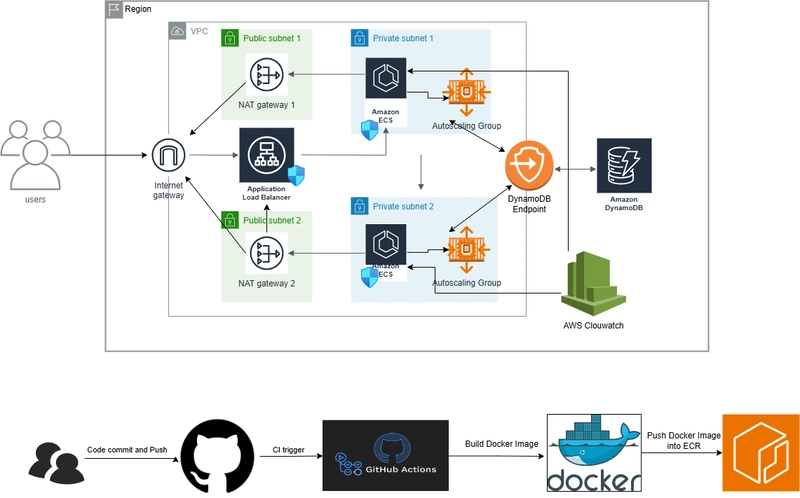
Deploying a Flask application can seem daunting, but using AWS makes the process streamlined and scalable. In this blog post, we’ll walk through deploying a simple "Hello World" Flask application using AWS ECS (Elastic Container Service) and AWS DynamoDB.
This is a simple "Hello World" application that exposes two HTTP-based APIs:
- PUT /hello/: Saves or updates the given user's name and date of birth in the database.
- GET /hello/: Returns a hello message for the given user, including their birthday message if it's today or in the next N days.
Architecture
Requirements
- Docker(local)
- Terraform
- Python 3.8+
- Flask 2.0+
- SQLite3(local)
- AWS account for deployment
- AWS DynamoDB
- Deployment Architecture
- Cloud Platform: AWS (Amazon Web Services)
- Github Action: CI/CD Deployment.
- AWS ECS: To run the application as a containers in EC2.
- AWS DynamoDB: Amazon DynamoDB is a fully managed proprietary NoSQL database.
- AWS S3: For storing terraform state file.
- AWS CloudWatch: For logging and monitoring.
1. Contents
./applocal.py
contains a Python Flask application, which is integrated with SQLite3
./app.py
contains a Python Flask application, which is integrated with DynamoDB the same applicaion can be used to run locally except you need to have aws dynamodb database deployed already.
terraform/
contains the terraform code necessary to deploy the application into AWS ECS
2. How to run and test locally
Install dependencies: pip install flask sqlite3 boto3
Run the application: python applocal.py
Run test: python3 -m unittest tests/test_app.py
Test the APIs using curl or a tool like Postman
3. How-to Deploy into AWS ECS using github action CI/CD and Terraform for IAC
General workflow:
- For the very 1st time, Run the sh setup.sh command which will create ECR repository and build, tag and push the image into it.
- As soon as the changes are pushed into git repository branches like main and develop it will trigger the GHA CI/CD to build and deploy into ECS using Terraform
- Terraform will output the alb url at the end of the GHA run.
4. File Descriptions
1. provider.tf
This file defines the AWS provider and region where the resources will be created, as well as the backend "s3" configures a remote backend using Amazon S3.
provider "aws" {
  region = "us-east-1"
}
terraform {
  backend "s3" {
    bucket  = ""
    key     = "terraform.tfstate"
    region  = "us-east-1"
    encrypt = true
  }
}
2. variables.tf
This file contains variable definitions used throughout your Terraform configuration. For example:
variable "ecs_cluster_name" {
  description = "Name of the ECS Cluster"
  default     = "hello-world-cluster"
}

variable "dynamodb_table_name" {
  description = "Name of the DynamoDB table"
  default     = "Messages"
}

variable "image_repository" {
  description = "ECR repository for the Docker image"
  default     = "hello-world-flask"
}
3. main.tf
This file includes the configurations for the ECS cluster, service, task definitions and dynamo DB configurations.
resource "aws_ecs_cluster" "hello_world_cluster" {
  name = var.ecs_cluster_name
}

resource "aws_ecs_task_definition" "hello_world_task" {
  family                = "hello-world-task"
  network_mode         = "awsvpc"
  requires_compatibilities = ["FARGATE"]

  container_definitions = jsonencode([{
    name      = "hello-world-container"
    image     = "${aws_ecr_repository.hello_world_repo.repository_url}:latest"
    cpu       = 256
    memory    = 512
    essential = true

    portMappings = [{
      containerPort = 5000
      hostPort      = 5000
      protocol      = "tcp"
    }]
  }])
}

resource "aws_ecs_service" "hello_world_service" {
  name            = "hello-world-service"
  cluster         = aws_ecs_cluster.hello_world_cluster.id
  task_definition = aws_ecs_task_definition.hello_world_task.arn
  desired_count   = 1
  launch_type     = "FARGATE"

  network_configuration {
    subnets          = var.subnet_ids
    security_groups  = [aws_security_group.ecs_sg.id]
    assign_public_ip = true
  }
}
4. outputs.tf
Outputs provide useful information after the Terraform apply, like resource ARNs or URLs.
output "alb_dns_name" {
  description = "The Application Load Balancer DNS name"
  value       = aws_lb.main.*.dns_name[0]
}
5. Deployment Steps
Initialize Terraform: Before applying the configuration, make sure to initialize the Terraform environment.
sh setup.sh # This command which will create ECR repository and build, tag and push the image into it.
cd terraform
terraform init
Plan the Deployment: Generate and show an execution plan.
terraform plan
Apply the Configuration: Deploy the infrastructure by applying the plan.
terraform apply
Verify Deployment: After the deployment completes, verify that all resources were created successfully.
6. Response Examples
Design and code a simple "Hello World" application that exposes the following HTTP-based APIs:
Description: Saves/updates the given user's name and date of birth in the database.
Request: PUT /hello/ { "dateOfBirth": "YYYY-MM-DD" }Response: 204 No Content
Note:
must contains only letters.
YYYY-MM-DD must be a date before the today date.
Description: Returns hello birthday message for the given user
Request: Get /hello/
Response: 200 OK
Response Examples:
A. If username's birthday is in N days: { "message": "Hello, ! Your birthday is in N day(s)" }
B. If username's birthday is today: { "message": "Hello, ! Happy birthday!" }
Conclusion
By using Terraform for the infrastructure as code, deploying the AWS resources needed for your Flask application becomes efficient and repeatable. Make sure to replace any default values in the variables to suit your requirements. This infrastructure can be modified or extended to accommodate more complex applications in the future.
For any updates or further assistance, feel free to check the original repository or reach out for clarifications.